How to Build a Parametric Insurance Smart Contract
Blockchain technology offers unique properties that can be used to create innovative decentralized insurance products that bring a number of benefits to both insurance providers and their customers. In this technical tutorial, we’ll show you:
- The main features of a decentralized parametric insurance contract
- Why Chainlink oracles play a pivotal role in these new insurance products
- The advantage of using Chainlink Price Feeds in decentralized insurance contracts.
- How to put everything together to create a working parametric crop insurance contract.
- How Chainlink nodes can be used to automate the updating of the insurance contract.
The complete code for the example below can be viewed in Remix or on GitHub and includes all the functions mentioned below as well as all the required helper functions.
Decentralized Insurance
Decentralized insurance involves using blockchain technology and smart contracts to replace traditional insurance agreements. There are three main features that stand out for a decentralized insurance product:
Data-Driven Automation
The most important aspect of decentralized insurance contracts is that they’re data-driven and self-executing. This means that the insurance contracts execute logic automatically without requiring human intervention, and rely on secure and accurate data obtained from external sources to determine the execution of the contract logic. These insurance smart contracts can also be connected to external outputs, such as payment processors or enterprise financial systems to facilitate payments to be triggered.
Smart Contract
The smart contract represents the insurance contract between the insurer and the customer, which is essentially a promise by the insurer to indemnify the client against specified types of loss, damage or liability, or in the case of parametric insurance, to hedge risk against a particular event occurring. It contains all the details of the insurance contract such as the index (for example rainfall in a crop insurance contract), client details for payments (such as a wallet address, or client ID for external payment systems), contract dates or duration, where the index will be measured, thresholds, and agreed payout value. Because the insurance contract is stored and executed on a blockchain typically running on a high number of nodes, it’s highly deterministic and not prone to being hacked or tampered with.
Claims Process
Unlike its traditional counterpart, in a decentralized insurance contract, the claims process is handled automatically as part of the contract execution. The client does not need to submit a claim, provide any evidence, or have any interaction with the insurance company or the smart contract. When the smart contract deems that a payout should occur, the payout is automatically triggered as part of the contract execution. This can be done via an on-chain payment directly to the client, but can also be done via external payment rails or financial systems that the smart contract connects to.
Creating a Data-Driven Parametric Insurance Contract
Now that we understand what makes up a decentralized parametric insurance contract, we’ll go through building a simple example that demonstrates the three concepts described above. In this scenario, we’ll create a parametric crop insurance contract with the following properties:
- The contract will pay out the agreed value to the customer if there is no rainfall at the location for a specified period, currently set to three days to make the demo easy to follow. The contract will obtain rainfall data from two different data sources to mitigate any data integrity issues, and then average the result.
- The contract will be fully funded with ETH equal to the USD value for the agreed payout amount to ensure complete determinism in the event of a claim being triggered. It will use the Chainlink ETH/USD Price Feed to determine the amount of ETH the contract requires.
Setting up the Insurance Contract Factory
First we need to create a master ‘contract factory’ contract that will generate multiple insurance agreements and allow us to interact with them. This contract will be owned by the insurance company and will fund each generated insurance contract with enough ETH and LINK to ensure once generated, the insurance contract can perform all the operations required throughout their duration, including the payout.
To start off, our Solidity code contains two contracts, an InsuranceProvider contract and an InsuranceContract contract. The InsuranceProvider contract generates many InsuranceContracts.
The constructor for the InsuranceProvider contract initializes the Chainlink ETH/USD price feed on the Kovan network. The constructor for the InsuranceContract contract has been defined below but will be fleshed out later on.
pragma solidity 0.4.24;
pragma experimental ABIEncoderV2;

//Truffle Imports
import "chainlink/contracts/ChainlinkClient.sol";
import "chainlink/contracts/vendor/Ownable.sol";
import "chainlink/contracts/interfaces/LinkTokenInterface.sol";

contract InsuranceProvider {
    constructor() public payable {
        priceFeed = AggregatorV3Interface(0x9326BFA02ADD2366b30bacB125260Af641031331);
    }
}

contract InsuranceContract is ChainlinkClient, Ownable  {
    constructor(address _client, uint _duration, uint _premium, uint _payoutValue, string _cropLocation, address _link, uint256 _oraclePaymentAmount)  payable Ownable() public {
    }
}
The general structure of the InsuranceProvider contract is as follows:
- Each generated contract is stored in a ‘contracts’ Map of Insurance contracts, with the generated Ethereum address of the contract as the key. The value is an instantiated InsuranceContract Solidity smart contract.
//here is where all the insurance contracts are stored.
mapping (address => InsuranceContract) contracts;
- The ‘newContract’ function takes the required inputs and generates a new InsuranceContract contract, passing in all the required details as per the constructor definition defined previously. It also sends the correct ETH amount equal to the payout value so that the generated contract is fully funded. It does this conversion using the Chainlink ETH/USD Price Feed. It then stores the generated contract in the ‘contracts’ map and transfers enough LINK to the generated contract so that it has enough for two data requests per day plus a small buffer. The small buffer is there to account for timing issues where the contract may need to be called an extra time after expiry. Any LINK left over when the contract ends will be returned to the insurance provider.
function newContract
(
    address _client,
    uint _duration,
    uint _premium,
    uint _payoutValue,
    string _cropLocation
)
    public payable onlyOwner() returns(address)
{
    //create contract, send payout amount so contract is fully funded plus a small buffer
    InsuranceContract i = (new InsuranceContract).value((_payoutValue * 1 ether).div(uint(getLatestPrice())))(_client, _duration, _premium, _payoutValue, _cropLocation, LINK_KOVAN,ORACLE_PAYMENT);

    contracts[address(i)] = i;  //store insurance contract in contracts Map

    //emit an event to say the contract has been created and funded
    emit contractCreated(address(i), msg.value, _payoutValue);

    //now that contract has been created, we need to fund it with enough LINK tokens to fulfil 1 Oracle request per day, with a small buffer added
    LinkTokenInterface link = LinkTokenInterface(i.getChainlinkToken());
    link.transfer(address(i), ((_duration.div(DAY_IN_SECONDS)) + 2) * ORACLE_PAYMENT.mul(2));

    return address(i);
}
- The ‘updateContract’ function is used to update an insurance contract’s data and check if a threshold has been met to trigger a payment, or if the contract has reached the end date.
function updateContract(address _contract) external {
    InsuranceContract i = InsuranceContract(_contract);
    i.updateContract();
}
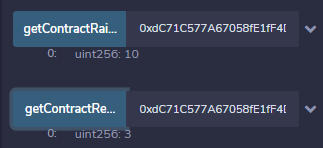
- Finally, the ‘getContractRainfall’ function is used to return the rainfall in millimeters for a given insurance contract, and the ‘getContractRequestCount’ function is used to see how many data requests have successfully made it back to the insurance contract.
function getContractRainfall(address _contract) external view returns(uint) {
    InsuranceContract i = InsuranceContract(_contract);
    return i.getCurrentRainfall();
}

function getContractRequestCount(address _contract) external view returns(uint) {
    InsuranceContract i = InsuranceContract(_contract);
    return i.getRequestCount();
}
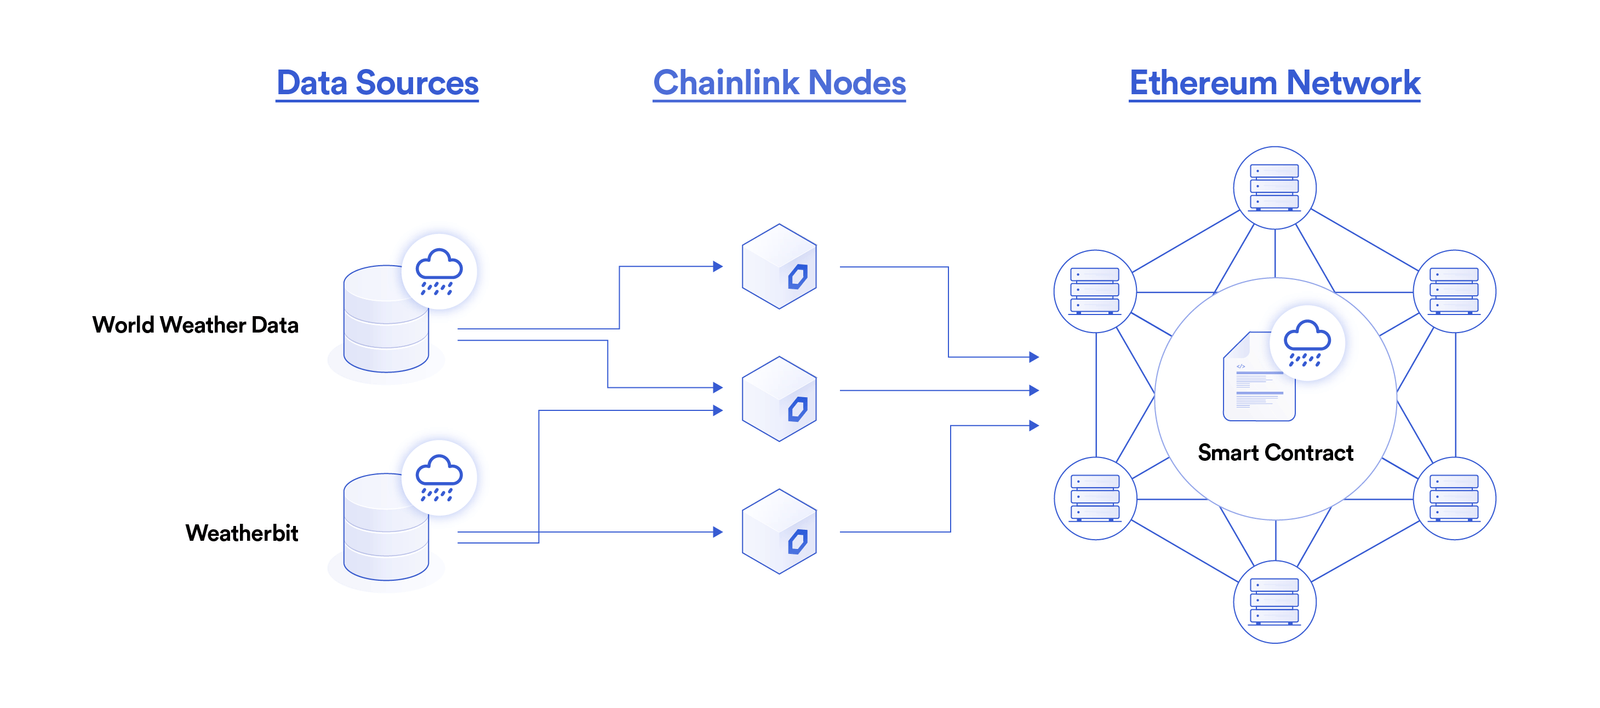
Obtaining External Data
The generated insurance contracts need to obtain external data to be able to execute properly. This is where the Chainlink Network comes into play, because you can use it to connect the insurance contract to multiple sources of rainfall data. In this example, we’ll use Job Specifications on two different Chainlink nodes that take data from two different weather APIs, and then we’ll create an average of the values on-chain to come to a final result. Both weather APIs require signup to obtain a free API key to use in each request.
Once we’ve taken note of the Weather API keys as well as the Job Specification Ids and oracle contracts above, we can now create the ‘InsuranceContract’ contract, populating the required constant fields. In a production scenario, these would be privately stored on the Chainlink node and not visible on-chain, but for the purposes of easily following the demo they have been left in the contract. We also store the required JSON path to traverse to find the daily total rainfall in millimetres when the Chainlink nodes obtain the weather data from each API.
string constant WORLD_WEATHER_ONLINE_URL = "http://api.worldweatheronline.com/premium/v1/weather.ashx?";
string constant WORLD_WEATHER_ONLINE_KEY = "insert API key here";
string constant WORLD_WEATHER_ONLINE_PATH = "data.current_condition.0.precipMM";

string constant WEATHERBIT_URL = "https://api.weatherbit.io/v2.0/current?";
string constant WEATHERBIT_KEY = "insert API key here";
string constant WEATHERBIT_PATH = "data.0.precip";
Completing the Insurance Contract
The next step is to complete the InsuranceContract contract that represents the crop insurance contract between the customer and the insurance company.
The contract is instantiated with all the required values passed into the constructor. It also does the following:
- Uses the Chainlink ETH/USD Price Feed to check if enough ETH has been sent with the contract to ensure it’s fully funded in the event a payment is triggered.
- Sets some variables required for contract execution
- Sets the JobId and oracle arrays to contain the values obtained from the two Job Specifications in the ‘Obtaining external data’ section above. However, if you want to run your own Chainlink node so you can see the outputs of each job, you can set both requests to use your job specification and oracle contract. If you go down this path, you need to create a new job specification the same as this example on market.link, and just modify the address in the runlog initiator to be your oracle contract.
constructor
(
    address _client,
    uint _duration,
    uint _premium,
    uint _payoutValue,
    string _cropLocation,
    address _link,
    uint256 _oraclePaymentAmount
)
    payable Ownable() public
{
    priceFeed = AggregatorV3Interface(0x9326BFA02ADD2366b30bacB125260Af641031331);

    //initialize variables required for Chainlink Node interaction
    setChainlinkToken(_link);
    oraclePaymentAmount = _oraclePaymentAmount;

    //first ensure insurer has fully funded the contract
    require(msg.value >= _payoutValue.div(uint(getLatestPrice())), "Not enough funds sent to contract");

    //now initialize values for the contract
    insurer= msg.sender;
    client = _client;
    startDate = now + DAY_IN_SECONDS; //contract will be effective from the next day
    duration = _duration;
    premium = _premium;
    payoutValue = _payoutValue;
    daysWithoutRain = 0;
    contractActive = true;
    cropLocation = _cropLocation;

    //if you have your own node and job setup you can use it for both requests
    oracles[0] = 0x05c8fadf1798437c143683e665800d58a42b6e19;
    oracles[1] = 0x05c8fadf1798437c143683e665800d58a42b6e19;
    jobIds[0] = 'a17e8fbf4cbf46eeb79e04b3eb864a4e';
    jobIds[1] = 'a17e8fbf4cbf46eeb79e04b3eb864a4e';

    emit contractCreated(
        insurer,
        client,
        duration,
        premium,
        payoutValue);
}
We then create a function to build up calls to request rainfall data from each Chainlink node and weather API. This function is called by the master InsuranceProvider contract. It builds up the required URLs for each request, and then calls the ‘checkRainfall’ function for each one. But before it does this, it calls a ‘checkEndContract’ function to check if the contract end date has been reached yet, and only proceeds if the contract is still active. This ‘checkEndContract’ function will be defined further below.
function updateContract() public onContractActive() returns (bytes32 requestId) {
    //first call end contract in case of insurance contract duration expiring, if it hasn't then this function execution will resume
    checkEndContract();

    //contract may have been marked inactive above, only do request if needed
    if (contractActive) {
        dataRequestsSent = 0;
        //First build up a request to World Weather Online to get the current rainfall
        string memory url = string(abi.encodePacked(WORLD_WEATHER_ONLINE_URL, "key=",WORLD_WEATHER_ONLINE_KEY,"&q=",cropLocation,"&format=json&num_of_days=1"));
        checkRainfall(oracles[0], jobIds[0], url, WORLD_WEATHER_ONLINE_PATH);

        // Now build up the second request to WeatherBit
        url = string(abi.encodePacked(WEATHERBIT_URL, "city=",cropLocation,"&key=",WEATHERBIT_KEY));
        checkRainfall(oracles[1], jobIds[1], url, WEATHERBIT_PATH);
    }
}
We can now create the ‘checkRainfall’ function. This is the function that actually performs the external data request. It takes all the required parameters, builds up a request and then sends it to the specified Chainlink nodes oracle contract.
In our demo, the value for the _path variable passed into the ‘checkRainfall’ function is used to traverse down the path of the JSON returned by the request to find the current rainfall. These values depend on which weather API is being called, with both options being stored in static variables in our contract and passed into the _path function parameter as required.
string constant WORLD_WEATHER_ONLINE_PATH = "data.current_condition.0.precipMM";
string constant WEATHERBIT_PATH = "data.0.precip";

function checkRainfall(address _oracle, bytes32 _jobId, string _url, string _path) private onContractActive() returns (bytes32 requestId) {
    //First build up a request to get the current rainfall
    Chainlink.Request memory req = buildChainlinkRequest(_jobId, address(this), this.checkRainfallCallBack.selector);

    req.add("get", _url); //sends the GET request to the oracle
    req.add("path", _path);
    req.addInt("times", 100);

    requestId = sendChainlinkRequestTo(_oracle, req, oraclePaymentAmount);

    emit dataRequestSent(requestId);
}
We then create a callback function to be called when the Chainlink nodes send a response back. This function receives the updated rainfall data for the specified location, performs an average if it’s the second data update (i.e. two of two responses have come back), and then updates the contract with the latest rainfall data.
The callback function also checks to see if a parameterized loss has been realized based on the current contract rainfall data. In this case, it checks the number of consecutive days without rain against the given threshold. If the payout condition is met, then the ‘payoutContract’ function is called.
function checkRainfallCallBack(bytes32 _requestId, uint256 _rainfall) public recordChainlinkFulfillment(_requestId) onContractActive() callFrequencyOncePerDay() {
    //set current temperature to value returned from Oracle, and store date this was retrieved (to avoid spam and gaming the contract)
    currentRainfallList[dataRequestsSent] = _rainfall;
    dataRequestsSent = dataRequestsSent + 1;

    //set current rainfall to average of both values
    if (dataRequestsSent > 1) {
        currentRainfall = (currentRainfallList[0].add(currentRainfallList[1]).div(2));
        currentRainfallDateChecked = now;
        requestCount +=1;

        //check if payout conditions have been met, if so call payoutcontract, which should also end/kill contract at the end
        if (currentRainfall == 0 ) { //temp threshold has been  met, add a day of over threshold
            daysWithoutRain += 1;
        } else {
            //there was rain today, so reset daysWithoutRain parameter
            daysWithoutRain = 0;
            emit ranfallThresholdReset(currentRainfall);
        }

        if (daysWithoutRain >= DROUGHT_DAYS_THRESDHOLD) {  // day threshold has been met
            //need to pay client out insurance amount
            payOutContract();
        }
    }

     emit dataReceived(_rainfall);
}
Next we create the payoutContract function. This function acts as the claims processing step, and performs the automatic payout of the agreed value from the insurer to the customer. We take extra care here and ensure it can only be called while the contract is still active (i.e. not ended), and can only be called internally by other contract functions. It also returns any remaining LINK back to the insurance provider master contract, and sets the contract to a completed state to prevent any further actions being performed on it.
function payOutContract() private onContractActive()  {
    //Transfer agreed amount to client
    client.transfer(address(this).balance);

    //Transfer any remaining funds (premium) back to Insurer
    LinkTokenInterface link = LinkTokenInterface(chainlinkTokenAddress());
    require(link.transfer(insurer, link.balanceOf(address(this))), "Unable to transfer");

    emit contractPaidOut(now, payoutValue, currentRainfall);

    //now that amount has been transferred, can end the contract
    //mark contract as ended, so no future calls can be done
    contractActive = false;
    contractPaid = true;
}
Finally, we create a function to handle the scenario where the contract end date has been reached, a payment has not been triggered, and we need to return the funds in the contract and then mark it as ended. The function performs a check to see if the contract received enough data requests throughout the contract. One data request per day is required, with an allowance of only one request allowed to be missed. So if the contract has a duration of 30 days, there must be at least 29 successful data requests. If the contract receives enough requests during its life-cycle, all funds will be returned to the insurance provider. Otherwise if there weren’t enough data requests throughout the contract’s duration, the customer automatically receives their premium back as a refund, and the insurance provider gets any remaining funds back.
This scenario also makes use of the Chainlink ETH/USD price feed to determine the correct amount of ETH to send back to the customer. This check gives the customer some level of guarantee that the insurance provider will not attempt to game the contract by not updating the rainfall data until the end date is reached. The function will also return any remaining LINK back to the InsuranceProvider contract.
function checkEndContract() private onContractEnded()   {
    //Insurer needs to have performed at least 1 weather call per day to be eligible to retrieve funds back.
    //We will allow for 1 missed weather call to account for unexpected issues on a given day.
    if (requestCount >= (duration.div(DAY_IN_SECONDS) - 1)) {
        //return funds back to insurance provider then end/kill the contract
        insurer.transfer(address(this).balance);
    } else { //insurer hasn't done the minimum number of data requests, client is eligible to receive his premium back
        client.transfer(premium.div(uint(getLatestPrice())));
        insurer.transfer(address(this).balance);
    }

    //transfer any remaining LINK tokens back to the insurer
    LinkTokenInterface link = LinkTokenInterface(chainlinkTokenAddress());
    require(link.transfer(insurer, link.balanceOf(address(this))), "Unable to transfer remaining LINK tokens");

    //mark contract as ended, so no future state changes can occur on the contract
    contractActive = false;
    emit contractEnded(now, address(this).balance);
}
Deploying and Testing the Contracts
First, we need to deploy the InsuranceProvider contract and fund it with some ETH and LINK to be used in generated InsuranceContract contracts.
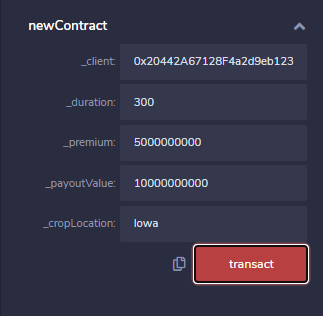
Once this has been done, we can create a new InsuranceContract, passing in the required values. Take note of the following:
- Duration is in seconds. For the purposes of this demo, 1 day has been shortened to 60 seconds (as specified in the DAY_IN_SECONDS constant), so a contract duration 300 seconds represents 5 days.
- premium and payoutValue parameters are in USD, multiplied by 100000000, eg $100 is 10000000000
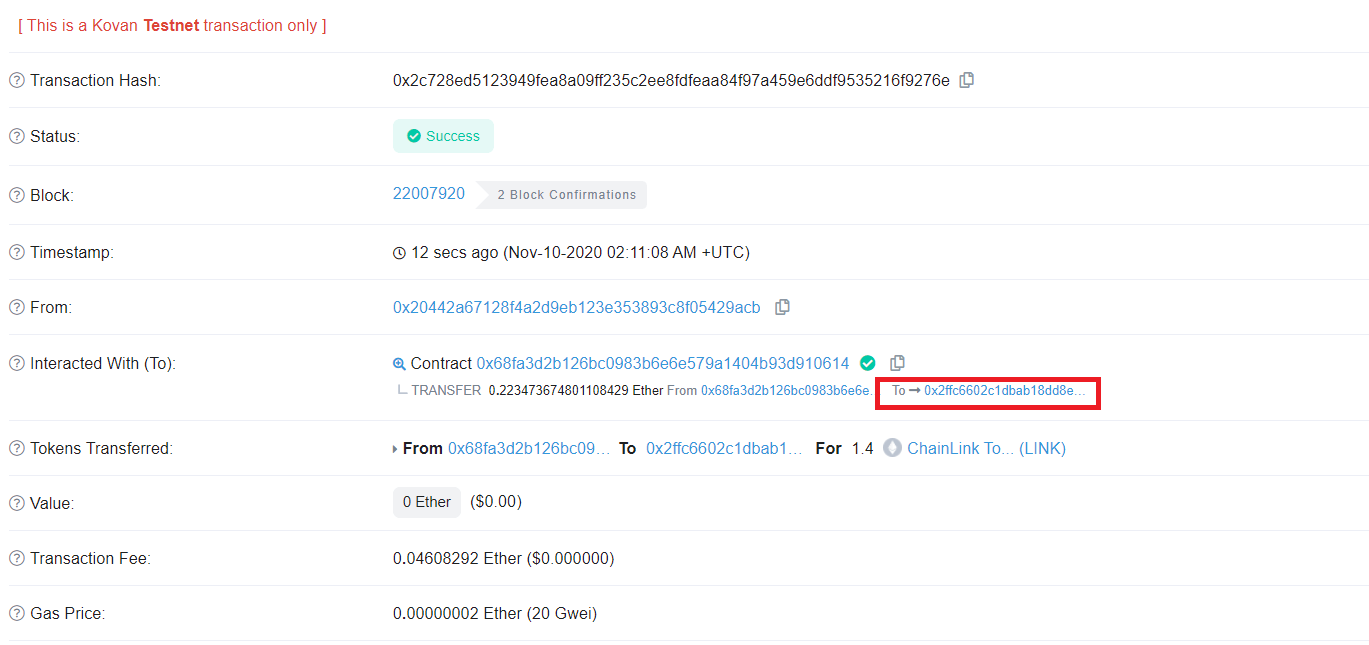
Once the insurance contract is generated, we can obtain its address via the transaction in Etherscan or via the transaction output.
We can then take the generated contract address, and pass it into the ‘updateContract’ function to start the process of getting rainfall data into the contract:

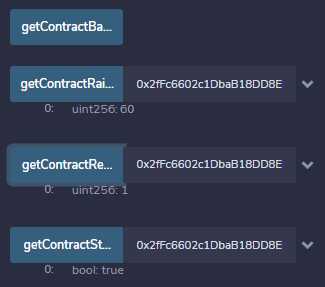
Once both Chainlink nodes process the job request and return a result, we can then call the ‘getContractRainfall’ and ‘getContractRequestCount’ functions to see the average rainfall updated, and the data request count increased. One data request means both nodes returned a result and it was averaged and stored in the contract. In this case, the average rainfall currently in Iowa across both data feeds is 0.6mm. We can also call the helper function ‘getContractStatus’ to verify that the contract is still in an active state.
This step should be repeated once every day (or minute in this case) for the contract duration (5 times/300 seconds for this demo) to end the contract. If the number of days without rain reaches the threshold set in DROUGHT_DAYS_THRESHOLD, the contract will payout the agreed amount to the customer, and the status of the contract will be ended.
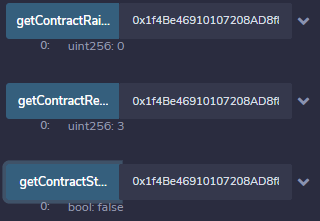
For the purposes of this demonstration, we created another insurance contract for a location with no rainfall and repeated the step above three times over three minutes to demonstrate what happens in the event of a payout. In this case, we can see that the latest rainfall is 0, the request count is 3, and the contract is no longer in an active status.
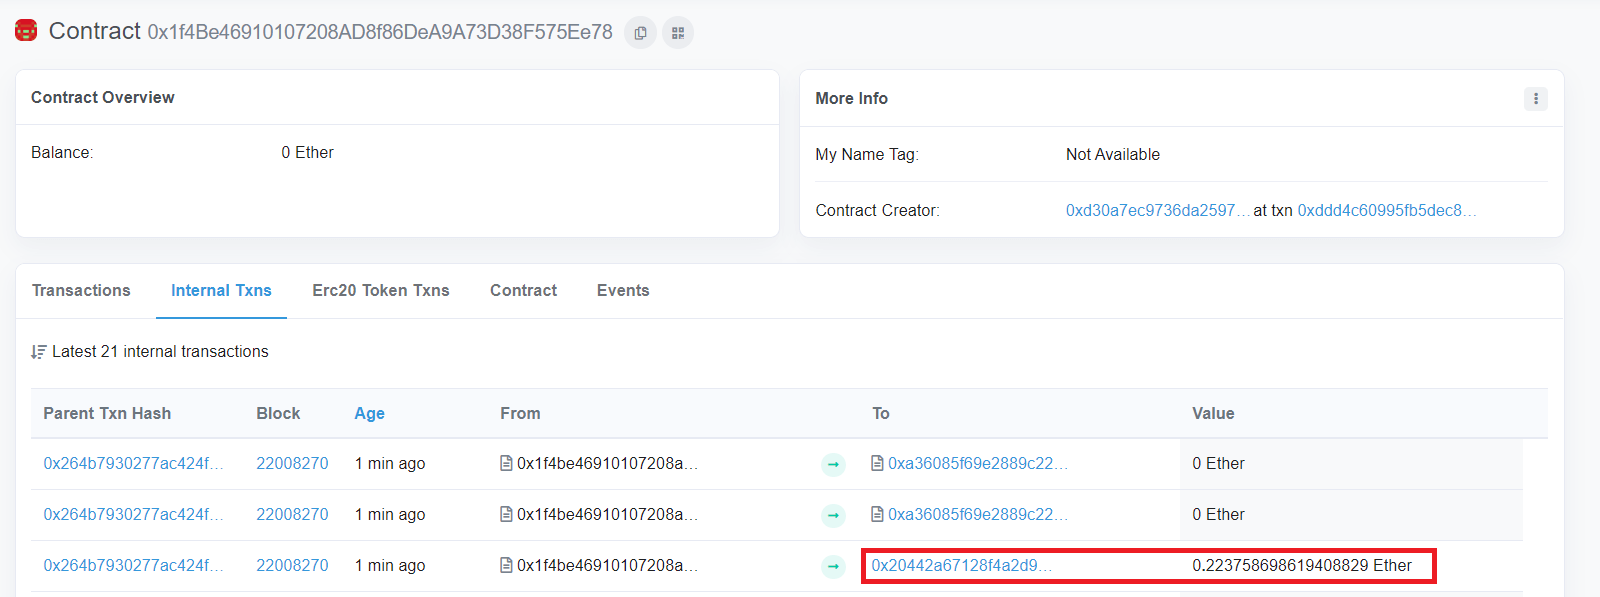
If we then go and inspect the contract on Etherscan, we will see that the agreed USD payout value in ETH has been transferred back to the client wallet address specified when the contract was created above, and that the insurance contract is no longer holding any ETH or LINK. Any subsequent actions on the insurance contract will be rejected as it’s now in a completed state.
Automating the Updating of Data
With the current version of the contract, someone must manually call the ‘updateContract’ function to get the contract to communicate with the Chainlink nodes and obtain the rainfall data. This isn’t ideal, because it needs to happen multiple times throughout the contract duration. A good way to automate this is to make use of the Chainlink nodes cron initiator.
The cron initiator is a way to schedule recurring jobs on a Chainlink node using simple cron syntax. In this case what we can do is create a new job specification on our Chainlink node that uses the Cron initiator to trigger the job specification once per day. But for the purposes of this demonstration we’ll set it to trigger every minute, as per the constant SECONDS_IN_DAY mentioned earlier.
The remaining part of the job specification will simply call the deployed smart contract ‘updateContract’ function every time the Cron job triggers the execution of the job specification. The idea is that the insurance front end will have all the relevant details (contract address, start date, end date), and can pass them in.
{
   "initiators": [
      {
         "type": "cron",
         "params": {
            "schedule": "CRON_TZ=UTC 0/' + 6 + ' * * * * *"
         }
      }
   ],
   "tasks": [
      {
         "type": "ethtx",
         "confirmations": 0,
         "params": {
            "address": "' + address + '",
            "functionSelector": "checkContract()"
         }
      }
   ],
   "startAt": "' + startDate + '",
   "endAt": "' + endDate + '"
}
Rather than having to manually create this job specification via the Chainlink node front end interface, the idea is that the decentralized insurance application front end will send a request to the Chainlink node API to dynamically generate the new job specification, with all the correct details required for the node to automatically start periodically updating the insurance contract.
To do this, first we need the Chainlink node IP address and port, with the username and password to log in to the node. These are used to generate a cookiefile for the next request.
curl -c cookiefile -X POST -H 'Content-Type: application/json' -d '{"email":"[email protected]", "password":"password"}' http://35.189.58.211:6688/sessions
Once this has been done, we should get back a response to show the authentication has been successful.
{"data":{"type":"session","id":"sessionID","attributes":{"authenticated":true}}}
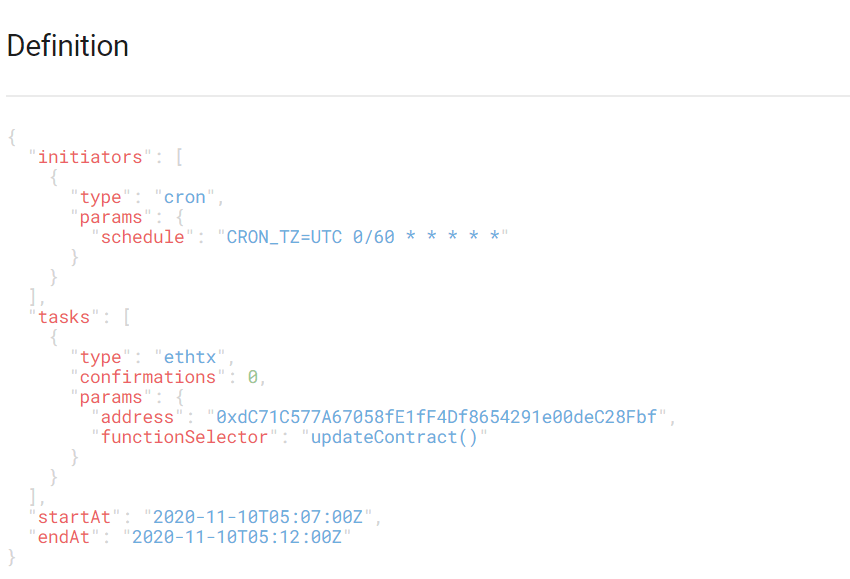
We can then POST another request to the Chainlink node API, this time to the /v2/specs endpoint. The JSON in the request should have the address of the generated insurance contract you wish to periodically update, as well as the start and end date/time (with a specified time offset if required) so that the node knows when to stop periodically updating the insurance contract.
curl -b cookiefile -X POST -H 'Content-Type: application/json' -d '{"initiators":[{"type":"cron","params":{"schedule":"CRON_TZ=UTC 0/60 * * * * *"}}],"tasks":[{"type":"ethtx","confirmations":0,"params":{"address":"0xdC71C577A67058fE1fF4Df8654291e00deC28Fbf","functionSelector":"updateContract()"}}],"startAt": "2020-11-10T15:37:00+10:30","endAt": "2020-11-10T15:42:00+10:30"}' http://35.189.58.211:6688/v2/specs
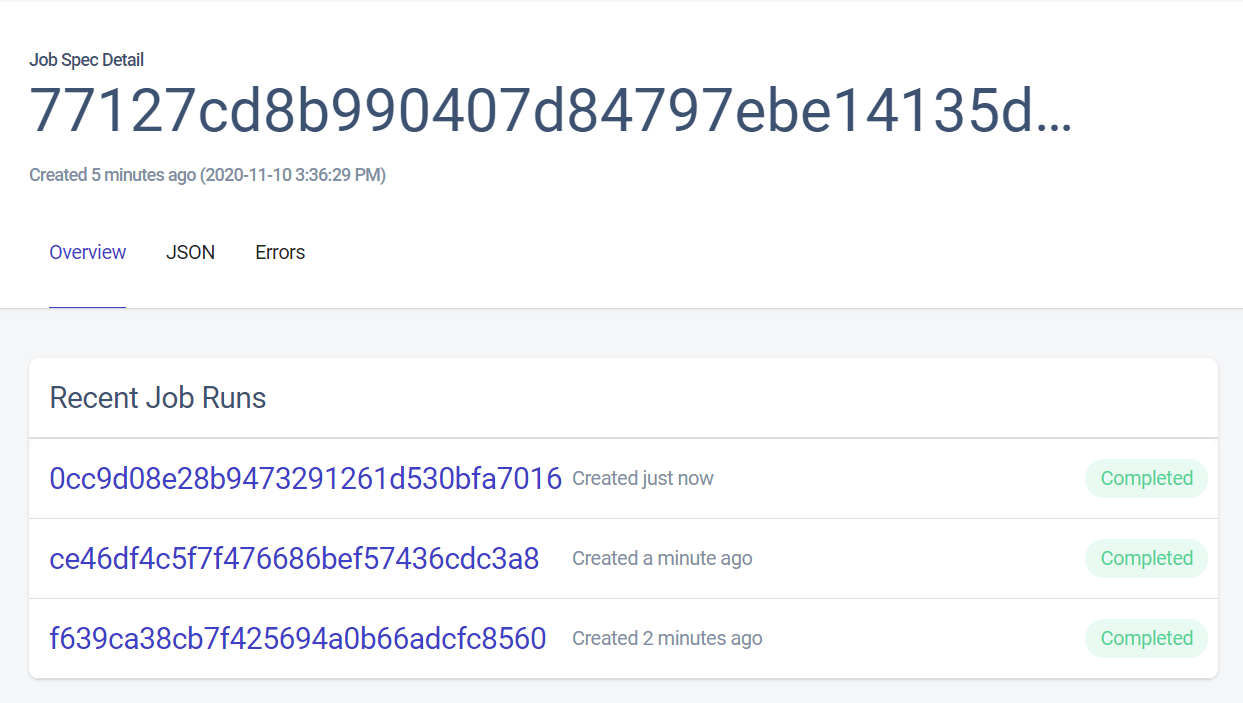
This should return a success message to the comment line with the details of the generated job specification. After this, you should be able to log in to the Chainlink node front end and see the newly created job specification.
Once the job specification is created it should soon start executing requests as per the parameters set in the cron initiator. We can monitor this on the Chainlink node front end.
Summary
In this technical article, we’ve demonstrated how a decentralized crop insurance product can be built to compensate a farmer against a period of no rain. We’ve shown the importance of the insurance contract having accurate and decentralized data, and the role Chainlink oracles play in securely providing this data.
We’ve also demonstrated how a deterministic smart contract connected to external data and events can be utilized to completely minimize the overhead and administrative costs in processing insurance claims, as well as how Chainlink Decentralized Price Feeds can be used to accurately determine correct payout amounts in the event of contractual terms based in USD yet payments made in cryptocurrency. Finally, we also demonstrated how the Chainlink node cron initiator can be used in conjunction with the Chainlink node API to automatically schedule and execute smart contract updates.
While this demo contains a number of features, it can be used as a basic template for building a complete and feature rich decentralized insurance product. Developers can build on this template in various ways, such as removing the manual data aggregation and making use of Chainlink’s Aggregator or PreCoordinator contracts. Another option is to securitize the insurance contracts and use them as collateral in the DeFi ecosystem or other markets.
If you’re a developer and want to connect your smart contract to off-chain data and systems, visit the developer documentation and join the technical discussion on Discord. If you want to schedule a call to discuss the integration more in-depth, reach out here.


