How To Create a Dynamic NFT Using 3 Chainlink Services [<1 Hour]
- How To Create a Dynamic NFT Using 3 Chainlink Services [<1 Hour]
- Overview
- Step 1: Create a MetaMask Wallet
- Step 2: Get Polygon Mumbai Testnet Funds
- Step 3: Create a VRF Subscription
- Step 4: Deploy the Dynamic NFT Smart Contract on Remix
- Step 5: Add a Consumer to Your VRF Subscription
- Step 6: Automate Your NFT With Chainlink Automation
- Step 7: View Your NFT on OpenSea
- Conclusion
Overview
Difficulty level: Beginner/Intermediate
Estimated time to complete: 60 minutes
In this tutorial, you will learn how to deploy a smart contract on the Polygon Mumbai testnet using Remix. The smart contract creates a NFT that updates dynamically based on the price of ETH in terms of USD.
Below, you’ll find step-by-step instructions on how to:
- Create a MetaMask wallet
- Get funds on Polygon Mumbai testnet
- Create a Chainlink VRF subscription
- Deploy the Dynamic NFT (dNFT) smart contract using Remix
- Add the dNFT smart contract as a VRF consumer
- Automate the NFT using Chainlink Automation
- View and interact with your NFT on OpenSea
Step 1: Create a MetaMask Wallet
Note: If you already have a MetaMask wallet (or any other wallet), feel free to skip this step.
To create a MetaMask wallet, go to https://metamask.io/ and follow the instructions to create your wallet.
Step 2: Get Polygon Mumbai Testnet Funds
A) Go to https://faucets.chain.link/mumbai
B) Click on “Connect wallet” in the top right corner.
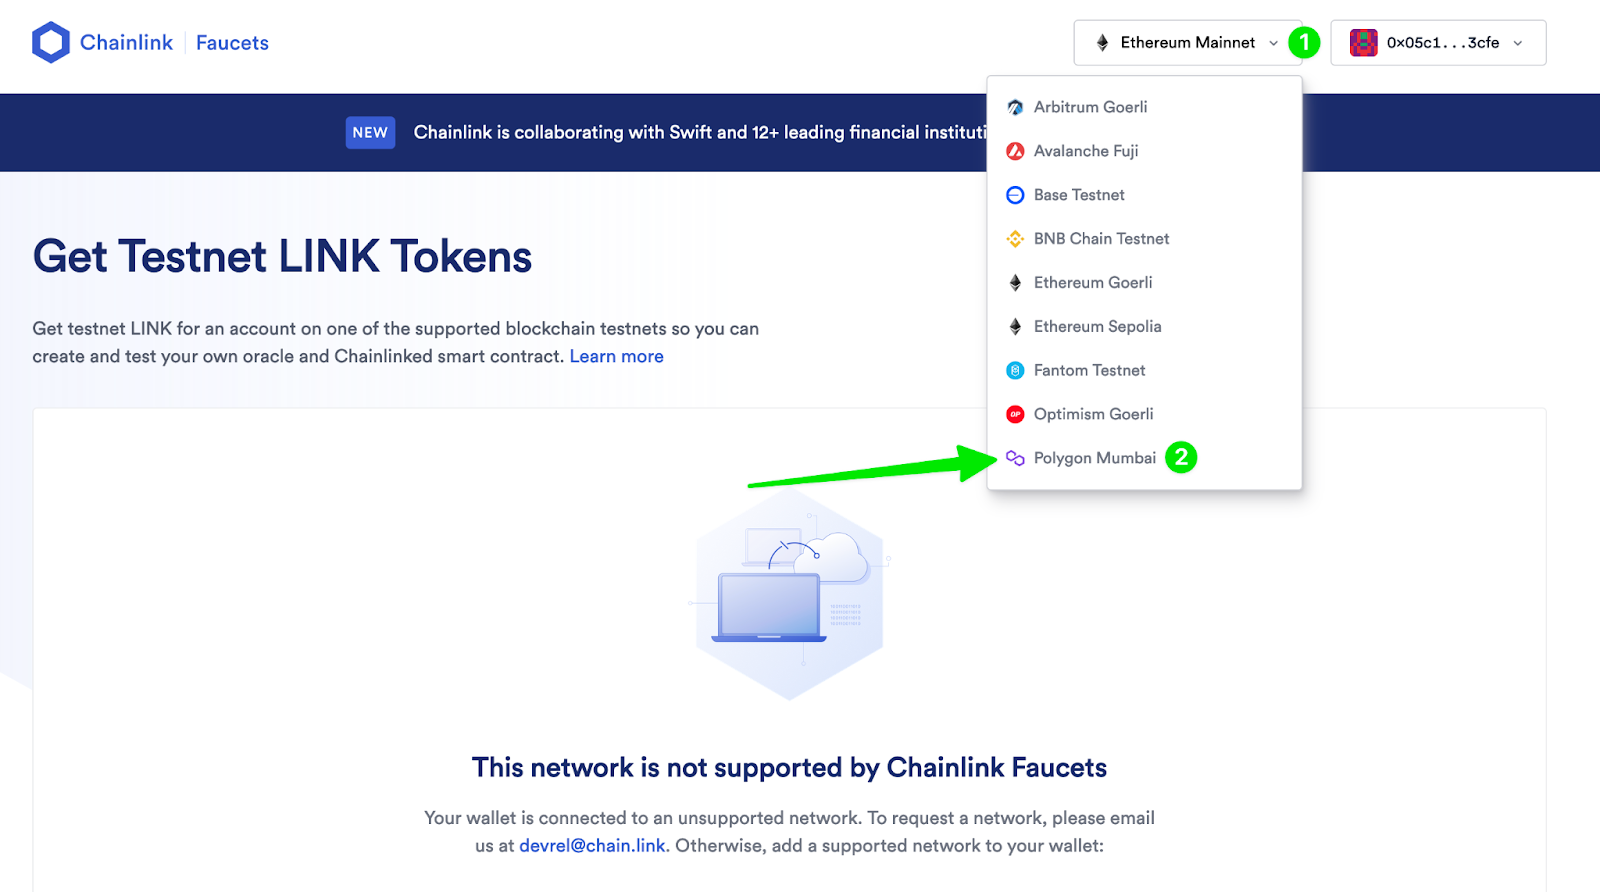
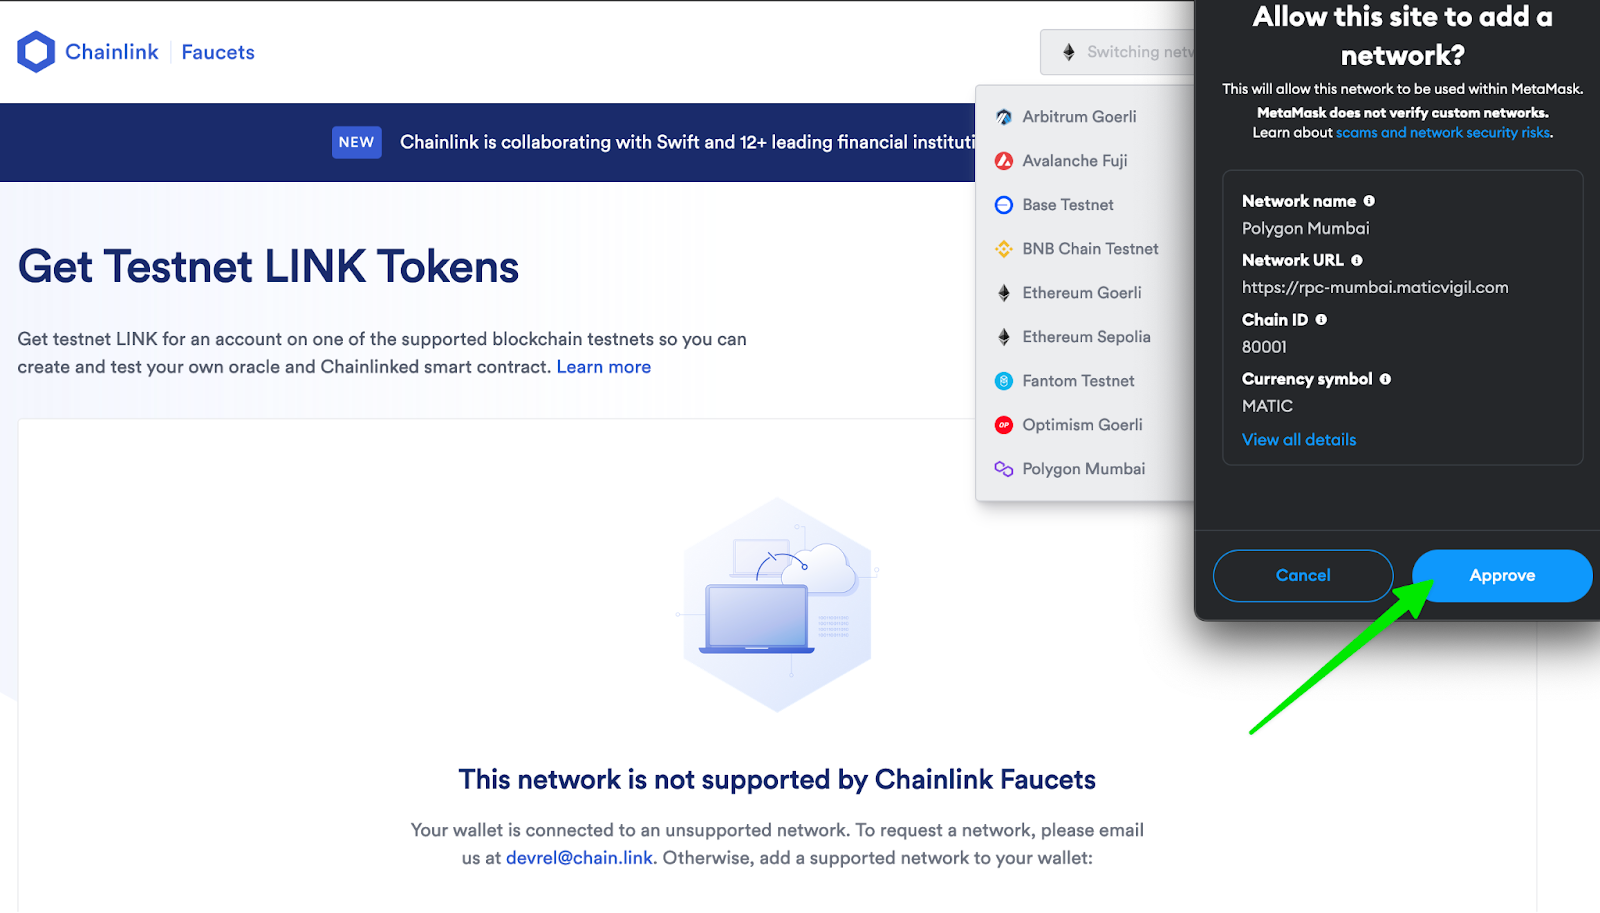
C) If this is your first time interacting with Polygon Mumbai, click “Approve” on the MetaMask prompt with the message “Allow this site to add a network?”
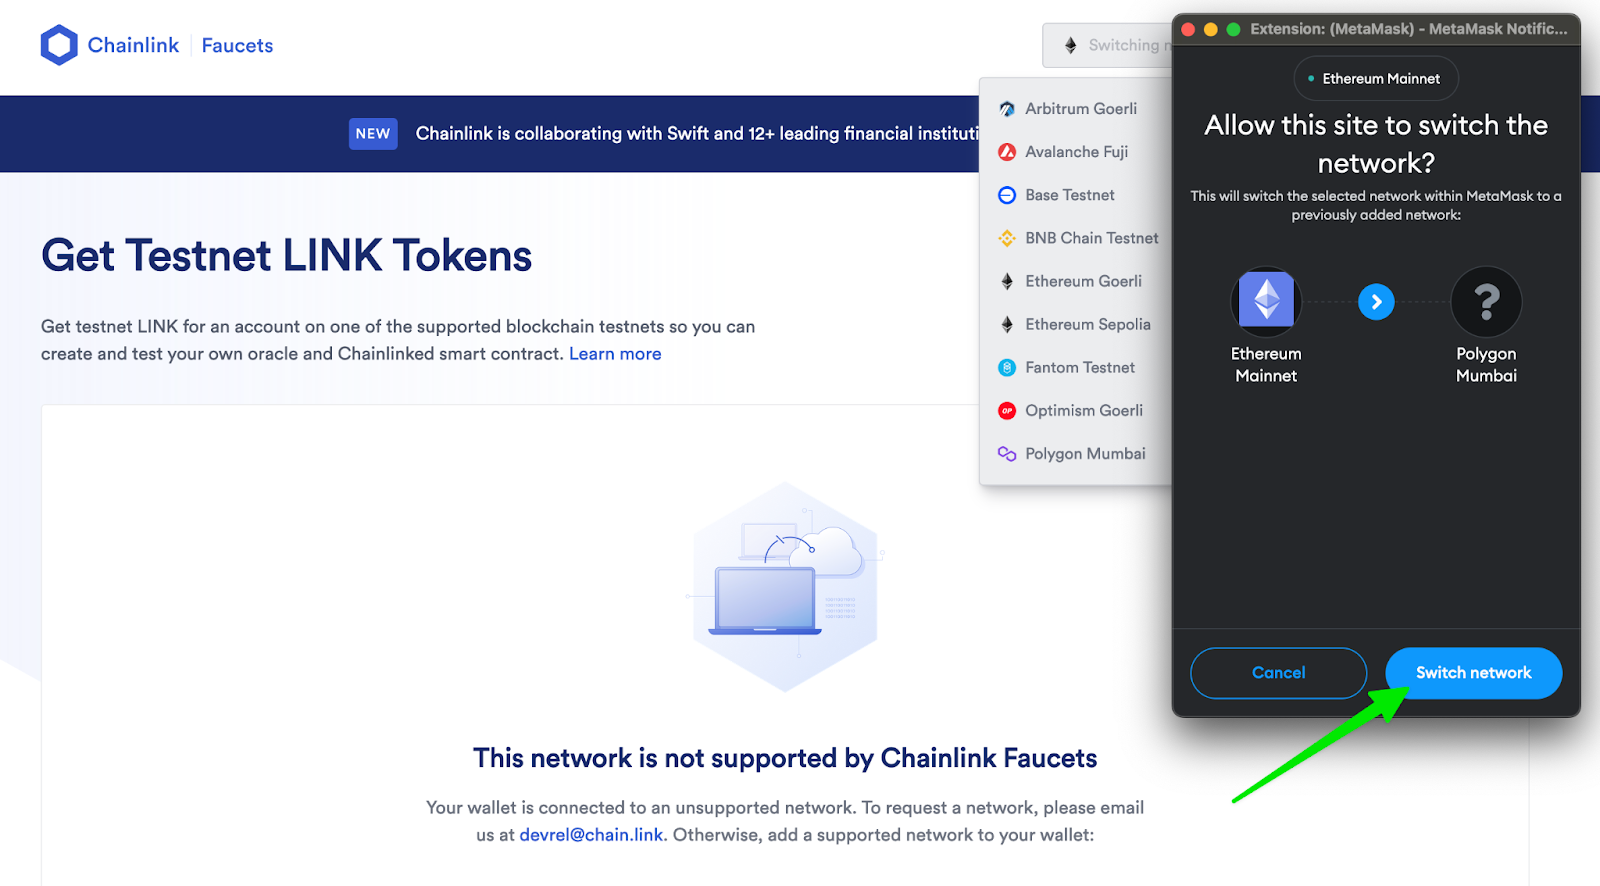
D) Click on “Switch network”.
E) Check the “I am human” checkbox and complete the CAPTCHA.
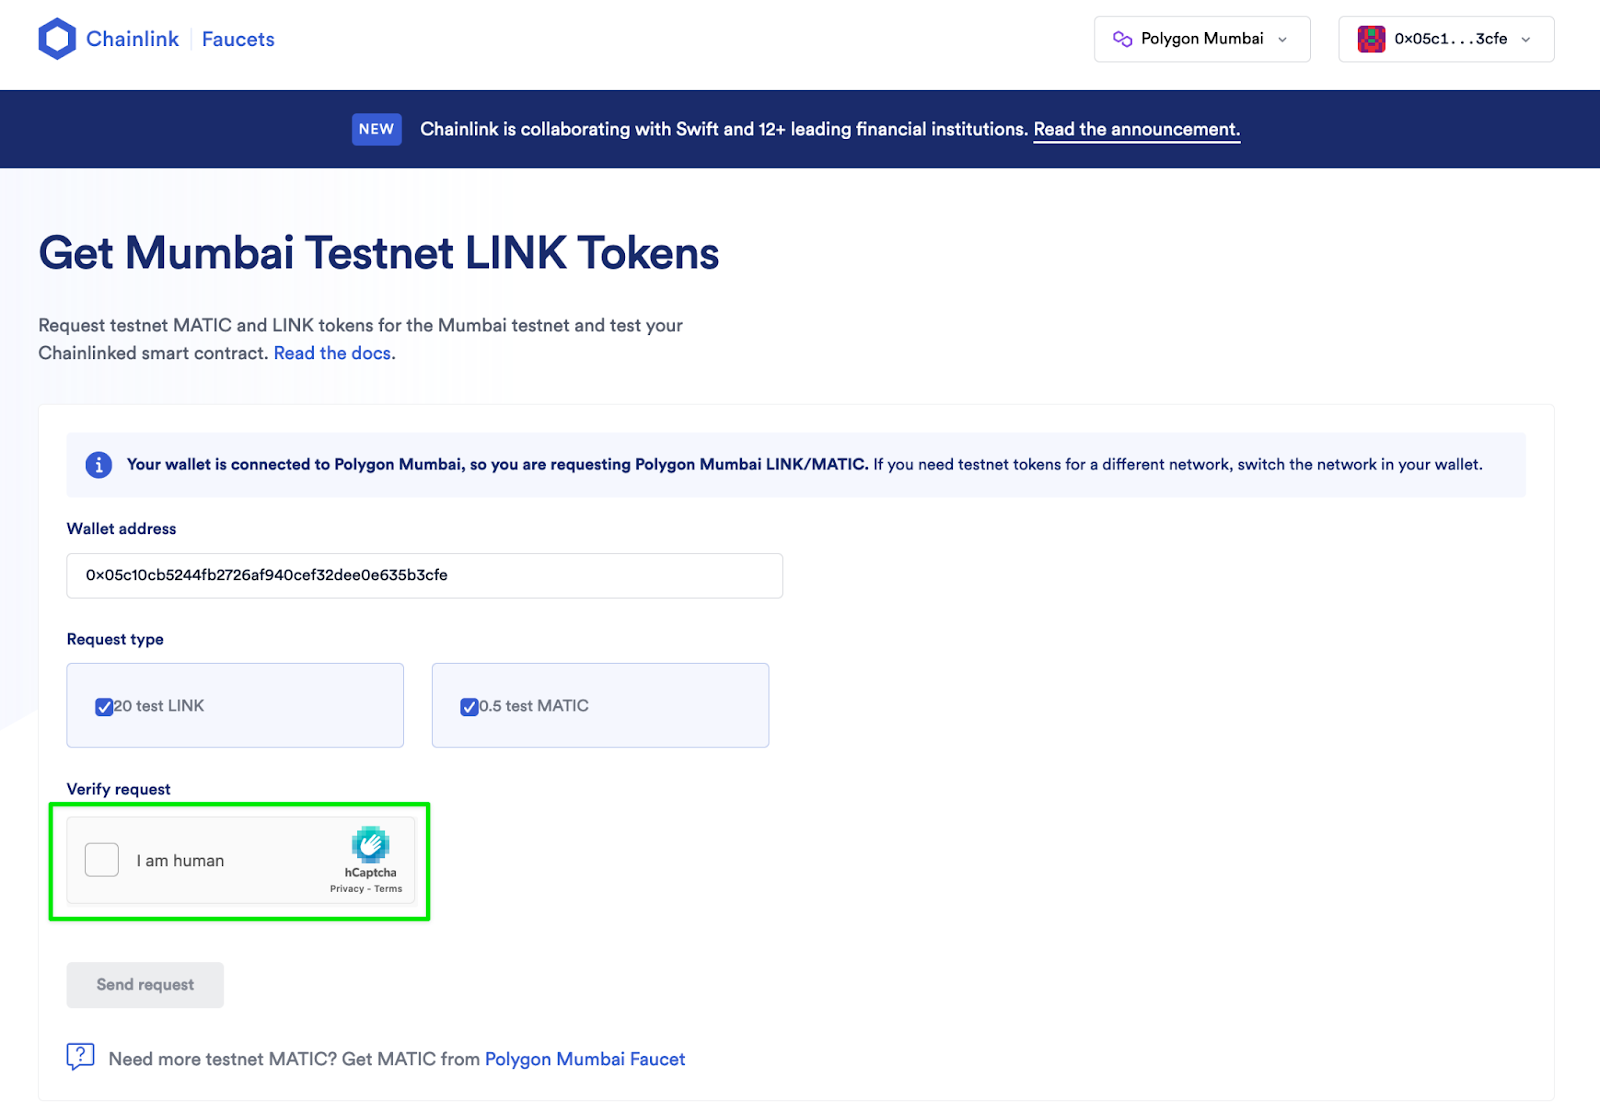
F) Click on “Send request”.
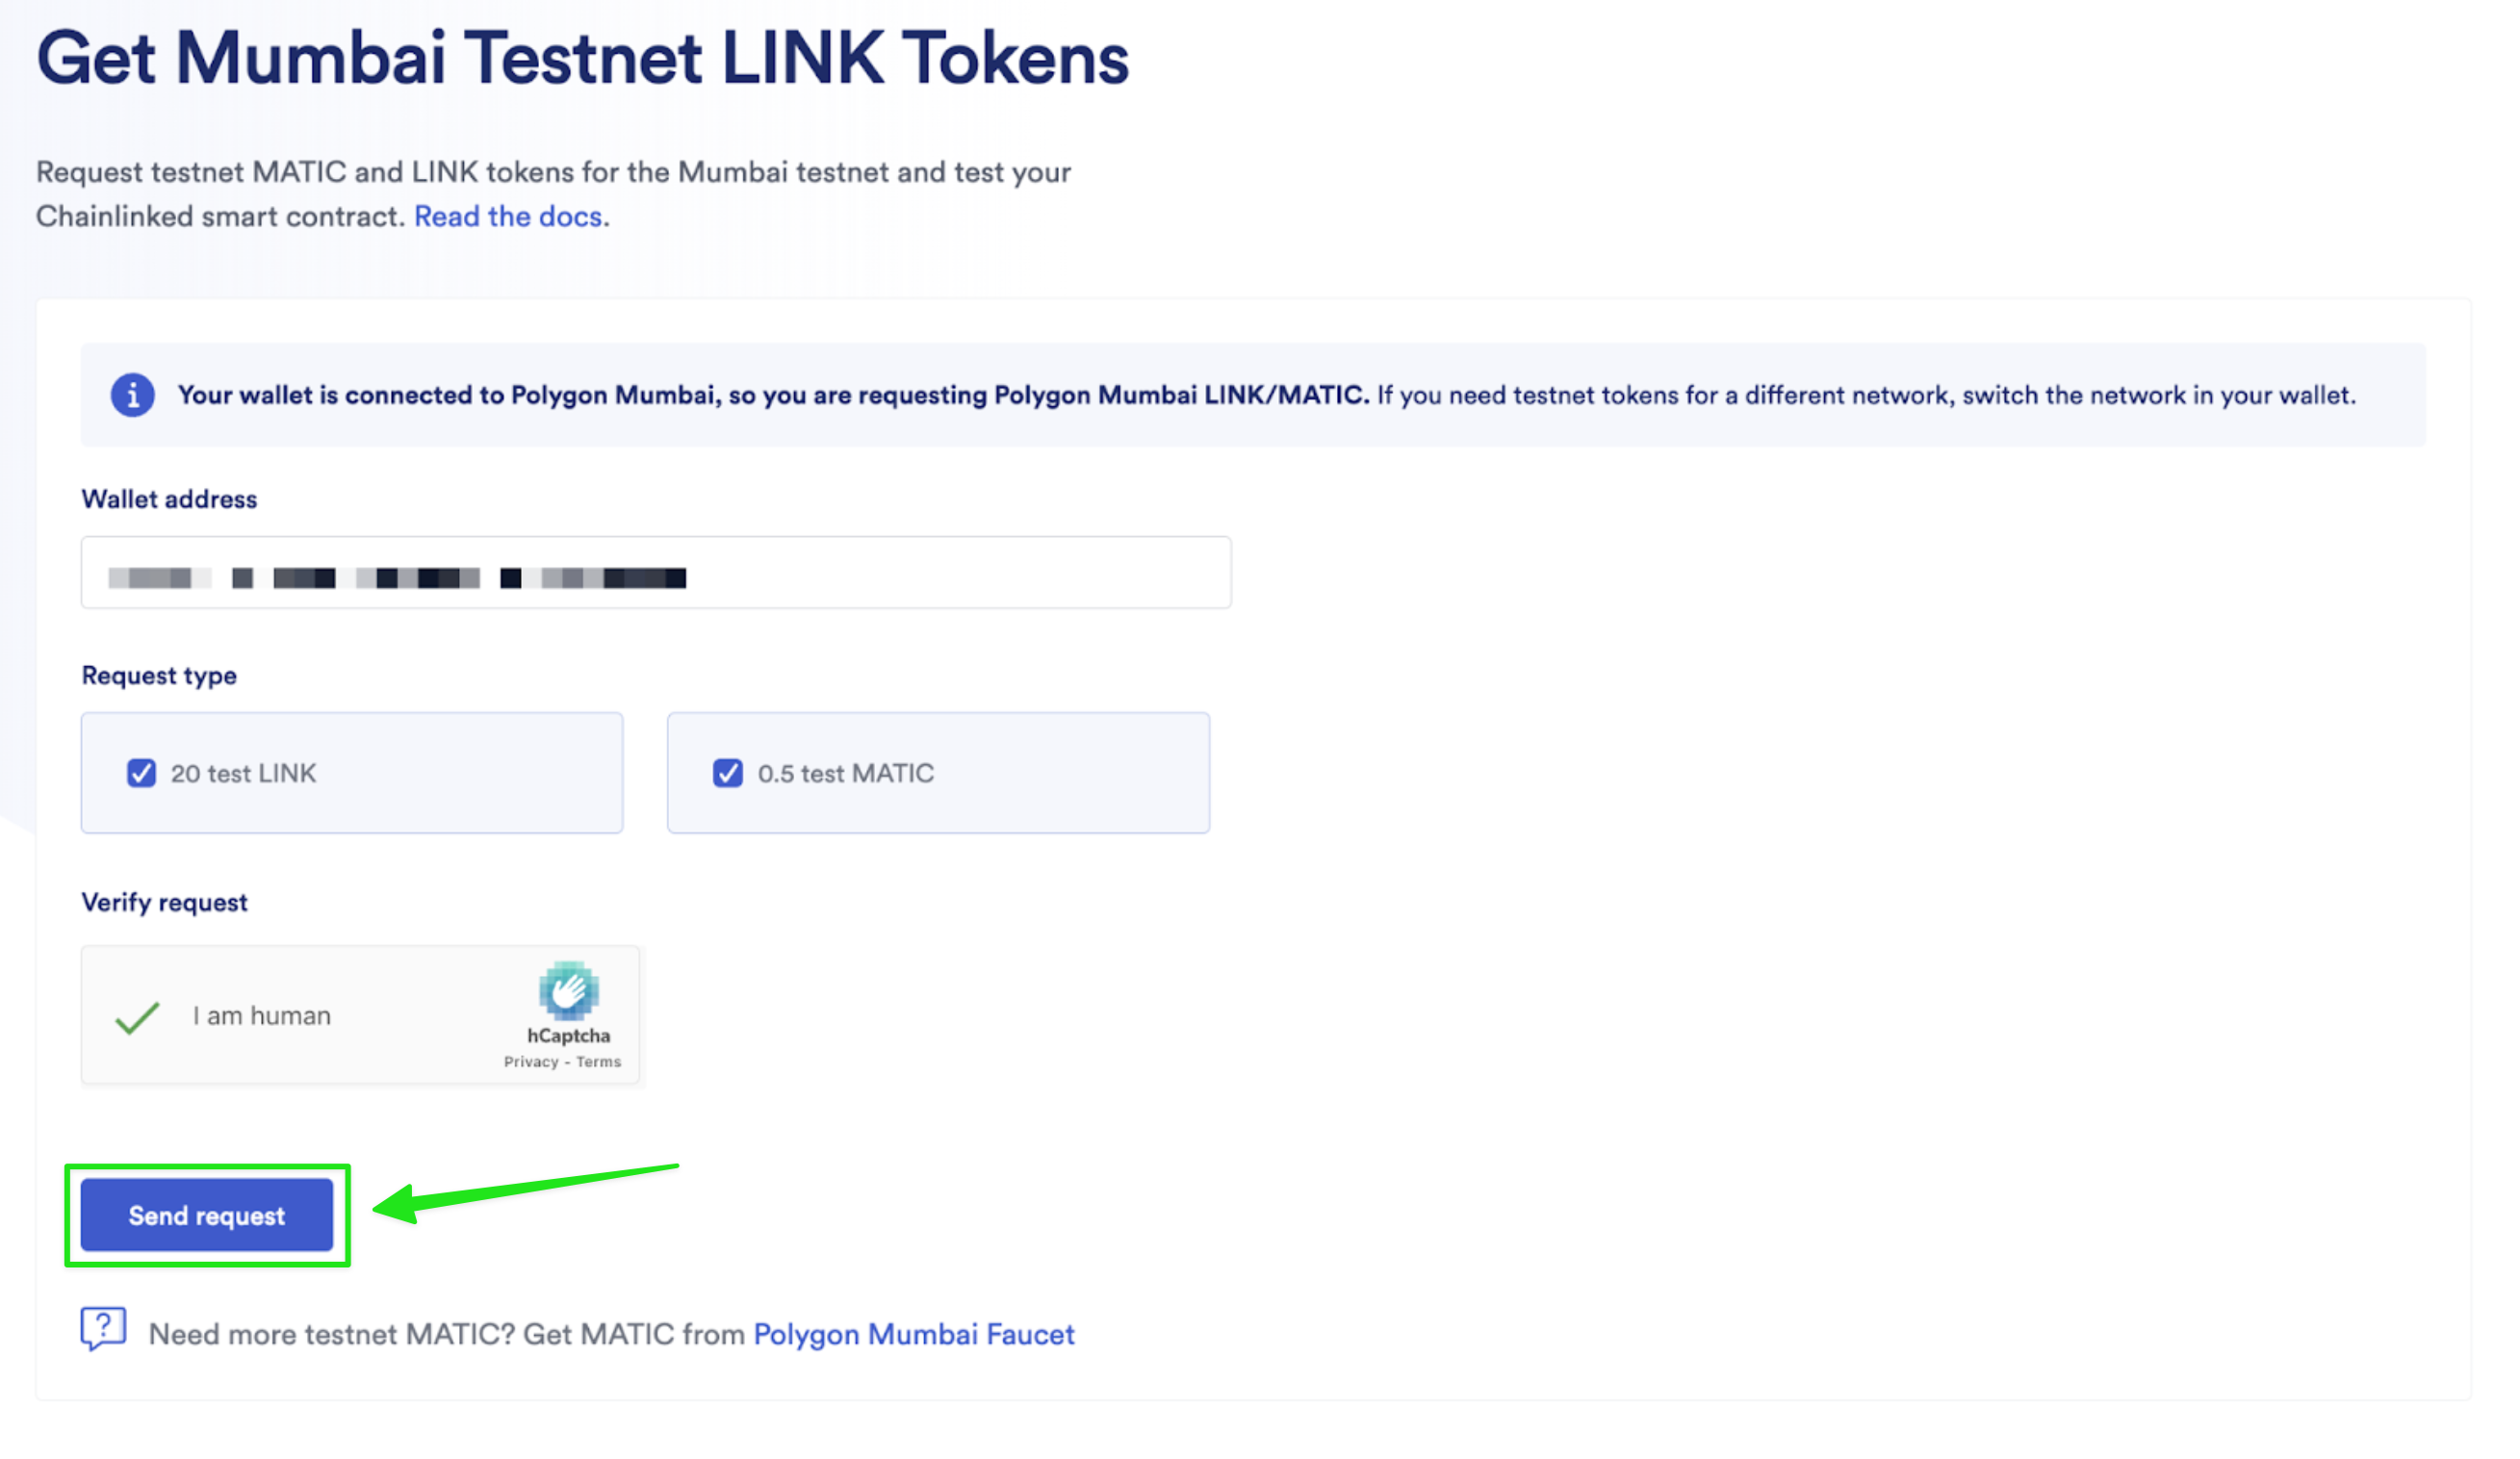
G) Wait for the transaction to be completed.
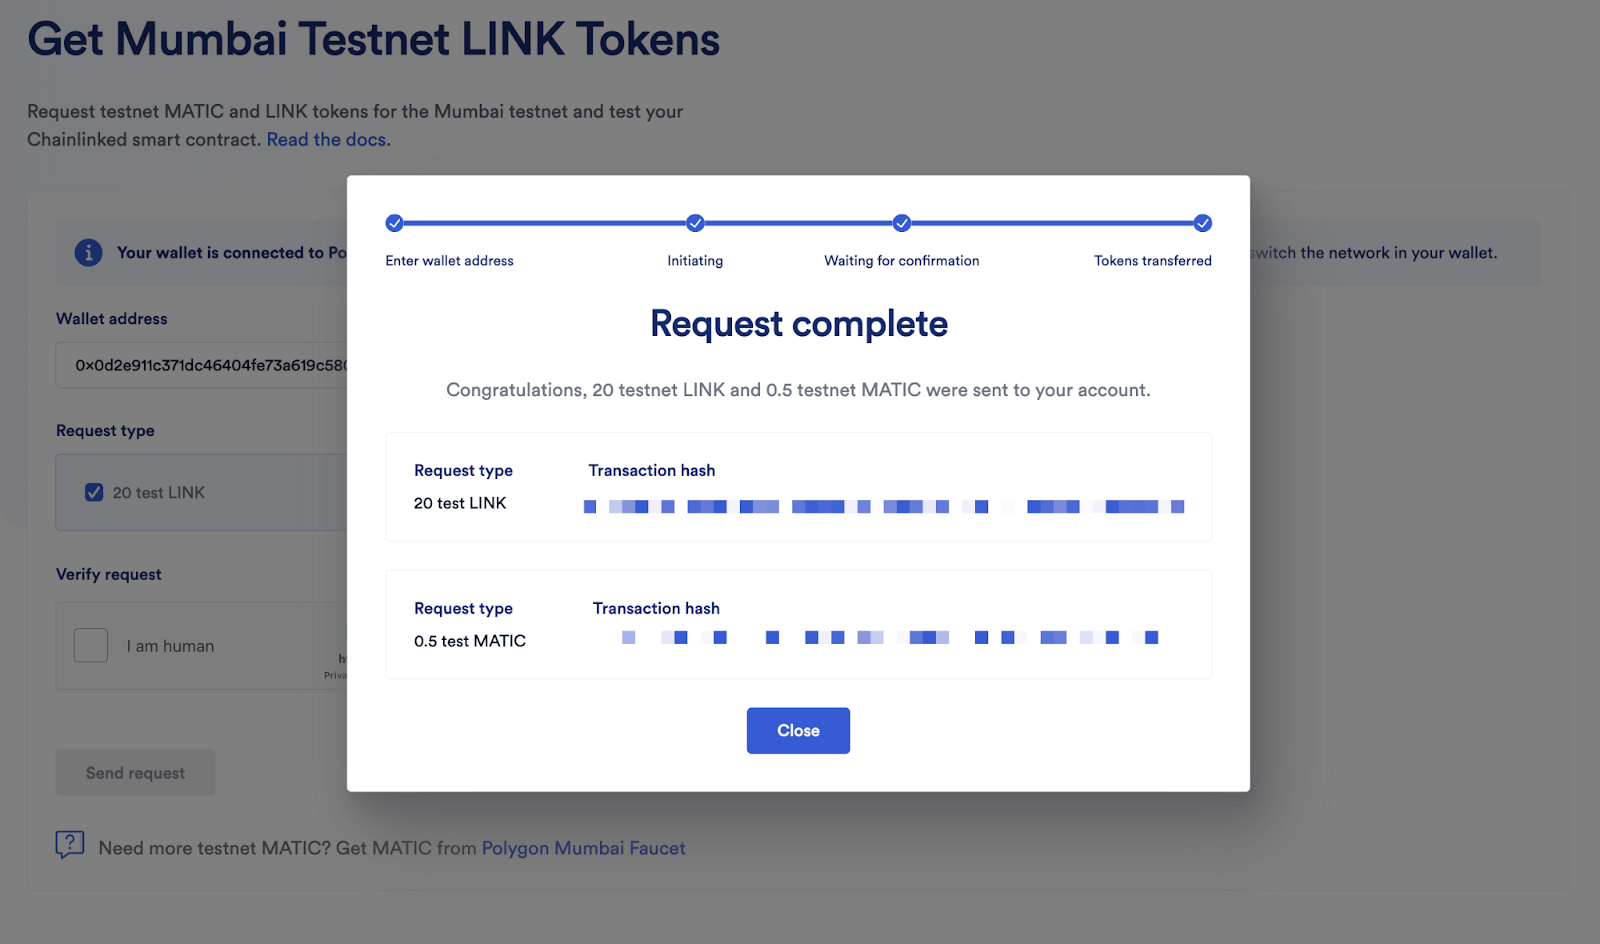
Congratulations! You have successfully requested and received testnet Polygon Mumbai MATIC and testnet LINK.
Note: If the Chainlink Faucet has run out of testnet MATIC, please use the Polygon Mumbai Faucet to receive testnet MATIC. You will still have to use the Chainlink Faucet to receive testnet LINK.
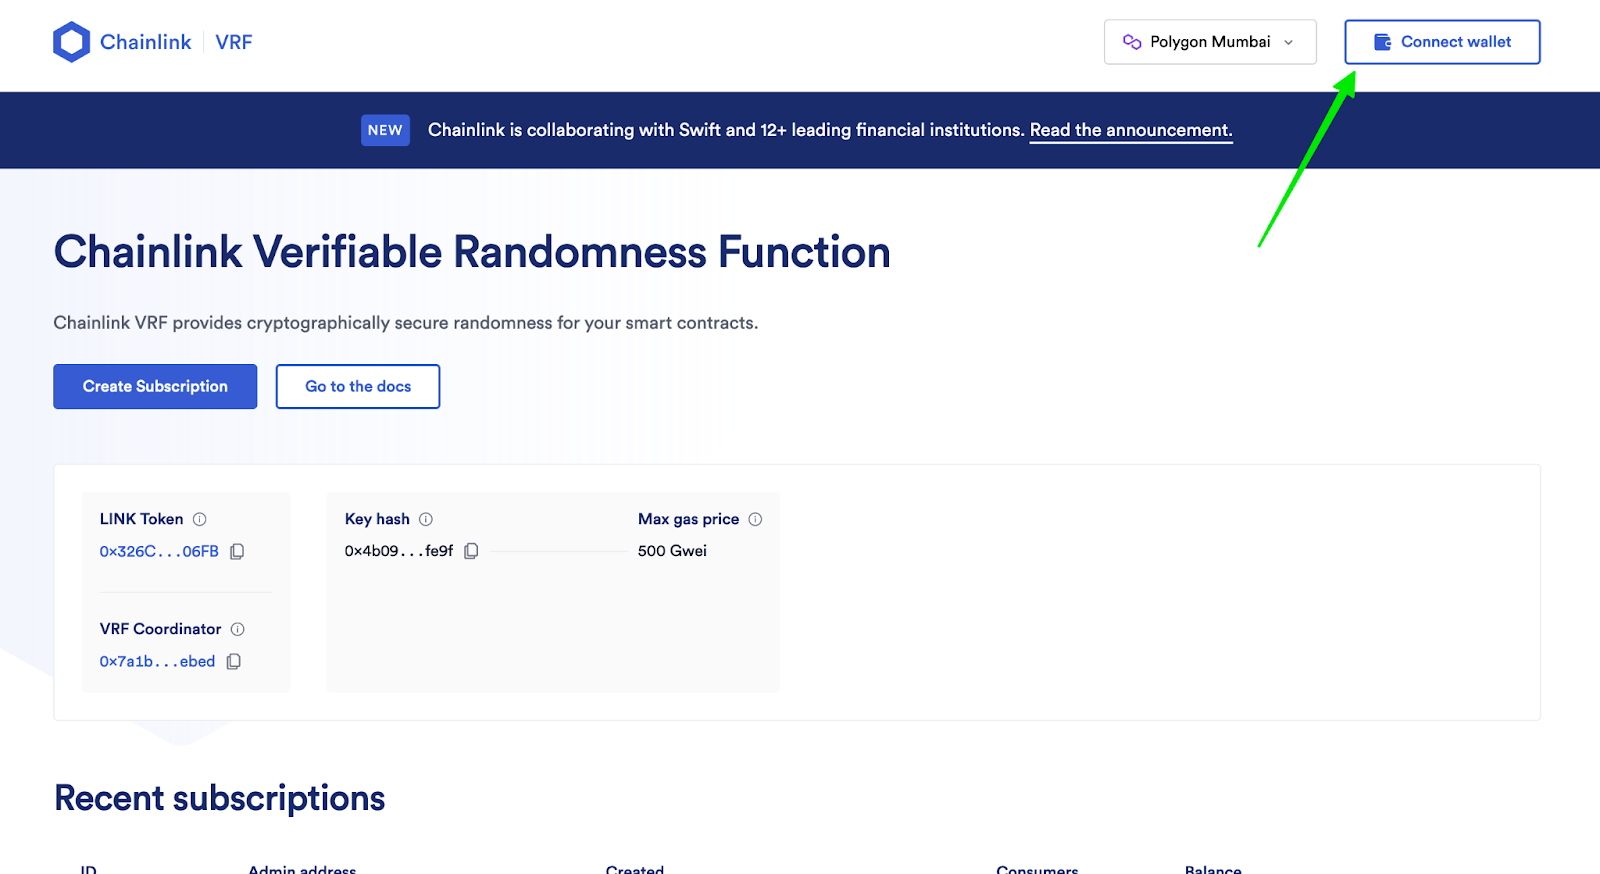
Step 3: Create a VRF Subscription
Before we deploy the dNFT smart contract, we will first create a VRF subscription. Think of this as a bucket of funds for your contract to use when generating random numbers. We will need the subscription ID to deploy the smart contract.
A) Go to https://vrf.chain.link/mumbai
B) Click “Connect wallet” in the top right corner.
C) Click on “Create Subscription”.
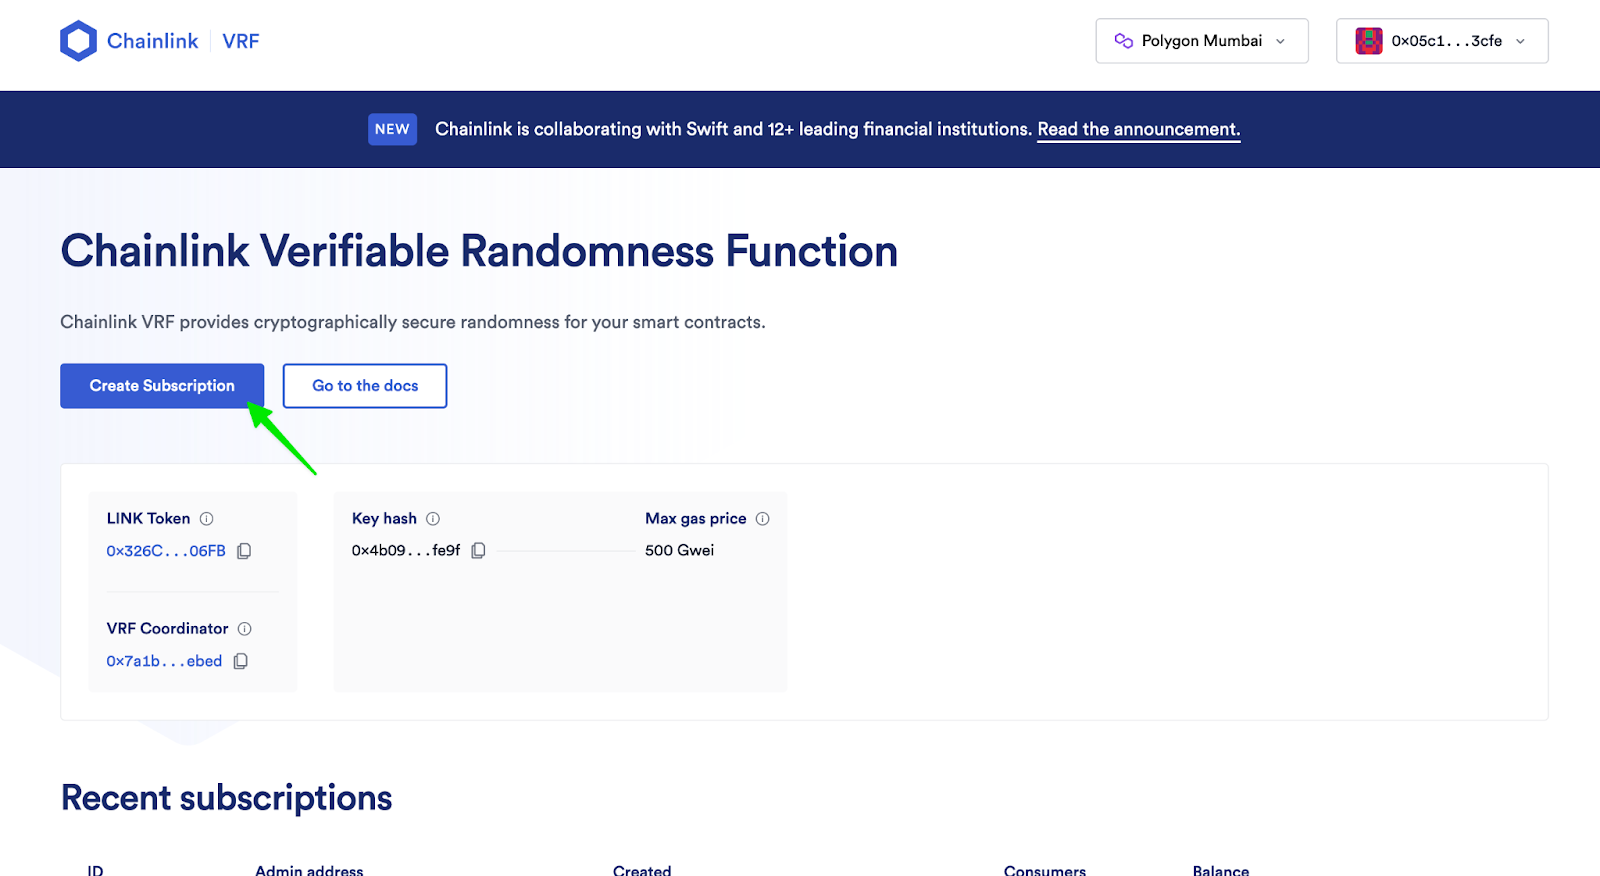
D) Click on “Create subscription” again.
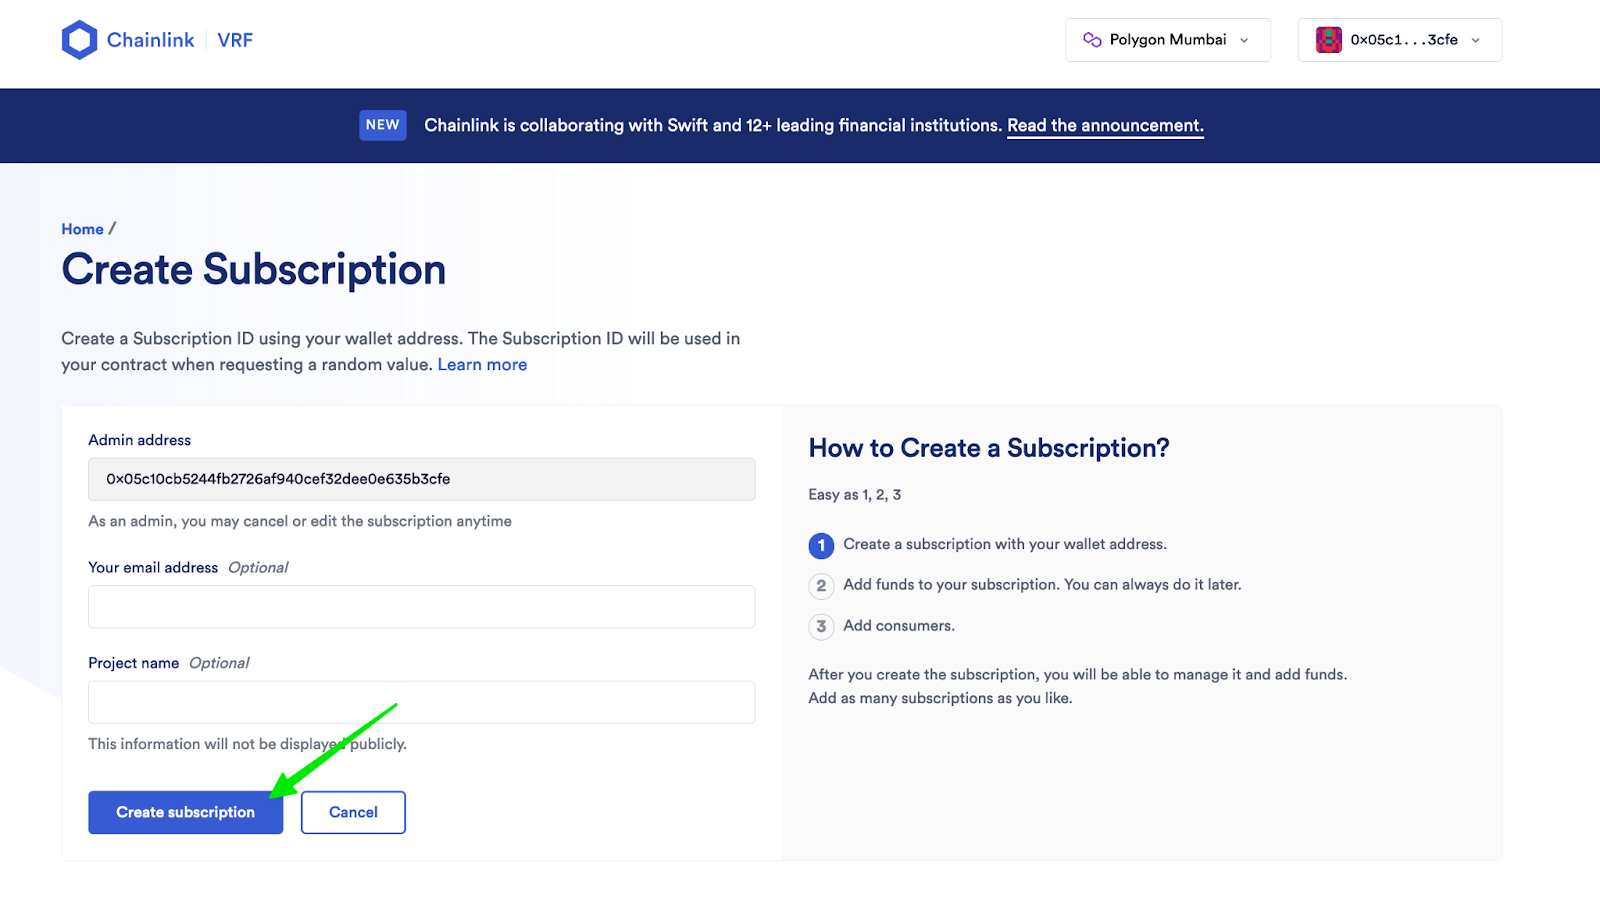
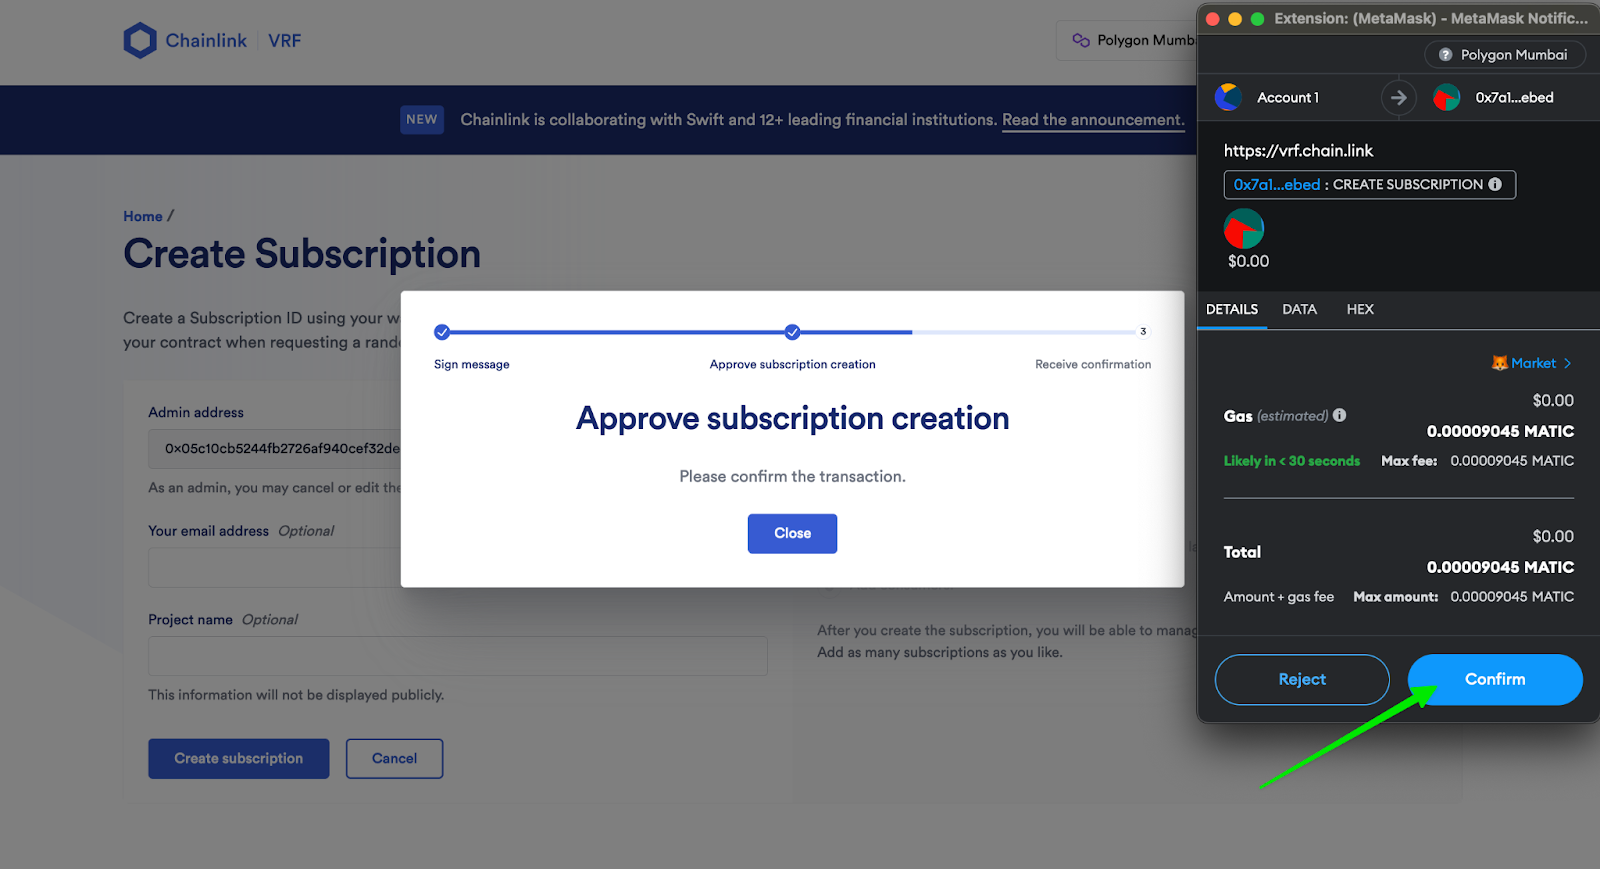
E) A MetaMask prompt should appear. Click on “Sign”.
![]()
F) Click on “Confirm” in MetaMask and wait for the transaction to be confirmed.
G) Once the transaction is confirmed and the subscription is created, click on “Add funds”.
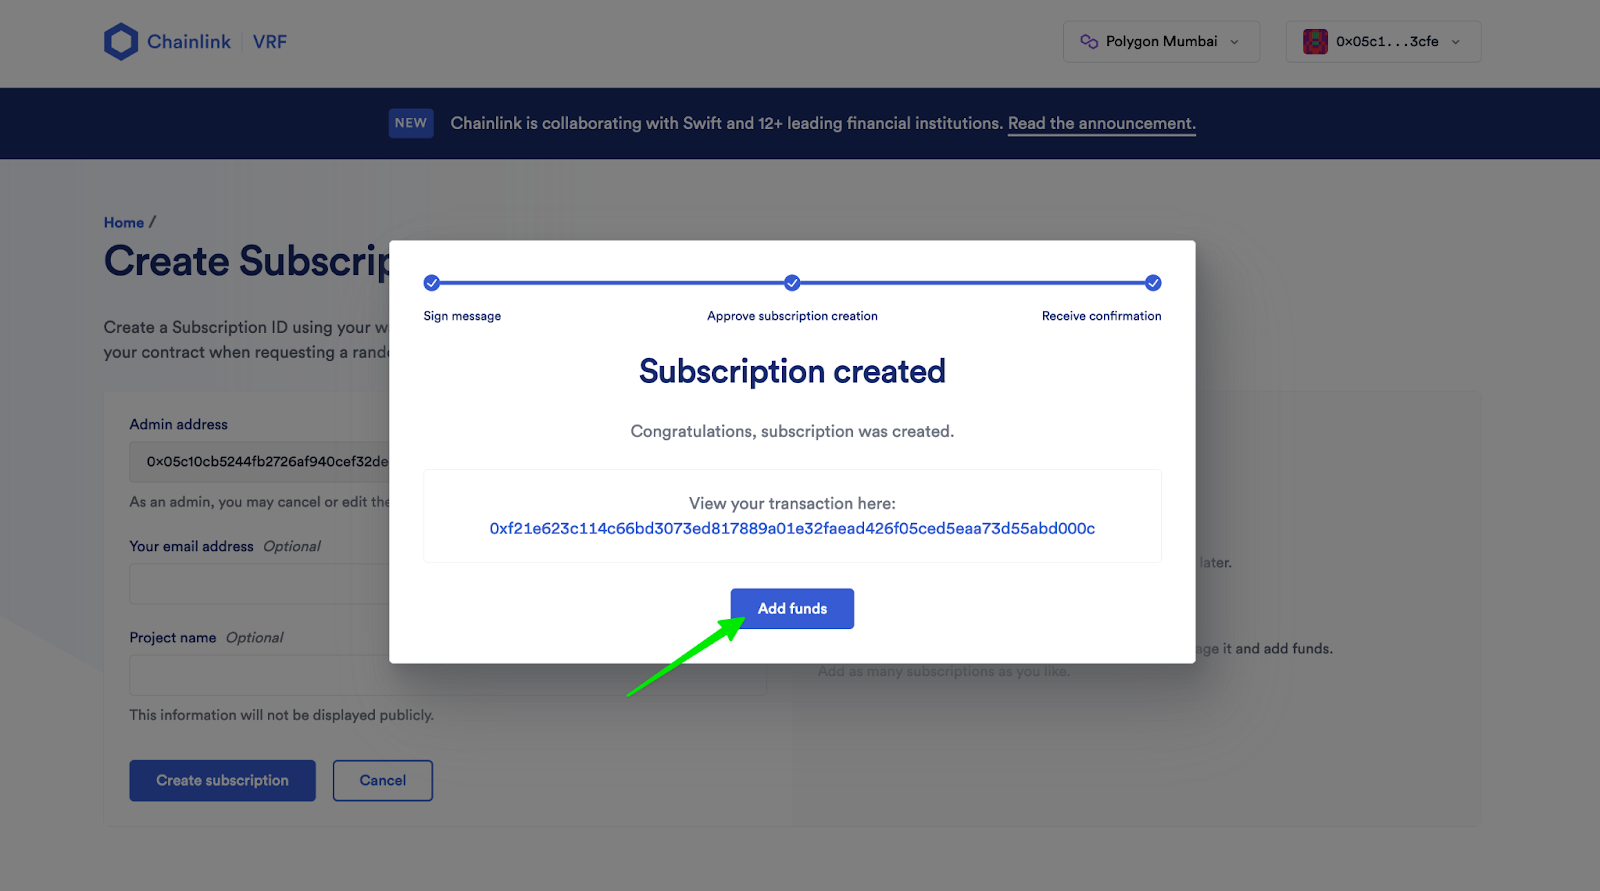
H) In the “Add funds (LINK)” input box, add 2 LINK and click on “Add funds”.

I) Confirm the transaction in MetaMask.
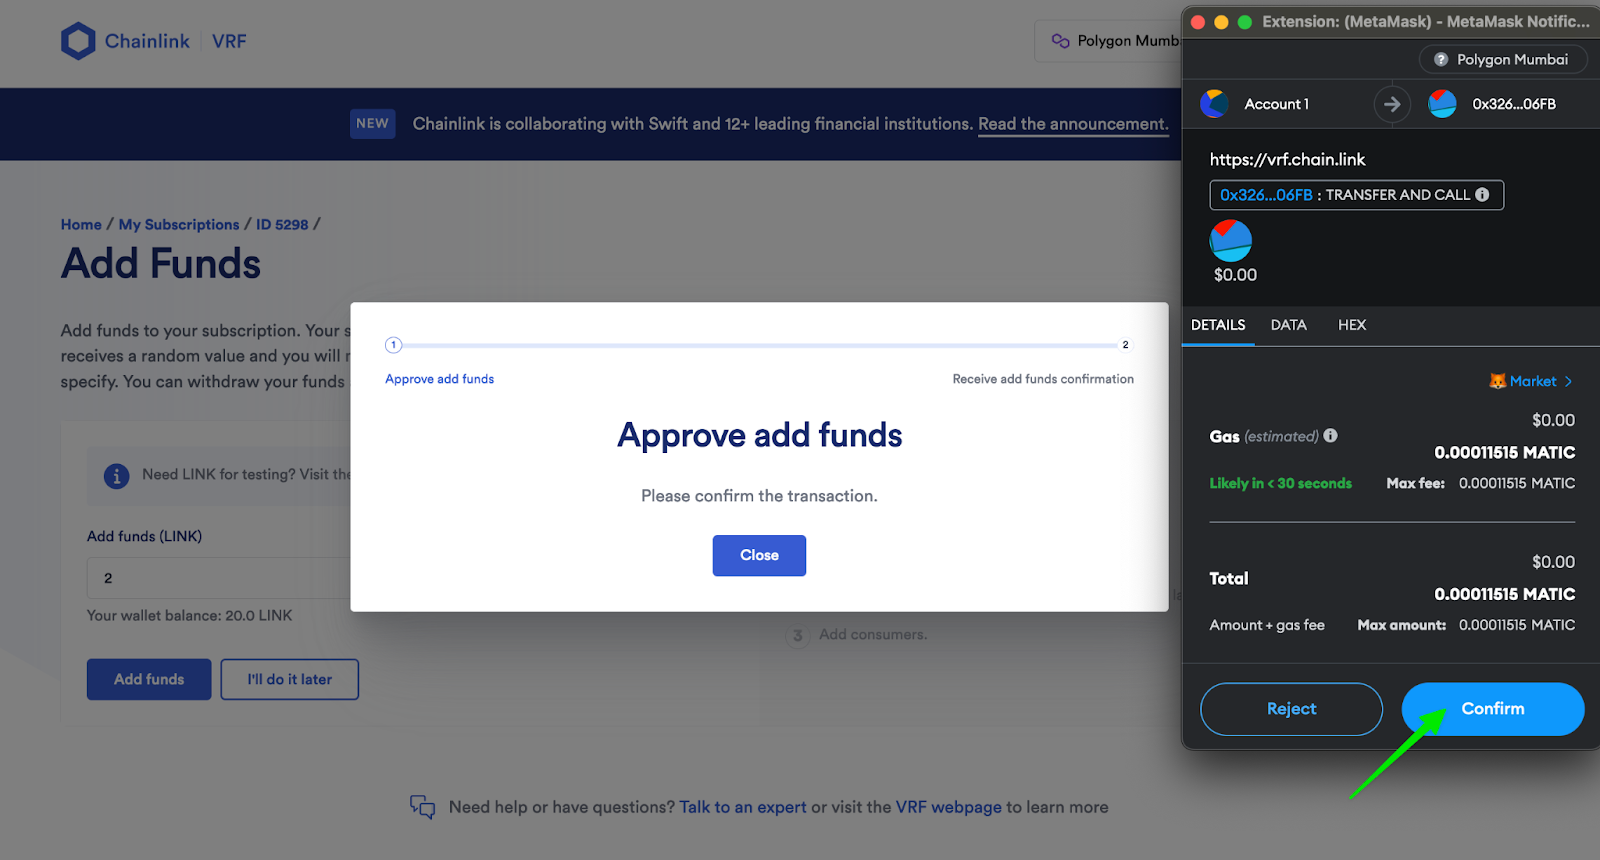
Congratulations! You have successfully created your VRF subscription and funded it with some testnet LINK. We will come back to the VRF subscription in the next step.
Step 4: Deploy the Dynamic NFT Smart Contract on Remix
Remix is an online integrated development environment (IDE) specifically designed for developing and testing smart contracts on the Ethereum blockchain. It provides a user-friendly interface and a set of powerful tools for writing, compiling, deploying, and debugging Ethereum smart contracts.
In this step, you will learn how to create a new Remix workspace and deploy a smart contract. Don’t worry: The smart contract is already written, so all you need to do is copy and paste.
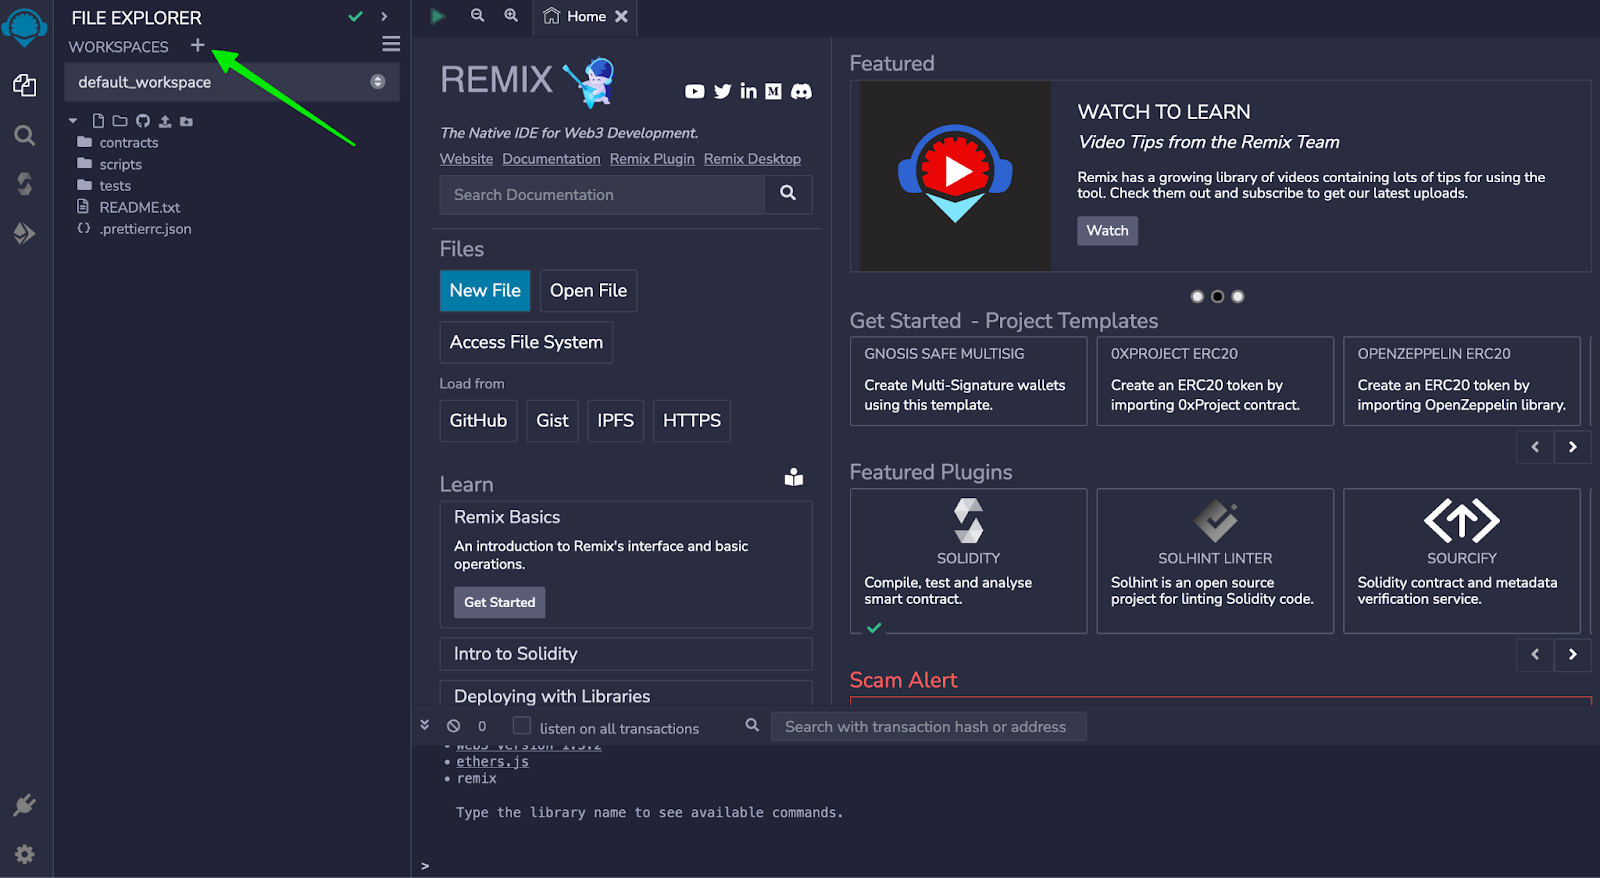
A) Go to https://remix.ethereum.org/
B) Click on the “+” icon in the top left corner of your screen to create a new workspace.
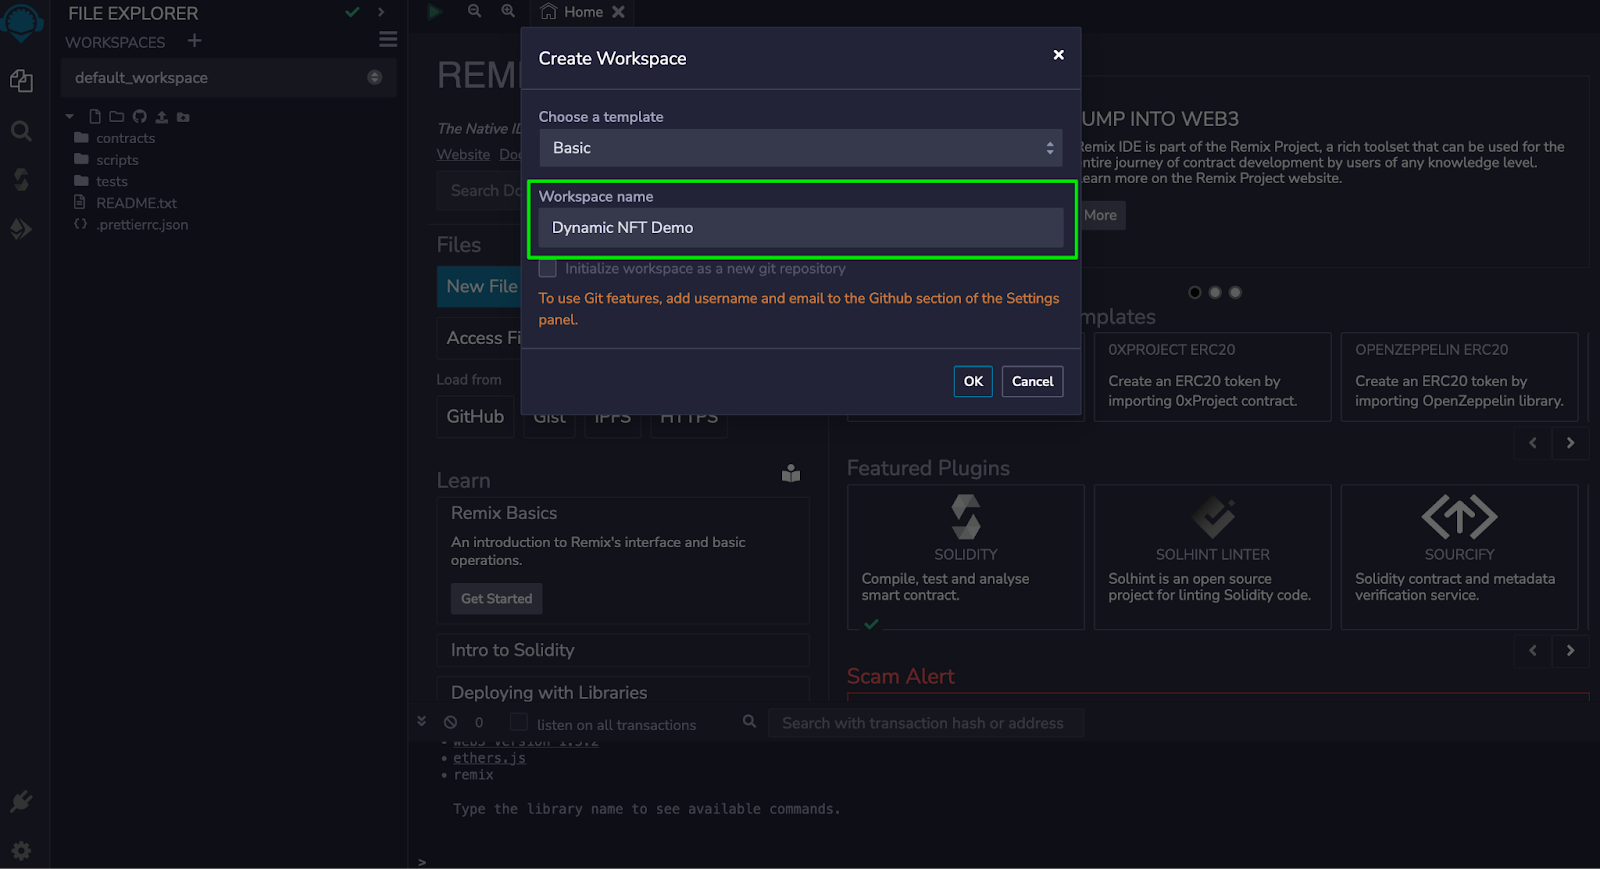
C) Enter a name for your new workspace and click “OK”.
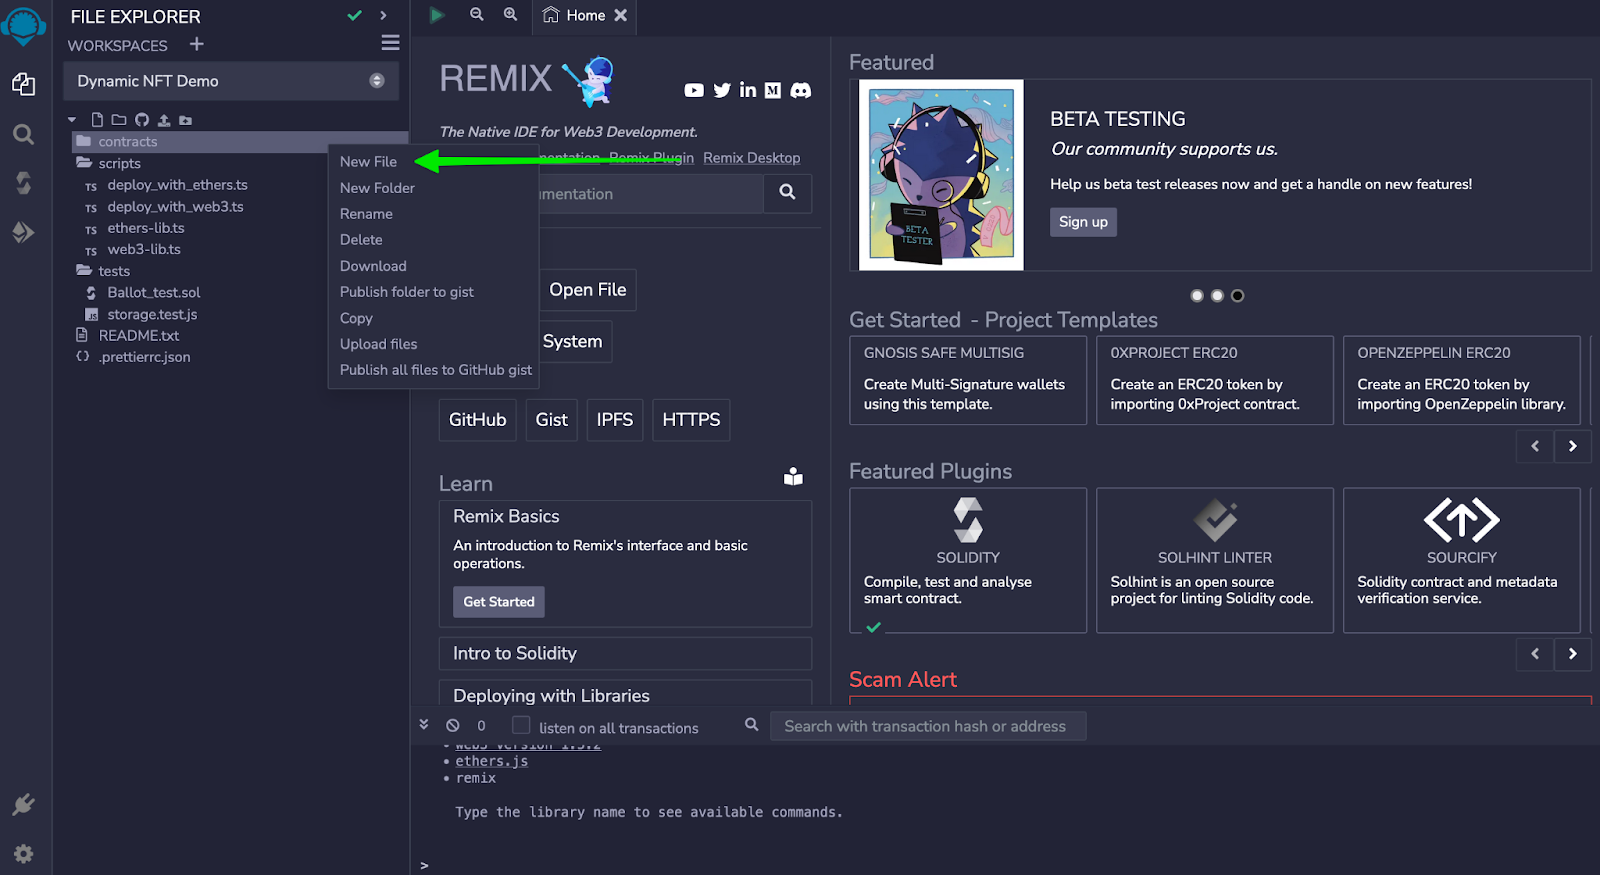
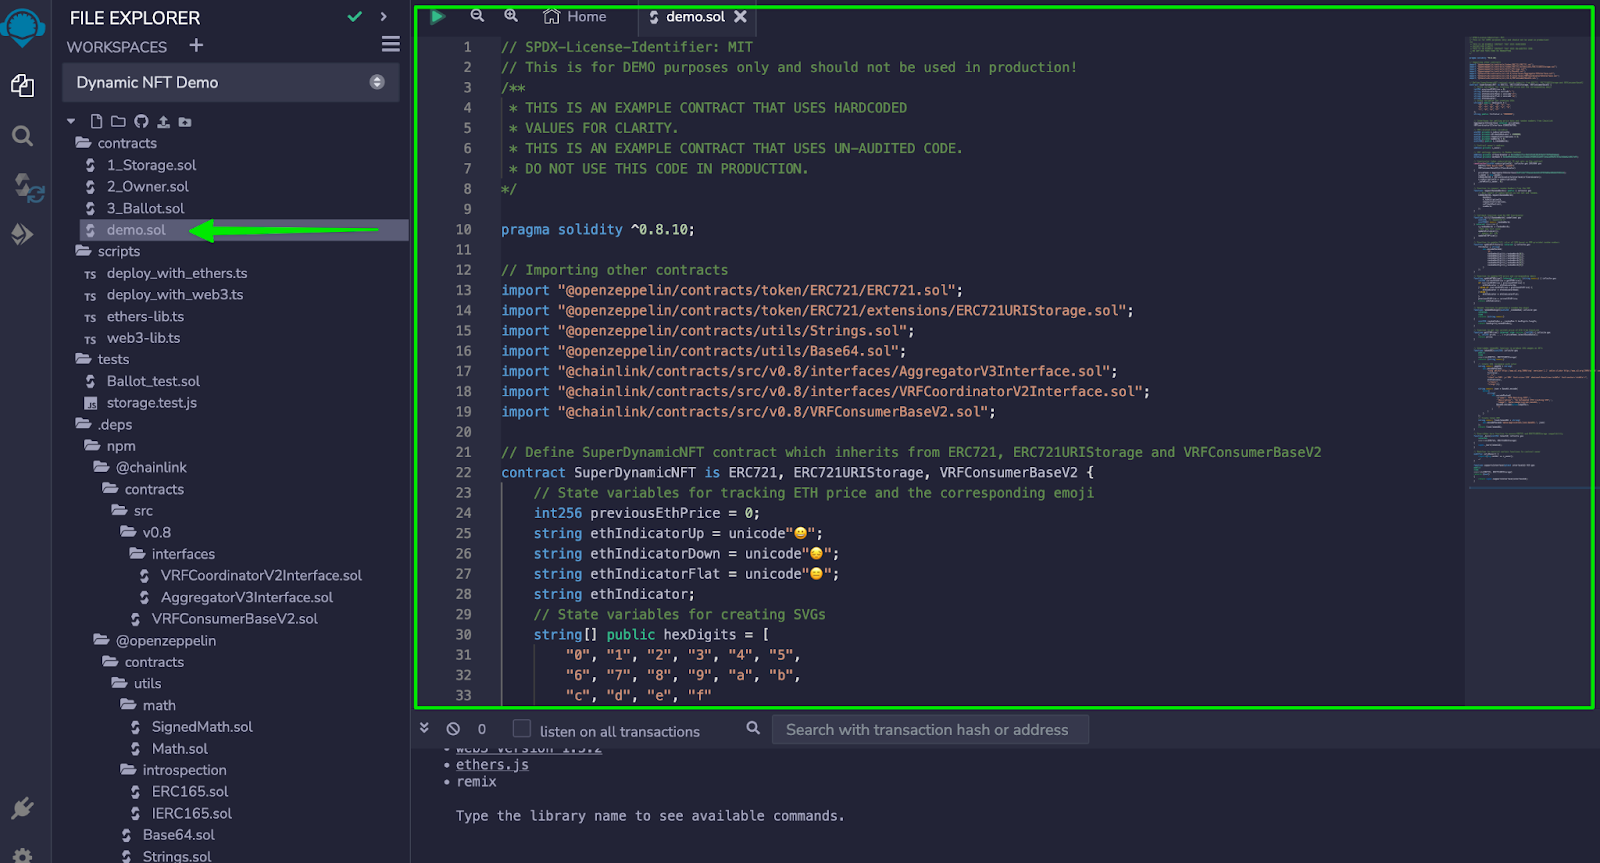
D) Right-click on “contracts” in the left-hand sidebar and click “New file”.
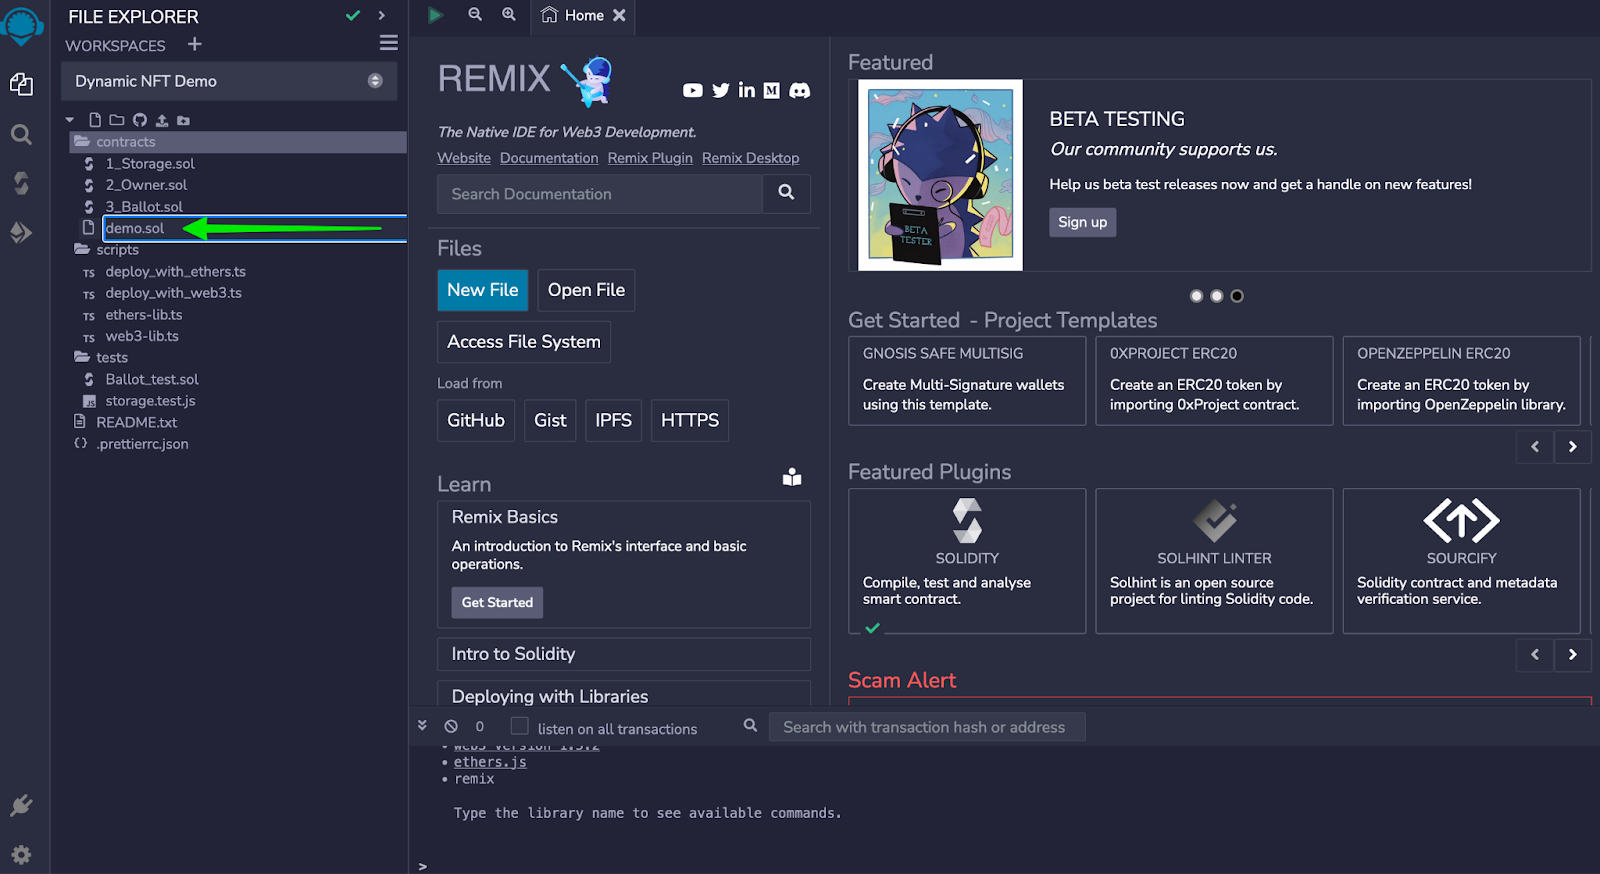
E) Name the file “demo.sol” or any other name you would like and hit enter.
F) Copy this code.
// SPDX-License-Identifier: MIT
// This is for DEMO purposes only and should not be used in production!

pragma solidity ^0.8.10;

// Importing other contracts
import "@openzeppelin/contracts/token/ERC721/ERC721.sol";
import "@openzeppelin/contracts/token/ERC721/extensions/ERC721URIStorage.sol";
import "@openzeppelin/contracts/utils/Strings.sol";
import "@openzeppelin/contracts/utils/Base64.sol";
import "@chainlink/contracts/src/v0.8/interfaces/AggregatorV3Interface.sol";
import "@chainlink/contracts/src/v0.8/interfaces/VRFCoordinatorV2Interface.sol";
import "@chainlink/contracts/src/v0.8/VRFConsumerBaseV2.sol";

// Define SuperDynamicNFT contract which inherits from ERC721, ERC721URIStorage and VRFConsumerBaseV2
contract SuperDynamicNFT is ERC721, ERC721URIStorage, VRFConsumerBaseV2 {

// State variables for tracking ETH price and the corresponding emoji
int256 previousEthPrice = 0;
string ethIndicatorUp = unicode"😀";
string ethIndicatorDown = unicode"😔";
string ethIndicatorFlat = unicode"😑";
string ethIndicator;

// State variables for creating SVGs
string[] public hexDigits = [
"0", "1", "2", "3", "4", "5",
"6", "7", "8", "9", "a", "b",
"c", "d", "e", "f"
];
string public fillColor = "#000000";

// Interfaces for getting price data and random numbers from Chainlink
AggregatorV3Interface internal priceFeed;
VRFCoordinatorV2Interface COORDINATOR;

// VRF-related state variables
uint64 private s_subscriptionId;
uint32 private callbackGasLimit = 2500000;
uint16 private requestConfirmations = 3;
uint32 private numWords = 6;
uint256[] public s_randomWords;

// Contract owner's address
address private s_owner;

// VRF settings specific to Mumbai testnet
address private vrfCoordinator = 0x7a1BaC17Ccc5b313516C5E16fb24f7659aA5ebed;
bytes32 private keyHash = 0x4b09e658ed251bcafeebbc69400383d49f344ace09b9576fe248bb02c003fe9f;

// Constructor takes subscription ID and sets up the contract
constructor(uint64 subscriptionId)
ERC721("ETH Watch SVG", "ewSVG")
VRFConsumerBaseV2(vrfCoordinator)
{
priceFeed = AggregatorV3Interface(0x0715A7794a1dc8e42615F059dD6e406A6594651A);
s_owner = msg.sender;
COORDINATOR = VRFCoordinatorV2Interface(vrfCoordinator);
s_subscriptionId = subscriptionId;
_safeMint(s_owner, 0);
}

// Function to request random Numbers from the VRF
function requestRandomWords() public {
// Will revert if subscription is not set and funded.
COORDINATOR.requestRandomWords(
keyHash,
s_subscriptionId,
requestConfirmations,
callbackGasLimit,
numWords
);
}

// Callback function used by VRF Coordinator
function fulfillRandomWords(
uint256, /* requestId */
uint256[] memory randomWords
) internal override {
s_randomWords = randomWords;
//Get new fill color
updateFillColor();
// Update NFT SVG
updateETHPrice();
}

// Function to update fill color of SVG based on VRF-provided random numbers
function updateFillColor() internal {
fillColor = string(
abi.encodePacked(
"#",
randomHexDigit(s_randomWords[0]),
randomHexDigit(s_randomWords[1]),
randomHexDigit(s_randomWords[2]),
randomHexDigit(s_randomWords[3]),
randomHexDigit(s_randomWords[4]),
randomHexDigit(s_randomWords[5])
)
);
}

// Function to update ETH price and corresponding emoji
function updateETHPrice() internal returns (string memory) {
int256 currentEthPrice = getETHPrice();
if (currentEthPrice > previousEthPrice) {
ethIndicator = ethIndicatorUp;
} else if (currentEthPrice < previousEthPrice) {
ethIndicator = ethIndicatorDown;
} else {
ethIndicator = ethIndicatorFlat;
}
previousEthPrice = currentEthPrice;
return ethIndicator;
}

// Helper function to generate a random hex digit
function randomHexDigit(uint256 _randomNum)
internal
view
returns (string memory)
{
uint256 randomIndex = _randomNum % hexDigits.length;
return hexDigits[randomIndex];
}

// Function to get the current price of ETH from Chainlink
function getETHPrice() internal view returns (int256) {
(, int256 price, , , ) = priceFeed.latestRoundData();
return price;
}

// Overridden tokenURI function to produce SVG images as NFTs
function tokenURI(uint256) public view override(ERC721, ERC721URIStorage)
returns (string memory)
{
// Create SVG rectangle with color
string memory imgSVG = string(
abi.encodePacked(
"<svg xmlns='http://www.w3.org/2000/svg' version='1.1' xmlns:xlink='http://www.w3.org/1999/xlink' xmlns:svgjs='http://svgjs.com/svgjs' width='500' height='500' preserveAspectRatio='none' viewBox='0 0 500 500'> <rect width='100%' height='100%' fill='",
fillColor,
"' />",
"<text x='50%' y='50%' font-size='128' dominant-baseline='middle' text-anchor='middle'>",
ethIndicator,
"</text>",
"</svg>"));

string memory json = Base64.encode(
bytes(
string(
abi.encodePacked(
'{"name": "ETH Watching SVG",',
'"description": "An Automated ETH tracking SVG",',
'"image": "data:image/svg+xml;base64,',
Base64.encode(bytes(imgSVG)),
'"}'
)
)
)
);

// Create token URI
string memory finalTokenURI = string(
abi.encodePacked("data:application/json;base64,", json)
);
return finalTokenURI;
}

// Modifier to restrict certain functions to contract owner
modifier onlyOwner() {
require(msg.sender == s_owner);
_;
}

function supportsInterface(bytes4 interfaceId)
public
view
override(ERC721, ERC721URIStorage)
returns (bool)
{
return super.supportsInterface(interfaceId);
}
}
G) Go back to Remix and paste the code in your newly created demo.sol file.
Note: You might get a pop-up warning that you are pasting a large piece of code. Click “OK”.
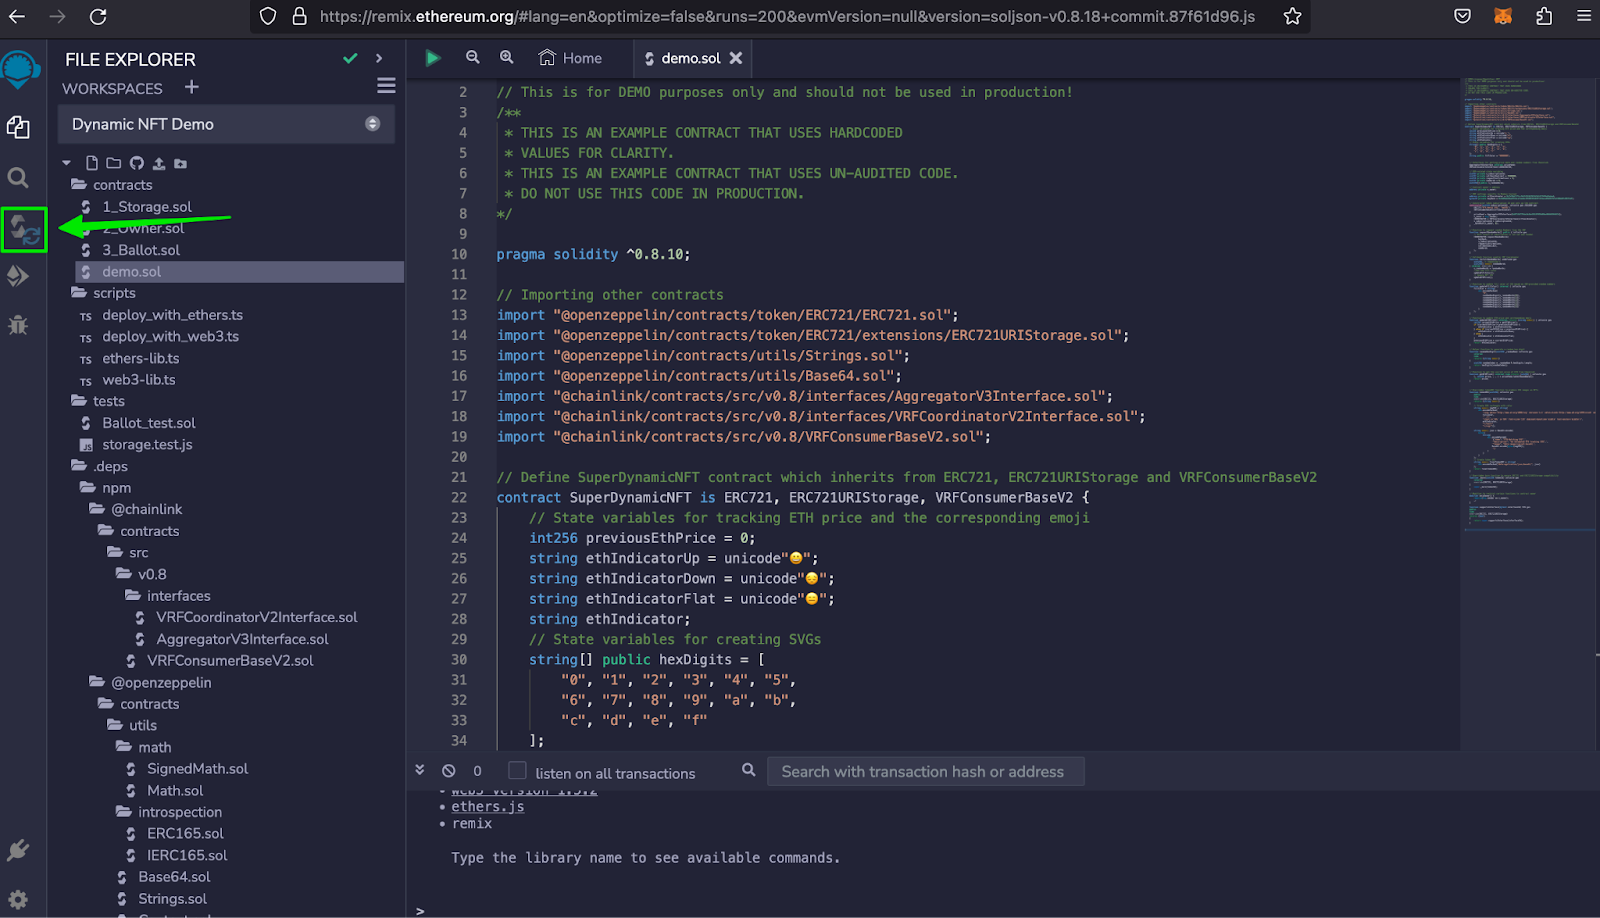
H) Click on the “Solidity Compiler” icon in the left-hand sidebar.
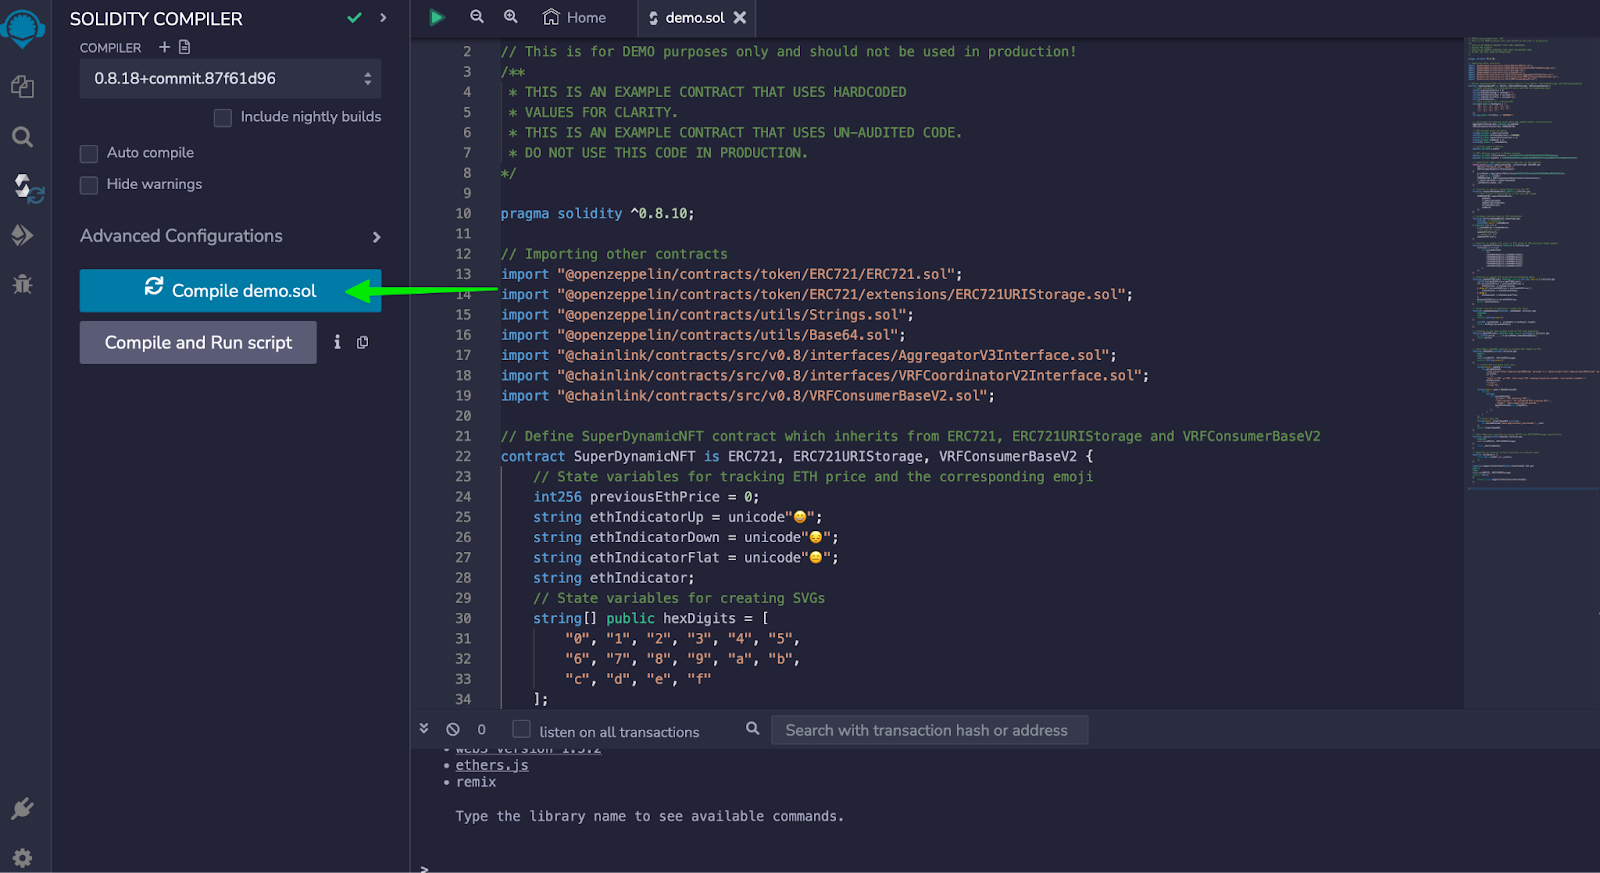
I) Click on “Compile demo.sol”.
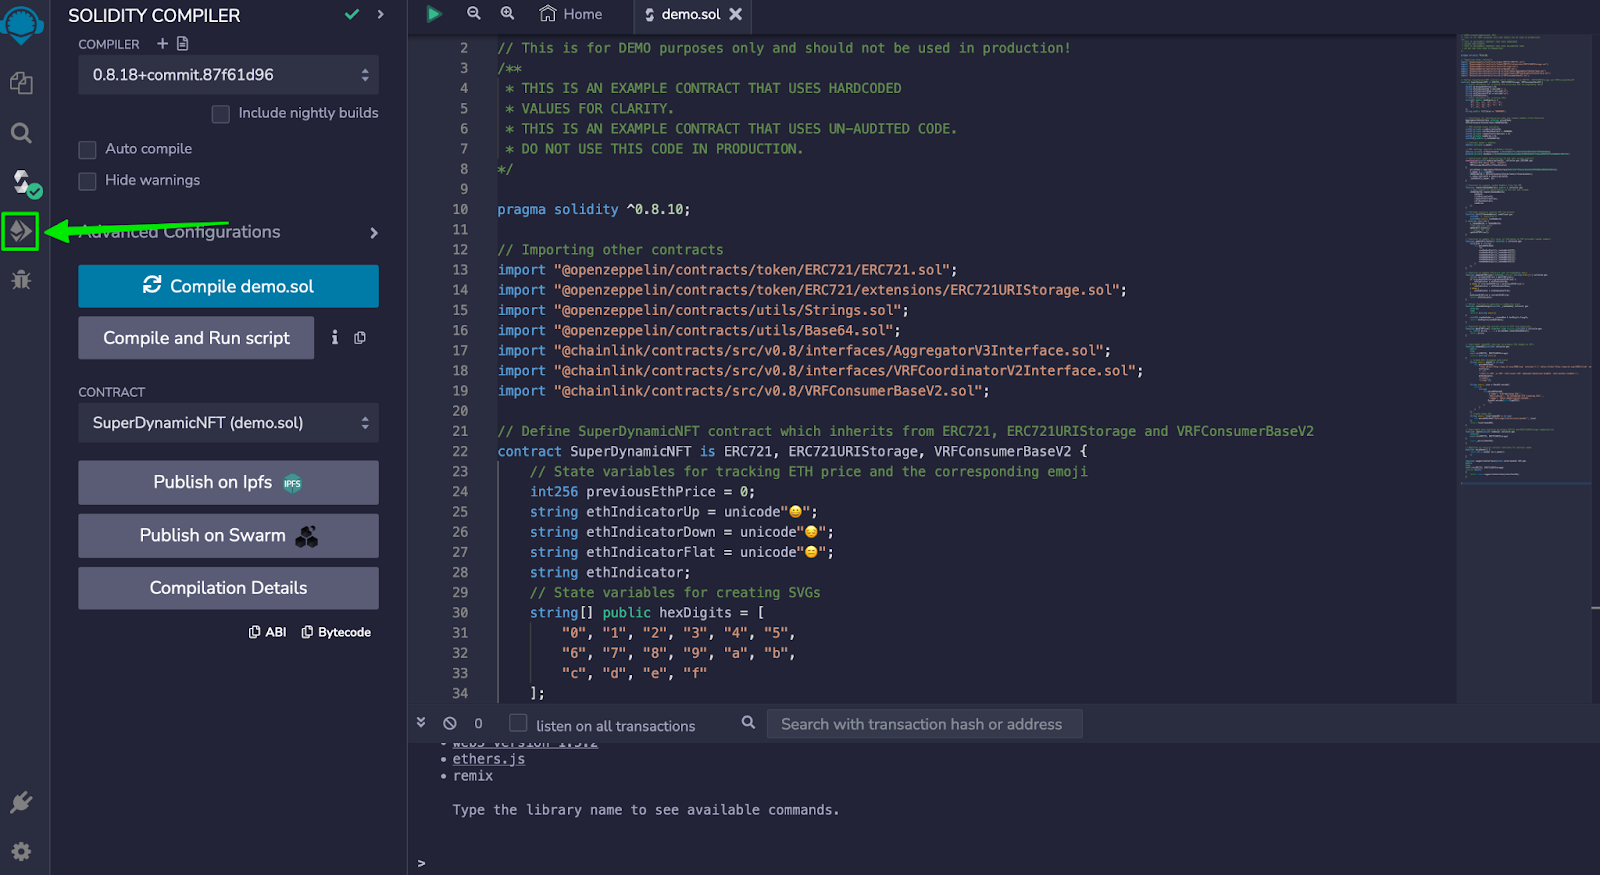
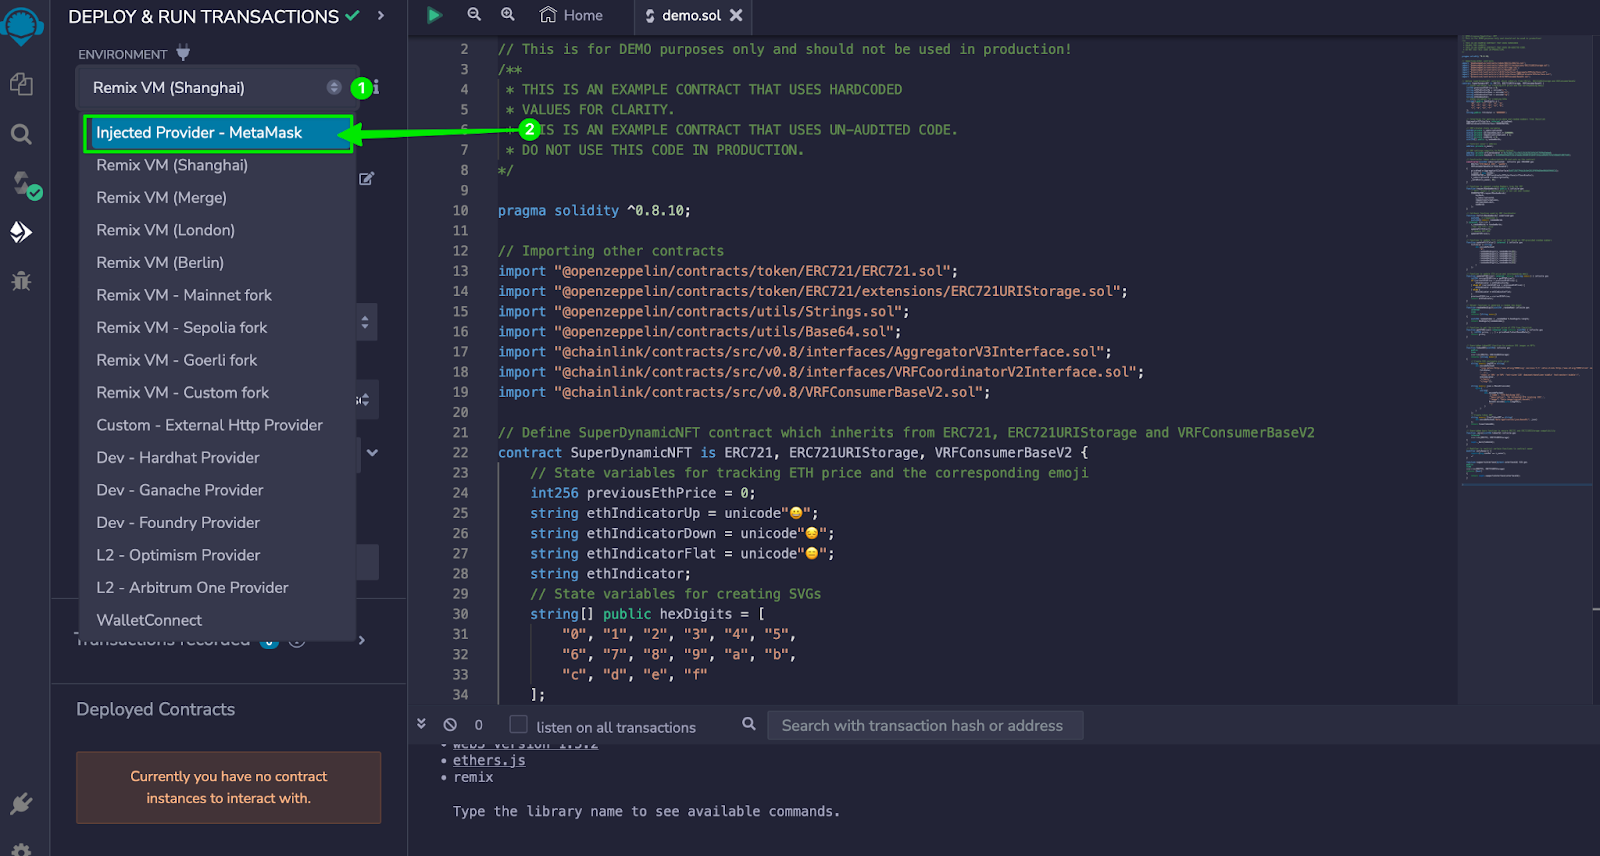
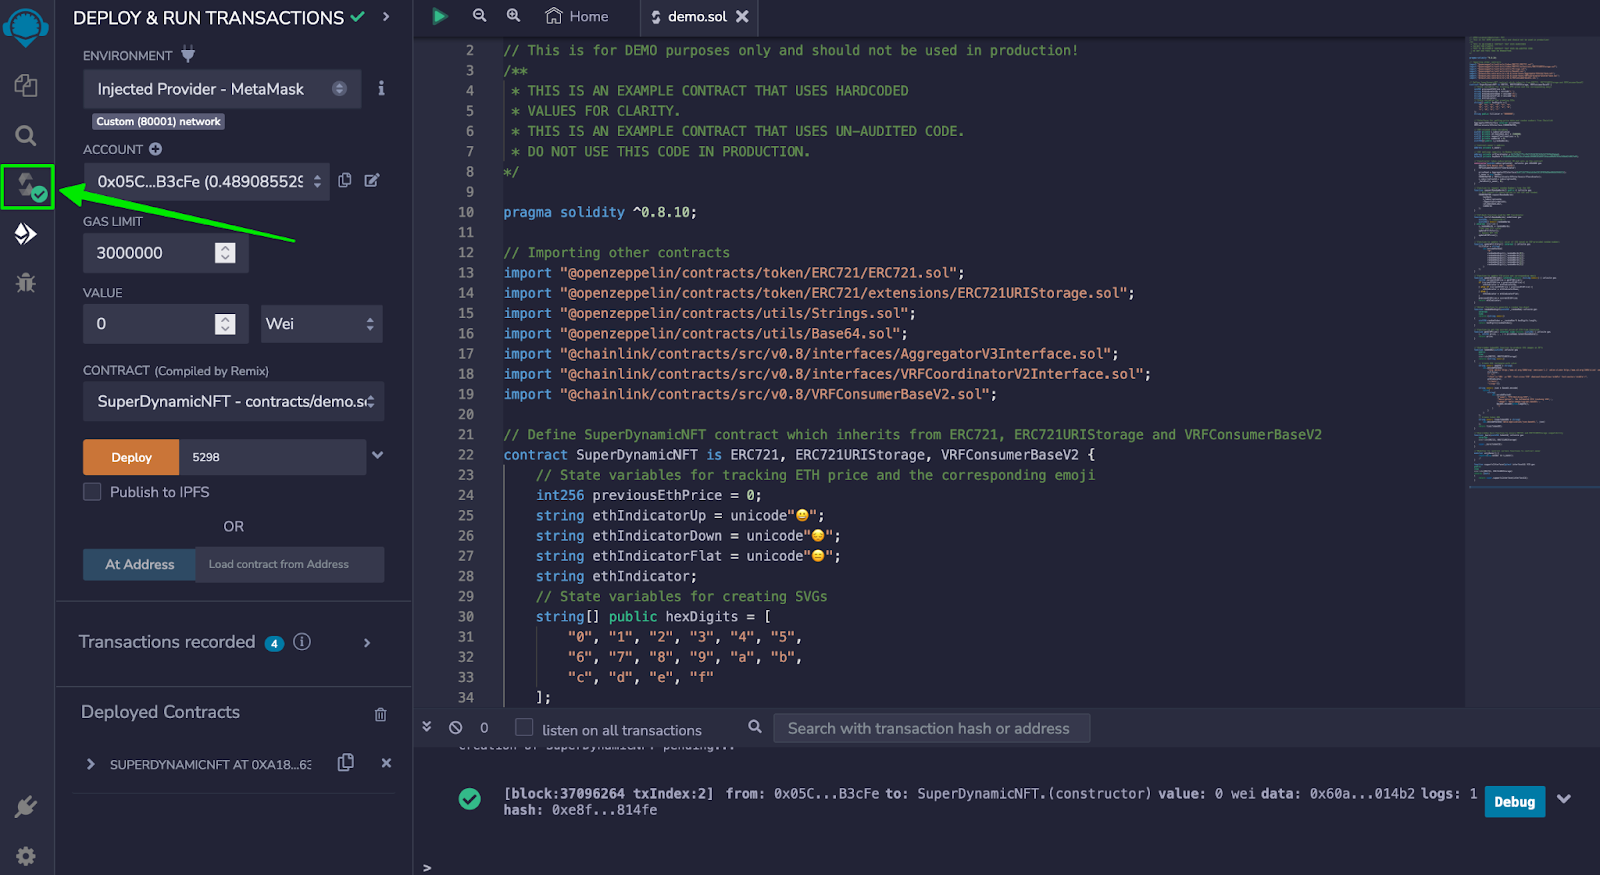
J) Click on the “Deploy & run transactions” icon in the left sidebar.
K) Click on the “Environment” dropdown and change it from “Remix VM (Shanghai)” to “Injected Provider – MetaMask” and follow the prompts in MetaMask to connect your wallet.
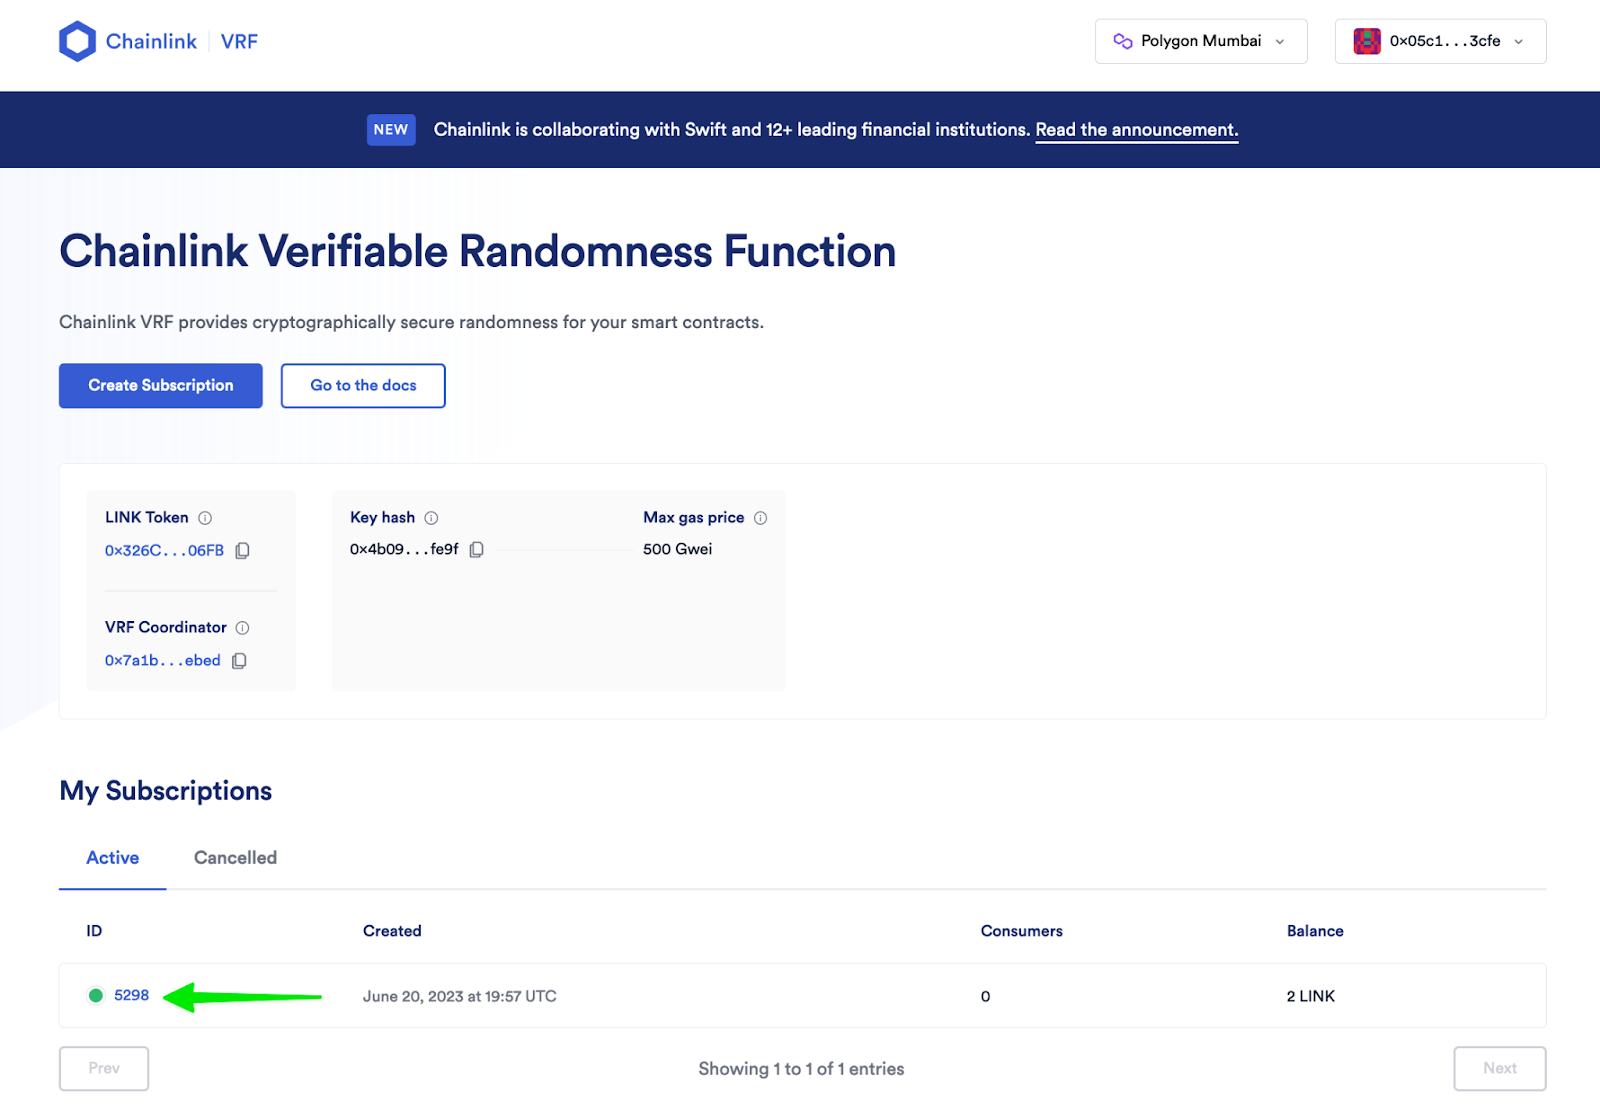
L) Before deploying the smart contract to the Polygon Mumbai blockchain, we need the subscription ID from the VRF subscription we created in the previous step. Go back to https://vrf.chain.link/mumbai and take note of the ID of the VRF subscription we just created. Your ID will be different from the one in the example. You first have to let the contract know about the subscription. In a future step, you’ll let the subscription know about the contract.
M) In Remix, enter the subscription ID in the input box next to the orange “Deploy” button.
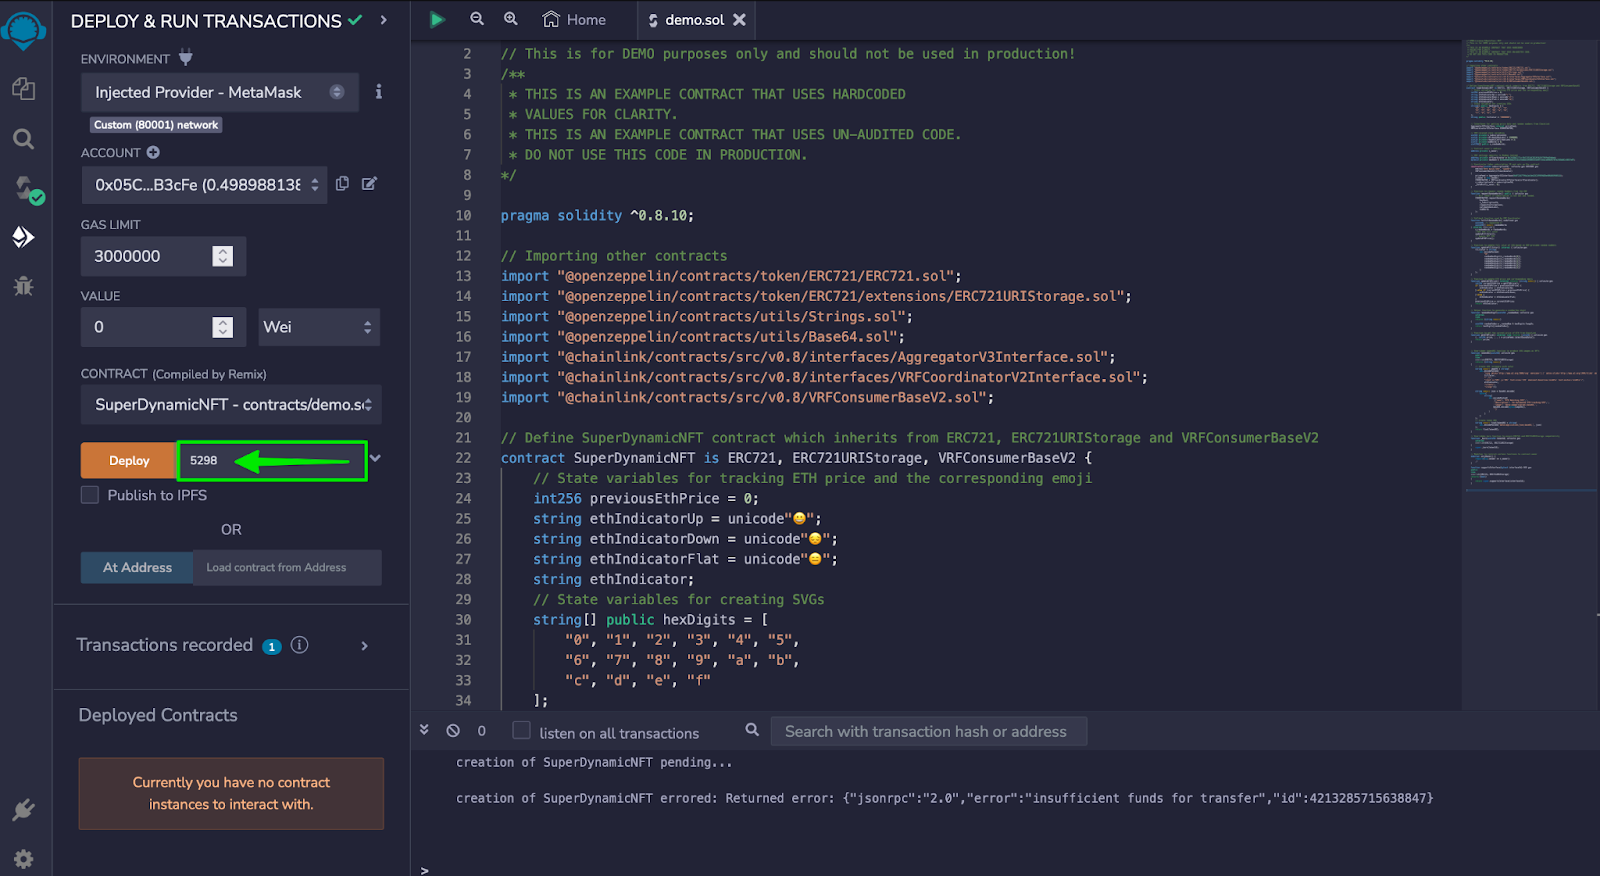
N) Click “Deploy” and then confirm the transaction in MetaMask.
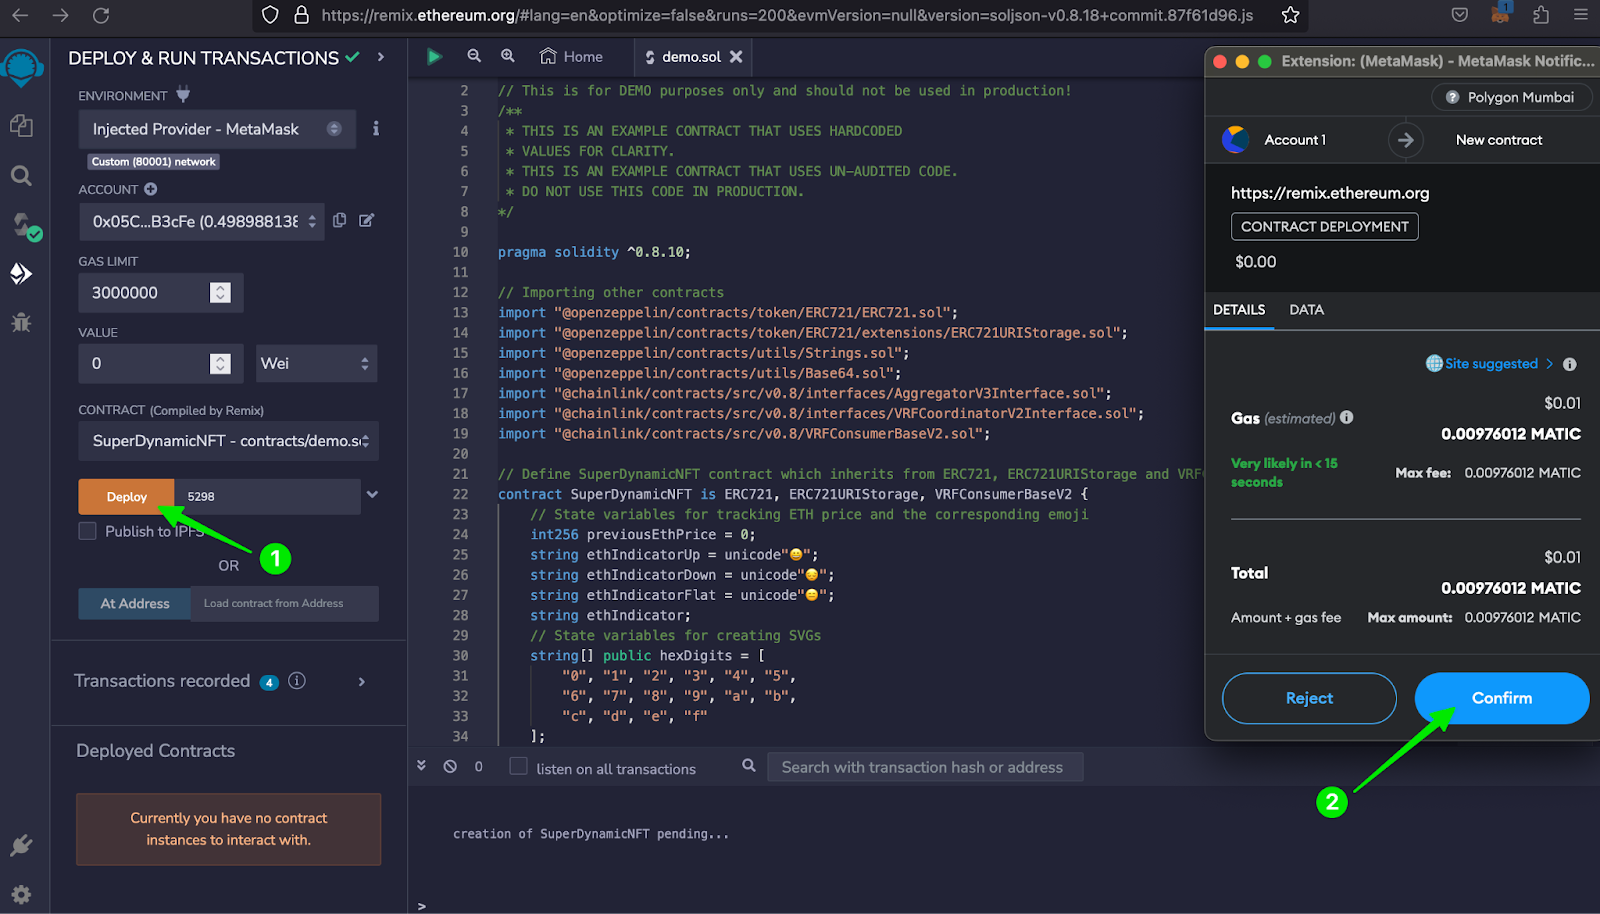
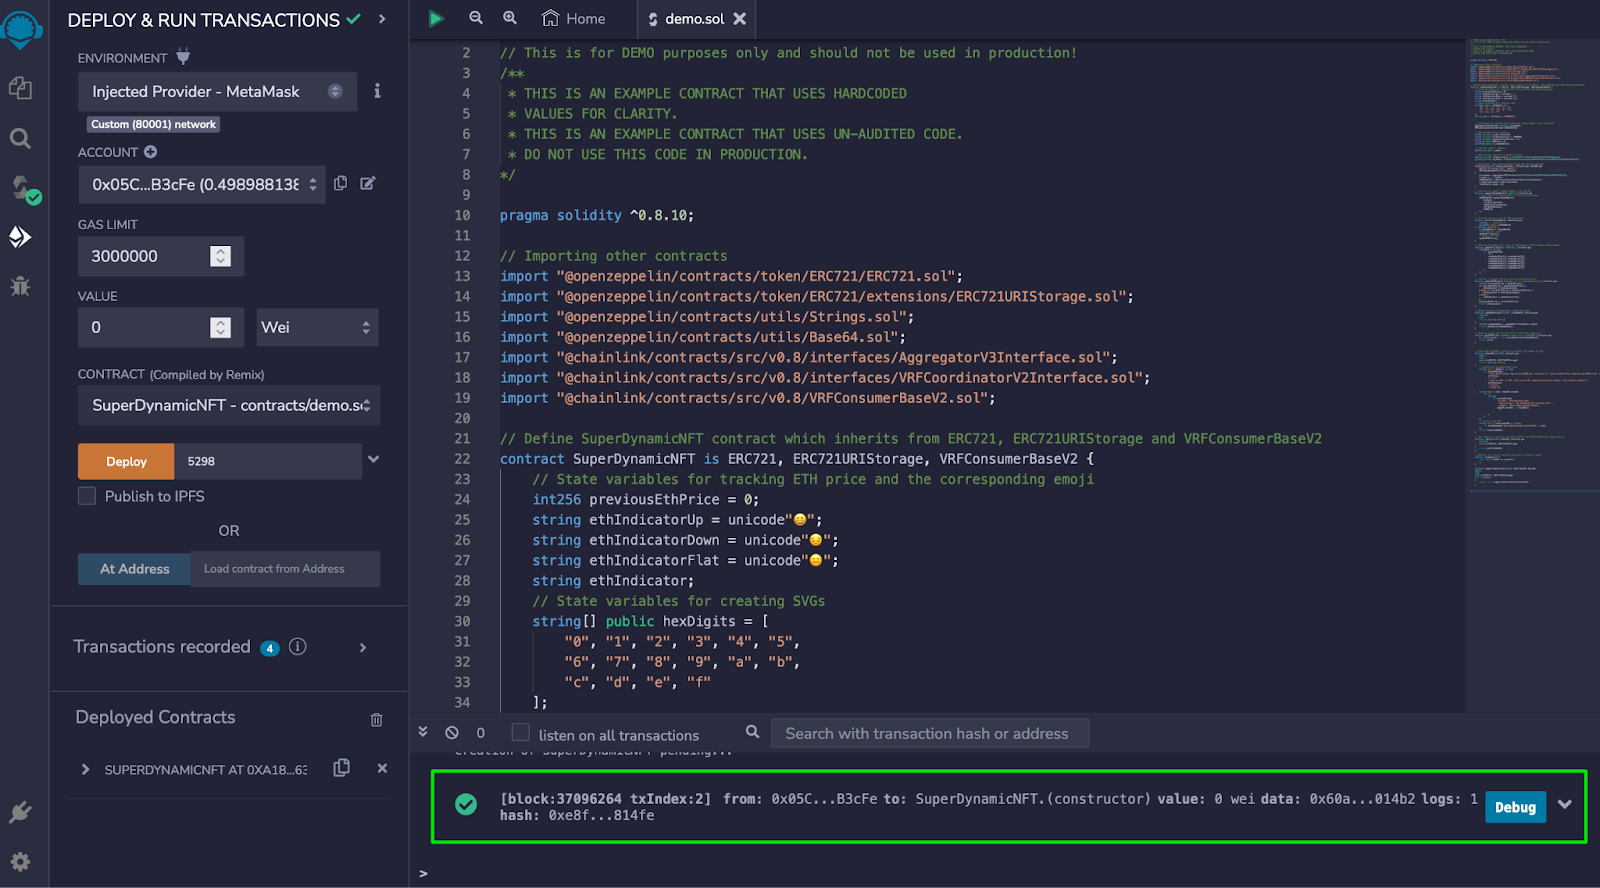
O) If you see a green checkmark in the console at the bottom of your screen, congratulations! You have successfully deployed the contract to the Polygon Mumbai blockchain!
Step 5: Add a Consumer to Your VRF Subscription
Congratulations! You’ve successfully deployed your smart contract. Now, it’s time to add the smart contract as a consumer to the VRF subscription you created in step 3.
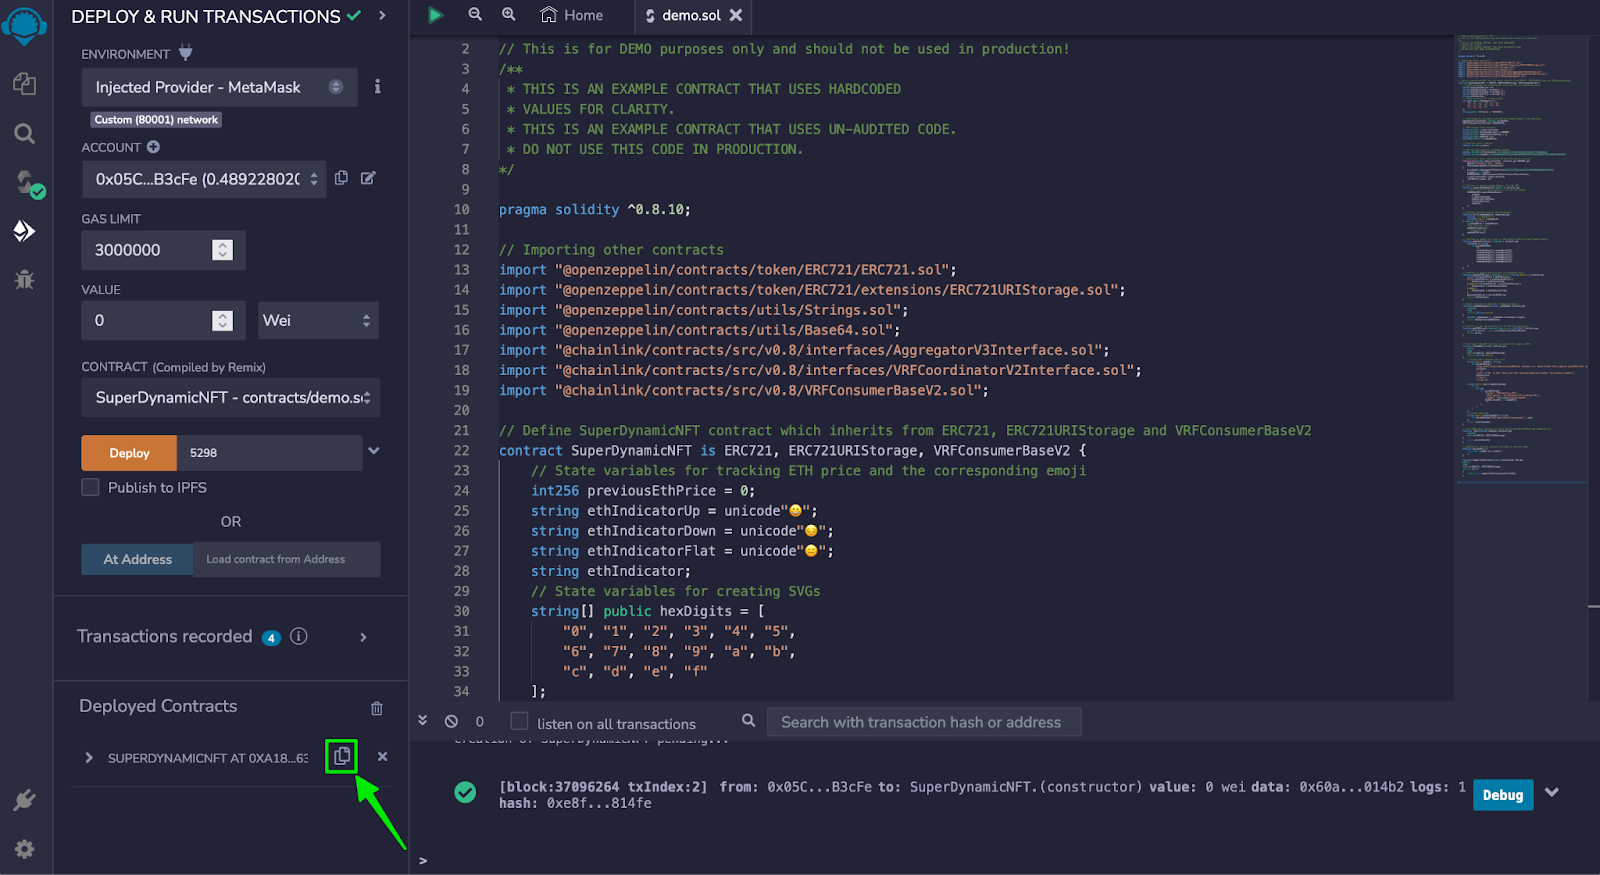
A) In Remix, copy the address of your contract.
B) Go to https://vrf.chain.link/mumbai and connect your wallet by clicking “Connect wallet” in the top right corner. If your wallet is already connected, you can skip this step.
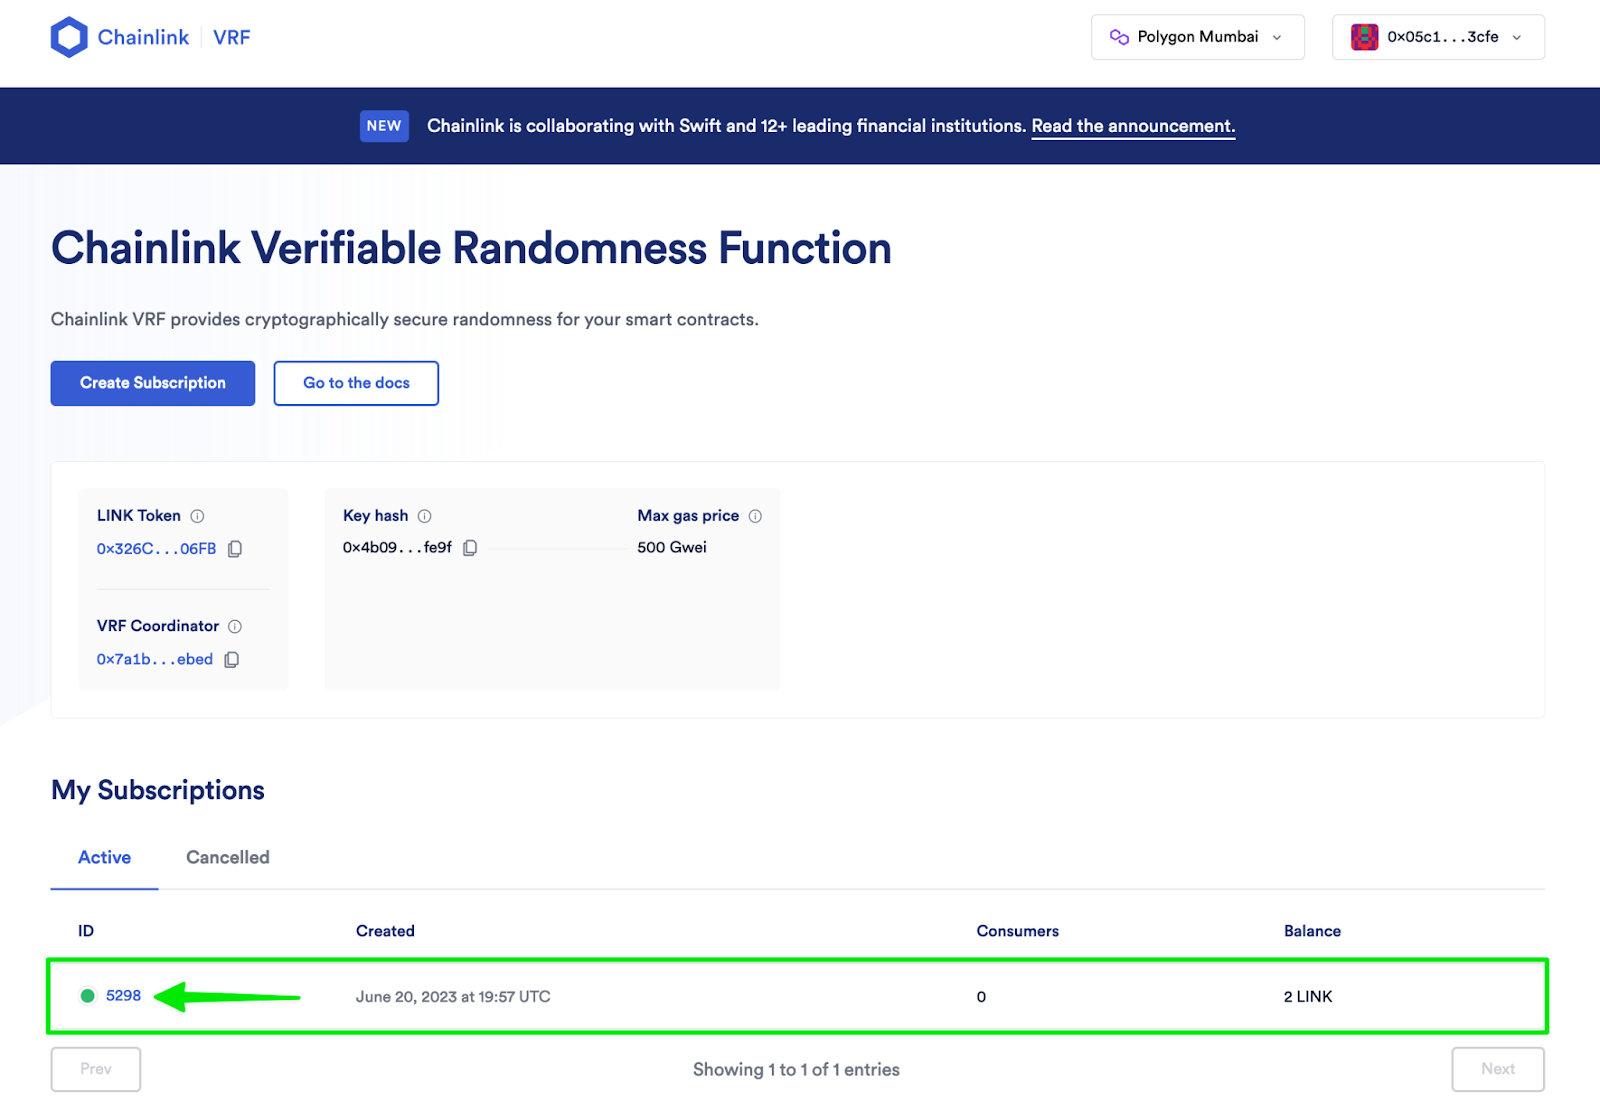
C) Click on the ID of the subscription you created in step 3. You can find your subscription under “My Subscriptions”.
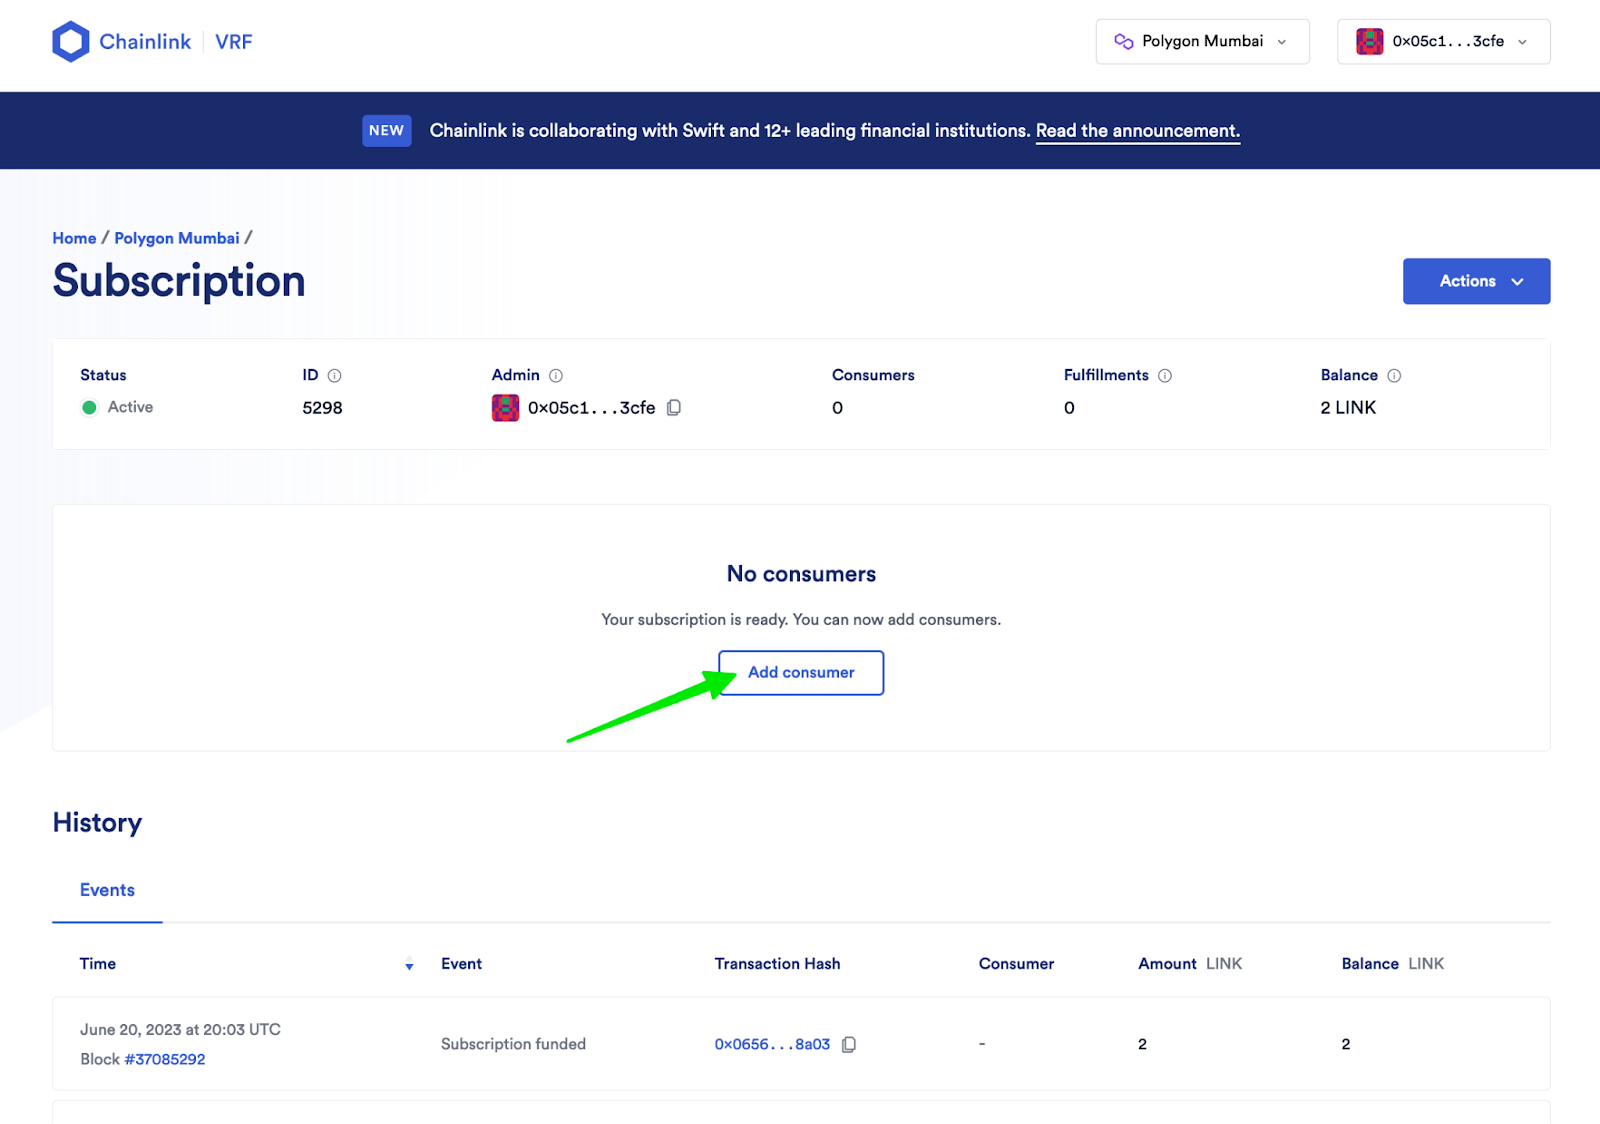
D) Click on “Add consumer” .
E) Paste the contract address in the “Consumer address” input box. This will let the subscription know about the contract you deployed.
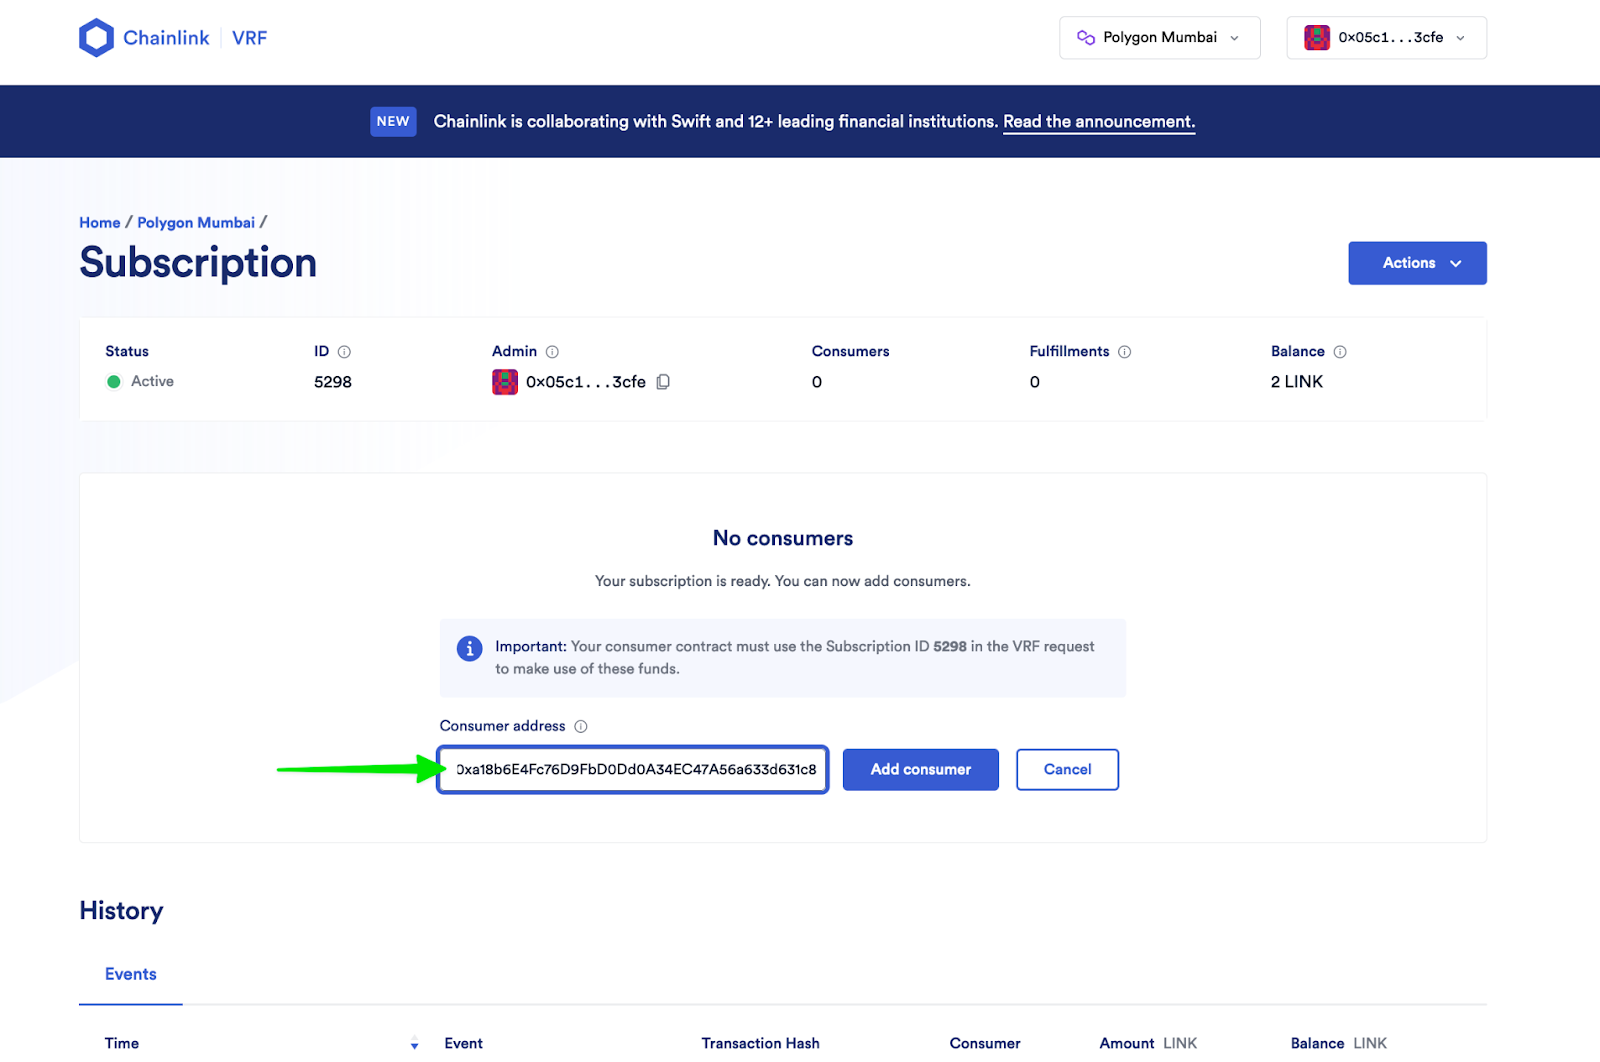
F) Click “Add consumer” and follow the prompts in MetaMask.
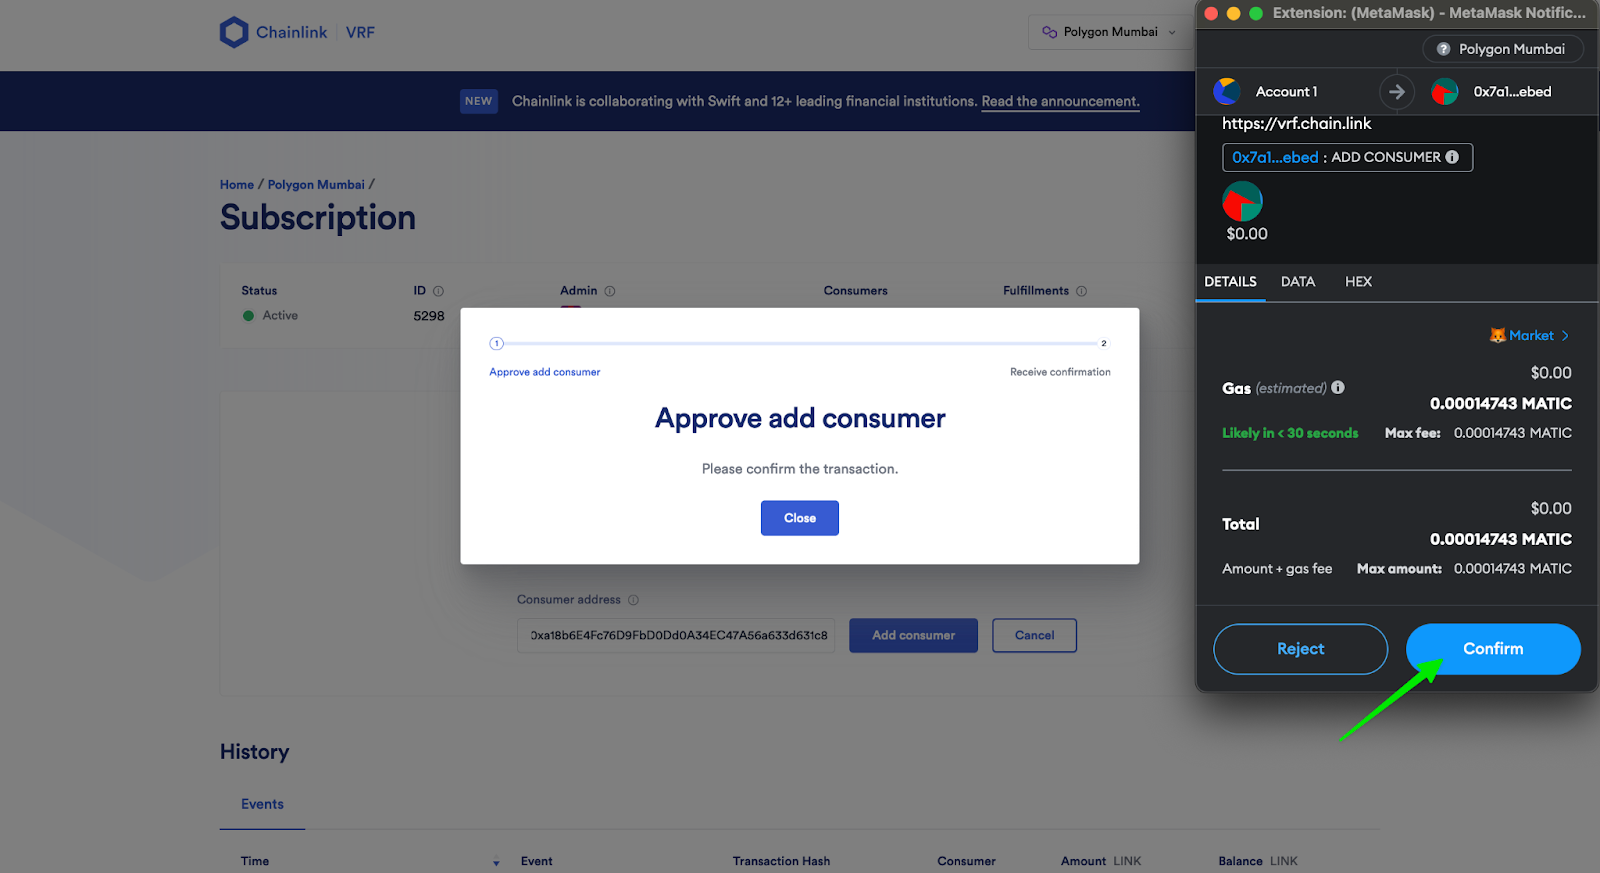
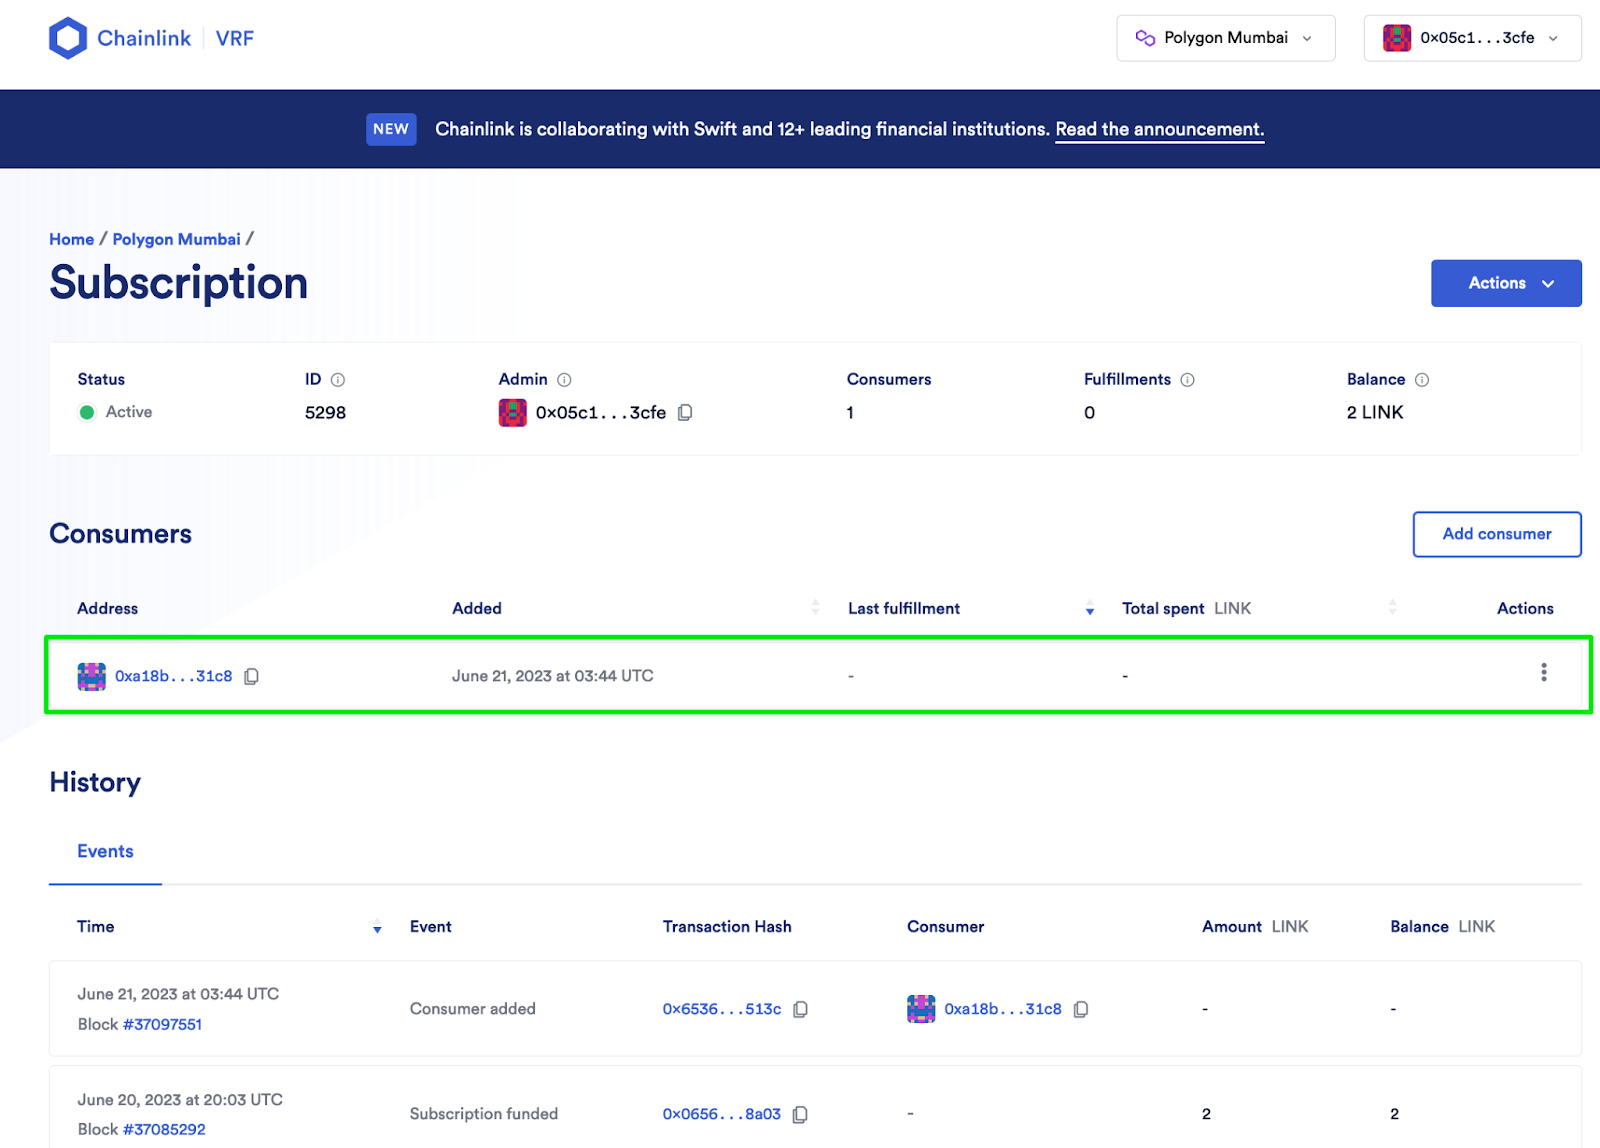
G) Click “Close” once the transaction is confirmed and refresh the page. You have successfully completed this step if you see a consumer added to your subscription like in the image below.
Step 6: Automate Your NFT With Chainlink Automation
In this step, you will create a time-based upkeep using Chainlink Automation to dynamically update the background color and the emoji of your NFT.
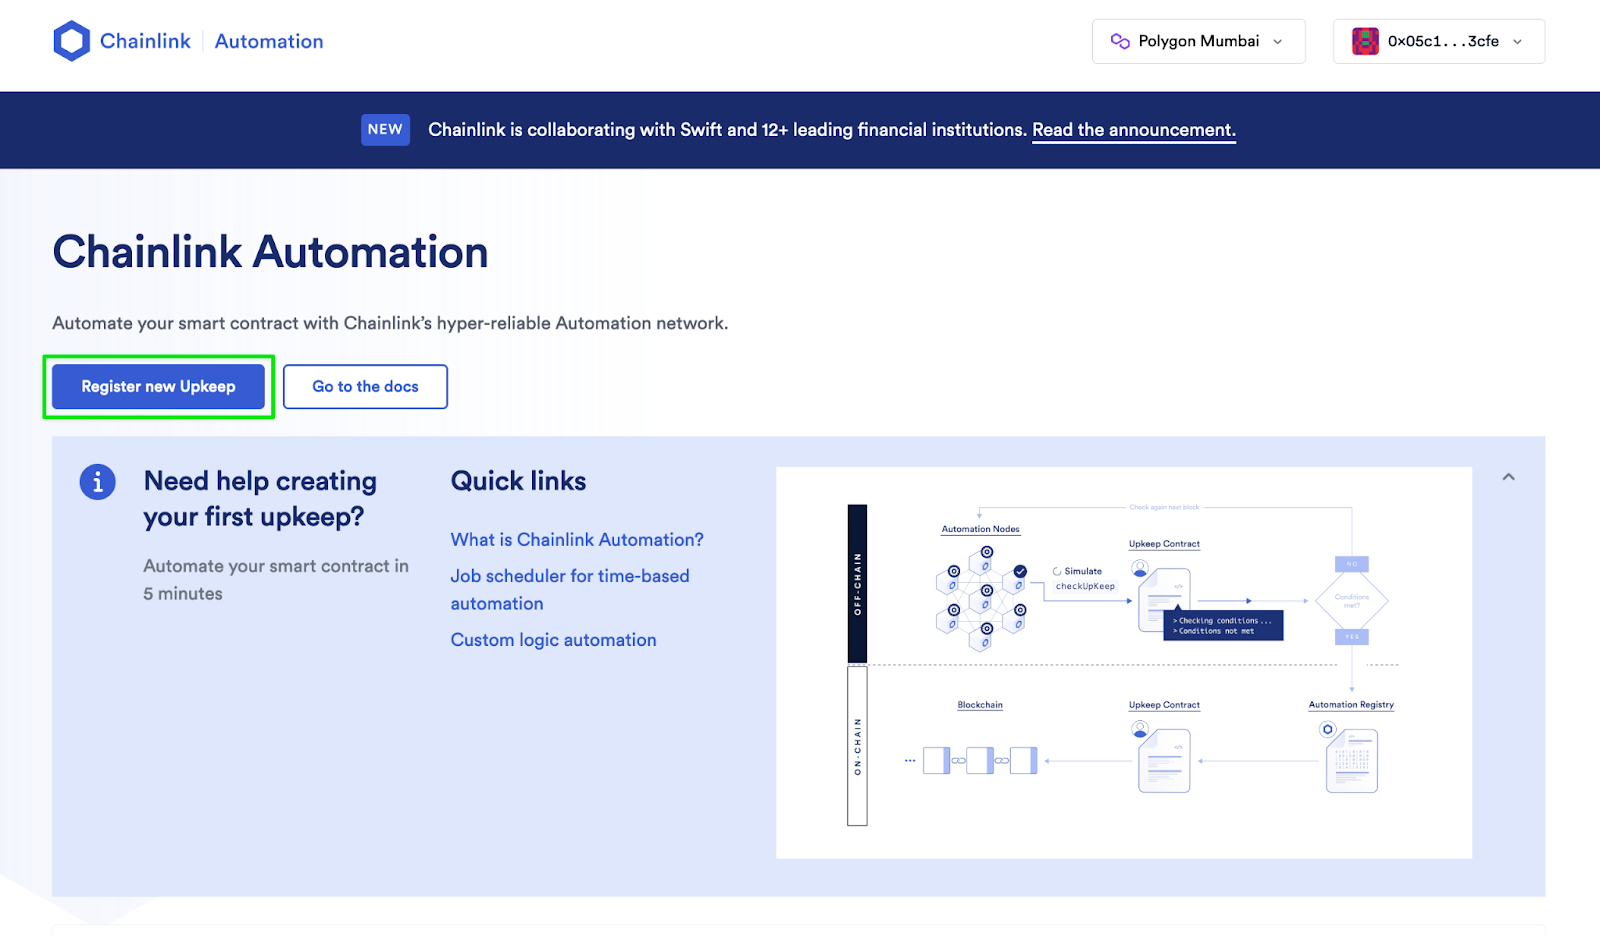
A) Go to https://automation.chain.link/mumbai and connect your wallet by clicking “Connect wallet” in the top right corner. If your wallet is already connected, you can skip this step.
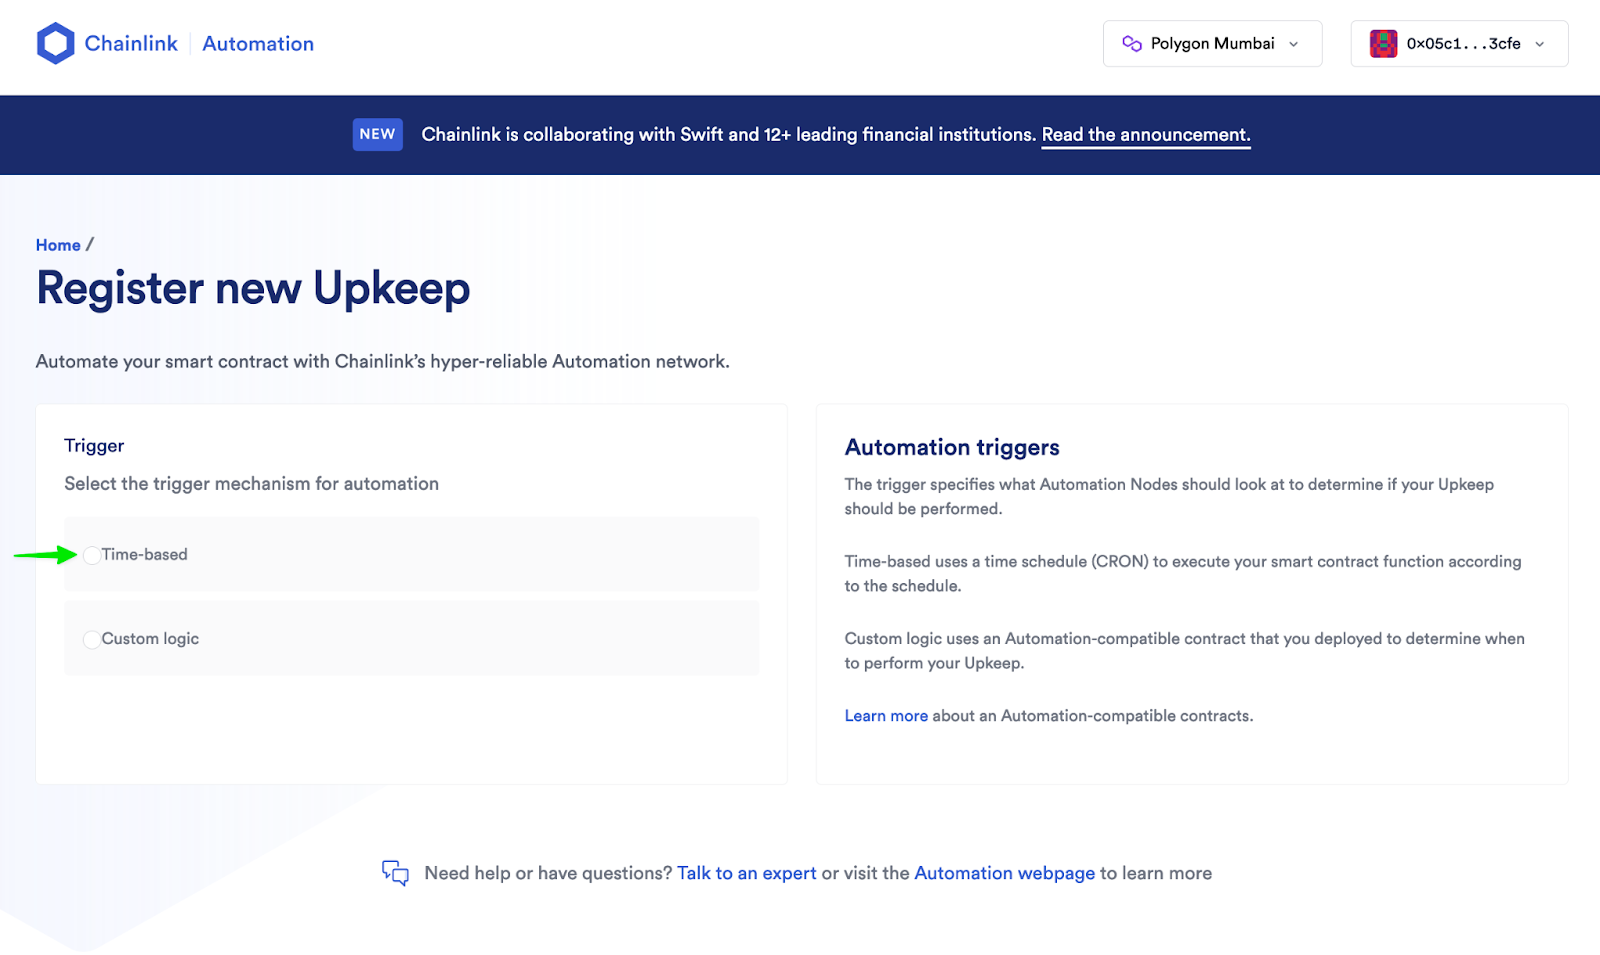
B) Click on “Register new Upkeep”.
C) Select “Time-based”.
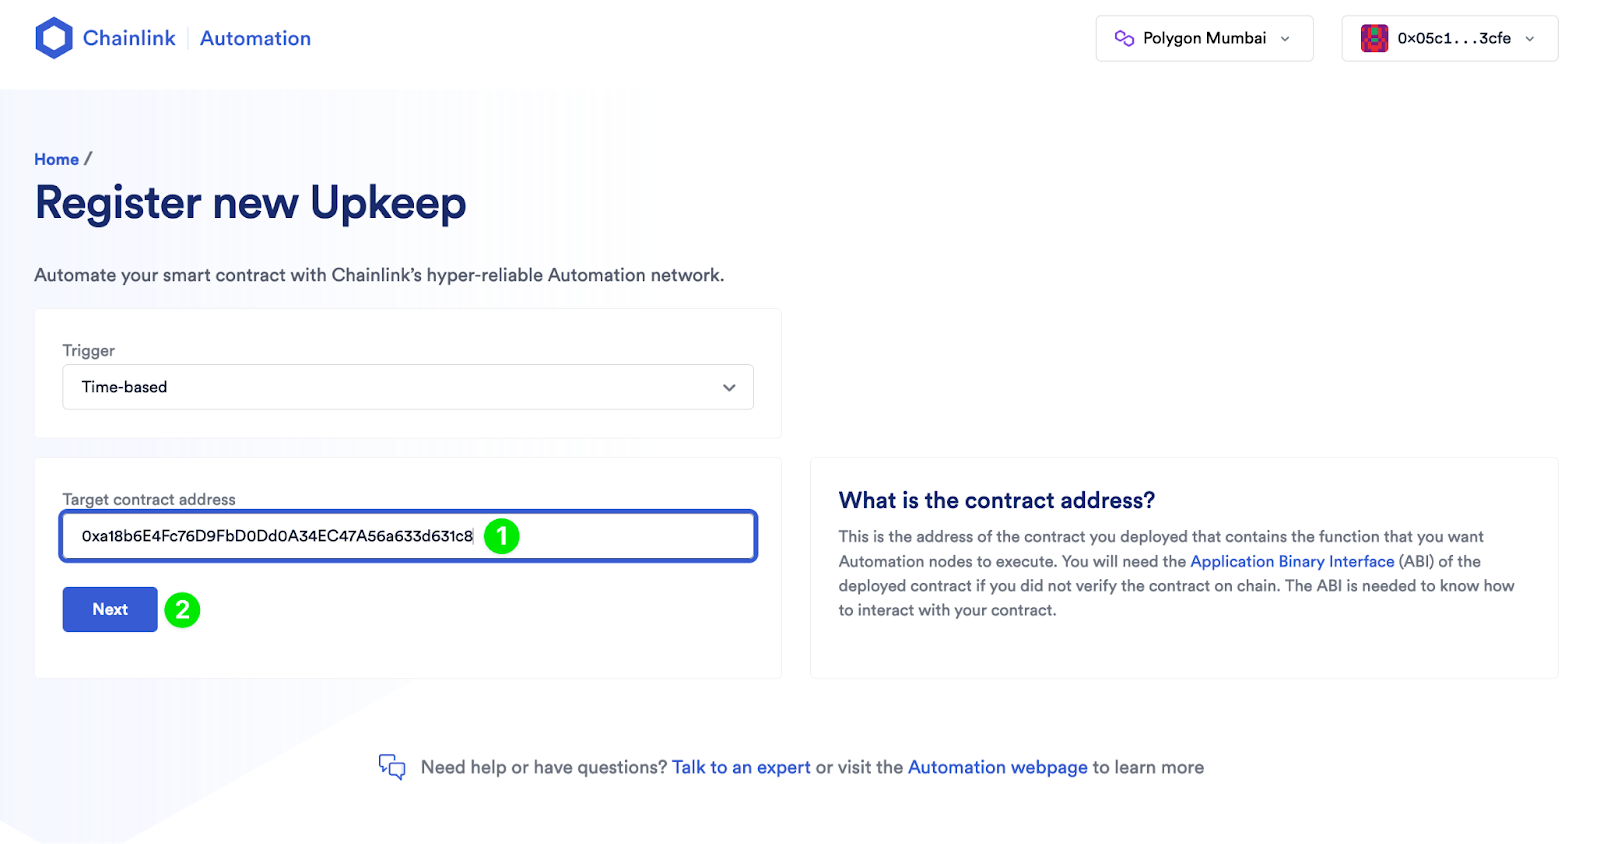
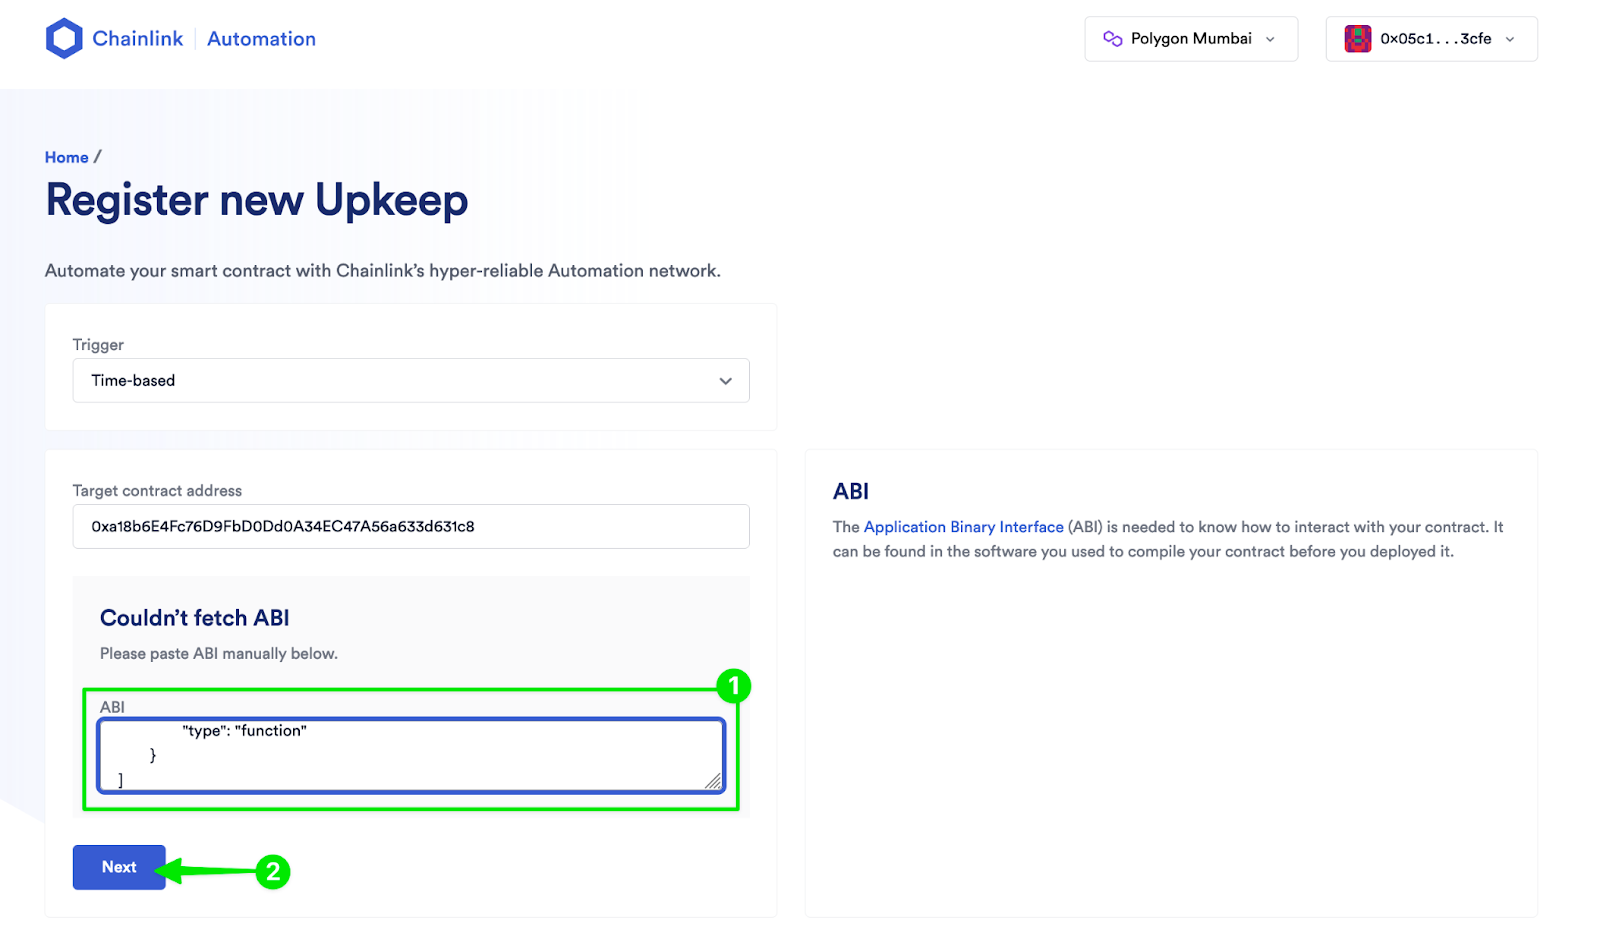
D) Paste in your contract address and click “Next” (refer to step 5A if you need help finding your contract address).
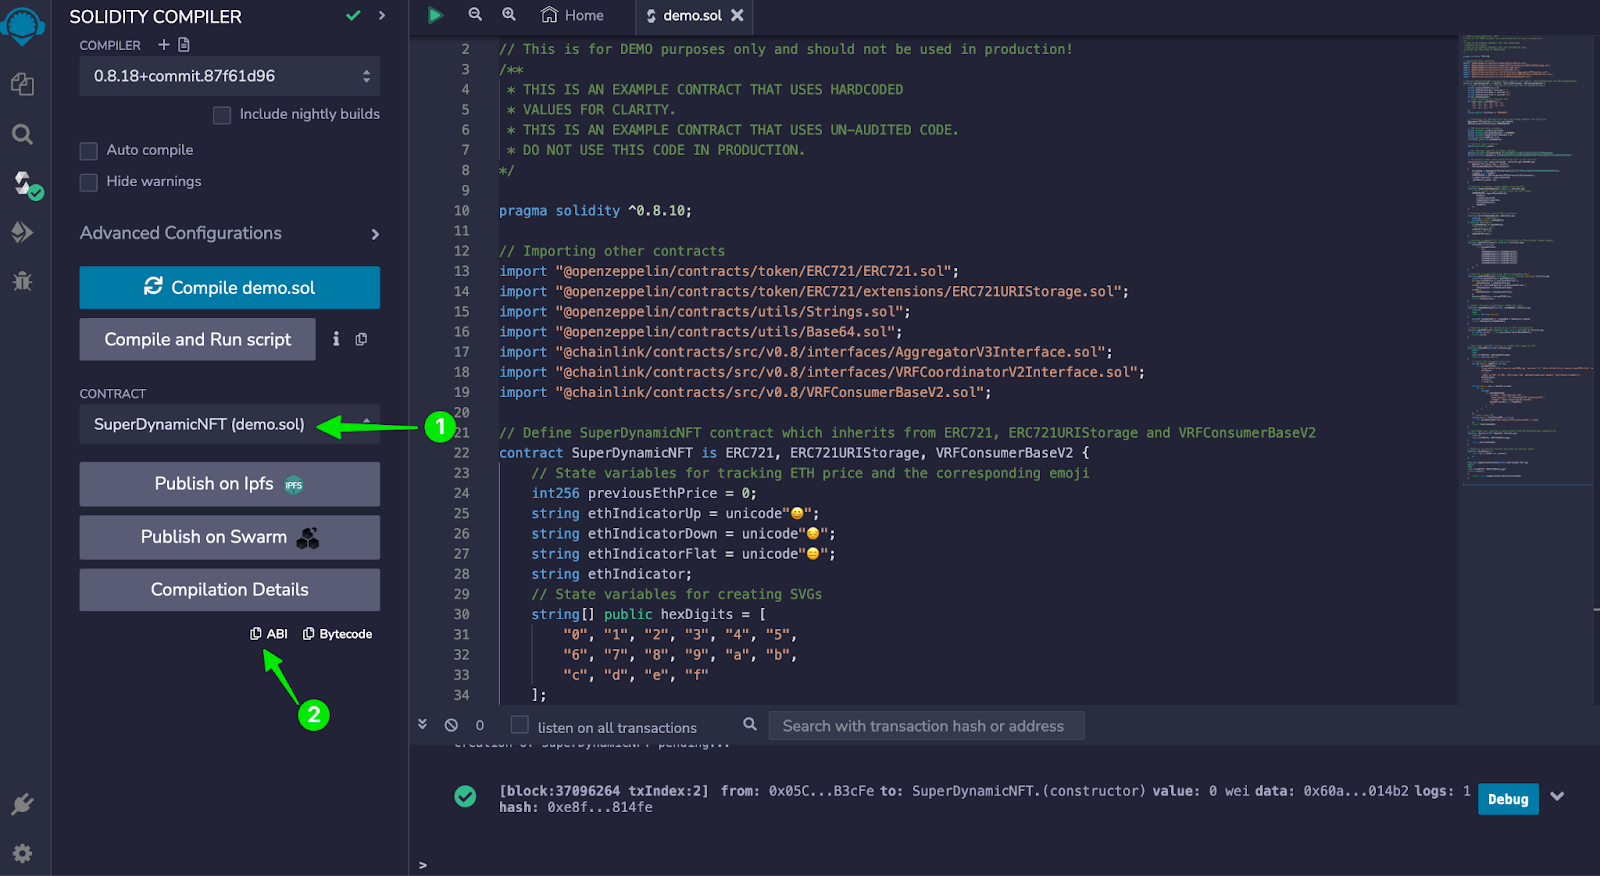
E) You are going to receive an alert with the following text: “Couldn’t fetch ABI.” In a separate tab, head back to Remix and select the “Solidity compiler” tab in the left sidebar.
F) Make sure your contract is selected in the “Contract” dropdown and click on the “Copy ABI” button.
G) Go back to your upkeep registration and paste the ABI in the input box and click “Next”.
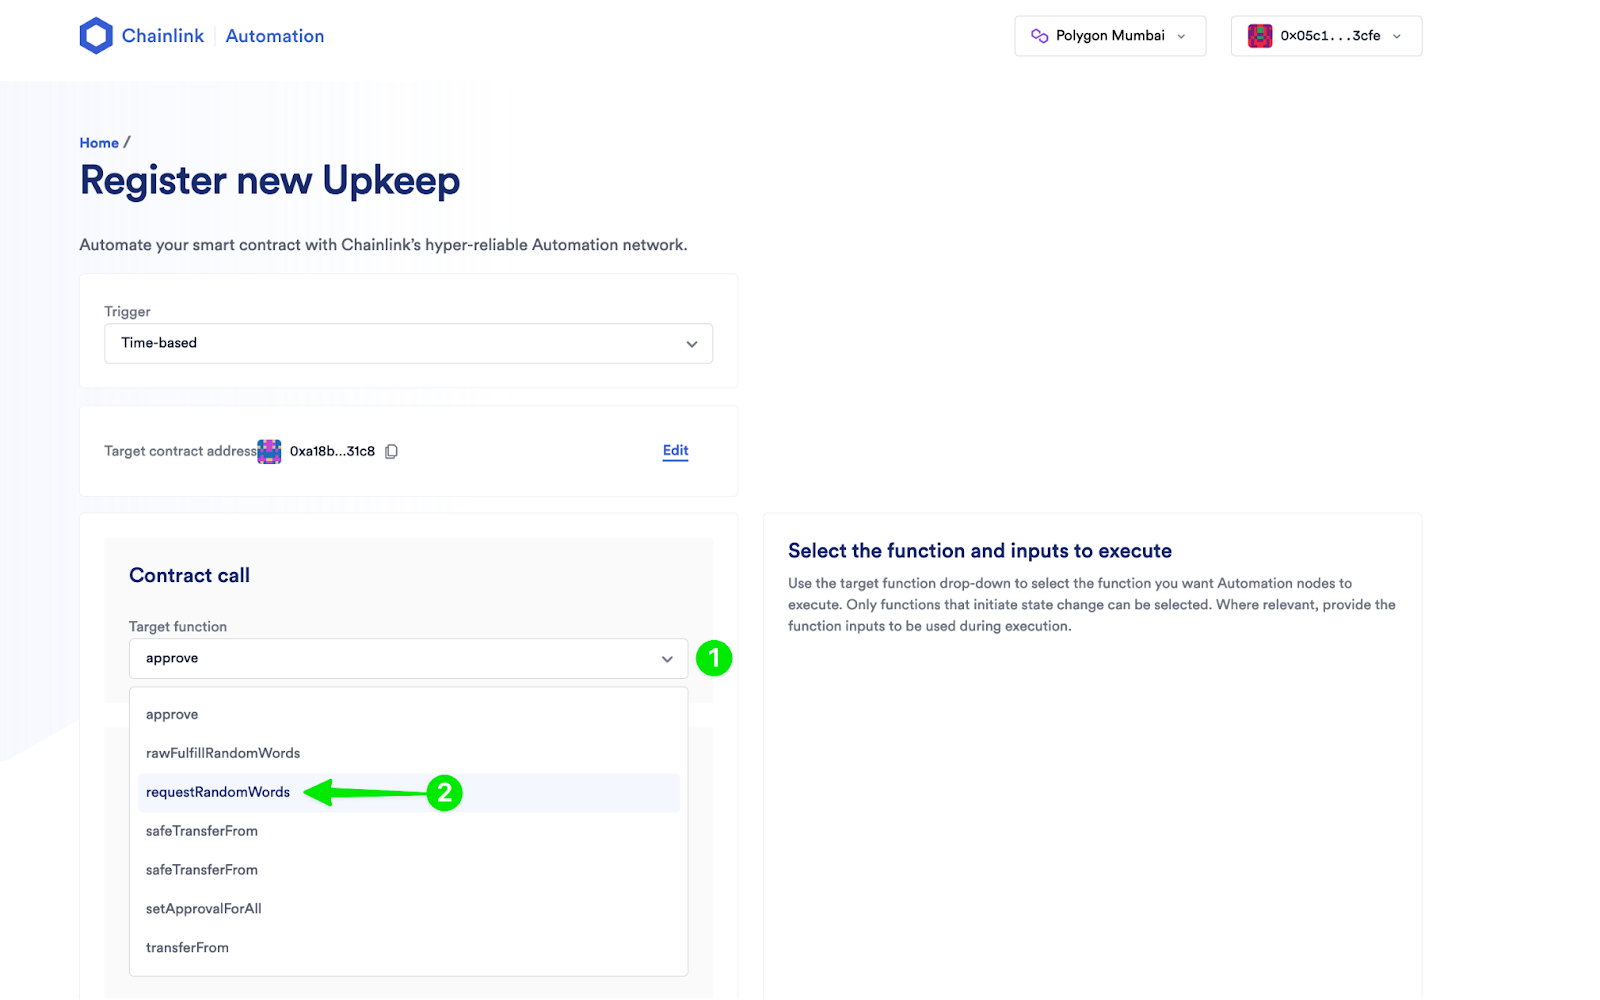
H) Under “Target function,” select “requestRandomWords” and click “Next”.
I) Under “Specify your time schedule,” enter the following CRON expression to generate a new background color for your NFT every 2 minutes: */2 * * * * .
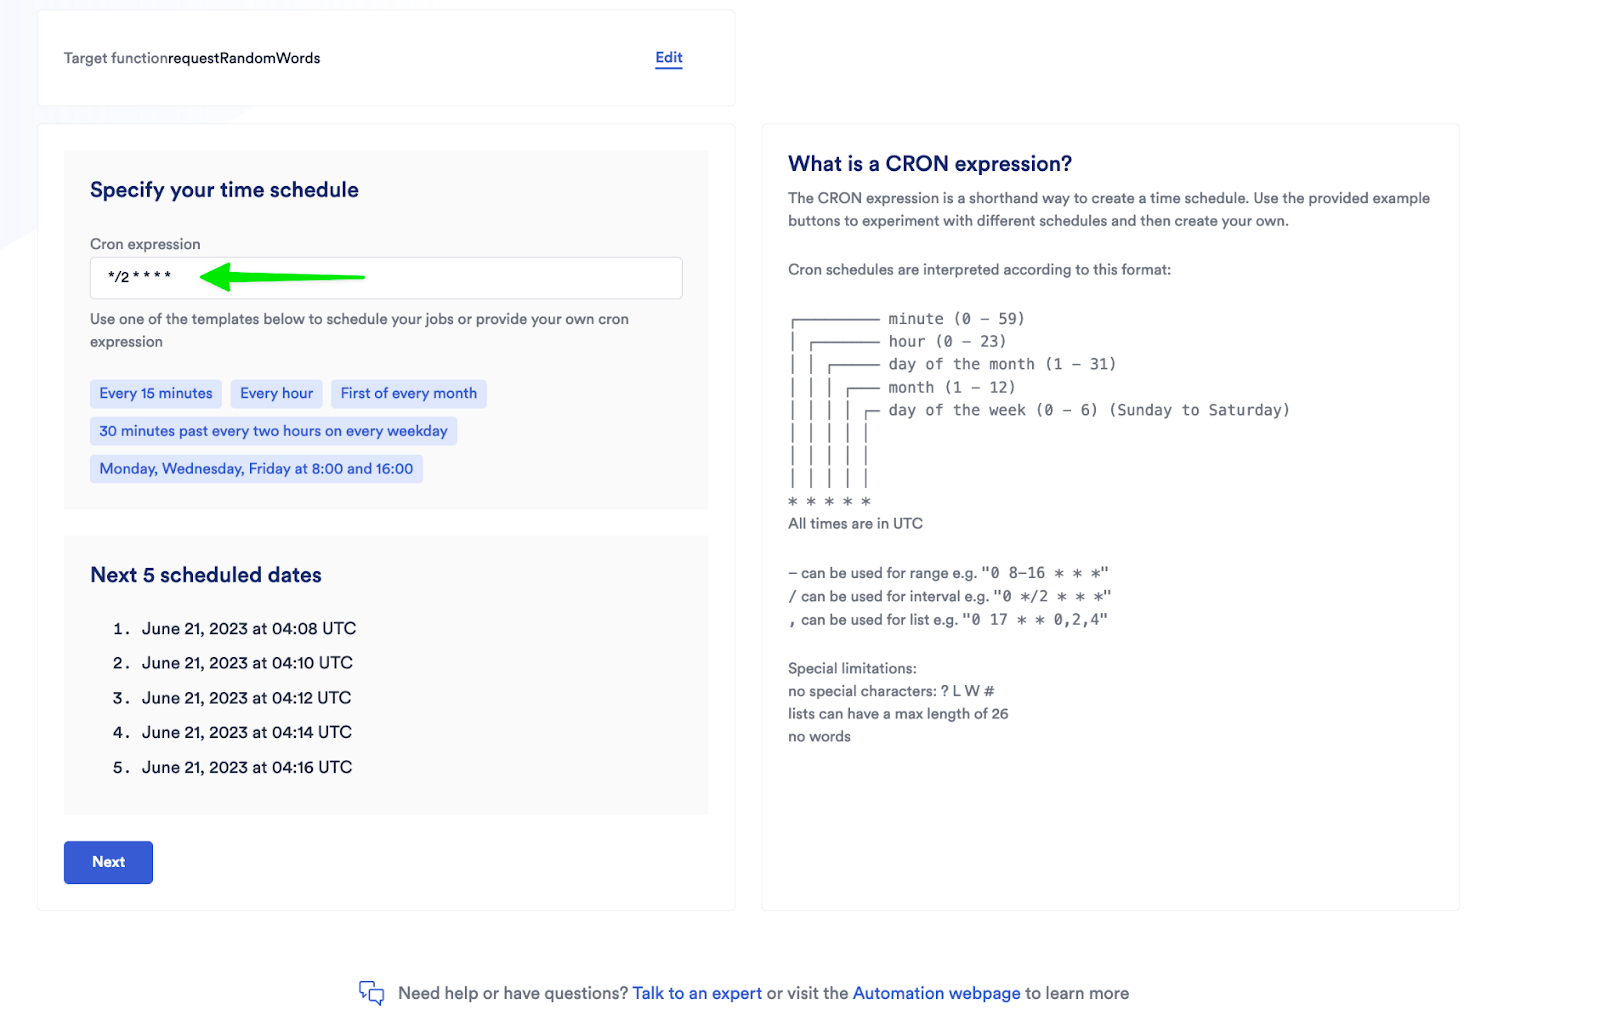
J) Click “Next”.
K) Give your upkeep a name (e.g. Dynamic NFT Demo) and enter a starting balance of 2 LINK.
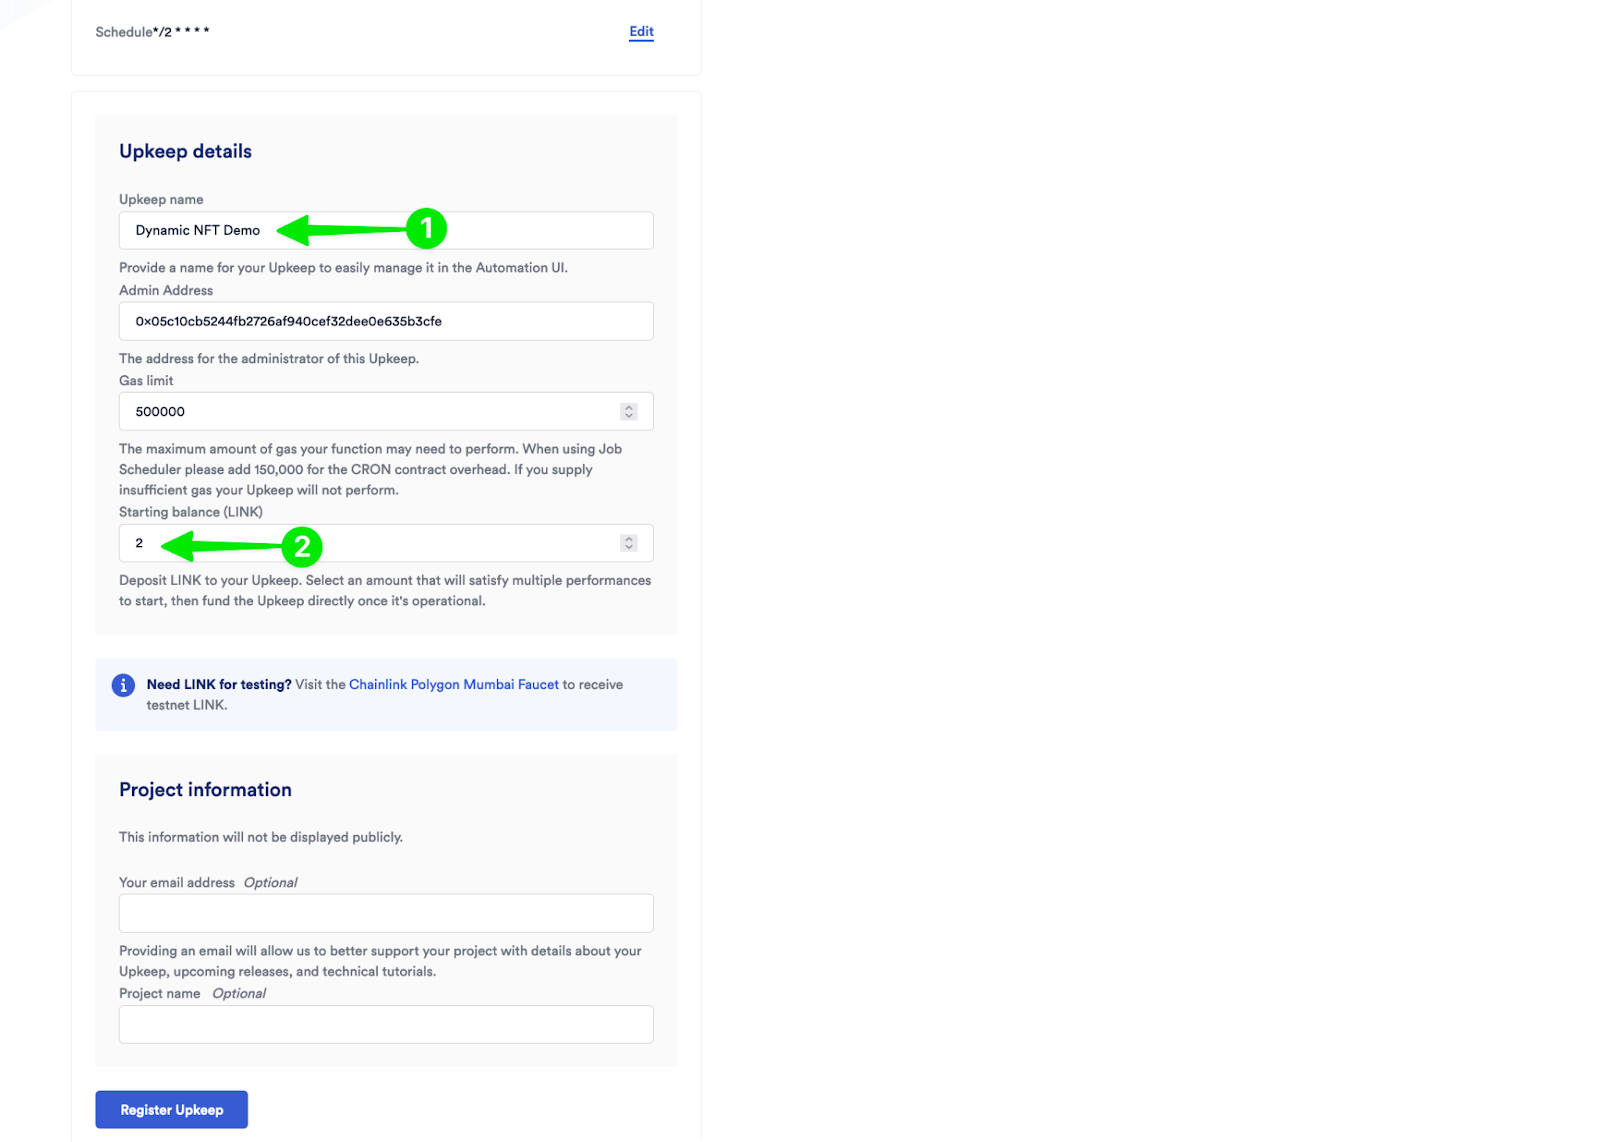
L) Click on “Register Upkeep” and approve the transaction to deploy the CRON job contract in MetaMask.

M) Once the transaction is approved, MetaMask will prompt you to confirm a second transaction to “Request time-based upkeep registration”.
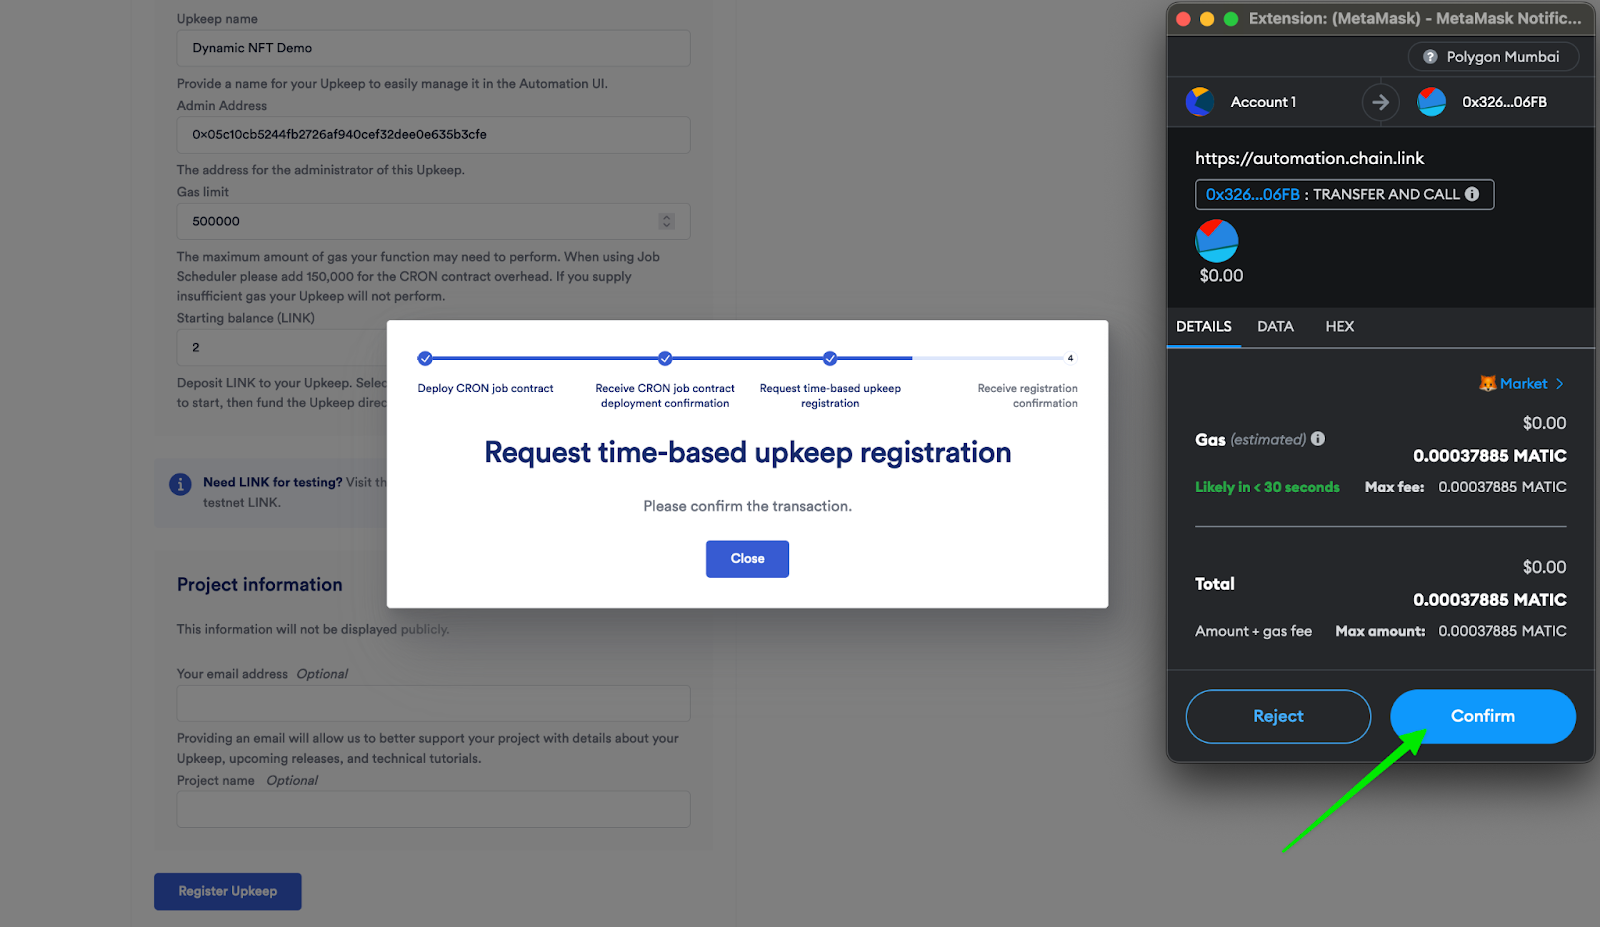
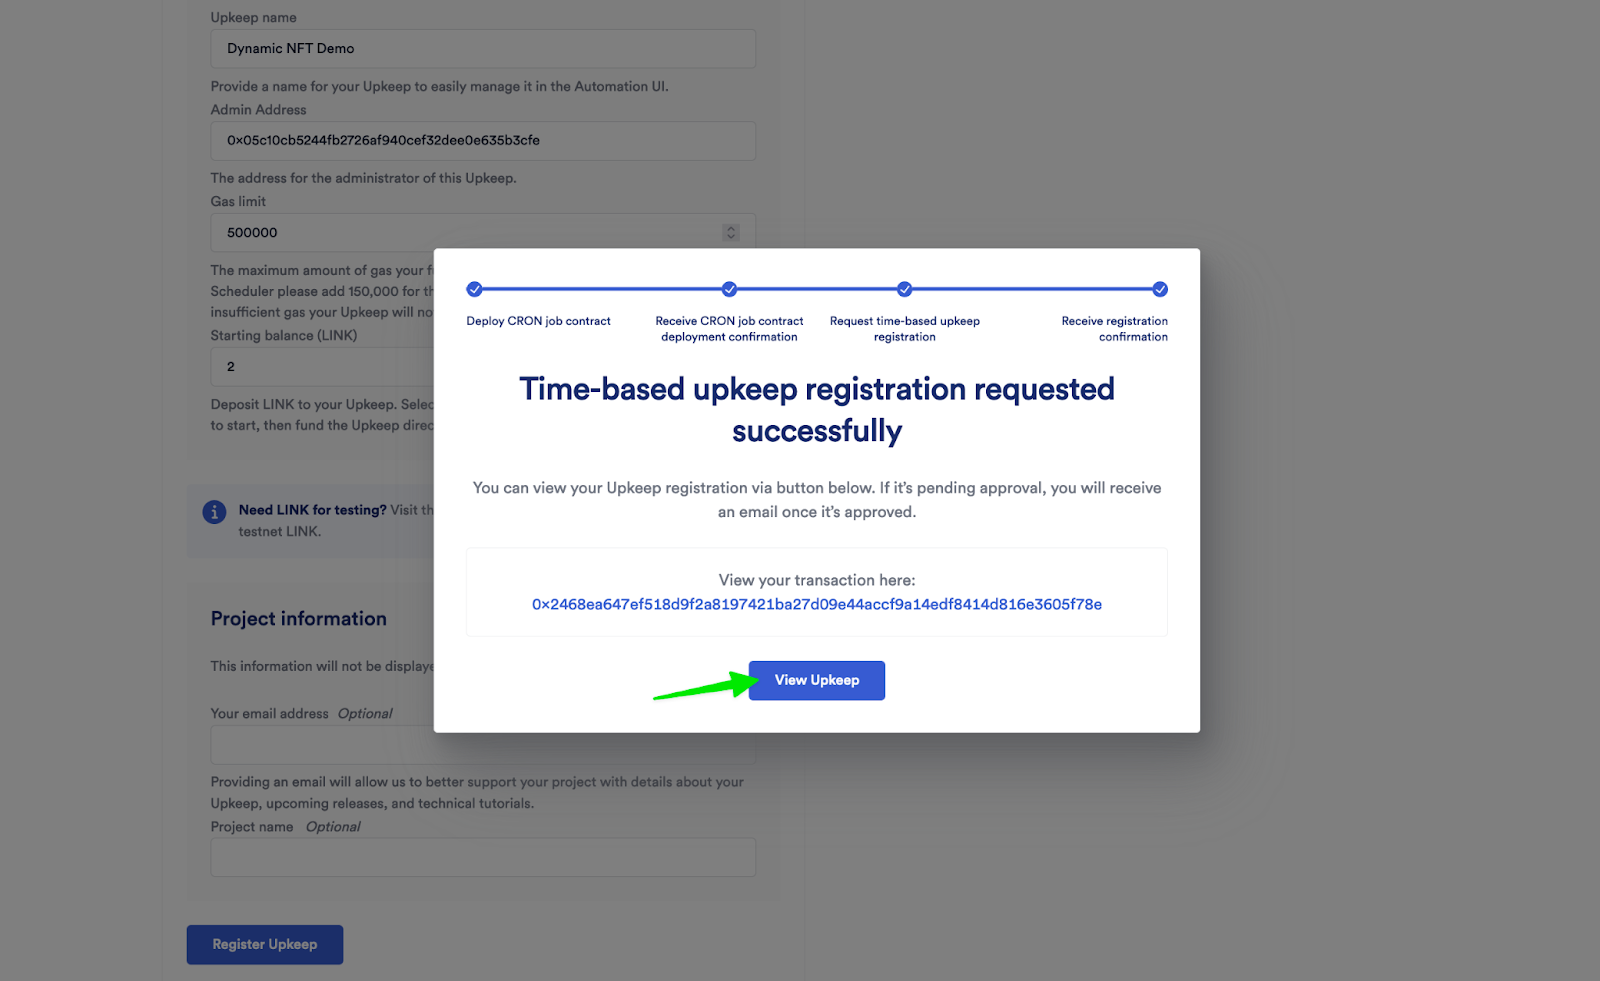
N) Wait for the transaction to be confirmed and click on “View Upkeep”.
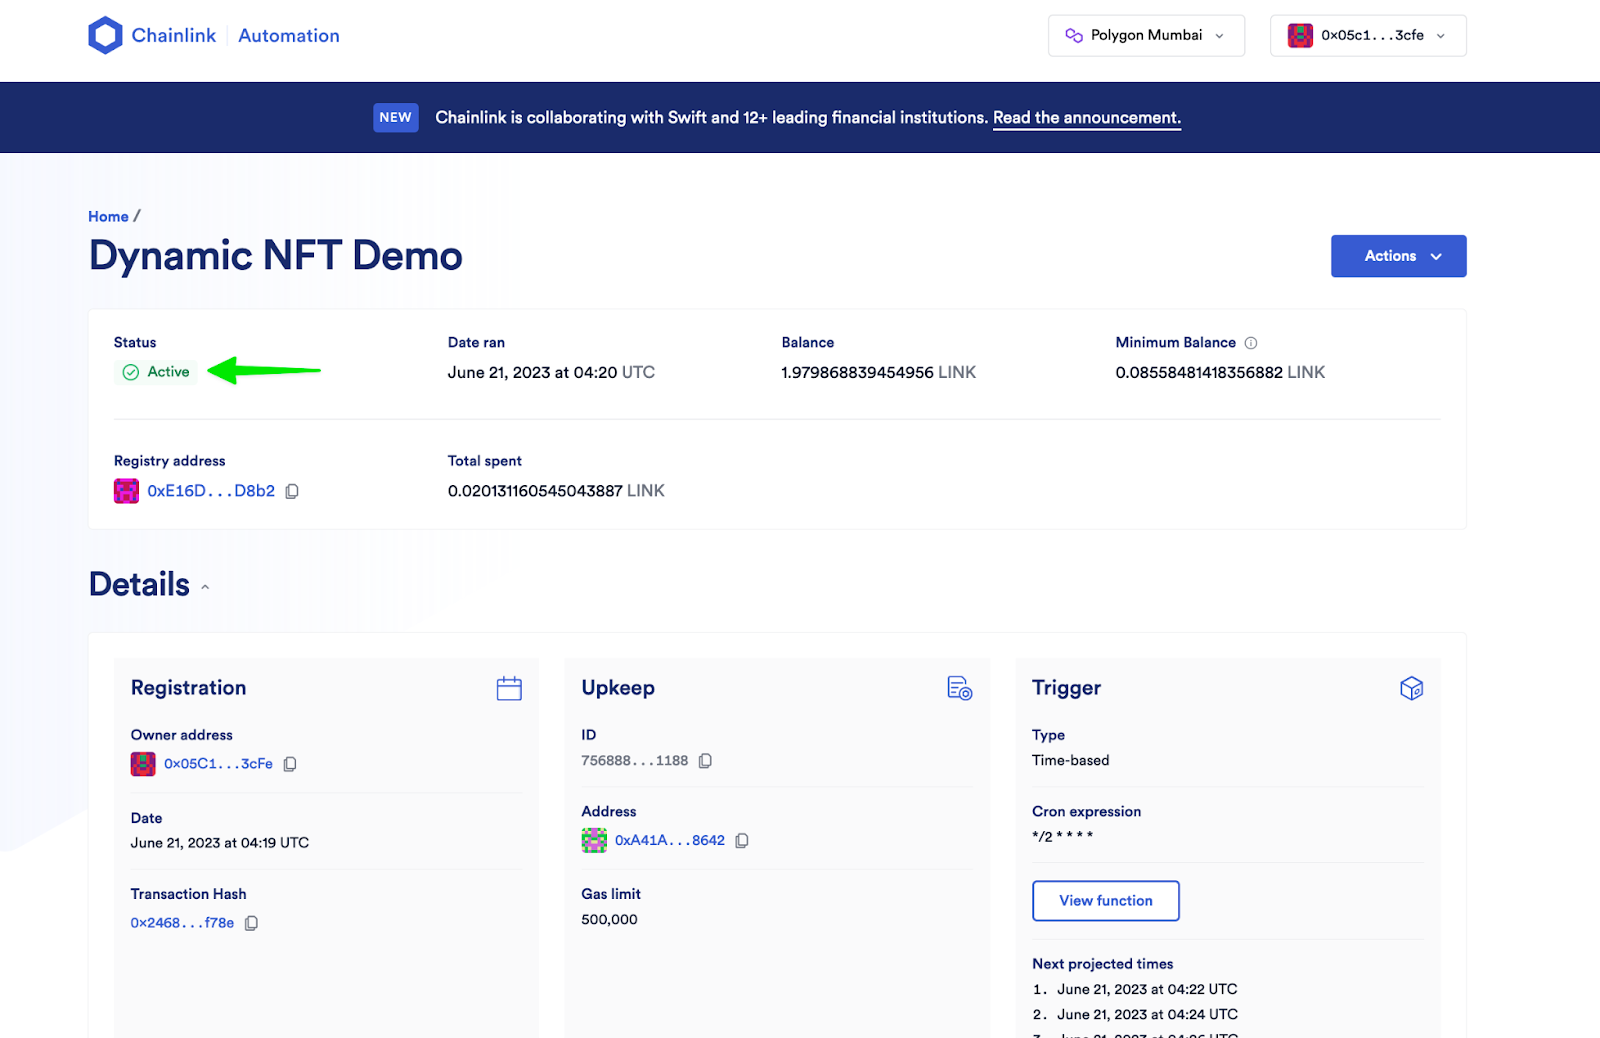
O) You have successfully completed this step if you see “Active” under the status of your newly created upkeep. Congratulations!
Step 7: View Your NFT on OpenSea
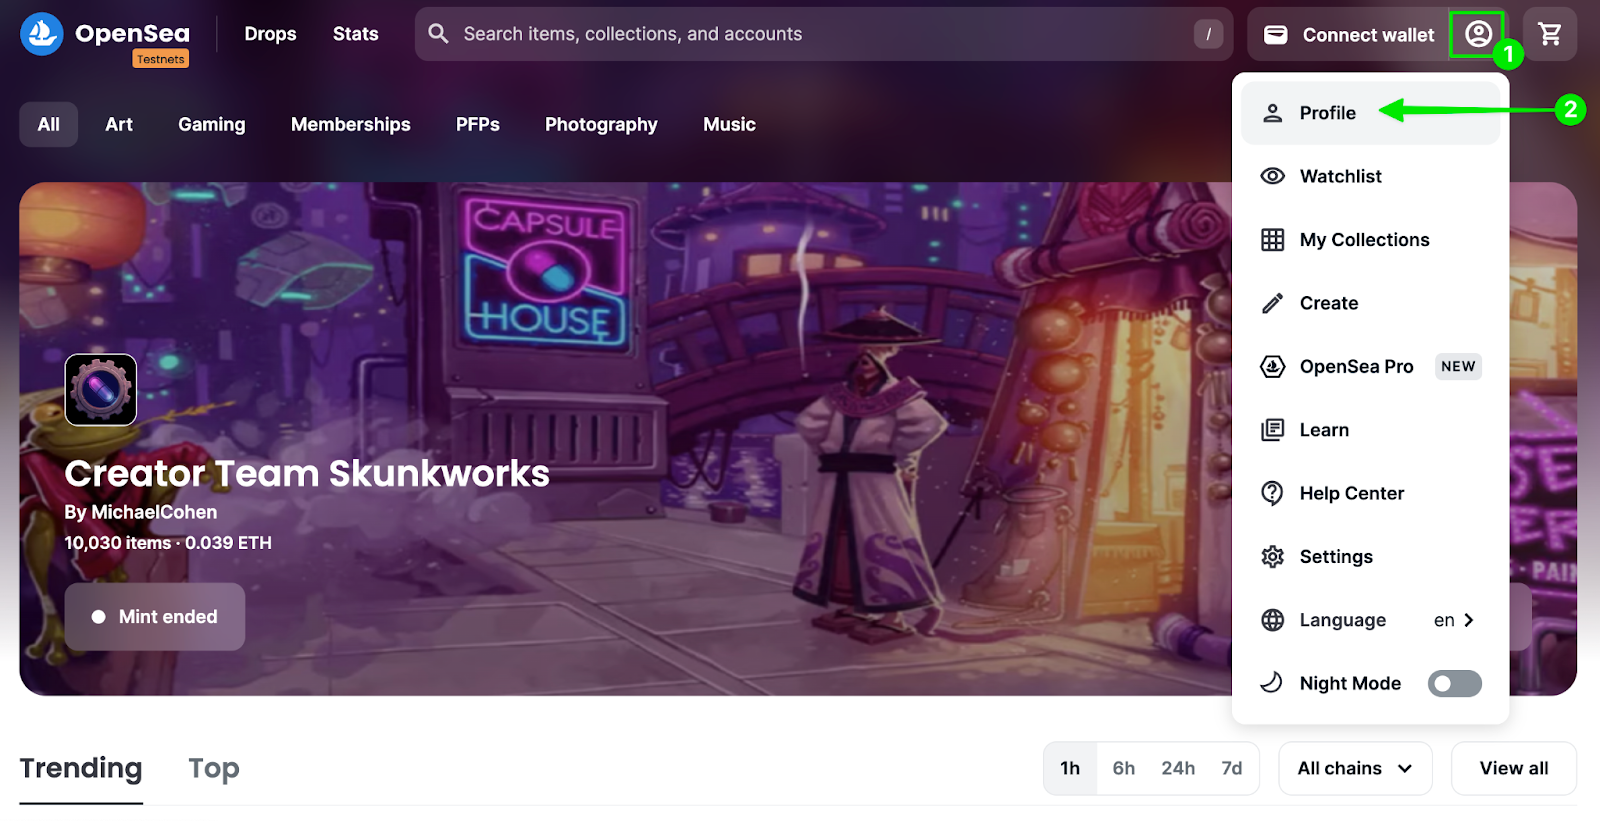
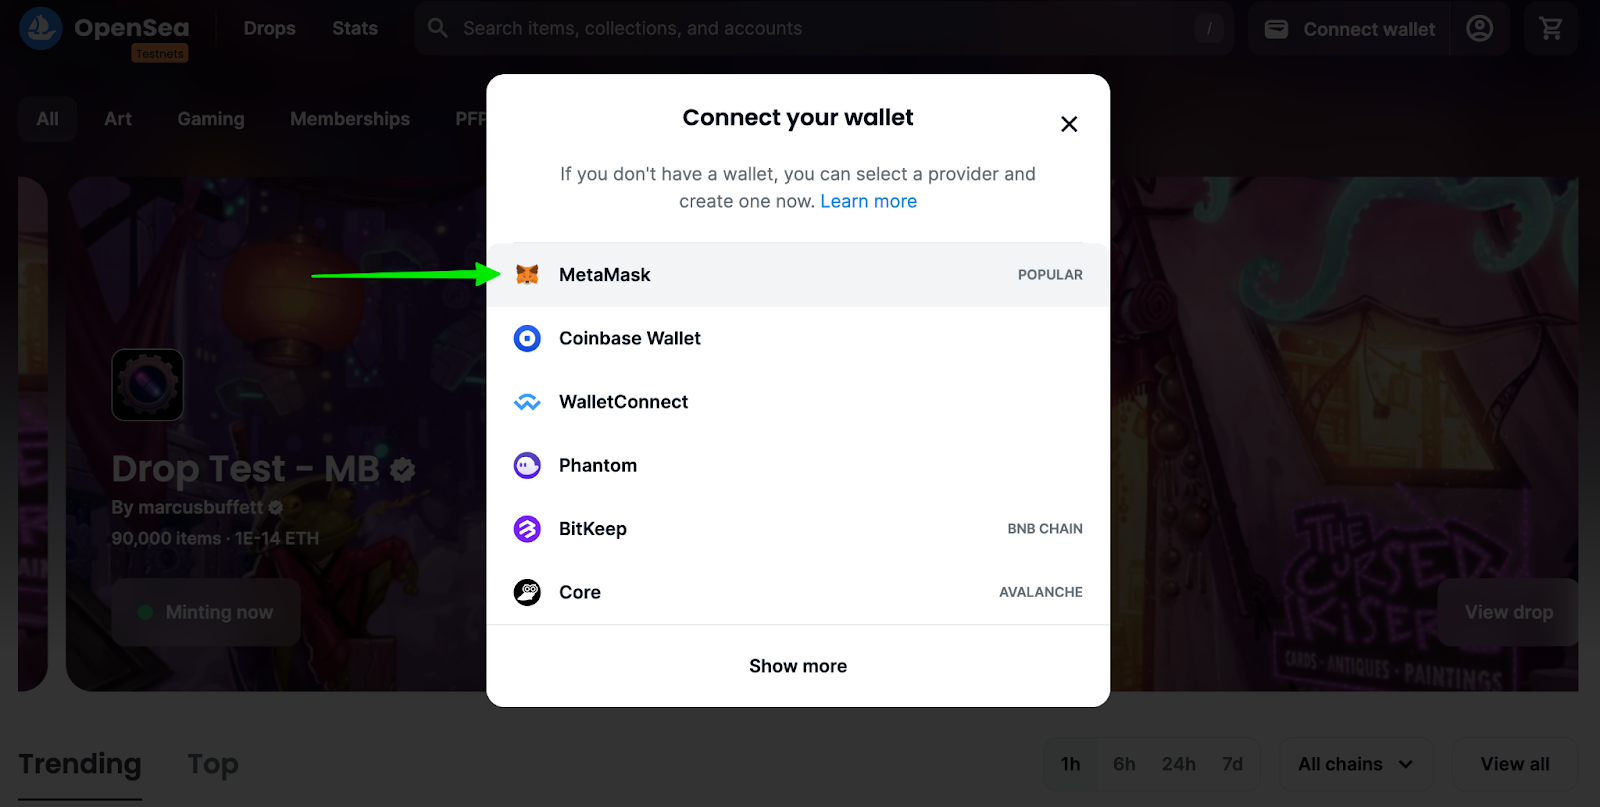
A) Go to https://testnets.opensea.io/ and select “Profile” from the drop-down menu in the top right corner.
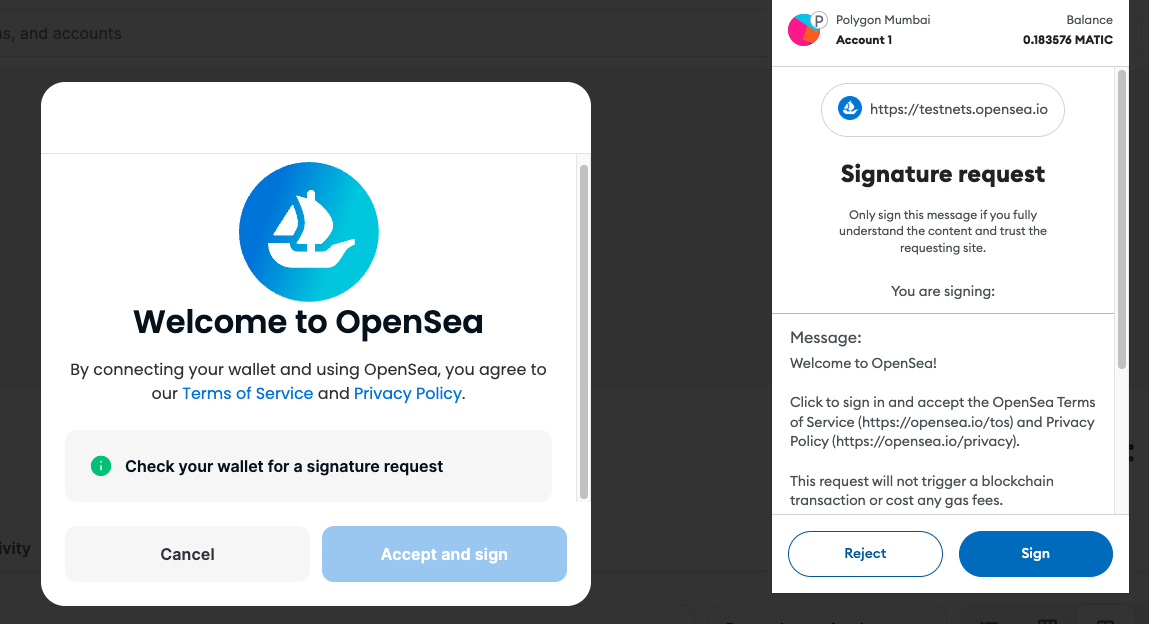
B) Connect your wallet as shown below. You may have to sign a transaction from OpenSea.
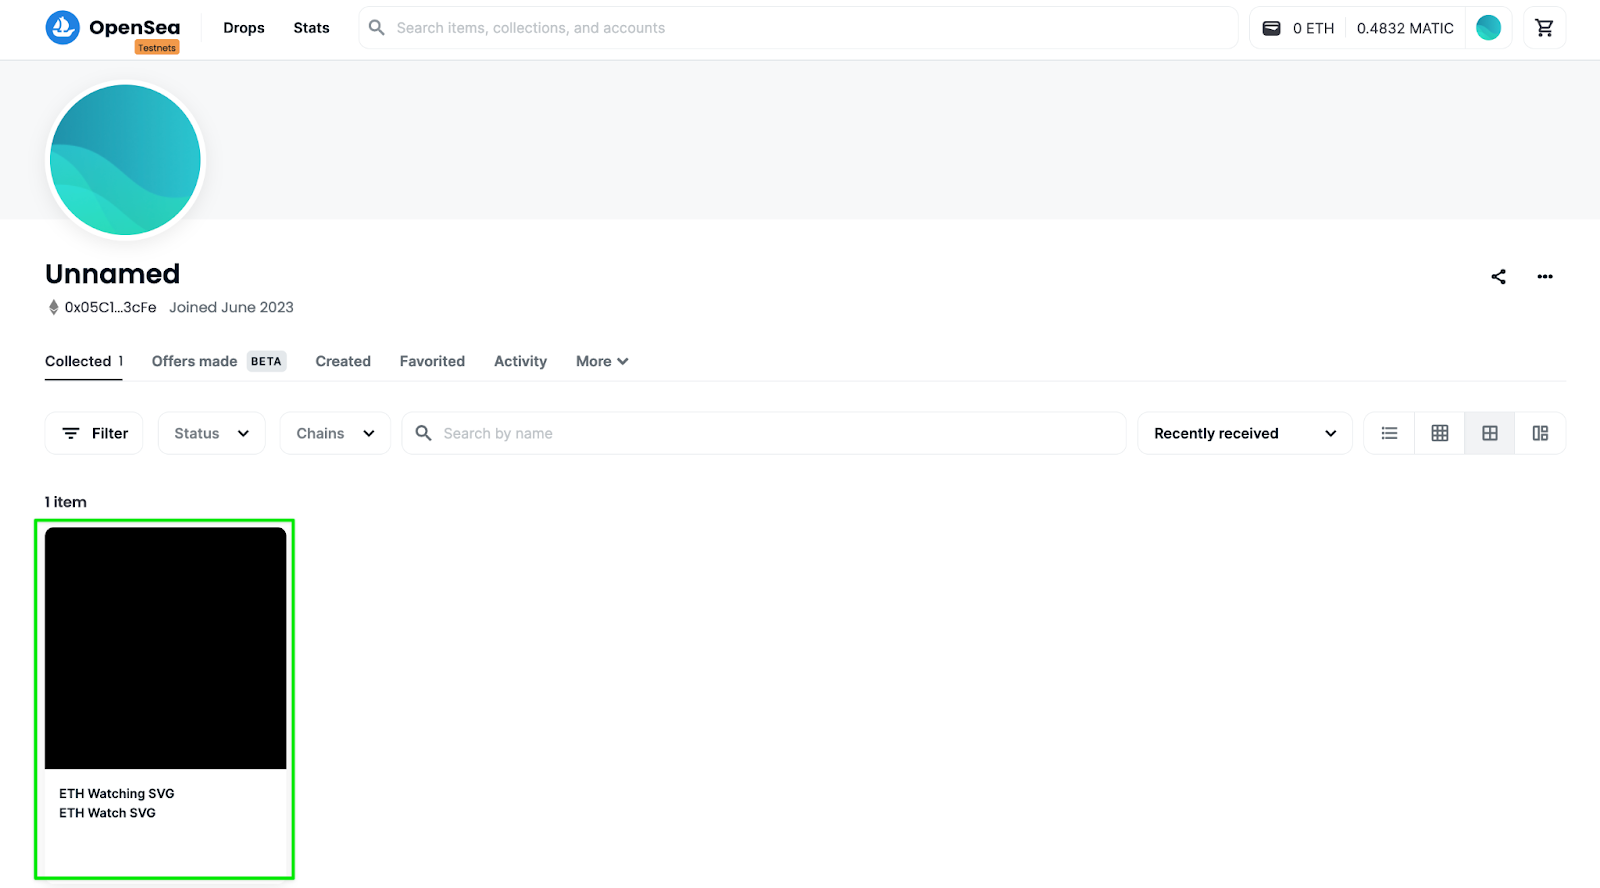
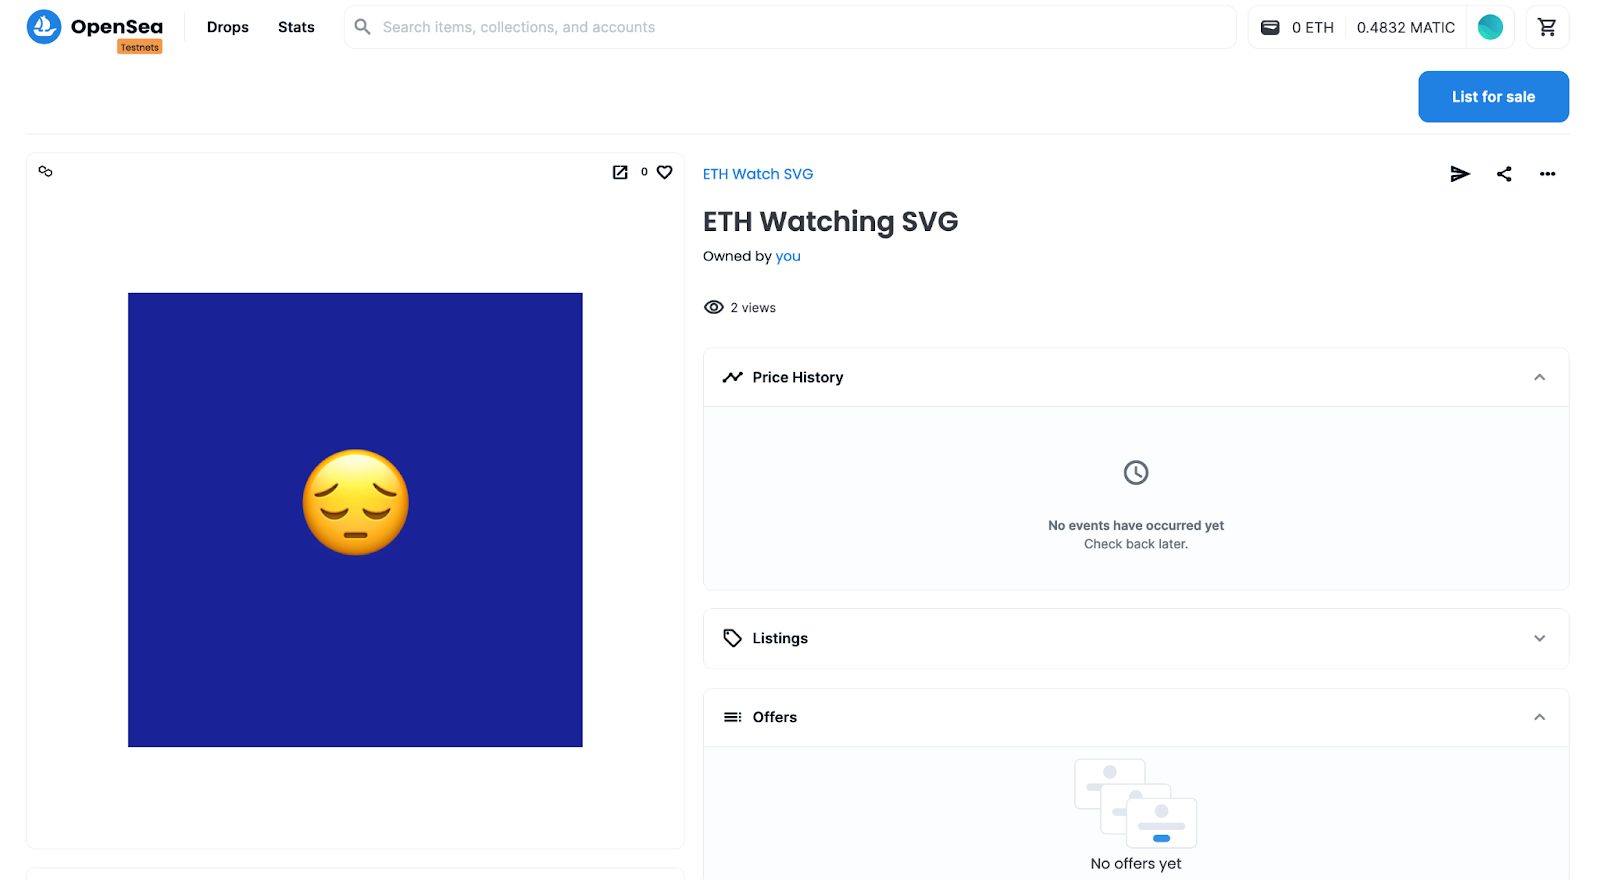
C) On your profile, click on the NFT labeled “ETH Watching SVG”.
D) Click on the three dots in the top right corner and select “Refresh metadata”.
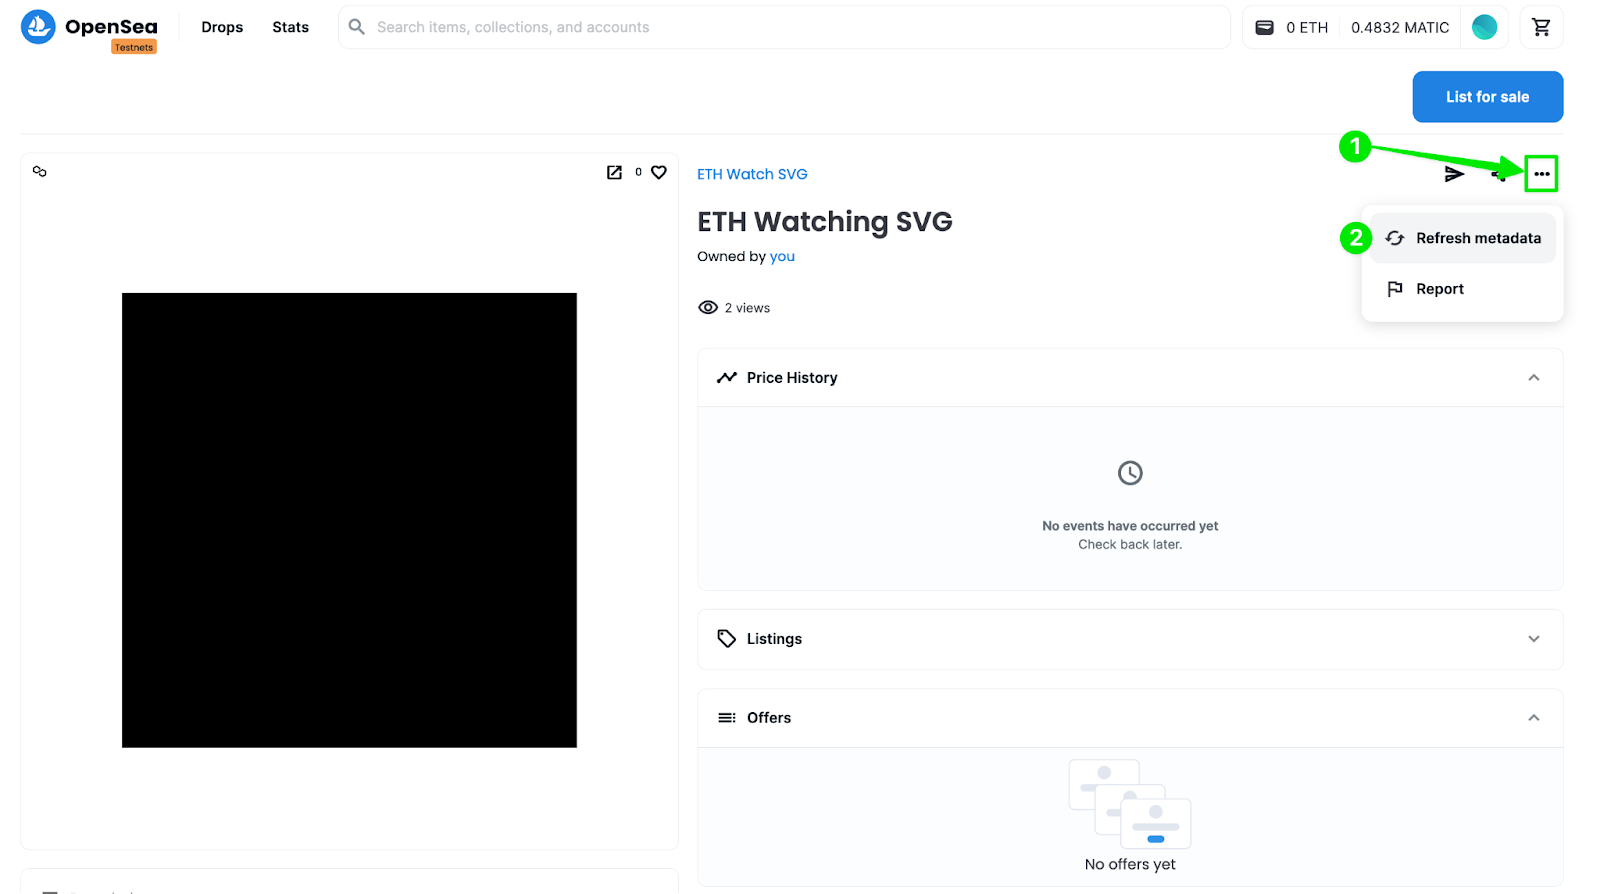
E) Wait 30 seconds and then refresh the page and you should see your newly created dNFT!
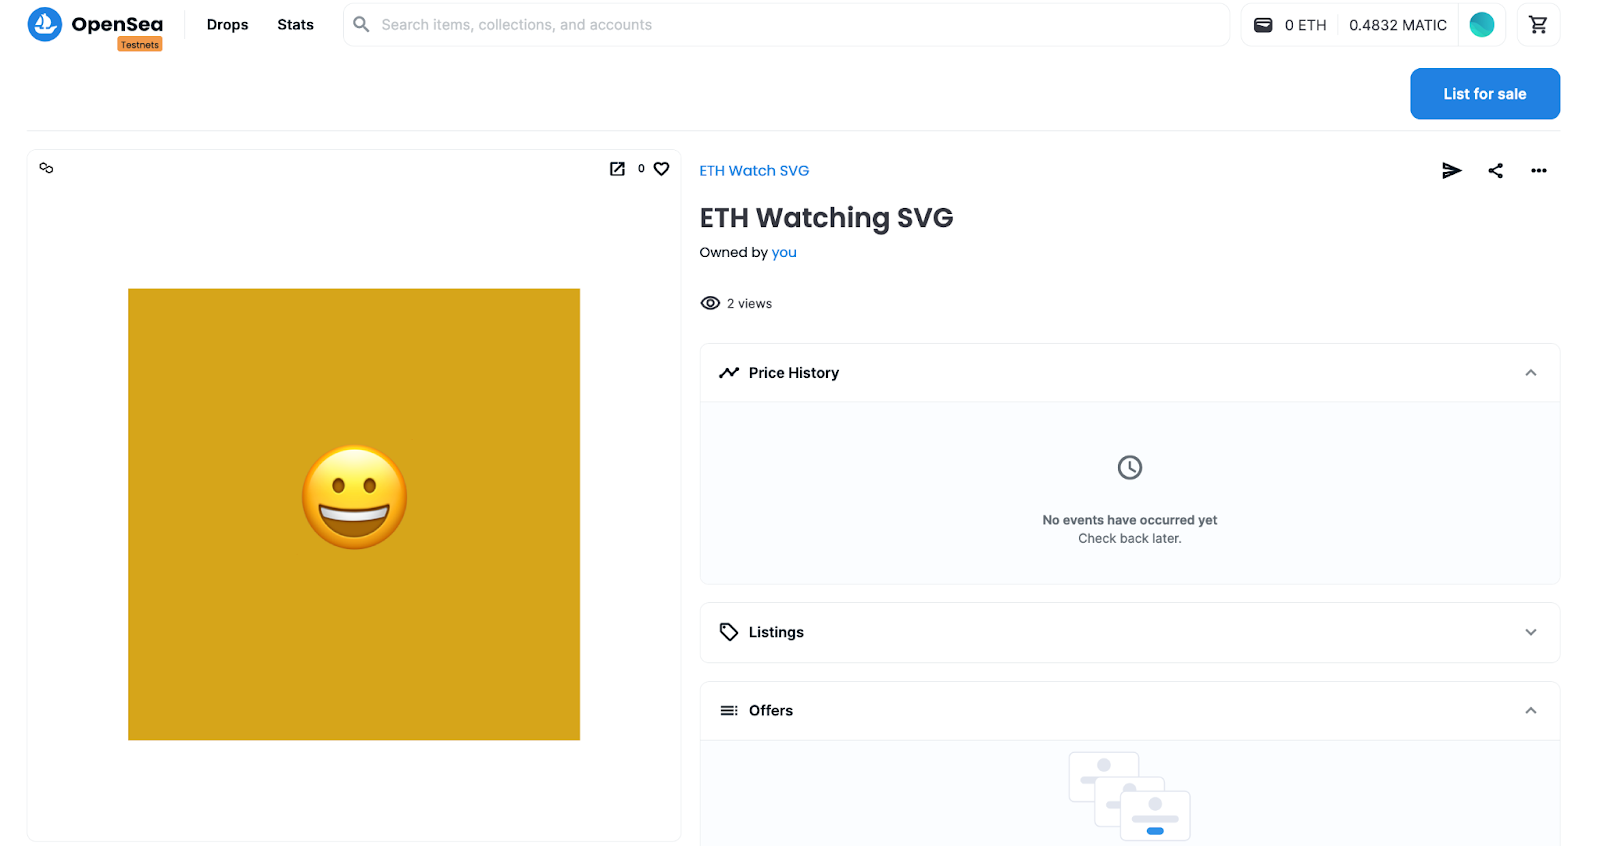
Congratulations! You have completed the tutorial. Every two minutes, until your subscriptions run out of funds, your NFT will check the price of ETH and request a new background color. The next time you refresh the metadata, you should see something a little different.
Conclusion
If you’ve made it this far, congratulations! You successfully deployed a dynamically updating NFT on the Polygon Mumbai Testnet that uses Chainlink Price Feeds to track the price of Ethereum, Chainlink VRF to choose a random background color, and Chainlink Automation to update the image every two minutes.
Keep learning:


