Upgradable Smart Contracts: What They Are and How To Deploy Your Own
In this blog, we’re going to learn the fundamental design principles behind building upgradable smart contracts. By the end, you should understand why we upgrade smart contracts, how to upgrade smart contracts, and what issues to consider when you’re doing so. This blog is focused on Ethereum and EVM-based smart contracts. Watch the first part of this video to learn what the EVM is.
To get the most out of this blog, you should have a beginner’s working knowledge of how blockchains work, specifically the Ethereum blockchain. There is a brief code walkthrough later in this blog, so having at least three months of programming experience would be useful, as would having some basic understanding of Solidity and how to compile it, what smart contracts are and how they’re deployed, and how to use tools like Metamask and Hardhat.
What are Upgradable Smart Contracts?
Blockchains are meant to be immutable—that’s one of the central tenets of blockchain technology. The data stored on the Ethereum blockchain, which includes the smart contracts deployed to it, is also immutable.
Before we dive into the details of how to upgrade smart contracts, let’s consider why we would even want to upgrade smart contracts.
The main reasons are:
- To fix bugs.
- To improve functionality.
- To modify functionality that is no longer required or considered useful.
- To optimize the code for more efficient use of Ethereum gas.
- To respond to evolutions in technology, markets, or society.
- To take away the need to migrate an entire community of users to a new version of the application.
Given enough time, most things will need some repair work. But then data stored on blockchains is immutable. So then how can smart contracts be upgradeable?
The short answer is that smart contracts are not themselves able to change—they’re permanent and immutable once deployed to a blockchain. But a dApp can be designed to have one or more smart contracts operate together to provide its “backend”. This means we can upgrade the pattern of interaction between those smart contracts. Upgrading a smart contract does not mean we modify the code of a smart contract that is deployed—it means we swap one smart contract out for another. We do so in a way that (in most cases) means the end user does not have to change how they interact with the dApp.
So really upgrading smart contracts is a process of substituting a new smart contract for an old one. Effectively, new smart contracts are used, and the old ones are “abandoned” on the chain because they are immutable.
How Do Upgrades Work?
Smart contracts are commonly upgraded by using a software architecture pattern called the “Proxy Pattern”. But what does the word “proxy” mean in software design? You can refer to Section 5 in this System Design Primer I wrote, but the TL;DR is that a proxy is a piece of software in a larger software system that acts on behalf of another part of the system. In traditional Web2 computing, a proxy sits between a client application and server application. A forward proxy acts on behalf of a client application and a reverse proxy acts on behalf of a server application.
In the world of smart contracts, the proxy is more of a reverse proxy, acting on behalf of another smart contract. It is a sort of middleware that redirects incoming traffic from the frontend to the correct smart contract on the backend of the system. Being a smart contract, a proxy has its own Ethereum contract address that is “stable” (i.e. unchanging). So you can swap out other smart contracts in the system and simply update the proxy smart contract with the correct address of the newly deployed smart contract. End users of the dApp interact with the proxy directly, and with the other smart contracts only indirectly, via the proxy.
So, in smart contract development, the Proxy Pattern is achieved through the following two pieces:
-
- The proxy smart contract
- The execution contract, also called the logic contract or the implementation contract.
In this blog, we will refer to these elements as the proxy contract and the logic contract, respectively.
There are three common variants of the proxy pattern, which we will discuss below.
Simple Proxy Pattern
A simple proxy has the architecture shown below.
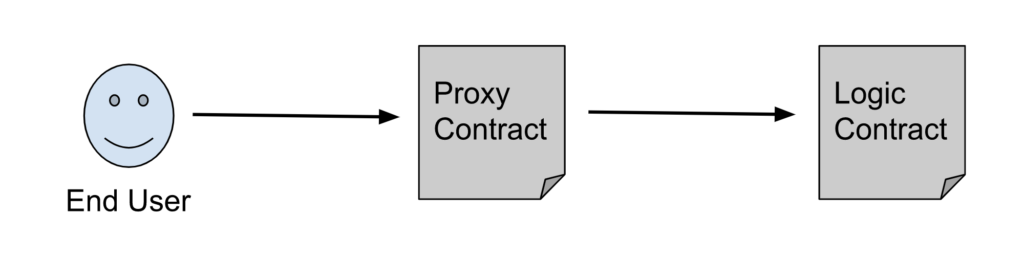
Let’s dive deeper into how this works under the hood.
In the EVM, there is something called the “execution context”. Think of this as the space in which code is executed.
So the proxy contract has its own execution context, and so do all other smart contracts. The proxy contract also has its own storage, where data is stored permanently on the blockchain, along with its own ether balance. Together, the data and balance that the smart contract holds are called its “state,” and state is part of a its execution context.
The proxy contract uses storage variables to keep track of the addresses of other smart contracts that make up the dApp. This is how it can redirect transactions and call the relevant smart contract.
But there is a clever trick that is used to pass the message calls to the correct contract. The proxy contract doesn’t just do a regular function call to the logic contract; it uses something called a delegatecall. Delegatecall is like a regular function call except that the code at the target address is executed in the context of the calling contract. If the logic contract’s code changes storage variables, those changes are reflected in the proxy contract’s storage variables—i.e. in the proxy contract’s state.
So where in the proxy contract does the delegatecall logic sit? The answer lies in the proxy contract’s fallback function. When the proxy contract receives a function call for a function that it does not support, the proxy contract’s fallback function will be invoked to handle that function. The proxy contract uses a custom logic inside its fallback function to redirect calls to logic contracts.
Applying this principle to the proxy and the logic contract, delegatecall will call the logic contract’s code, but that code gets run inside the execution context of the proxy contract. What this means is that the code in the logic contract has the power to change the state in the proxy contract—it can change state variables and other data stored inside the proxy contract. This effectively decouples the application’s state from the code that gets executed. The proxy contract effectively holds all the dApp’s state, which means that the logic can be changed without losing that state.
Now that the application state and the application logic are decoupled in the EVM, we can upgrade the application by changing the logic contracts, and giving the new addresses to the proxy. But the application’s state isn’t affected by this upgrade.
There are two common issues that we need to watch out for when using proxies.
One issue is storage collisions; the other is another type of collision called proxy selector clashing. You can read the linked article about storage collisions to learn more, but for now we will focus on selector clashes because they are the underlying reason for the proxy pattern we will be examining.
As we saw previously, proxies delegate all function calls to the logic contract. However, the proxy contracts also have functions themselves, which are internal to them and necessary for their operation. For example, a proxy contract would need a function like upgradeTo(address newAdd) to upgrade to the new logic contract’s address. So what happens if the proxy contract and the logic contract have a function with the same name and signature (parameters and types)? How would the proxy contract know whether to call its own function or to delegatecall out to the logic contract? This is known as “proxy selector clashing” and is a security vulnerability that can be exploited, or at the very least be a source of annoying bugs.
Technically, this clash can also happen between functions even if they have different names. This is because every publicly callable function (a function that can be defined in the ABI) is identified at the bytecode level by an identifier that is four bytes long. Since it’s only four bytes, it is technically possible for the first four bytes of two completely different function signatures to just happen to be identical, thus producing identical identifiers for dissimilar function signatures, resulting in clashes.
Fortunately, the Solidity compiler can detect this sub-type of selector clashes when the clash is produced by function signatures within the same contract, but not when such a clash happens across different contracts. For example, if a clash happened between a proxy contract and logic contract, the compiler would not be able to detect it, but inside the same proxy contract, the compiler would detect the clash.
The solution to this problem is the “transparent” proxy pattern, which has been popularized by Open Zeppelin.
Transparent Proxy Pattern
The transparent proxy pattern is where function calls initiated by the end user (caller) are always routed to the logic contract rather than the proxy contract. However, if the caller is an admin of the proxy, the proxy will know to invoke its own administrative function. This makes intuitive sense because calling administrative functions in the proxy contract to manage the upgradability and other admin tasks should only be done by an admin, and if there is a clash, a fair presumption can be made that the admin intended to call the proxy contract’s function and not the logic contract’s function. But if the caller is any other non-admin address, the proxy will always delegatecall out to the relevant logic contract. We can identify the caller by examining the message.sender value.
In this pattern, the proxy contract would have logic in its fallback function to parse message.sender and the function selector that is being called, and accordingly invoke one of its own functions or delegate out to a logic contract.
OpenZeppelin contracts, as we will see in our code walkthrough, add another level of abstraction, with the upgrade functionality owned by a ProxyAdmin contract—the smart contract that is the admin for one or more proxy contracts. This proxy admin contract must be the caller for upgrade-related functionality. So end users will interact directly with the proxy, which will delegatecall out to the logic contract, but upgrade and admin requests will be passed via the ProxyAdmin contract, which will then forward the upgrade request to the proxy.
Transparent proxy patterns do have some drawbacks. They’re susceptible to function selector clashes if they’re not handled carefully, they can cost more gas to operate (as the EVM needs extra gas to load the logic contract address for each delegatecall), and deploying the proxy contract in this pattern can also cost more gas.
UUPS pattern
The Universal Upgradable Proxy Standard (UUPS) was proposed in EIP1822 as a way to create a standard for proxy contracts that have universal compatibility with all contracts. It overcomes the issue of proxy function selector clashes. This pattern also uses Solidity’s delegatecall operation, but whereas in the Simple/Transparent proxy pattern all upgrades are managed by the proxy contract, in UUPS, the upgrades are handled by the logic contract—specifically the “proxiable” smart contract that the logic contract inherits from.
The logic contract will still be executed in the context of the proxy contract, thus utilizing the proxy contract’s storage, balance, and address, but the logic contract inherits from the Proxiable parent contract that houses the upgrade functionality. The upgrade logic contained in the proxiable smart contract is used to update the logic contract’s address, which is stored in the proxy contract.
Since the Solidity compiler is able to detect function selector clashes if they arise within the same contract, the presence of the upgrade logic in the parent proxiable contract helps the compiler identify such clashes, which reduces their likelihood.
The UUPS proxy pattern also has drawbacks. Though deployment in this pattern is cheaper (less gas), maintaining the dApp’s smart contracts using this pattern can be a bit more challenging.
An important issue is that because the upgrade logic is not in the proxy contract but rather in the logic contract’s proxiable parent contract, if an updated logic contract fails to inherit proxiable then the upgrade functionality is not inherited and it’s impossible to upgrade the smart contract in future.
But this issue has an upside: The UUPS pattern allows for upgradability to be removable by simply no longer inheriting from the proxiable contract, which is an option not inherent in the Transparent Proxy pattern. This is why OpenZeppelin and others recommend that UUPS is used over Transparent Proxies, though Transparent remains more popular at the time of writing.
Code Along
To get started we will employ the Transparent Proxy pattern using OpenZeppelin upgrades tooling, which works with common Web3 development workflows that use JavaScript and Hardhat. OpenZeppelin offers plugins that integrate with Hardat and Truffle. We will use Hardhat.
The Hardhat Plugin gives us functions like deployProxy that track the logic contract for us and give us easy access to upgrade functionality. By default, the address that deployed the contract is the one that has admin rights to upgrade it.
Let’s create a Hardhat project—you can name it whatever you want—and from inside that directory, let’s start to set up our project tooling with the following steps.
Project Setup
Install the Hardhat developer tools, Web3 libraries, and the upgrades plug-in provided by OpenZeppelin. The below command will create your package.json file as well.
yarn add -D hardhat @openzeppelin/hardhat-upgrades @nomiclabs/hardhat-ethers ethers
Install contract packages from NPM that contain the Chainlink contract interfaces and OpenZeppelin upgradeable contract libraries we will want to use:
yarn add @chainlink/contracts @openzeppelin/contracts-upgradeable
Then run yarn hardhat inside the project root directory to create an empty hardhat.config.js file in the root. Inside that config file, paste the following to tell Hardhat which compiler version the project will use while importing the right dependencies:
require("@nomiclabs/hardhat-ethers");

require("@openzeppelin/hardhat-upgrades");

const GOERLI_RPC_URL = process.env.GOERLI_RPC_URL_HTTP
const PRIVATE_KEY = process.env.WALLET_PRIVATE_KEY_DEV1;

const ETHERSCAN_KEY = process.env.ETHERSCAN_API_KEY;

/** @type import('hardhat/config').HardhatUserConfig */
module.exports = {
 solidity: "0.8.17",
 defaultNetwork: "hardhat",
 networks: {
   localhost: {
     chainId: 31337,
   },
   goerli: {
     url: GOERLI_RPC_URL,
     accounts: PRIVATE_KEY ? [PRIVATE_KEY] : [],
     chainId: 5,
   },
 },
 etherscan: {
   apiKey: ETHERSCAN_KEY,
 },
};
Smart Contract Code
In your project root, create a <root>/contracts/PriceFeedTrackerV1.sol Solidity file and paste the following smart contract into it:
// SPDX-License-Identifier: MIT
pragma solidity ^0.8.0;

import "@chainlink/contracts/src/v0.8/interfaces/AggregatorV3Interface.sol";
import "@openzeppelin/contracts-upgradeable/proxy/utils/Initializable.sol";

contract PriceFeedTracker is Initializable {
   address private admin;

   function initialize(address _admin) public initializer {
       admin = _admin;
   }

   function getAdmin() public view returns (address) {
       return admin;
   }

   /**
    * Network: Goerli
    * Aggregator: ETH/USD
    * Address: 0xD4a33860578De61DBAbDc8BFdb98FD742fA7028e
    */
   function retrievePrice() public view returns (int) {

       AggregatorV3Interface aggregator = AggregatorV3Interface(

           0xD4a33860578De61DBAbDc8BFdb98FD742fA7028e
       );
       (
           ,
           /*uint80 roundID*/
           int price, /*uint startedAt*/ /*uint timeStamp*/ /*uint80 answeredInRound*/
           ,
           ,

       ) = aggregator.latestRoundData();

       return price;
   }
}
If you now run yarn hardhat compile you should see that the Solidity code compiles successfully and you have two new folders, “Artifacts” and “cache,” in your project directory.
You’ll note that this V1 smart contract retrieves the ETH/USD price data from Chainlink Price Feeds on the Goerli network. Right now, the Price Feed’s address is hardcoded, which means it can only ever return the ETH/USD price. In future, we will upgrade it to handle any asset pair’s Price Feed address on the Goerli network.
For now though, let’s consider what’s going on with Initializable and the initialize() function. Due to some quirks in Solidity that are out of scope for this blog, we cannot include a constructor in our smart contracts when we use Open Zeppelin upgradable contracts. Instead, we create our own construtor-like functionality by extending the Initializable base contract, which helps us apply an initializer modifier to the initialize() function. We can name the initialize function anything we like, but by using initialize, the Hardhat plugin will recognize it, and will call that function by default. If we have an initializer function by another name, we would need to specify the name of our initializer.
This “Initialize” pattern, with the modifier, simulates a constructor function by ensuring that initialize() is run only once. This is where we can expressly set our admin address if we want to—the default will be the deployer’s address. The retrievePrice() function calls the ETH/USD Price Feed smart contract and returns the exchange price.
Deploy Script
Let’s deploy this V1 contract using the following script in scripts/deploy_upgradeable_pricefeedtracker.js .
// The Open Zeppelin upgrades plugin adds the `upgrades` property
// to the Hardhat Runtime Environment.
const { ethers, network, upgrades } = require("hardhat");

async function main() {
 // Obtain reference to contract and ABI.
 const PriceFeedTracker = await ethers.getContractFactory("PriceFeedTracker");
 console.log("Deploying PriceFeedTracker to ", network.name);

 // Get the first account from the list of 20 created for you by Hardhat
 const [account1] = await ethers.getSigners();

 //  Deploy logic contract using the proxy pattern.
 const pricefeedTracker = await upgrades.deployProxy(
   PriceFeedTracker,

   //Since the logic contract has an initialize() function
   // we need to pass in the arguments to the initialize()
   // function here.
   [account1.address],

   // We don't need to expressly specify this
   // as the Hardhat runtime will default to the name 'initialize'
   { initializer: "initialize" }
 );
 await pricefeedTracker.deployed();

 console.log("PriceFeedTracker deployed to:", pricefeedTracker.address);
}

main();
By using deployProxy() in the OpenZeppelin Upgrades Plugins, that deployed contract instance can be upgraded later. By default, only the address that originally deployed the contract has the rights to upgrade it.
deployProxy will create the following transactions:
-
- Deploy the logic contract (our
PriceFeedTrackercontract). - Deploy a proxy contract and run any initializer function.
- Deploy a
ProxyAdmincontract (the admin for our proxy).
- Deploy the logic contract (our
Before we run the deploy script, make sure you have enough Goerli ETH. You can get Goerli ETH from the Chainlink faucet. Make sure that you also set your RPC node URL and private key in your environment variables so that your hardhat.config.js file can read them!
We can run our deploy script with the following command to deploy the contract to the Ethereum Goerli testnet.
yarn hardhat run --network goerli scripts/deploy_upgradeable_pricefeedtracker.js
That should produce a confirmation in your terminal that looks like the below but with a different contract address. Make a note of this contract address. Note that it is the address of your proxy contract, not the logic contract. We want the proxy contract’s address because that is the stable (unchanging) address we will use to interact with our logic contracts.
Deploying PriceFeedTracker...
PriceFeedTracker deployed to: 0x5FC8d32690cc91D4c39d9d3abcBD16989F875707
You can study the documentation for deployProxy() and its configuration options here. Note that the default pattern is “transparent” but you can specify that you want your proxy to follow the UUPS pattern by explicitly setting that configuration option.
Hardhat Console
Before we upgrade our contract, let’s interact with it using the Hardhat console, which allows us to write JavaScript to interact with our logic contract, which is deployed via the proxy contract.
In a new (third!) terminal window, run the following command to attach the console to the Goerli blockchain:
yarn hardhat console --network goerli
That will open up the console prompt into which you can run the following commands individually:
> const PriceFeedTracker = await ethers.getContractFactory("PriceFeedTracker");
undefined
> const priceFeedTracker = await PriceFeedTracker.attach('<<<< YOUR CONTRACT ADDRESS  >>>>')
undefined
Then call the getAdmin() getter function, which should output your deployer wallet address—the address you passed in to your initialize function’s argument inside your deploy script.
> (await priceFeedTracker.getAdmin())
'0xf39Fd6e51aad88F6F4ce6aB8827279cffFb92266'
Next try retrieving the ETH/USD price. This is a view-only call as it does not modify state or emit any events, so you don’t need to pay gas.
> (await v1.retrievePrice())
BigNumber { value: "150701000000" }
Ok! If you’re getting these results, then the proxy contract is correctly interacting with your deployed proxy contract.
Here is a useful tip: Go to goerli.etherscan.io/address/YOUR_CONTRACT_ADDRESS and then click on the Events tab. You should see several events that look like the below picture. Look for an event called “Upgrade” and click on the little arrow beside it. That will show you the address of the implementation contract. This is the address that will end up changing each time you upgrade your smart contract.
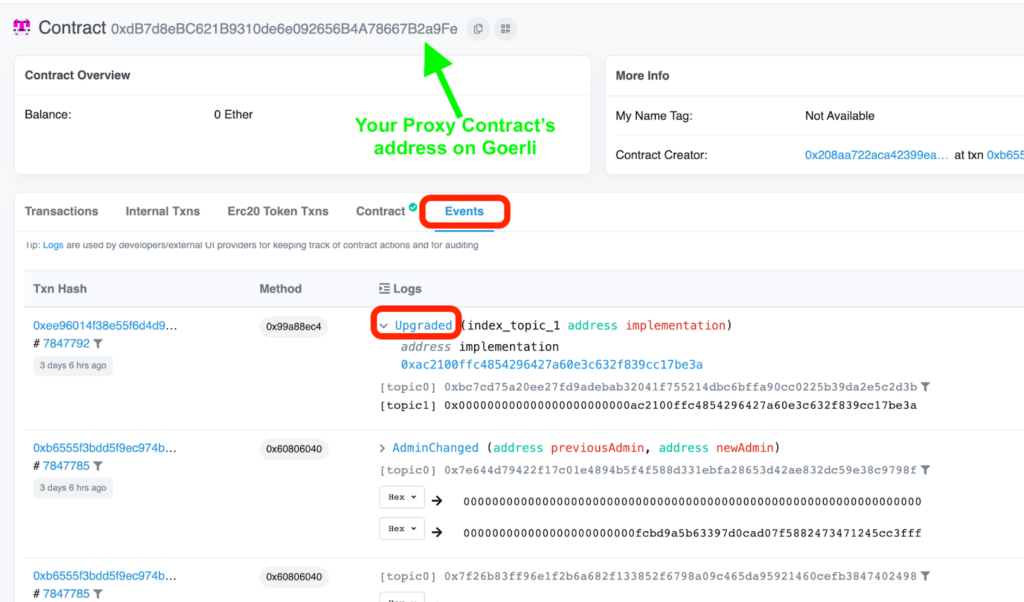
Upgraded Logic Contract
Now let’s put together an updated logic contract that has some added functionality. Take a look at PriceFeedTrackerV2 below. You’ll note the following changes:
-
- There is a new public storage variable called
price, which is of type int which will store the retrieved price. - There is a new Event that emits two pieces of data when the Price Feed is updated.
- The
retrievePrice()function no longer hardcodes the ETH/USD address but instead gets the Price Feed’s address from the caller. It also checks that a non-zero address is passed in. Once the price is retrieved it emits an event and also stores the price in thepricestate variable (both operations change the blockchain’s state, so this is no longer aviewfunction).
- There is a new public storage variable called
// SPDX-License-Identifier: MIT
pragma solidity ^0.8.0;

import "@chainlink/contracts/src/v0.8/interfaces/AggregatorV3Interface.sol";
import "@openzeppelin/contracts-upgradeable/proxy/utils/Initializable.sol";

contract PriceFeedTrackerV2 is Initializable {
   address private admin;
   int public price; // NOTE: new storage slot

   // Emitted when the price is retrieved changes
   event PriceRetrievedFrom(address feed, int price);

   function initialize(address _admin) public initializer {
       admin = _admin;
   }

   function getAdmin() public view returns (address) {
       return admin;
   }

   // Fetches the price from the feed.
   // Note that the function is no longer a view function as it emits an event.
   function retrievePrice(address feed) public returns (int) {
       require(
           feed != address(0x0),
           "PriceFeedTrackerV2: Pricefeed address must not be zero address."
       );

       AggregatorV3Interface aggregator = AggregatorV3Interface(feed);
       (
           ,
           /*uint80 roundID*/
           int _price, /*uint startedAt*/ /*uint timeStamp*/ /*uint80 answeredInRound*/
           ,
           ,

       ) = aggregator.latestRoundData();

       price = _price;

       emit PriceRetrievedFrom(feed, _price);

       return price;
   }
}
-
- There is an important technical issue regarding the storage variables that we must note at this stage. You’ll see that the admin state variable is left in exactly the same “position” and the
pricevariable is declared after it. This is because when logic contracts are updated they must not change the order of the declaration of state variables, as that would cause a storage clash (otherwise known as a storage collision) because the storage context is in the proxy contract (as discussed earlier in this blog). This is because state variables are generally assigned storage layout “slots” in the context of the proxy contract, and these slots must be unchanged across the upgrades of the logic contract. So we cannot replace storage slots or insert new ones in between. All new state variables must be appended at the end, in a slot that has not previously been taken up. OpenZeppellin uses EIP1967 storage slots to avoid storage clashes in logic contracts. You can read more about the deeper details of the OpenZeppelin proxy patterns and storage here.
- There is an important technical issue regarding the storage variables that we must note at this stage. You’ll see that the admin state variable is left in exactly the same “position” and the
Deploy Script for Upgrade Contract
The upgrade logic contract has a different name and new functionality. We can upgrade the V1 instance by calling the upgradeProxy function, which creates the following transactions:
-
- Deploy the updated logic contract (our
PriceFeedTrackerV2contract). - Call
ProxyAdmincontract (the admin for our proxy) to update the proxy contract to point to the new logic contract.
- Deploy the updated logic contract (our
Our updated script will be in scripts/upgrade_pricefeedtracker.js and will look like this (note how we use upgradeProxy and not deployProxy). It’s very important to note that you must add your deployed contract’s address before you run the script—forgetting this is an easy mistake to make that could confuse you for hours!
const { ethers, upgrades } = require("hardhat");

async function main() {
  // TODO Check this address is right before deploying.
  const deployedProxyAddress = "<<< YOUR PROXY CONTRACT ADDRESS HERE >>>";

  const PriceFeedTrackerV2 = await ethers.getContractFactory(
    "PriceFeedTrackerV2"
  );
  console.log("Upgrading PriceFeedTracker...");

  await upgrades.upgradeProxy(deployedProxyAddress, PriceFeedTrackerV2);
  console.log("PriceFeedTracker upgraded");
}

main();
We can then run the script with
yarn hardhat run --network goerli scripts/upgrade_pricefeedtracker.js
And we should see an output that looks like
Compiled 2 Solidity files successfully
Upgrading PriceFeedTracker...
PriceFeedTracker upgraded
Note that the proxy address is unchanged. But if you go back to Etherscan and look at your proxy contract’s emitted events you should see a new “Upgraded” event and a new implementation contract address.
If your contract is taking forever to deploy, please scroll down to the troubleshooting section of this blog.
Now let’s use the Hardhat console to interact with the upgraded contract.
Run the following commands, one at a time. I recommend leaving 60-90 seconds after you request the price before you check the price state variable.
> var V2 = await ethers.getContractFactory("PriceFeedTrackerV2")
undefined

> var v2 = await V2.attach(///// INSERT PROXY CONTRACT ADDRESS /////)
undefined

// ETH/USD
> var ethusdTx = await v2.retrievePrice('0xD4a33860578De61DBAbDc8BFdb98FD742fA7028e')
undefined

// Wait about 60-90 seconds then read the updated state variable.
> (await v2.price())
BigNumber { value: "150701000000" }

// Change to LINK/ETH
> var linkEthTx = await v2.retrievePrice('0xb4c4a493AB6356497713A78FFA6c60FB53517c63')

// Wait about 60-90 seconds then read the updated state variable.
> (await v2.price())
BigNumber { value: "4659009800000000" }
You’ll note that we updated the price variable to store the retrieved price from the ETH/USD Price Feed aggregator contract and then again from the LINK/ETH Price Feed.
And there you have it! You have just upgraded your logic contract, and the contract that you interact with (the proxy contract) has not changed! The proxy contract delegates the logic function calls to the logic contract that is registered with the proxy contract as being the latest logic contract!
Troubleshooting
There are a couple of problems that could arise when running transactions with upgradeable contracts on the Goerli network. One problem that I encountered when writing this blog was that my transactions were getting stuck in the mempool. This is because the gas that was being sent from my wallet was less than the gas required by the network at that time—there were gas spikes on Goerli at the time of writing. There were no errors suggesting this had happened, so it took me a while to figure out! I use Alchemy as my RPC provider to connect to Goerli, so I found this video to help me get unblocked. I created this script to run as a Hardhat script which helped me clear my mempool transactions.
Also, note that it’s best to wait for about 60 seconds after any transaction that changes the state of the blockchain. For example, reading from the price storage variable too soon after running retrievePrice() will return older data from the blockchain as the state-changing write transactions may not have been confirmed by blocks yet.
Conclusion
We’ve covered how to upgrade smart contracts, why we would want to, and what the emerging practices are around upgrading smart contracts. We’ve learned a few design patterns, some issues that could trip you up, and also run some code to deploy and upgrade a smart contract that consumes data from Chainlink Price Feeds. If you have trouble following this blog, feel free to tweet me.
Learn more about Chainlink by visiting chain.link or reading the documentation at docs.chain.link. To discuss an integration, reach out to an expert.


