How to use Chainlink with Truffle
When working with Chainlink, a powerful development environment is essential to ensure your smart contracts are deployed successfully and securely on-chain. Truffle aims to be exactly that, offering an easy-to-use dApp framework to help make your developer life a lot more manageable.
Working with Truffle is simple, thanks to the Truffle Boxes feature that allows you to download sample dApp boilerplates directly from your terminal. To help you get started, we’ve prepared a Chainlink Truffle Box for you. Inside is a sample Chainlinked smart contract titled “MyContract” as well as a pre-made test suite. To grab it, open up your terminal of choice and install truffle.
npm install truffle -g
Next, create a new directory and grab the box via the following commands:
mkdir Chainlink
cd Chainlink
truffle unbox smartcontractkit/box
Upon successful unboxing, you will notice some new directories have been added. These contain helpful boilerplate code and modules to get you started with Chainlinked smart contracts. For the purposes of this article, the smart contract we will be focusing on is “MyContract” and can be found under the contracts directory. This contains some basic Chainlink functionality to help us get a solid understanding of how Chainlinked contracts work.
Testing
First, it’s always a good idea to test your contracts to ensure correct functionality. You can do so via the following command:
npm test
This will run a variety of test cases on our sample contract, such as creating requests with and without Link tokens, sending these requests to oracle contract addresses, and testing contract ownership.
Note: You may encounter some compilation warnings dealing with the various Link token contracts. This is because we are using an updated version of the Solidity compiler than what was used when these contracts were created initially. Thus, these warnings can be ignored. The Link token is already deployed and we are simply making these contracts available for local testing.
It is important to note that after every test is run, we redeploy each contract. This allows us to have true unit testing, as we do not want our tests to rely on the output of other tests. Furthermore, redeploying each contract takes time, but this is only for testing purposes and does not impact our actual performance run time.
Let’s now view these test cases for “MyContract” in more detail, which you can find under test/MyContract_test.js. If you have used Mocha.js for testing before, you’ll notice that the syntax is familiar. Truffle is based on the Mocha testing framework and has the additional function of working with smart contracts. Let’s go over some of these new features.
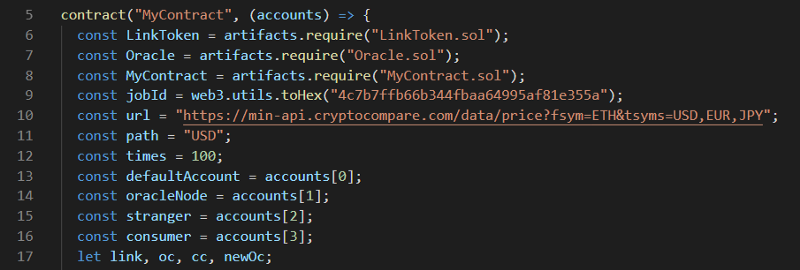
The contract() function behaves similarly to Mocha’s describe(), yet it incorporates Truffle’s clean-room-features. From the Truffle documentation, it works like this:
- Before each contract() function is run, your contracts are redeployed to the running Ethereum client so the tests within it run with a clean contract state.
- The contract() function provides a list of accounts made available by your Ethereum client which you can use to write tests.
Furthermore, our example “MyContract” requires artifacts from other smart contracts. To do so, we will make use of the artifacts.require() method, which essentially imports a specific smart contract’s artifacts as a contract abstraction. This data is stored as a JSON blob that Truffle can work with, and can be easily viewed under build/contracts/. Read more about how artifacts.require() works here.
With our helper contracts now stored as constant references, we can now start to create test cases. To do so, we will need to properly understand key test methods such as describe(), beforeEach(), it(), and context().
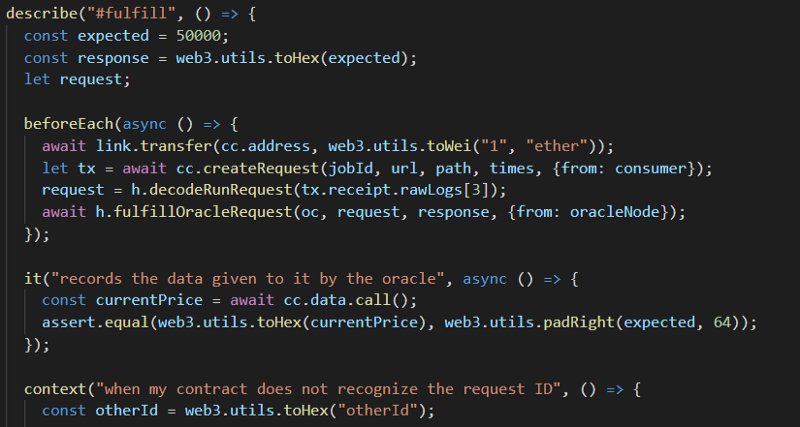
- describe() allows us to group our test cases together. It takes two arguments, the first being a string for our test group name, and the second being a callback function. You will notice in our code example, the test cases involved are creating a request, fulfilling a request, cancelling a request, and withdrawing LINK.
- beforeEach() runs before each individual test in it’s block scope. For many tests, certain actions will have to take place first (such as awaiting a transfer of link) before we can run our test case.
- it() is used for an individual test case. These are used to test our contract at different states, and should be explicit in what they are trying to accomplish. You will notice when we ran npm test, the strings in each it() functions’ parameters are output as logs, helping us clearly see our tests timeline.
- context() is an alias for describe(), yet is meant to be used in more specific states of a contract’s execution. Put simply, it provides another way to keep tests easier to read and more organized.
Final thoughts
Truffle offers a powerful toolbox to help ensure your Chainlinked smart contracts are working as intended. Thanks to its world-class testing framework based on the popular and well-documented Mocha.js, many developers will find working with it to be friendly and familiar, helping you hit the ground running. With Truffle boxes, dApp companies are able to easily provide useful examples for their fellow developers, helping grow the blockchain ecosystem. We at Chainlink plan on providing more Chainlinked smart contracts for you to work with in the near future. Stay tuned.
If you want to learn more about how to develop on Chainlink, visit the developer documentation or join the technical discussion on Discord.


