5 Ways To Build Cross-Chain Applications With CCIP
Chainlink’s Cross-Chain Interoperability Protocol (CCIP) is a new generalized cross-chain communication protocol that provides smart contract developers with the ability to transfer data and tokens across blockchain networks in a trust-minimized manner.
Currently, applications deployed across multiple blockchains suffer from the fragmentation of assets, liquidity, and users. With CCIP, developers can utilize token transfers and arbitrary messaging to enable the creation of decentralized applications that are composed of multiple different smart contracts deployed across multiple different blockchain networks that interoperate to create a single unified application. This Web3 design pattern is known as the cross-chain smart contract.
Below are a few examples of CCIP use cases for cross-chain applications, ranging from DeFi and cross-chain ENS to minting NFTs on multiple chains to cross-chain gaming. These use case examples demonstrate the potential for CCIP to transform traditional single-chain or multi-chain applications into powerful new cross-chain dApps.
All examples can be found on the Chainlink Labs GitHub and can be deployed and interacted with now.
DeFi: Cross-Chain Composability
DeFi is a category of Web3 applications that is ripe for transformation by cross-chain smart contracts. In the world of DeFi today, many applications are either deployed on a single chain or on multiple chains, with each instance requiring its own set of users and liquidity. Within each chain, there is a concept of DeFi composability and “money Legos,” with developers able to permissionless-ly connect and integrate with various protocols deployed on a particular network to create new use cases and financial products.
By enabling cross-chain smart contracts and cross-chain token transfers, CCIP takes the concept of DeFi composability and exponentially multiplies it. Because now, instead of composability being restricted to each chain and limited to the DeFi protocols on that chain, all DeFi applications on all blockchains can now be composed together in various ways to create new financial products. Applications and protocols are no longer confined to the chain they’re on.
This cross-chain composability of DeFi applications enables a less fragmented and more connected DeFi ecosystem, with liquidity, users, and financial products on all chains being available to all protocols. Using the money Legos analogy, CCIP enables you to bring all of your different Lego sets together and build financial protocols with them as if they were a single, unified set.
One particular DeFi financial service that would greatly benefit from CCIP is lending and borrowing. In today’s world, most DeFi lending and borrowing protocols require you to deposit collateral on the chain the protocol you want to use is deployed on. But many DeFi users use multiple DeFi protocols across multiple blockchains and have assets scattered across all these chains. These users often chase the best returns, adjusting their positions to maximize yield, but in many cases they have assets locked up in protocols on one chain when there are better yield-earning opportunities to use those assets on another chain. If they wanted to participate in those superior yield opportunities, they’d need to liquidate their position on one chain, manually bridge the asset to the new chain, deposit that asset on to the protocol on the new chain, and then perform the same process in reverse when they want to return their asset to the originating chain—a lot of steps just to move assets into a new protocol to chase yield opportunities.
Scenarios like this are where CCIP can help enable DeFi protocols to truly go cross-chain, and allow users to seamlessly utilize digital assets on one chain as collateral for a DeFi protocol on another chain, all handled by CCIP at the protocol level, without the user having to perform manual steps, or adding trust assumptions due to using a third party bridge. Using CCIP, a DeFi protocol can enable a borrower to deposit assets on one (source) chain, or transfer them directly to a destination chain, and then have those assets made available on the destination chain to borrow against. Then when they wish to stop using their assets on the destination chain, the DeFi protocol can use CCIP to withdraw their position and move their assets back to the originating chain. This is the power of CCIP-enabled DeFi.
In this example, we have a DeFi smart contract Sender.sol on the Avalanche Fuji testnet. This contract accepts user deposits in the form of a token; it could be wrapped ETH, a stablecoin, or any token that has a real value. Sender.sol has a sendMessage function, which uses CCIP to execute a programmable token transfer of the specified tokens as well as a message to a destination chain. In this case, we are sending the specified tokens to the Ethereum Sepolia testnet, with the message containing the end-user’s EOA (externally owned account):
// Sender.sol
 Client.EVM2AnyMessage memory evm2AnyMessage = Client.EVM2AnyMessage({
receiver: abi.encode(receiver), // ABI-encoded receiver contract address
data: data,
tokenAmounts: tokenAmounts,
extraArgs: Client._argsToBytes(
Client.EVMExtraArgsV1({gasLimit: 200_000, strict: false}) // Additional arguments, setting gas limit and non-strict sequency mode
),
feeToken: address(linkToken) // Setting feeToken to LinkToken address, indicating LINK will be used for fees
});


// Initialize a router client instance to interact with cross-chain router
IRouterClient router = IRouterClient(this.getRouter());


// Get the fee required to send the message. Fee paid in LINK.
uint256 fees = router.getFee(destinationChainSelector, evm2AnyMessage);


// Approve the Router to pay fees in LINK tokens on contract's behalf.
linkToken.approve(address(router), fees);


// Approve the Router to transfer the tokens on contract's behalf.
IERC20(tokenToTransfer).approve(address(router), transferAmount);


// Send the message through the router and store the returned message ID
messageId = router.ccipSend(destinationChainSelector, evm2AnyMessage);


// Emit an event with message details
emit MessageSent(messageId, destinationChainSelector, receiver, msg.sender, tokenAmount, fees);
Note: All code examples in this post are illustrative and are provided on an “as-is” basis without any representations, warranties, covenants, or conditions of any kind. Use of these code snippets is governed by our Terms of Service found at chain.link/terms.
On the Ethereum Sepolia network, we have deployed a Protocol.sol smart contract. This contract receives the CCIP programmable token transfer message and does the following:
- Mints and controls stablecoins that can be borrowed against deposited collateral.
- From the CCIP message, reads the specified token contract address (on the destination chain) for which funds were sent from the source chain (as collateral for borrowing) and the amount deposited.
- Also from the CCIP message contents, reads the end-user’s (depositor/borrower’s) wallet address. The stablecoin is minted to this address, and this address is also used to track deposits and borrowing.
- Stores this information in the smart contract.
// Protocol.sol
   bytes32 messageId = any2EvmMessage.messageId; // fetch the messageId
   uint64 sourceChainSelector = any2EvmMessage.sourceChainSelector; // fetch the source chain identifier (aka selector)
   address sender = abi.decode(any2EvmMessage.sender, (address)); // abi-decoding of the sender address

   // Collect tokens transferred. This increases this contract's balance for that Token.
   Client.EVMTokenAmount[] memory tokenAmounts = any2EvmMessage.destTokenAmounts;
   address token = tokenAmounts[0].token;
   uint256 amount = tokenAmounts[0].amount;

   address depositor = abi.decode(any2EvmMessage.data, (address)); // abi-decoding of the depositor's address

   receivedMessages.push(messageId);
   MessageIn memory detail = MessageIn(sourceChainSelector, sender, depositor, token, amount);
   messageDetail[messageId] = detail;

   emit MessageReceived(messageId, sourceChainSelector, sender, depositor, tokenAmounts[0]);

   // Store depositor data.
   deposits[depositor][token] = amount;
Once this CCIP programmable token transfer message has been received and successfully processed by Protocol.sol, the user can then manually initiate an action to borrow funds by executing the borrowUSDC function. This function allows the user to use the transferred tokens as collateral to mint and borrow an equivalent amount of a stablecoin, such as USDC, to the borrower’s EOA. In this example, we assume a 70% collateralization ratio, meaning that the protocol will lend no more than 70% of the value of the deposited token:
uint256 borrowed = borrowings[msg.sender][address(usdcToken)];
require(borrowed == 0, "Caller has already borrowed USDC");

address transferredToken = messageDetail[msgId].token;
require(transferredToken != address(0), "Caller has not transferred this token");

uint256 deposited = deposits[msg.sender][transferredToken];
uint256 borrowable = (deposited * 70) / 100; // 70% collateralization ratio.

// LINK/USD on Sepolia (https://sepolia.etherscan.io/address/0xc59E3633BAAC79493d908e63626716e204A45EdF)
// Docs: https://docs.chain.link/data-feeds/price-feeds/addresses#Sepolia%20Testnet
AggregatorV3Interface priceFeed = AggregatorV3Interface(0xc59E3633BAAC79493d908e63626716e204A45EdF);

(, int256 price, , , ) = priceFeed.latestRoundData();
uint256 price18decimals = uint256(price * (10 ** 10)); // make USD price 18 decimal places from 8


uint256 borrowableInUSDC = borrowable * price18decimals;

// MintUSDC
usdcToken.mint(msg.sender, borrowableInUSDC);

// Update state.
borrowings[msg.sender][address(usdcToken)] = borrowableInUSDC;


return borrowableInUSDC;
Once the user has successfully borrowed UDSC on Sepolia against their deposited collateral, they can then use the funds as they wish on any DeFi protocol on the Sepolia network. Then, when they are done, they can repay the funds to Protocol.sol, which will cause the stablecoin tokens to be burnt, and a CCIP programmable token transfer message is then sent back to the Sender.sol contract on the Fuji network, which will return the locked up tokens to the specified address on the Fuji network. Note that the user must first approve Protocol.sol as a “spender” of the user’s borrowed stablecoin for the protocol to be able to burn the borrowed amount, which is how repayment is implemented:
require(amount >= borrowings[msg.sender][address(usdcToken)], "Repayment amount is less than amount borrowed");


// Get the deposit details, so it can be transferred back.
address transferredToken = messageDetail[msgId].token;
uint256 deposited = deposits[msg.sender][transferredToken];


uint256 mockUSDCBal = usdcToken.balanceOf(msg.sender);
require(mockUSDCBal >= amount, "Caller's USDC token balance insufficient for repayment");


if (usdcToken.allowance(msg.sender, address(this)) < borrowings[msg.sender][address(usdcToken)]) {
revert("Protocol allowance is less than amount borrowed");
}


usdcToken.burnFrom(msg.sender, mockUSDCBal);


borrowings[msg.sender][address(usdcToken)] = 0;
// send transferred token and message back to Sepolia Sender contract
sendMessage(destinationChain, receiver, transferredToken, deposited);
The complete source code and instructions for this example can be found in the CCIP-DeFi Lending GitHub repository.
DeFi: Cross-Chain Liquidation Protection
Continuing with the theme of DeFi and lending and borrowing protocols, many DeFi users have multiple positions held across multiple DeFi protocols across multiple blockchains. This makes keeping track of portfolios and DeFi positions difficult. There are multiple third-party platforms, trackers, and even yield aggregators available, with DeFi users able to simply deploy collateral and let these third-party platforms handle the deploying and moving around of assets to optimize yield for the end-user. While these tools are a great way to abstract away some of the complexities of DeFi so users can simply earn yield, they are not trust-minimized. The user is entrusting the protocol to earn yield and to ensure positions are kept collateralized to avoid liquidation. In addition to this, if the end-user wants to have some sort of liquidation protection, they are required to have native assets deployed across all blockchains they have DeFi positions in, ready to be deployed to ensure collateralization of loans on the positions they have on each respective chain.
With CCIP and cross-chain token transfers and messaging, DeFi protocols, position monitoring apps, and yield aggregators can be enhanced to have cross-chain liquidation protection. This means that a user can have open positions on multiple DeFi protocols across multiple blockchains, and they can then allocate assets on a single chain to be used as extra collateral in the event that one or more of the loans requires extra funds to ensure collateralization. Here’s how that works at a high level:
- A DeFi end-user has debt positions across multiple protocols across multiple chains (e.g., Ethereum, Avalanche, Polygon), but they keep their liquidity safely in a vault on one chain (e.g., Aave on Ethereum).
- On each chain where the user has a debt position, a user’s implementation of Chainlink Automation monitors the debt ratio of the positions.
- If Automation detects that any of their loans are approaching the liquidation threshold, then Automation will send a CCIP message to the user’s liquidity chain (e.g., Ethereum) to request funds to be sent to top up the debt position.
- When the contract on the liquidity chain receives the CCIP message, it withdraws liquidity from Aave and sends a new CCIP message back to the requesting chain with the funds. The message includes enough information and tokens to fund the position and avoid a liquidation scenario.
The result of this is the user can have debt positions on multiple chains while still keeping liquidity on a single chain. The entire process is trust-minimized, with the user still 100% in control of their debt positions, and they do not have to manually withdraw and move funds across chains. Here’s how it works:
Chainlink Automation monitors all chains where a user has a debit position and determines if a message for funding needs to be sent. If required, the performUpkeep function will then send a CCIP message to the vault on the chain that has liquidity, requesting funds to be sent.
function checkUpkeep(
       bytes calldata checkData
   )
       external
       view
       override
       returns (bool upkeepNeeded, bytes memory performData)
   {
       upkeepNeeded =
           IMockLending(i_lendingAddress).healthFactor(i_onBehalfOf) <
           i_minHealthFactor &&
           !_isCcipMessageSent;
   }

function performUpkeep(bytes calldata performData) external override {
       require(
           !_isCcipMessageSent,
           "CCIP Message already sent, waiting for a response"
       );
       require(
           IMockLending(i_lendingAddress).healthFactor(i_onBehalfOf) <
               i_minHealthFactor,
           "Account can't be liquidated!"
       );

       // Ask for funds from LPSC on the source blockchain
       Client.EVM2AnyMessage memory message = Client.EVM2AnyMessage({
           receiver: abi.encode(i_lpsc),
           data: abi.encode(
               i_tokenAddress,
               IMockLending(i_lendingAddress).getBorrowedAmount(i_onBehalfOf)
           ),
           tokenAmounts: new Client.EVMTokenAmount[](0),
           extraArgs: "",
           feeToken: i_link
       });

       bytes32 messageId = IRouterClient(i_sourceChainRouter).ccipSend(
           i_sourceChainSelector,
           message
       );
       _isCcipMessageSent = true;

       emit MessageSent(messageId);
   }
The vault on the chain that has the liquidity then receives the request for funds and checks if it has enough funds to send back to the requesting chain or if it should withdraw some liquidity from a DeFi protocol (such as Aave) to ensure it has enough funds to send. Following this, it then initiates a CCIP programmable token transfer containing the funds requested as well as the message ID of the initially received message (so the destination contract on the blockchain that requested funds knows which request the funds are for):
function _ccipReceive(
       Client.Any2EVMMessage memory receivedMessage
   ) internal override {
       bytes32 messageId = receivedMessage.messageId;
       uint64 sourceChainSelector = receivedMessage.sourceChainSelector;
       address sender = abi.decode(receivedMessage.sender, (address));
       (address tokenAddress, uint256 amount) = abi.decode(
           receivedMessage.data,
           (address, uint256)
       );

       address tokenToReturn = s_destinationToSourceMap[
           keccak256(abi.encodePacked(tokenAddress, sourceChainSelector))
       ];

       uint256 currentBalance = IERC20(tokenToReturn).balanceOf(address(this));

       // If there are not enough funds in LPSC, withdraw additional from Aave vault
       if (currentBalance < amount) {
           withdrawFromVault(tokenToReturn, amount - currentBalance);
       }

       Client.EVMTokenAmount[] memory tokenAmounts;
       tokenAmounts[1] = (Client.EVMTokenAmount(tokenToReturn, amount));

       Client.EVM2AnyMessage memory messageReply = Client.EVM2AnyMessage({
           receiver: abi.encode(sender),
           data: abi.encode(msgId),
           tokenAmounts: tokenAmounts,
           extraArgs: "",
           feeToken: LINK
       });

       bytes32 replyMessageId = IRouterClient(i_router).ccipSend(
           sourceChainSelector,
           messageReply
       );

       //  emit ReplySent(replyMessageId,sourceChainSelector, messageId, sender, tokenToReturn, amount);
   }
Finally, the smart contract on the chain that requested funds to top up a debt position receives the CCIP programmable token transfer, matches up the request ID with it’s original request, and then takes the funds and deposits the transferred funds into the debt position in order to increase the collateralization of the loan and avoid a liquidation:
function _ccipReceive(
        Client.Any2EVMMessage memory receivedMessage
    ) internal override {
        _isCcipMessageSent = false;
        bytes32 requestMessageId = abi.decode(receivedMessage.data, (bytes32));
        uint256 amountToRepay = requested[requestMessageId];
        IMockLending(i_lendingAddress).repay(
            i_tokenAddress,
            amountToRepay,
            i_onBehalfOf
        );
    }
This example demonstrates how CCIP can be utilized in DeFi protocols and DeFi position monitoring applications to provide users with trust-minimized liquidation protection of their debt positions across multiple blockchains while allowing them to keep their funds and liquidity on a single blockchain.
The complete source code and instructions for this example can be found in the CCIP Liquidation Protector GitHub repository.
Cross-Chain Domain Name Service
Decentralized domain name services like ENS are extremely popular in Web3, as they facilitate the translation of human readable names to wallet addresses. In an ideal world, domain name services should not be specific to one chain, but each registered domain should propagate and live across all Ethereum chains, side chains, layer 2s, and app chains. This would allow users to have a single, unified identity across the entire Ethereum ecosystem, as opposed to having to register domains across multiple naming services or using interoperability solutions that aren’t trust-minimized.
However, to achieve this, domain name services would be required to communicate with other blockchains. Each instance of the naming service on a blockchain would need to be notified when new domains are registered, and there would need to be a way to perform “lookups” against a global name registry across all blockchains.
This example showcases how you could build a simplified cross-chain naming service application, where users could register domains on one chain and have that registration propagate across multiple other blockchains as well as resolve names to addresses across any blockchain.
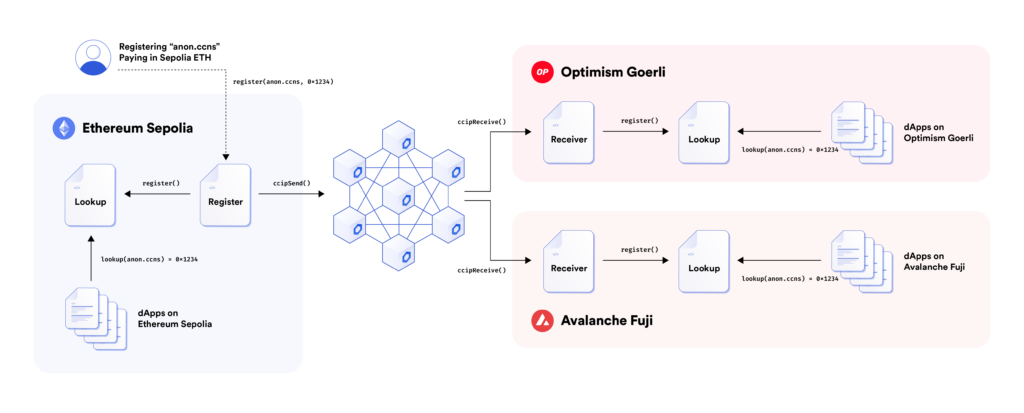
The first step is to deploy the CrossChainNameServiceRegister and CrossChainNameServiceLookup contracts to the Ethereum Sepolia network. This network will act as the “home” network where all registrations will occur, and then propagate to other chains.
When you register a new .ccns handle, the CrossChainNameServiceRegister contract will use CCIP to send a message to other supported blockchains containing information about the registered .ccns handle:
uint256 length = s_chains.length;
       for (uint256 i; i < length; ) {
           Chain memory currentChain = s_chains[i];

           Client.EVM2AnyMessage memory message = Client.EVM2AnyMessage({
               receiver: abi.encode(currentChain.ccnsReceiverAddress),
               data: abi.encode(_name, msg.sender),
               tokenAmounts: new Client.EVMTokenAmount[](0),
               extraArgs: Client._argsToBytes(
                   Client.EVMExtraArgsV1({
                       gasLimit: currentChain.gasLimit,
                       strict: currentChain.strict
                   })
               ),
               feeToken: address(0) // We leave the feeToken empty indicating we'll pay raw native.
           });

           i_router.ccipSend{
               value: i_router.getFee(currentChain.chainSelector, message)
           }(currentChain.chainSelector, message);

           unchecked {
               ++i;
           }
       }

       i_lookup.register(_name, msg.sender);
On all the supported receiving blockchains, the CrossChainNameServiceReceiver contract would be deployed. This contract would receive registered .ccns domains from the CrossChainNameServiceRegister contract, and would store them in the CrossChainNameServiceLookup contract deployed on that blockchain:
constructor(
        address router,
        address lookup,
        uint64 sourceChainSelector
    ) CCIPReceiver(router) {
        i_router = IRouterClient(router);
        i_lookup = ICrossChainNameServiceLookup(lookup);
        i_sourceChainSelector = sourceChainSelector;
    }

    function _ccipReceive(
        Client.Any2EVMMessage memory message
    ) internal override onlyFromSourceChain(message.sourceChainSelector) {
        (string memory _name, address _address) = abi.decode(
            message.data,
            (string, address)
        );

        i_lookup.register(_name, _address);
    }
Finally, the CrossChainNameServiceLookup contract would be deployed on all blockchains, including the registering blockchain (in this case, Sepolia), as well as all destination blockchains. This contract would be used to store all registered .ccns handles and act as an interface to perform lookups to translate names to addresses:
function register(
        string memory _name,
        address _address
    ) external onlyCrossChainNameService {
        if (lookup[_name] != address(0)) revert AlreadyTaken();

        lookup[_name] = _address;
    }
Using this simple design pattern, it becomes possible to create a simple cross-chain domain name service where users can register a domain once, then own and use it across multiple blockchains.
The complete source code and instructions for this example can be found in the Cross-Chain Name Service GitHub repository.
Cross-Chain NFTs
NFTs are one of the most popular use cases in Web3. Each NFT project is usually on a single blockchain, or the project itself has multiple deployments across multiple chains, with end-users having to mint the NFT more than once if they want to own it on multiple blockchains.
With CCIP Arbitrary Messaging, NFT projects can allow for their assets to be minted once on a single chain, paid for once by the minter, and then have them propagated to the user on other blockchains. This means users can own and share their NFT, irrespective of which network they are using. CCIP can also be used to “burn and mint” NFTs across chains, allowing users to move their NFTs from one chain to another. Here is an example of how the first scenario works:
The MyNFT contract contains a simple NFT smart contract with a mint function:
function mint(address to) public {
    unchecked {
        tokenId++;
    }
    _safeMint(to, tokenId);
}
The sourceMinter contract is deployed on the source chain, and contains logic in its mint function to send a CCIP Cross-Chain Message with the ABI-encoded mint function signature from the MyNFT.sol smart contract to the destination blockchain:
function mint(
        uint64 destinationChainSelector,
        address receiver,
        PayFeesIn payFeesIn
    ) external {
        Client.EVM2AnyMessage memory message = Client.EVM2AnyMessage({
            receiver: abi.encode(receiver),
            data: abi.encodeWithSignature("mint(address)", msg.sender),
            tokenAmounts: new Client.EVMTokenAmount[](0),
            extraArgs: "",
            feeToken: payFeesIn == PayFeesIn.LINK ? i_link : address(0)
        });

        uint256 fee = IRouterClient(i_router).getFee(
            destinationChainSelector,
            message
        );

        bytes32 messageId;

        if (payFeesIn == PayFeesIn.LINK) {
            LinkTokenInterface(i_link).approve(i_router, fee);
            messageId = IRouterClient(i_router).ccipSend(
                destinationChainSelector,
                message
            );
        } else {
            messageId = IRouterClient(i_router).ccipSend{value: fee}(
                destinationChainSelector,
                message
            );
        }

        emit MessageSent(messageId);
The DestinationMinter smart contract will receive the CCIP Cross-Chain Message with the ABI-encoded mint function signature as a payload, and call the mint function in the MyNFT smart contract function using it. The MyNFT smart contract will then mint the new NFT to the msg.sender account from the mint() function of the SourceMinter smart contract, i.e. to the same account address for which the NFT was minted on the source chain:
function _ccipReceive(
    Client.Any2EVMMessage memory message
) internal override {
    (bool success, ) = address(nft).call(message.data);
    require(success);
    emit MintCallSuccessfull();
}
The end result is that the user that minted the NFT now owns the NFT on multiple chains, and they only had to mint and pay for it once. If the NFT project wants to remain strictly non-fungible even across blockchains, this solution can also be easily modified to mint the NFT on a destination blockchain and burn it on the source chain afterwards, ensuring there is only ever one version of it across all blockchains.
The complete source code and instructions for this example can be found in the Cross-Chain NFT GitHub repository.
Gaming: Cross-Chain Tic-Tac-Toe
In the past couple of years, Web3 gaming has become massively popular. However, like DeFi, gaming is very fragmented, with games and their assets usually being specific to a certain chain. But like traditional gaming, the ultimate goal or best experience is when you have gamers that can play a game together, irrespective of the hardware or software they’re playing on. Just like how a PC gamer can play games with Xbox console owners, there should be no reason why someone can’t play a game on Polygon with someone playing on Avalanche. This is known as cross-platform gaming.
This translates perfectly to turn-based Web3 games and other games that do not require fast real-time interaction. Web3 gaming suffers from user fragmentation, with gamers preferring to play on their chain of choice and use their preferred digital assets. CCIP enables Web3 games to be truly cross-chain, facilitating the transferring of assets across chains and enabling a shared game state across multiple blockchains, allowing gamers to play each other regardless of the chain they want to use. If you want to reach as many gamers as possible, then it makes sense to have your game deployed across multiple chains and design it in a way where all players can play against or with each other.
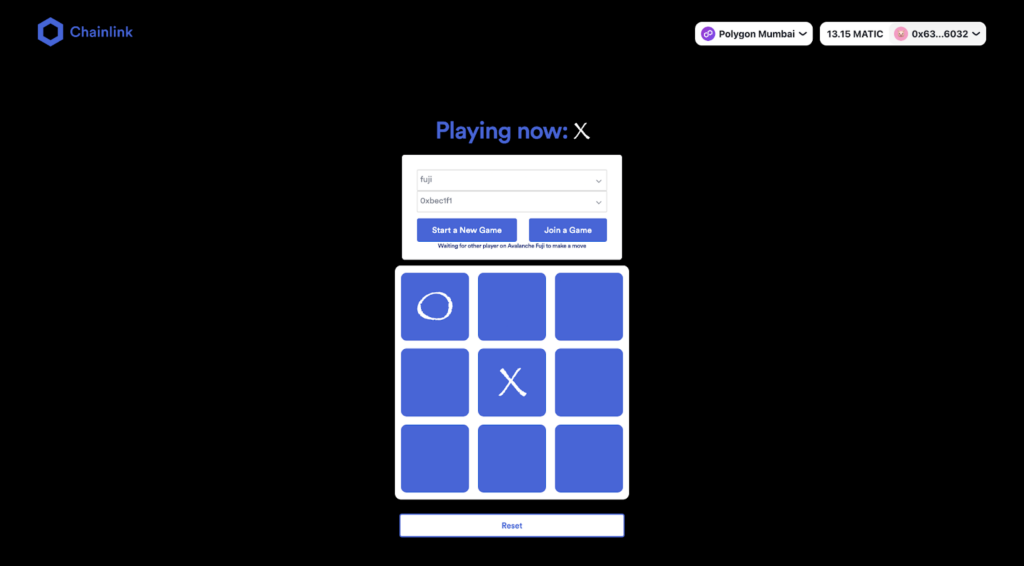
A simple demonstration of this cross-chain gaming design pattern can be shown with a turn-based strategy game, such as Tic-Tac-Toe. In this example, we have a game smart contract that is deployed on multiple blockchains. Users can then start a game on their chain of choice and then share the game session ID with their friends. Their friends can then join the game from another chain if they wish. On game creation, CCIP will have shared the game details and initial state with all the other chains:
struct GameSession {
        bytes32 sessionId;
        address player_1; // player who starts the game
        address player_2; // the other player in the game
        address winner; // winner of game
        address turn; // check who takes action in next step
        uint8[9] player1Status; // current status for player 1
        uint8[9] player2Status; // current status for player 2
    }
    mapping(bytes32 => GameSession) public gameSessions;
    bytes32[] public sessionIds;


function start(uint64 destinationChainSelector, address receiver) external {
        bytes32 uniqueId = keccak256(abi.encodePacked(block.timestamp, msg.sender));
        sessionIds.push(uniqueId);
        gameSessions[uniqueId]= GameSession(
            uniqueId,
            msg.sender,
            address(0),
            address(0),
            msg.sender,
            initialCombination,
            initialCombination
            );

        sendMessage(destinationChainSelector, receiver, gameSessions[uniqueId]);
    }
Once the first player has taken a turn after initiating the game, the second player on another blockchain will see the updated game state on their game smart contract once the CCIP message is successfully processed. Player 2 will then take their turn, which will generate a CCIP message to get sent back to player 1 and update the state of the game on their chain:
function _ccipReceive(
        Client.Any2EVMMessage memory any2EvmMessage
    ) internal override {
        bytes32 messageId = any2EvmMessage.messageId; // fetch the messageId
        uint64 sourceChainSelector = any2EvmMessage.sourceChainSelector; // fetch the source chain identifier (aka selector)
        address sender = abi.decode(any2EvmMessage.sender, (address)); // abi-decoding of the sender address
        GameSession memory message = abi.decode(any2EvmMessage.data, (GameSession)); // abi-decoding of the sent string message
        receivedMessages.push(messageId);
        Message memory detail = Message(sourceChainSelector, sender, message);
        messageDetail[messageId] = detail;
        gameSessions[message.sessionId] = message;
        sessionIds.push(message.sessionId);

        emit MessageReceived(messageId, sourceChainSelector, sender, message);
    }


 function move(
        uint256 x,
        uint256 y,
        uint256 player,
        bytes32 sessionId,
        uint64 destinationChainSelector,
        address receiver)
        public
    {
        GameSession memory gs = gameSessions[sessionId];
        // make sure the game session setup and not over.
        require(gs.player_1 != address(0), "the session is not setup, please start game first!");
        require(gs.winner == address(0), "the game is over");

        // make sure the player is in the game session
        require(player == 1 || player == 2, "you must be player1 or player2"); //this is used to when player has the same address

        if(player == 1) {
            // make sure it is player1's turn to move
            require(gs.player_1 == msg.sender && gs.turn == msg.sender, "it is not your turn");

            // 1. if the position is not taken by the opponent, then take the position
            if(gs.player1Status[x * 3 + y] == 0 && gs.player2Status[x * 3 + y] == 0) {
               gameSessions[sessionId].player1Status[x * 3 + y] = 1;

               // 2. check if player1 wins or make the turn to the opponent, send the message
               if(checkWin(keccak256(abi.encodePacked(gameSessions[sessionId].player1Status)))) {
                   gameSessions[sessionId].winner = gameSessions[sessionId].player_1;
               } else {
                   gameSessions[sessionId].turn = gameSessions[sessionId].player_2;
               }
               sendMessage(destinationChainSelector, receiver, gameSessions[sessionId]);
            } else {
                revert("the position is occupied");
            }
        } else if(player == 2) {
            // make sure it is player2's turn to move, this is the first step for player2
            require((gs.player_2 == msg.sender && gs.turn == msg.sender) || gs.player_2 == address(0), "it is not your turn");

            if(gs.player_2 == address(0)) {
                gameSessions[sessionId].player_2 = msg.sender;
            }

            // 1. if the position is not taken by the opponent, then take the position
            if(gs.player1Status[x * 3 + y] == 0 && gs.player2Status[x * 3 + y] == 0) {
               gameSessions[sessionId].player2Status[x * 3 + y] = 1;

               // 2. check if player1 wins or make the turn to the opponent, send the message
               if(checkWin(keccak256(abi.encodePacked(gameSessions[sessionId].player2Status)))) {
                   gameSessions[sessionId].winner = gameSessions[sessionId].player_2;
               } else {
                   gameSessions[sessionId].turn = gameSessions[sessionId].player_1;
               }
               sendMessage(destinationChainSelector, receiver, gameSessions[sessionId]);
            } else {
                revert("the position is occupied");
            }
        }
    }
Player 1 will then see the updated game state and make their move once again. This back and forth of CCIP messages between chains will continue to happen as the gamers make their moves until the game reaches a conclusion and a winner is declared. The important thing to note here is that the game smart contracts on both chains both maintain the game state, with CCIP being used to send and receive messages to ensure game state is maintained across both blockchains:
function checkWin(bytes32 combination) public view returns (bool) {
        return wcs[combination];
    }

    /// @notice Sends data to receiver on the destination chain.
    /// @dev Assumes your contract has sufficient native asset (e.g, ETH on Ethereum, MATIC on Polygon...).
    /// @param destinationChainSelector The identifier (aka selector) for the destination blockchain.
    /// @param receiver The address of the recipient on the destination blockchain.
    /// @param message The string message to be sent.
    /// @return messageId The ID of the message that was sent.
    function sendMessage(
        uint64 destinationChainSelector,
        address receiver,
        GameSession memory message
    ) public returns (bytes32 messageId) {
        // Create an EVM2AnyMessage struct in memory with necessary information for sending a cross-chain message
        Client.EVM2AnyMessage memory evm2AnyMessage = Client.EVM2AnyMessage({
            receiver: abi.encode(receiver), // ABI-encoded receiver address
            data: abi.encode(msg), // ABI-encoded string message
            tokenAmounts: new Client.EVMTokenAmount[](0), // Empty array indicating no tokens are being sent
            extraArgs: Client._argsToBytes(
                Client.EVMExtraArgsV1({gasLimit: 400_000, strict: false}) // Additional arguments, setting gas limit and non-strict sequency mode
            ),
            feeToken: address(0) // Setting feeToken to zero address, indicating native asset will be used for fees
        });

        // Initialize a router client instance to interact with cross-chain router
        IRouterClient router = IRouterClient(_router);

        // Get the fee required to send the message
        uint256 fees = router.getFee(destinationChainSelector, evm2AnyMessage);

        // Send the message through the router and store the returned message ID
        messageId = router.ccipSend{value: fees}(
            destinationChainSelector,
            evm2AnyMessage
        );

        // Emit an event with message details
        emit MessageSent(
            messageId,
            destinationChainSelector,
            receiver,
            message,
            fees
        );

        // Return the message ID
        return messageId;
    }
The complete source code and instructions for this example can be found in the CCIP Tic-Tac-Toe GitHub repository.
Conclusion
From cross-chain DeFi and NFTs to games that run across multiple blockchains, CCIP enables the realization of cross-chain smart contracts, true DeFi composability across all blockchains, and a much more unified Web3.
If you are building a cross-chain application that uses CCIP, we would love to hear about it. Please reach out and email us at [email protected]. If you are interested in taking your CCIP-enabled application to mainnet, please reach out to us.
Disclaimer: This post is for informational purposes only and contains statements about the future, including anticipated product features, development, and timelines for the rollout of these features. These statements are only predictions and reflect current beliefs and expectations with respect to future events; they are based on assumptions and are subject to risk, uncertainties, and changes at any time. Chainlink CCIP is in the “Early Access” stage of development, which means that Chainlink CCIP currently has functionality which is under development and may be changed in later versions. There can be no assurance that actual results will not differ materially from those expressed in these statements, although we believe them to be based on reasonable assumptions. All statements are valid only as of the date first posted. These statements may not reflect future developments due to user feedback or later events and we may not update this post in response. Chainlink CCIP is a messaging protocol which does not hold or transfer any assets. Please review the Chainlink Terms of Service which provides important information and disclosures.


