How To Build a dApp in Three Steps
Decentralized applications, or dApps, are applications that don’t rely on a centralized server or backend but instead make use of Web3 technologies such as blockchains and oracles to contain their logic and backend functions, making them tamper-proof and secure.
In this technical tutorial, you’ll learn how to create a simple end-to-end dApp that allows the user to retrieve and store the current price of Ethereum in a smart contract. The completed demo can be found on GitHub.
Requirements
Please ensure you have the following installed:
What Is a Decentralized Application?
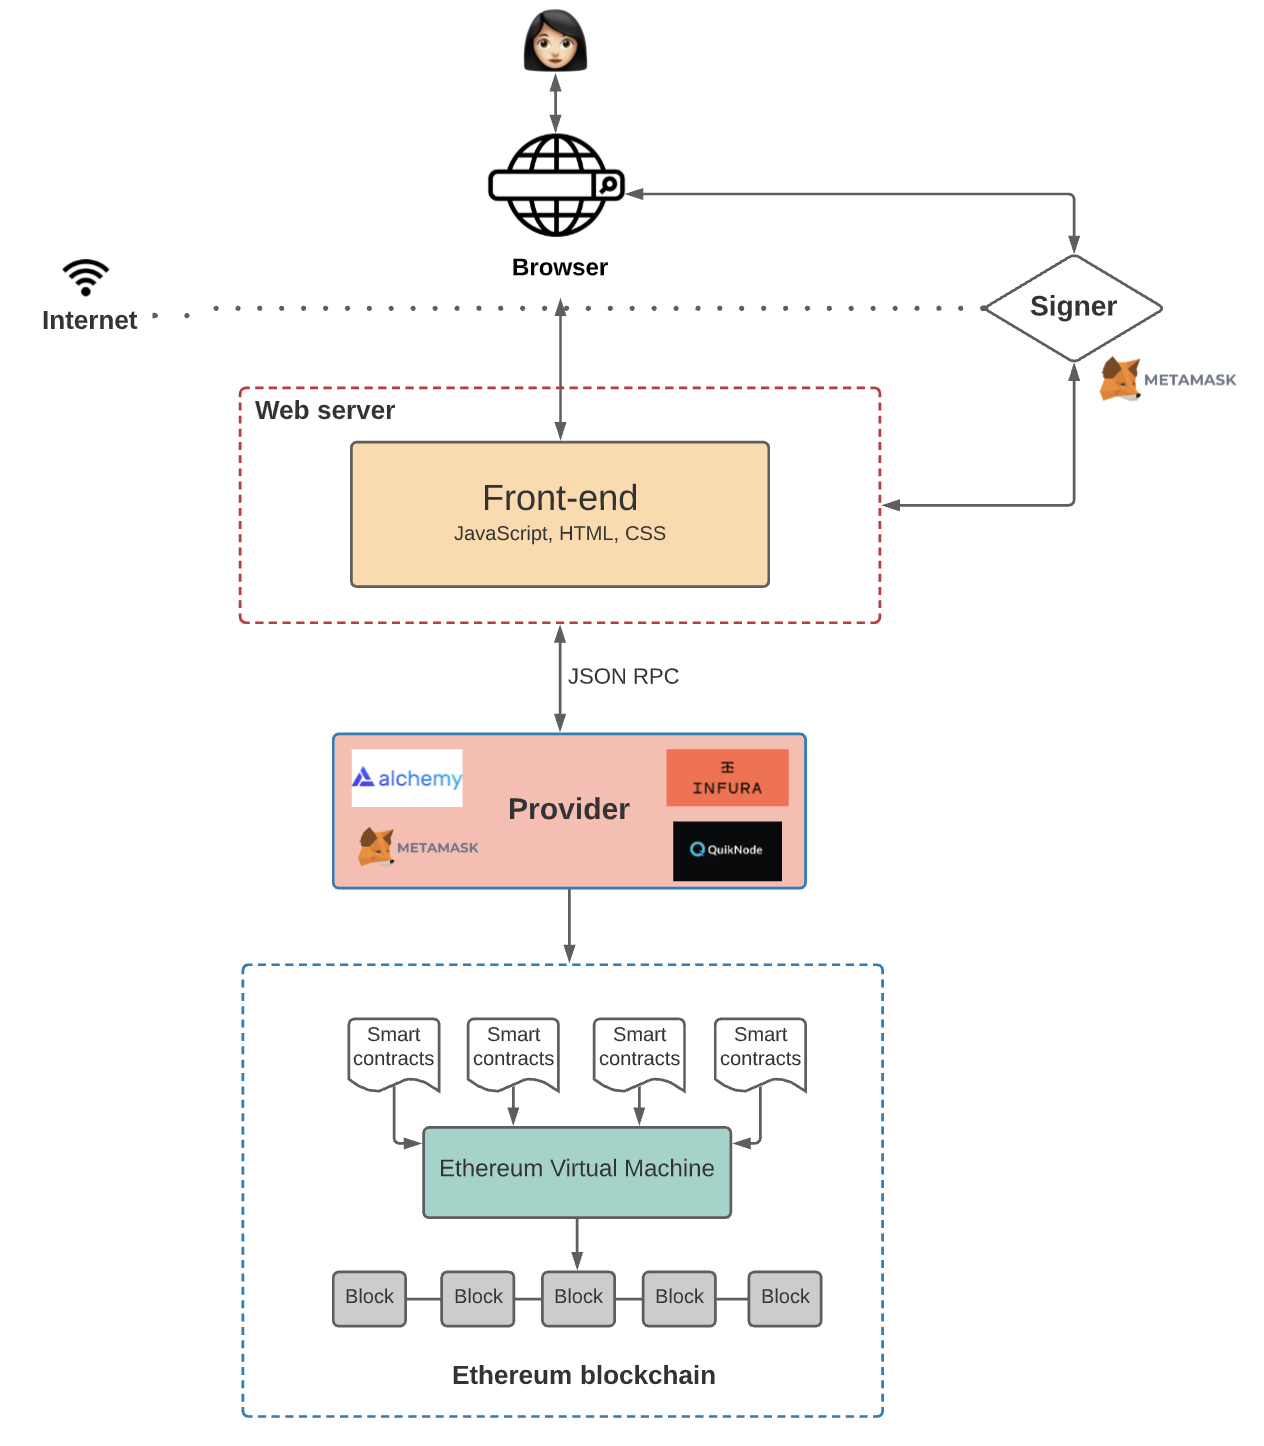
A dApp has its backend code running on a blockchain, as opposed to a traditional application where the backend code runs on centralized servers. A dApp can have frontend code and user interfaces written in any language and deployed on any server or servers to interact with the backend logic.
Due to housing their backend logic in highly secure, tamper-proof smart contracts, dApps enjoy many benefits not possible with traditional Web2 systems:
- Zero downtime
- Enhanced privacy
- Censorship resistance
- Trust-minimized execution of logic
However, these benefits also come with some drawbacks. Maintenance of dApps is more involved, as code deployed to the blockchain isn’t modifiable by default. There is also a performance overhead due to running the logic across a distributed network as opposed to a centralized server. In addition to this, user experience can also suffer due to the dApp user needing to go through the complexity of having a Web3 wallet and funding it with enough cryptocurrency to pay for transaction fees.
Components of a dApp
The components of a dApp can be split into three different categories: smart contracts, the frontend logic and user interface, and data storage.
Smart Contracts
Smart contracts store the business logic for a dApp along with the state of the application. This is the biggest difference between a dApp and a traditional web application, and what gives a dApp all the benefits mentioned above.
Frontend/User Interface
While the backend logic of a dApp requires a developer to write smart contract code to be deployed on a blockchain, the frontend or client side of a dApp can use standard web technologies such as HTML and JavaScript. This allows developers to use familiar tools, libraries, and frameworks. The client-side user interface is usually linked to the smart contracts via client-side libraries such as Web3.js or Ethers.js, which are bundled with the frontend resources and sent to the browser together with the UI. Interactions with smart contracts such as signing messages and sending transactions to the smart contracts are usually conducted via a browser-based Web3 wallet, such as MetaMask.
Data Storage
Most applications need to store data, but due to the distributed nature of blockchains, storing large amounts of data on-chain is not feasible, and can get very expensive. This is why many dApps that need to store data make use of off-chain data storage services such as IPFS or Filecoin, leaving the blockchain to store crucial business logic and state only.
You can also use traditional cloud-based storage services. However, many developers choose decentralized options to maintain and extend the trust-minimized properties that a blockchain-powered dApp provides.
Now that we know the components of a dApp, let’s go through an example of building a simple end-to-end example.
Step One: Creating the Smart Contract
The smart contract in our dApp will be a simple example used to look up data and reflect state changes on the blockchain. In this case, we will be looking up the value of ETH/USD using the ETH/USD Chainlink Data Feed and then permanently storing the result in the smart contract.
The first step is to open up our docs and head to the Using Data Feeds page. From there you can copy the example source code and paste it into a new file in your IDE of choice (e.g. Visual Code), or you can press the “Open In Remix” button and work from the web version of Remix.
In this example, we’ll work with Visual Studio Code and Hardhat, an Ethereum Virtual Machine development framework.
First, we’ll create a new directory structure for our dApp, with a backend folder for the smart contract code:
mkdir chainlink-dapp-example
cd chainlink-dapp-example
mkdir backend
cd backend
Next, we’ll open the created directory for our dApp in our VS Code editor and then install Hardhat:
npm init -y
npm install --save-dev hardhat
npx hardhat

(choose create javascript project, choose default parameters)
Once this is done, remove the Touch.solfile in the “contracts” folder, create a new file in that folder called PriceConsumerV3.sol, and save. This is where we will create our smart contract, so copy the code from the Chainlink docs example into this file and save it.
In the sample code, you’ll see the demo contract already has a function getLatestPrice to lookup the current price of Ethereum on the Rinkeby ETH/USD Data Feed.
    function getLatestPrice() public view returns (int) {
        (
            /*uint80 roundID*/,
            int price,
            /*uint startedAt*/,
            /*uint timeStamp*/,
            /*uint80 answeredInRound*/
        ) = priceFeed.latestRoundData();
        return price;
We need to create a new variable and a new function to store this value on the smart contract. The first step is to create a new variable under the existing priceFeedone to store the price of Ethereum:
int public storedPrice;
Next, we need to create a new function that can be called by the dApp frontend. The function should look up the latest price of Ethereum by calling the existing getLatestPrice function. Then it should store the value in the new storedPrice parameter:
    function storeLatestPrice() external {
        storedPrice = getLatestPrice();
    }
Your new contract should look like this:
// SPDX-License-Identifier: MIT
pragma solidity ^0.8.7;

import "@chainlink/contracts/src/v0.8/interfaces/AggregatorV3Interface.sol";

contract PriceConsumerV3 {

    AggregatorV3Interface internal priceFeed;
    int public storedPrice;

    /**
     * Network: Rinkeby
     * Aggregator: ETH/USD
     * Address: 0x8A753747A1Fa494EC906cE90E9f37563A8AF630e
     */
    constructor() {
        priceFeed =
AggregatorV3Interface(0x8A753747A1Fa494EC906cE90E9f37563A8AF630e);
    }

    /**
     * Returns the latest price
     */
    function getLatestPrice() public view returns (int) {
        (
            /*uint80 roundID*/,
            int price,
            /*uint startedAt*/,
            /*uint timeStamp*/,
            /*uint80 answeredInRound*/
        ) = priceFeed.latestRoundData();
        return price;
    }

    function storeLatestPrice() external {
        storedPrice = getLatestPrice();
    }
}
Step Two: Deploying the Smart Contract
Now you’re ready to compile and deploy your contract to the Rinkeby test network. Be sure to fund your MetaMask wallet with some Rinkeby ETH first.
If you’re using Remix, you can compile and deploy your contract using the standard Remix process. If you’re using an IDE like Visual Studio Code, we recommend using Hardhat to manage your contracts.
The first step to compiling and deploying your contract is to install the Hardhat tools library, the Chainlink contracts library, and the dotenv library for storing passwords and sensitive keys in a separate .env file:
npm install --save-dev @nomicfoundation/hardhat-toolbox
npm install @chainlink/contracts --save
npm install dotenv
Next, replace the contents of your hardhat-config.js file with the following:
require("@nomicfoundation/hardhat-toolbox");

//require("@nomiclabs/hardhat-ethers")
 require('dotenv').config()

 const RINKEBY_RPC_URL = process.env.RINKEBY_RPC_URL ||
"https://eth-rinkeby.alchemyapi.io/v2/your-api-key"
 const PRIVATE_KEY = process.env.PRIVATE_KEY || "abcdef"

 module.exports = {
     defaultNetwork: "rinkeby",
     networks: {
         hardhat: {
             // // If you want to do some forking, uncomment this
             // forking: {
             // url: MAINNET_RPC_URL
             // }
         },
         localhost: {
         },
         rinkeby: {
             url: RINKEBY_RPC_URL,
             accounts: [PRIVATE_KEY],
             saveDeployments: true,
         },
     },

  solidity: "0.8.9",
};
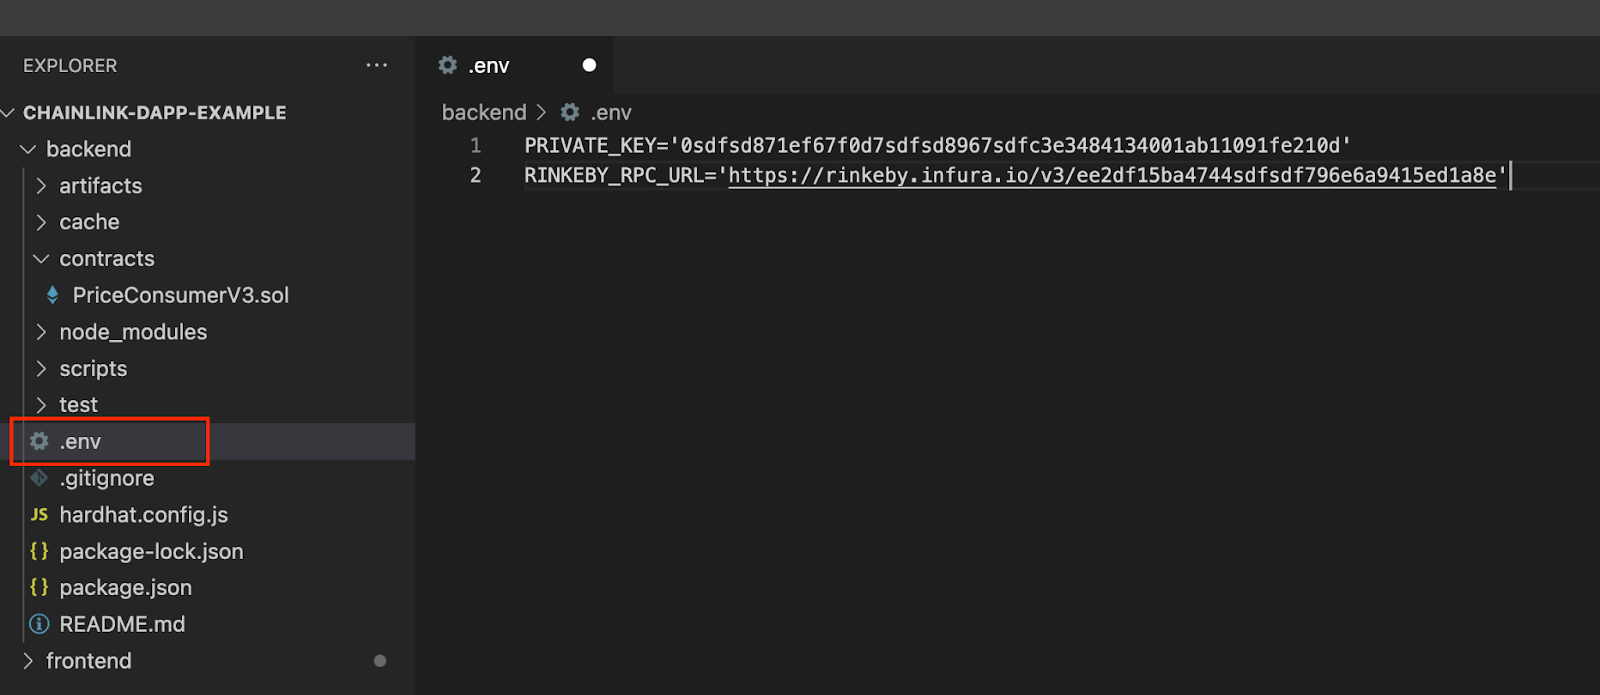
The next step is to create a .env file in your backend folder. You then need to extract your Private Key from your Web3 wallet, and paste it into the value section of the PRIVATE_KEY field in the .env file. Please ensure you are using a new Web3 wallet that doesn’t have any funds on mainnet.
Once this is done, you need to obtain an RPC endpoint to gain access to the Rinkeby network. You can do this by pasting in the RPC URL in the RINKEBY_RPC_URL field in the .env file. We recommend signing up for a free Infura or Alchemy account to get an RPC URL.
The next step is to modify the contents of the deploy.js file in the ‘scripts’ folder to ensure it will deploy your new contract. Open the file and ensure the following code replaces what is already in there. This will simply take your compiled PriceConsumerV3 contract and attempt to deploy it. Remember to save your changes.
// We require the Hardhat Runtime Environment explicitly here. This is optional
// but useful for running the script in a standalone fashion through `node <script>`.
//
// You can also run a script with `npx hardhat run <script>`. If you do that, Hardhat
// will compile your contracts, add the Hardhat Runtime Environment's members to the
// global scope, and execute the script.
const hre = require("hardhat");

async function main() {

  const PriceConsumer = await hre.ethers.getContractFactory("PriceConsumerV3");
  const priceConsumer = await PriceConsumer.deploy();

  await priceConsumer.deployed();

  console.log("Contract deployed to:", priceConsumer.address);
}

// We recommend this pattern to be able to use async/await everywhere
// and properly handle errors.
main().catch((error) => {
  console.error(error);
  process.exitCode = 1;
});
You’re now ready to compile and deploy your smart contract to the Rinkeby network using Hardhat:
npx hardhat compile
npx hardhat run --network rinkeby scripts/deploy.js
You should see a message similar to the one below, showing the address on Rinkeby that your smart contract was deployed to. Note this address down, we will need it for the next step.

Congratulations, you’re now ready to move onto the frontend part of your dApp!
Step Three: Creating the Frontend Application
The frontend logic and user interface of your dApp can be built using a wide variety of different frameworks.
React is one of the most popular JavaScript libraries for building feature-rich web user interfaces, and is therefore used by a lot of Web3 dApps. In addition to this, Ethers.js is a JavaScript library for connecting to and interacting with EVM-based blockchains and smart contracts. When you combine the two, you have a sensible starting point for building out the frontend of your dApp.
In this section, we’ll create a new React application using the create-react-app boilerplate generator. Then we’ll introduce some off-chain logic that uses Ethers.js to connect the user interface with the deployed smart contract, giving us a full end-to-end dApp.
Creating the React Application
The first step for creating the frontend is to install and implement the create-react-app boilerplate project, then modify it to suit our dApp. The first step is to install the library into a new “frontend” folder:
cd ..
npx create-react-app frontend
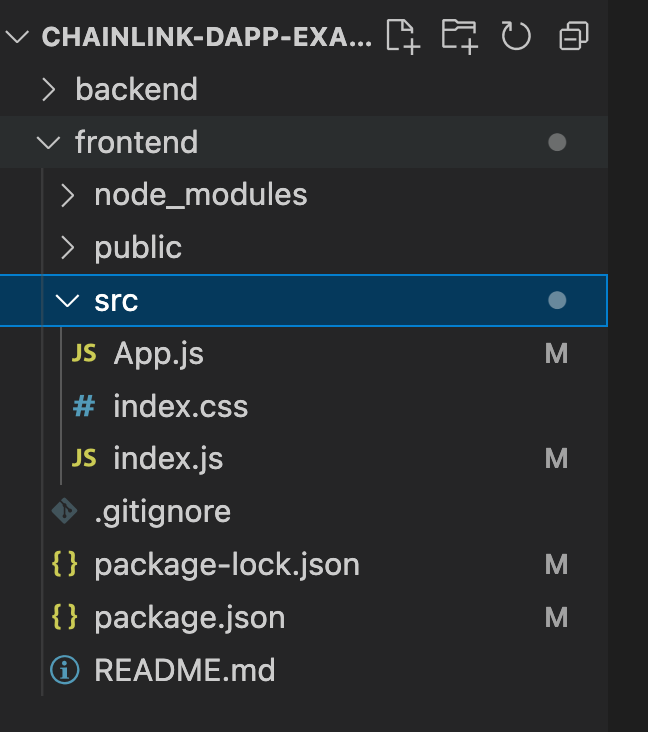
Once this has completed, you should see a new “frontend” folder in your project with all the associated React code. Expand the “frontend” folder and perform the following actions:
- Delete /src/setupTests.js
- Delete /src/ReportWebVitals.js
- Delete /src/logo.svg
- Delete /src/App.test.js
- Delete /src/App.css
The folder structure should look like the following:
We’re now almost ready to start modifying the React application code. But first, be sure to install the libraries for Bootstrap and Ethers.js. Bootstrap is a popular frontend CSS framework that comes with React-friendly UI widgets with CSS styling applied, while Ethers.js allows us to connect our frontend to deployed smart contracts on the blockchain. Ensure these commands are run from within the “frontend” folder.
cd frontend
npm install bootstrap
npm install ethers
Now we’re ready to modify the React application code. Open up the App.js file in the /src/ folder and remove the contents. We will start building it from scratch.
The first step is to tell the application we want to use React (including useEffect and useState libraries) and Ethers.js:
import React, { useEffect, useState } from 'react';
import { ethers } from "ethers";
Next, create a function called “App” and export it:
function App() {

}

export default App;
Now we’ll start filling out the contents of the “App” function. Add the following code to it. The code does the following:
- Sets up the storedPrice and setStoresPrice react hooks.
- Creates a connection to your MetaMask Web3 wallet.
- Sets the deployed smart contract address and ABI. Both are required by Ethers.js for us to interact with the deployed smart contract.
- The smart contract address can be obtained from the deployment step earlier in this guide. Plug this value in place of the REPLACE_WITH_DEPLOYED_CONTRACT_ADDRESS string.
- The smart contract ABI can be obtained from the /backend/artifacts/contracts/PriceConsumerV3.json file, in the
abielement. You can use a code minifier to format it in a better way for storing in your application.
  const [storedPrice, setStoredPrice] = useState('');
  const provider = new ethers.providers.Web3Provider(window.ethereum)
  const signer = provider.getSigner()
  const contractAddress = <REPLACE_WITH_DEPLOYED_CONTRACT_ADDRESS>’';
  const ABI =
'[{"inputs":[],"stateMutability":"nonpayable","type":"constructor"},{"inputs":[],"name":"getLatestPrice","outputs":[{"internalType":"int256","name":"","type":"int256"}],"stateMutability":"view","type":"function"},{"inputs":[],"name":"storeLatestPrice","outputs":[],"stateMutability":"nonpayable","type":"function"},{"inputs":[],"name":"storedPrice","outputs":[{"internalType":"int256","name":"","type":"int256"}],"stateMutability":"view","type":"function"}]'
  const contract = new ethers.Contract(contractAddress, ABI, signer);
Now we’ll create two functions to be used in our application:
- getStoredPrice will connect to the deployed smart contract and obtain the current value of the
storedPrice()getter function. - setNewPrice will call the deployed smart contract’s
storeLatestPricefunction, wait for the transaction to complete, then call thegetStoredPricefunction to retrieve the stored price in the smart contract.
We’ll also add a call to getStoredPrice in our App function so that it will initially call the getter function on page load:
const getStoredPrice = async () => {
    try {
      const contractPrice = await contract.storedPrice();
      setStoredPrice(parseInt(contractPrice) / 100000000);
    } catch (error) {
      console.log("getStoredPrice Error: ", error);
    }
  }

  async function updateNewPrice() {
    try {
      const transaction = await contract.storeLatestPrice();
      await transaction.wait();
      await getStoredPrice();
    } catch (error) {
      console.log("updateNewPrice Error: ", error);
    }

  }

  getStoredPrice()
  .catch(console.error)
The final step in creating the frontend is for your application to return the JSX code for the browser to render. Paste in the following code at the bottom of your App function, under the getStorePrice() call. This code does the following:
- Returns a simple two-column grid layout.
- The first column contains the currently stored ETH/USD price in the smart contract.
- The second column contains a button that the user can use to interact with the smart contract and update the stored price. Pressing the button calls the
setNewPricefunction above.
  return (
    <div className="container">
      <div className="row mt-5">

        <div className="col">
          <h3>Stored Price</h3>
          <p>Stored ETH/USD Price: {storedPrice}</p>
        </div>

        <div className="col">
          <h3>Update Price</h3>
          <button type="submit" className="btn btn-dark"
onClick={updateNewPrice}>Update</button>
        </div>
      </div>
    </div>
  );
Your application is now ready. If required, you can compare your code to the completed example to ensure you’ve done everything correctly. Now you’re ready to run your dApp.
Running Your dApp
After ensuring you have all the files saved, start your dApp locally by running the following command from the frontend folder:
npm run start
After the application loads, a new window should appear in your browser displaying your dApp user interface. You should also receive a popup notification from MetaMask asking to connect your wallet to the application.
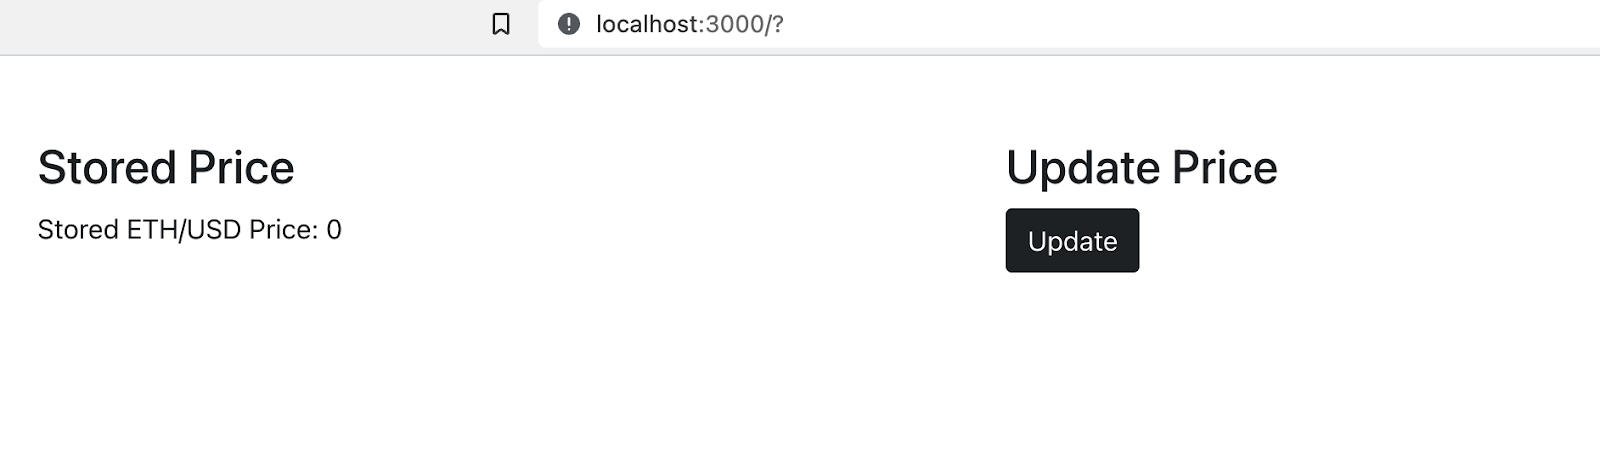
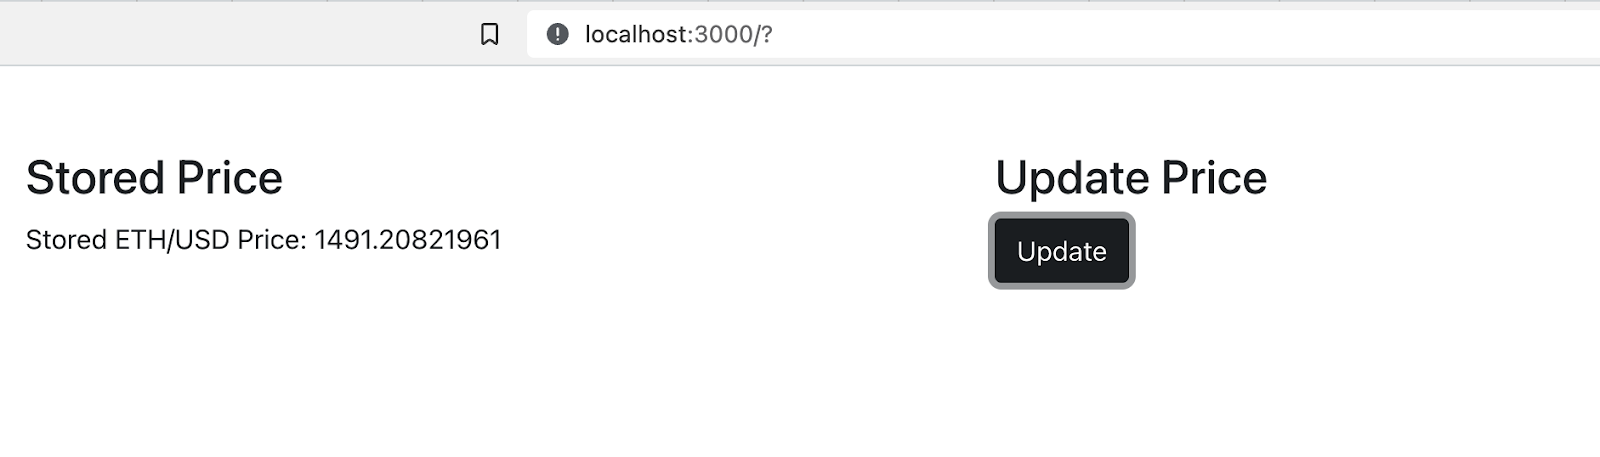
After you verify that you’ve funded your MetaMask account with some Rinkeby ETH, click the “Update” button on the dApp UI to interact with your deployed smart contract on the Rinkeby network. You should receive a notification from MetaMask asking you to confirm the transaction. After you complete this, within a few seconds, your dApp should automatically refresh, and the current price of Ethereum should appear in the “Stored Price” section:
Congratulations, you’ve now successfully created, deployed, and interacted with a simple dApp! In this guide, you’re just running the frontend locally on your computer, but if you want you can deploy it to a cloud-based server, or even decentralize the frontend too and deploy it to IPFS! You can also play around with the application’s CSS to change the look and feel of the user interface.
Summary
Decentralized applications are applications that replace traditional backend server processing with Web3 technology such as blockchains and smart contracts, giving them unique security and censorship-resistance guarantees that aren’t possible with traditional web applications.
In this technical demo, we created a simple dApp that contains a smart contract that obtains the latest price from the ETH/USD Chainlink Data Feed and stores the result in the smart contract. We then created a simple UI that made use of React and Ethers.js to connect to and interact with the deployed smart contract.
Learn more about Chainlink by visiting chain.link or reading the documentation at docs.chain.link. You can also subscribe to the Chainlink Newsletter to stay up to date with everything in the Chainlink stack. To discuss an integration, reach out to an expert.


