11 Ways To Use Chainlink Functions in Your Decentralized Applications
- 11 Ways To Use Chainlink Functions in Your Decentralized Applications
- Meta: Connecting Social Media to Web3
- Lens Protocol: Creating Open Actions Using Web2 Data and Events
- Twilio: Generating Alerts Based on Onchain Events
- Amazon Web Services (AWS): Integrating Web3 With Cloud Systems and APIs
- Amazon Web Services (AWS): Connecting to IoT Devices Using AWS IoT Core
- Google: Integrating Decentralized Applications With Google Cloud and Vertex AI
- Google: Bringing Cloud Datasets Onchain
- Google: Integrating Decentralized Applications With BigQuery and Analytics
- Chainalysis: Onchain Finance
- The Graph: Leveraging Indexed Data for DeFi Applications
- Decentralized Insurance: Leveraging Offchain Weather Data for Parametric Insurance
- Conclusion
Chainlink Functions is a serverless developer platform for Web3 that enables smart contracts to connect to any API and get decentralized and verifiable consensus on the result of any code you want to run.
This is extremely powerful, because traditionally smart contracts running on a blockchain cannot easily access data and systems offchain, and doing complex computation onchain can be expensive.
Below are a few sample use cases, ranging from NFT giveaways to crypto payments for music streams, that walk through how Chainlink Functions can connect decentralized applications to any API. These technical tutorials with code examples were built in collaboration with leading cloud and Web2 platforms such as Meta, Twilio, AWS, and Google Cloud to demonstrate Chainlink Functions’ extensive connectivity and showcase the new possibilities when the expansive, feature-rich world of Web2 is combined with the highly automated and secure infrastructure of Web3.
All examples can be found on the Chainlink Labs GitHub and can be deployed today.
Meta: Connecting Social Media to Web3
Social media platforms like Instagram and Facebook serve billions of users, enabling them to stay connected with their peers and consume content. Most businesses have a heavy online presence on these platforms, with many of them driving a large majority of their business via these channels.
One use case that combines the powerful connectivity and reach of social media applications with the unique properties of the Web3 world is social media promotions and campaigns. Millions of businesses worldwide leverage the reach of social media platforms like Facebook and Instagram to share and promote new product launches via competitions, campaigns, and giveaways, with customers able to win special prizes by interacting with content shared by business pages.
In addition to this, digital collectibles were integrated into Instagram in 2022, offering creators the opportunity to share and showcase their art, images, videos, and music with their network in the form of NFTs. This provides an avenue for businesses and creators to leverage new tools to earn income, and to take more control over their work and their relationships with their fans and customers.
With Instagram’s integration of digital collectibles now being rolled out and being used by millions of people, combining digital collectibles with social media competitions and giveaways presents an incredible opportunity to showcase how social media and Web3 technologies like Chainlink Functions can be used together to empower businesses to conduct social media campaigns and competitions that leverage digital collectibles in an automated, scalable, and trust-minimized way.
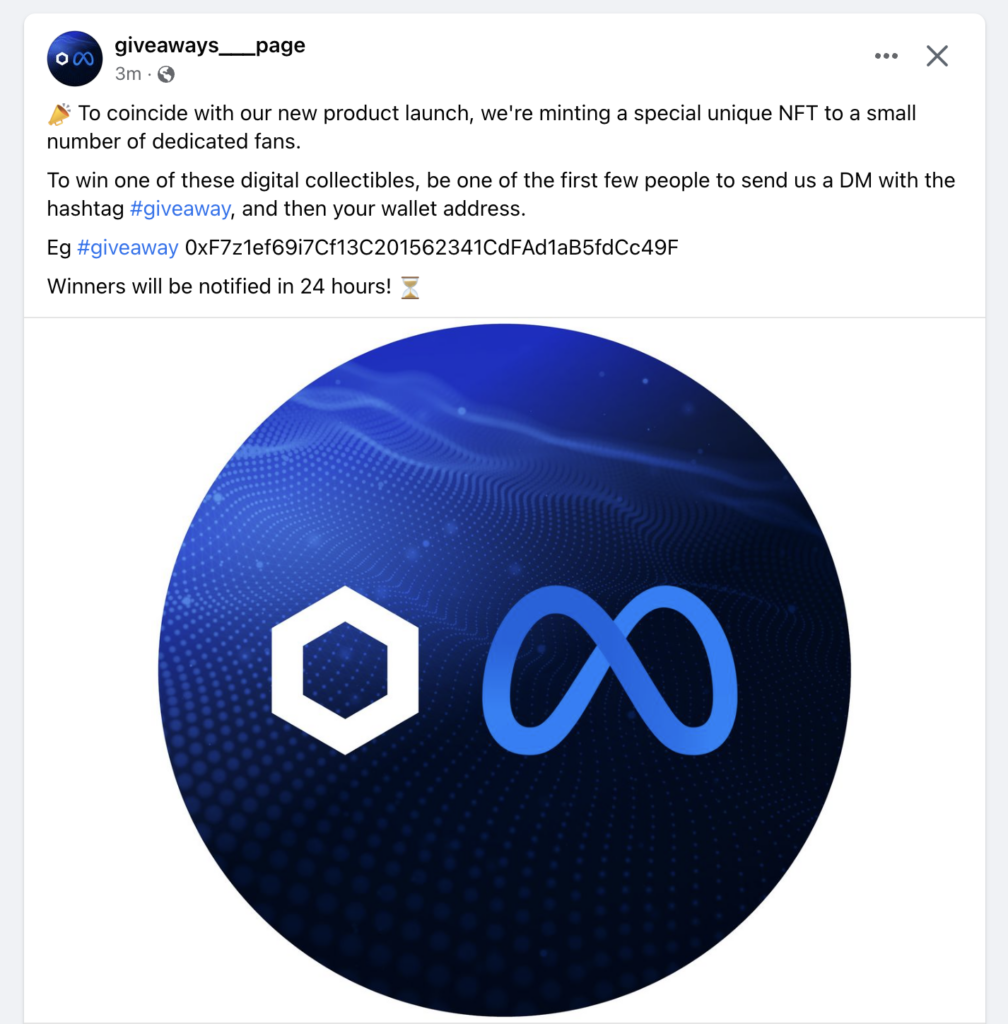
The Use Case: New Product Launch NFT Giveaway
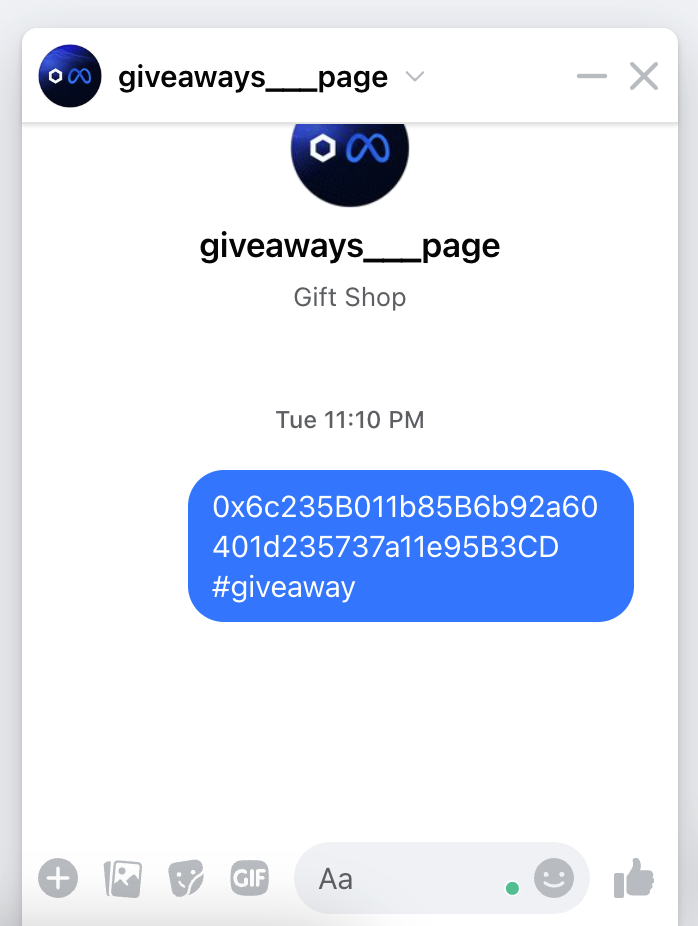
This use case example starts with a business advertising that it has a new product or service launching through its Facebook or Instagram business page, and, to celebrate the occasion, it has a limited number of unique digital collectibles in the form of NFTs to offer customers. To be eligible for one of these special NFTs, the customers need to send the business page a private message containing their wallet address and the specific hashtag for the promotion.
Once the timeframe for the promotion has expired, the business interacts with a smart contract to handle the NFT minting. The smart contract requires a list of eligible wallet addresses as an input, and once it receives the eligible wallet addresses, it will mint an NFT for each of them. In this example, it assumes there are three winners:
 function fulfillRequest(bytes32 requestId, bytes memory response, bytes memory err) internal override {
    latestResponse = response;
    latestError = err;
    emit OCRResponse(requestId, response, err);

    address winner1;
    address winner2;
    address winner3;

    assembly {
      winner1 := mload(add(response, 20))
      winner2 := mload(add(response, 40))
      winner3 := mload(add(response, 60))
    }

    nft.mint(winner1);
    nft.mint(winner2);
    nft.mint(winner3);
    }

The business uses Chainlink Functions together with a smart contract to find the eligible list of customer wallet addresses. In this case, the smart contract initiates the call to Chainlink Functions, passing in the JavaScript code to be executed. This JavaScript code reaches out to the Meta Messaging API, extracts and filters out conversations that contain the relevant hashtag, and then figures out which customers should be eligible to receive an NFT (in this case, the first three that responded).
async function getEligibleConversations(isoStartDate) {
    const conversationsResponse = await Functions.makeHttpRequest({
        url: `https://graph.facebook.com/v16.0/${secrets.FACEBOOK_PAGE_ID}/conversations?fields=messages.limit(1){message,from},updated_time&access_token=${secrets.FACEBOOK_GRAPH_API_KEY}`
    })

    if (conversationsResponse.status === 200) {
        const conversationsObject = conversationsResponse.data;
        const conversations = conversationsObject.data;

        const eligibleConversations = conversations.filter(conversation => new Date(conversation.updated_time) > isoStartDate);
        return eligibleConversations;
    } else {
        throw Error(conversationsResponse.statusText);
    }
}

async function chooseWinners(eligibleConversations, numberOfWinners) {
    let winnersArray = [];
    const length = eligibleConversations.length;

    for (let i = 0; i < length;) {
        // we are getting only the latest received message from the conversation with the user
        const current = eligibleConversations[i].messages.data[0].message;

        if (current.includes("#giveaway")) {
            const walletAddress = current.substr(current.indexOf("0x"), 42);
            if (isAddress(walletAddress)) {
                winnersArray.push({
                    walletAddress: walletAddress,
                    senderId: eligibleConversations[i].messages.data[0].from.id
                });
                if (winnersArray.length == numberOfWinners) {
                    return winnersArray;
                }
            }
        }
        ++i;
    }

    throw Error("No eligible addresses");
}
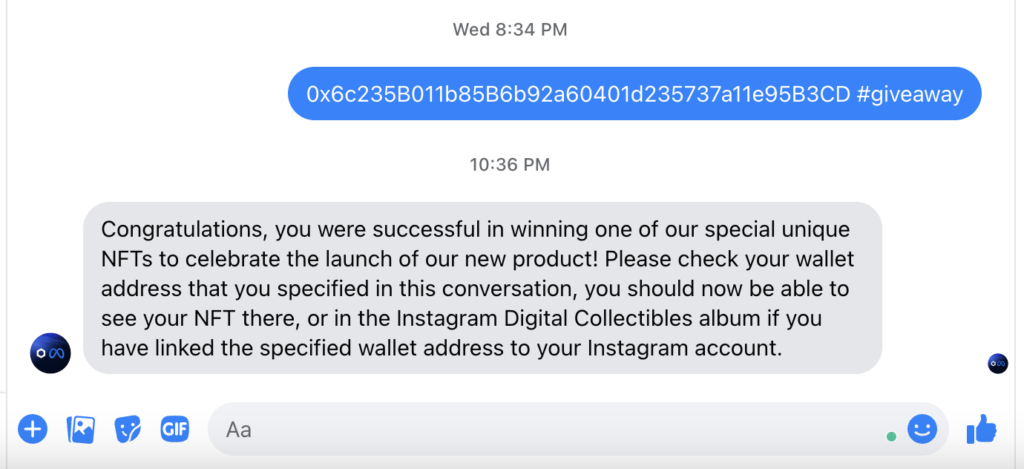
Once it builds up a list of wallet addresses eligible to receive an NFT, the function uses the Meta API to send a message back to each chosen user informing them that they were successful. From here, it simply returns the list of addresses to the smart contract in the form of a byte array. Once the smart contract receives the output from Chainlink Functions, it will use it to mint an NFT to each of the specified wallet addresses.
  async function sendNotification(recipientId) {
    await Functions.makeHttpRequest({
        method: 'POST',
        url: `https://graph.facebook.com/v16.0/${secrets.FACEBOOK_PAGE_ID}/messages?recipient={'id':'${recipientId}'}&messaging_type=MESSAGE_TAG&message={'text':'Congratulations, you were successful in winning one of our special unique NFTs to celebrate the launch of our new product! Please check your wallet address that you specified in this conversation, you should now be able to see your NFT there, or in the Instagram Digital Collectibles album if you have linked the specified wallet address to your Instagram account.'}&tag=CONFIRMED_EVENT_UPDATE&access_token=${secrets.FACEBOOK_GRAPH_API_KEY}`
    })
}

async function main() {
    const isoStartDate = new Date(args[0]);
    const numberOfWinners = args[1];
    const testerAccounts = JSON.parse(args[2]);

    const eligibleConversations = await getEligibleConversations(isoStartDate);
    if (eligibleConversations === undefined || eligibleConversations.length === 0) {
        throw Error("No eligible conversations");
    }

    // conversations are stored based on the latest update:
    // 1. the newest
    // 2. old
    // 3. the oldest
    //
    // we want to find the fastest eligible address to award it with an NFT
    const sortedEligibleConversations = eligibleConversations.reverse();

    const chosenWinners = await chooseWinners(sortedEligibleConversations, numberOfWinners);

    const winners = chosenWinners.map(({ walletAddress }) => Buffer.from(walletAddress.slice(2), 'hex'))

    chosenWinners.forEach(async ({ senderId }) => {
        if (testerAccounts.includes(senderId)) {
            await sendNotification(senderId);
        }
    });

    return winners;
}
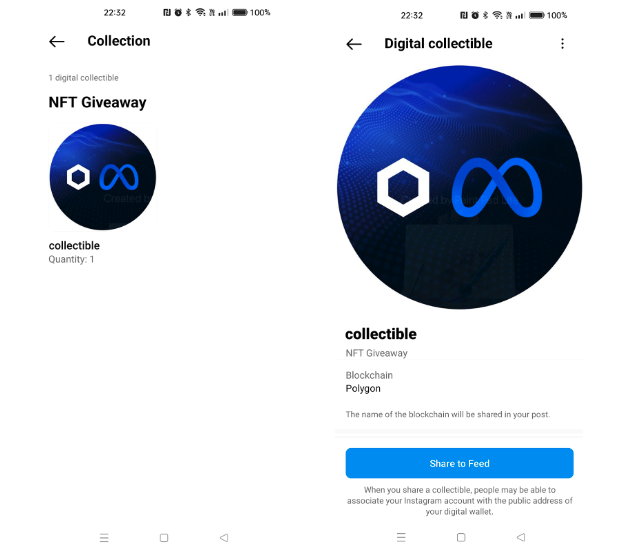
The final step is each customer who won the competition receiving a private message informing them that they were successful. They will be able to see their newly minted digital collectible in their Instagram Digital Collectibles gallery or in their account on OpenSea:
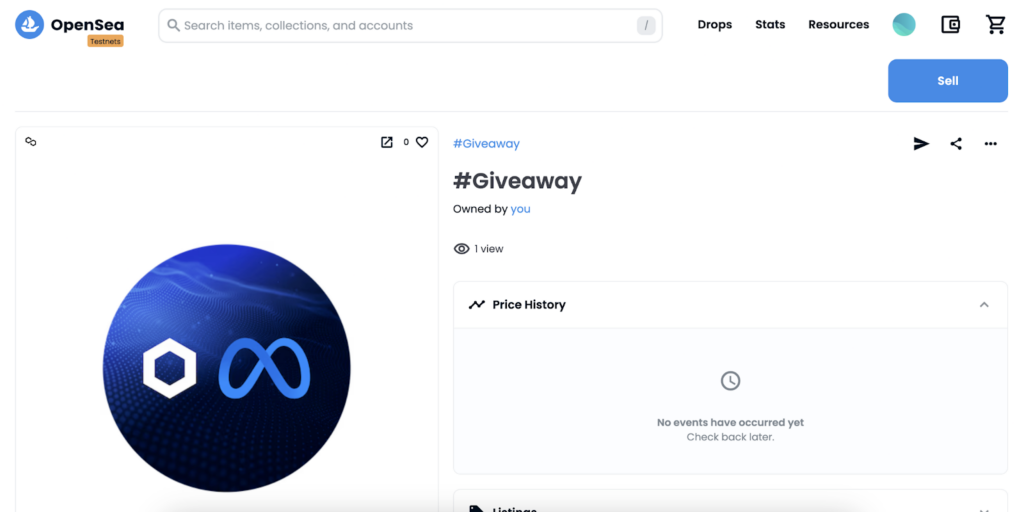
Please see the example repository for the full source code and complete instructions on how to deploy and execute this use case.
Lens Protocol: Creating Open Actions Using Web2 Data and Events
Lens Protocol is a permissionless, composable, and decentralized social graph built using Web3 technology that offers unique features and capabilities, such as user-owned social graphs, full composability between applications, and immutable user-owned content and social relationships. With Lens, developers can build social media applications on top of the protocol, with each of them taking advantage of all the features and functionality of Lens.
As part of the introduction of Lens V2, developers will be able to make use of Open Actions.
Open Actions enhances the user experience in Lens applications by allowing users and developers to seamlessly incorporate external smart contract actions within Lens publications, enabling greater versatility and interaction. An example of this would be allowing Lens users to mint a special NFT directly by interacting with a Lens user’s publication.
But the very nature of social applications often involves having access to data, APIs, and other external applications, something which a blockchain cannot natively handle on its own. By combining Lens Protocol and Chainlink Functions, developers can build feature-rich Web3-powered social experiences that make use of Web2 data, applications, and APIs.
The Use Case: Generating Event Discounts Based on the Lens Social Graph
This use case involves combining Chainlink Functions and Lens Open Actions to facilitate the creation of unique Eventbrite event discount codes for Lens users directly from the Lens protocol.
The idea is that when a promoter has a new event published on the Eventbrite platform, they can use this new “Eventbrite Discount” Open Action together with a Lens publication that they publish with their profile to advertise their event. The publication will include this Open Action as a call to action to generate a discount code to be used on the Eventbrite platform for the specific Lens user, and can include any logic or “gating” that the developer wants, e.g. you could mandate that the Lens user must follow the account that posted the publication advertising the event to be eligible to generate a discount code.
Once the Lens user interacts with the publication to generate a discount code, the Lens Open Action will use Chainlink Functions to reach out to the Eventbrite API and use the Discounts endpoint to generate a unique discount code for the specific event and Lens user. Once the Eventbrite API has generated the discount code for the event, it will return it to Chainlink Functions, which will then return it back to Lens Protocol, where it can be shared with the Lens user, either via the frontend or as a URL to the event page on Eventbrite with the discount code included in the URL. Once the user has the generated discount code, they can then use it to complete a purchase of a ticket to the event.
const organizationId = args[0];
const eventId = args[1];
const msgSender = args[2];

const resolveAddressToLensHandle = await Functions.makeHttpRequest({
url: `https://api.lens.dev`,
method: "POST",
headers: {
'Content-Type': 'application/json'
},
data: {
query: `{
profiles(request: { ownedBy: ["${msgSender}"] }) {
items {
name
}
}
}`,
}
})
This use case fits in nicely with the Lens V2 narratives of composability, attribution, and shared value among the Lens value chain. The discount codes are unique to the specific Lens user, which means that rather than the promoter creating a blanket Lens-specific discount code and sharing it in a publication on a Lens app, they have full attribution down to the individual Lens user level, so they know exactly which Lens users generated and then used a discount code. By having this level of attribution, a number of new possibilities around further composability open up. Think about being able to then offer these Lens users that generated and used a discount code further special offers. Perhaps they will be able to mint a special NFT, or perhaps they will get special access to a VIP room or side event based on the fact they generated a discount through Lens and then bought a ticket. Or perhaps if someone builds a Lens app for ticketing it can use this data to generate offers especially for these users. The opportunities are limitless.
Please see the example repository for the full source code and complete instructions on how to deploy and execute this use case.
Twilio: Generating Alerts Based on Onchain Events
Twilio is a cloud communication platform that offers a set of APIs and tools that enable developers to build and integrate messaging, voice, and video capabilities into their applications. With Twilio, developers can easily add real-time communication features to their web and mobile applications without the need for any complex infrastructure setup or maintenance.
With decentralized applications not natively able to access offchain data and APIs, they have been limited in their functionality and ability to interact with offchain services. With Chainlink Functions, dApp builders can now easily set up complex custom workflows that decentralize the execution of arbitrary code, run complex compute, and also consume services like Twilio’s email, WhatsApp, and SMS alerting services. This opens up a number of new features and use cases, from alerting users when a DeFi position is in danger of being liquidated to sending automated email invoices based on onchain payments made as the result of a digital agreement.
The Use Case: Music Artist and Record Label Streaming Income Digital Agreement
This use case revolves around a digital agreement between a record label and a music artist in the form of a smart contract. The smart contract has been set up to pay out the music artist based on the number of Spotify music streams they received in the past month based on an agreed formula of X USD per Y streams. The smart contract has a function that, when invoked, executes custom logic to fetch and compare the latest streaming count to the last fetched count, calculates the payment required, and then pays out the required amount to the specified artist’s wallet address in the form of a stablecoin such as USDC. This smart contract can act as a single source of truth for the digital agreement and its state, and the data can be integrated and referenced by other systems as required.
The ability for the smart contract to reach out and find the artist’s Spotify streams and generate an email alert to the artist is not something that smart contracts can do themselves. In this example, the smart contract uses Chainlink Functions to connect to a music data API to come to consensus on the number of Spotify streams the artist has.
const URL = `https://sandbox.api.soundcharts.com/api/v2/artist/${artistId}/streaming/spotify/listeners`

const soundchartsResponse = await Functions.makeHttpRequest({
    url: URL,
    // Get a free sandbox API key from https://doc.api.soundcharts.com/api/v2/doc
    headers: { "x-app-id": secrets.soundchartAppId, "x-api-key": secrets.soundchartApiKey },
  })
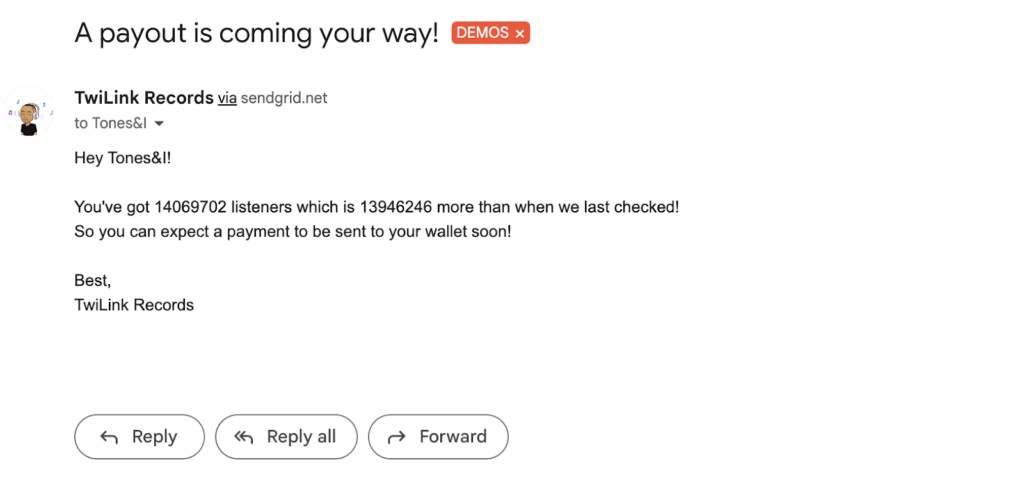
It then does the offchain computation to calculate the payment amount, generates an email alert for the artist to inform them of the streams and payment amount using the Twilio email API, then returns the latest listener count back to the smart contract.
 const emailData = {
    personalizations: [
      {
        to: [
          {
            email: artistEmail,
            name: artistName,
          },
        ],
        subject: "A payout is coming your way!",
      },
    ],
    content: [
      {
        type: "text/plain",
        value: `Hey ${artistName}!
You've got ${latestListenerCount} listeners which is ${
          latestListenerCount - lastListenerCount
        } more than when we last checked!
So you can expect some cool crypto to be sent to your wallet soon!
Best,
TwiLink Records
            `,
      },
    ],
    from: {
      email: VERIFIED_SENDER,
      name: "TwiLink Records",
    },
    reply_to: {
      email: "[email protected]",
      name: "Sam Smith",
    },
  }
Once the smart contract receives the listener count, it calculates and sends the required payment of USDC to the saved artists’ wallet address, then stores the latest number of streams in the digital agreement to be used in the next month’s calculation.
For this particular use case, having a process in place using trust-minimized smart contracts as digital agreements has multiple advantages:
- The artist knows they will always be paid and can be sure that the record label can’t alter the conditions of the agreement.
- The record label’s process for paying its artists is more efficient, removing the need for manual payments.
- The solution scales well, and is automated and efficient regardless of how many artists are onboarded to the record label.
In this example, the Twilio email is being used as a simple alert for the artist. But it can also be used in conjunction with a fully designed invoice email using the Twilio SendGrid Design editor, giving the onchain smart contract full functionality for sending professional-looking invoices to the artist, as the payments are made in real-time.
Please see the example repository for the full source code and complete instructions on how to deploy and execute this use case.
Amazon Web Services (AWS): Integrating Web3 With Cloud Systems and APIs
Cloud platforms such as Amazon Web Services (AWS) offer a wide range of cloud-based computing services to developers, including scalable and reliable infrastructure, storage solutions, database management, machine learning tools, and serverless computing. These services are used to power much of the digital world today, thanks to them being easy to integrate into developer workflows in an efficient and cost-effective way.
Integrating these cloud services into the world of Web3 and smart contracts opens up a large number of potential use cases that fuse together the capabilities and scalability of Web2 cloud computing with the high security and trust-minimization properties of Web3 decentralized applications.
The Use Case: A Universal Connector to Consume AWS Data APIs
This use case involves creating a universal connector Chainlink Function that can be used to connect to any AWS Data Exchange data, allowing developers to seamlessly integrate third-party data in AWS together with smart contracts. This enables the creation of advanced Web3 applications that can make use of the vast array of data sets available in AWS.
In this specific example, the universal connector will be used to connect and obtain currency exchange data from the Rearc Currency Exchange API, then return the data to an onchain smart contract.

The universal connector has been built as a JavaScript function for all nodes in the Chainlink Functions decentralized oracle network (DON) to execute before coming to consensus on the result of the API call.
The HTTP request that Functions executes is built up programmatically, taking in a number of encoded environment variables, such as the data set ID, revision ID, and asset ID from the Rearc data set.
The authorization header is built up using the AWS access key and secret key as well as a signature. The signature is generated in the request header containing a concatenated string of the request that is then hashed with the SHA-256 hashing algorithm. For more information on generating signatures for the authorization header, see the Amazon Simple Storage Service API Reference.
const signature = buildSignature(method, url, host, secrets.secretKey, secrets.securityToken, date, payload, region, service)

const config = {
  url: `https://${host}${url}`,
  headers: {
    'x-amzn-dataexchange-data-set-id': secrets.dataSetID,
    'x-amzn-dataexchange-revision-id': secrets.revisionID,
    'x-amzn-dataexchange-asset-id': secrets.assetID,
    'X-Amz-Date': date,
    'Authorization': `AWS4-HMAC-SHA256 Credential=${secrets.accessKey}/${shortDate(date)}/${region}/${service}/aws4_request, SignedHeaders=${buildSignedHeaders(secrets.securityToken)}, Signature=${signature}`
  }
}

const response = await Functions.makeHttpRequest(config)
To calculate the signature, the AWS secret key is used to derive a signing key. The derived signing key is specific to the date, service, and region. The final signature is the HMAC-SHA256 hash of the string to sign (concatenated string of the request), using the derived signing key as the key.
  /**
   * To calculate a signature, a special string has to be signed. Canonical request is part of that string. This functions takes various request parts and returns special shaped string that will be hashed later on. Since queries are passed separately we need to remove them from url parameter (if there is any)
   * @param {string} method - request method
   * @param {string} url - absolute url of the request WITHOUT query parameters
   * @param {string} host - host of the request url
   * @param {string} securityToken - optional security token when temporary credentials are used
   * @param {string} queries - encoded and sorted query parameters
   * @param {string} date - current date (ISO 8601)
   * @param {string} payload - request body for POST/PUT request, empty string for GET requests
   * @returns canonical request string
   */
  const buildCanonicalRequest = (method, url, host, securityToken, queries, date, payload) => {
    url = url.split('?')[0]
    return method + '\n'
      + encodeURI(url) + '\n'
      + queries + '\n'
      + 'host:' + host + '\n'
      + 'x-amz-date:' + date + '\n'
      + (securityToken ? 'x-amz-security-token:' + securityToken + '\n' : '')
      + '\n'
      + buildSignedHeaders(securityToken) + '\n'
      + crypto.createHash('sha256').update(payload).digest('hex')
  }
Once each node in the Chainlink Functions DON has executed the AWS API call and the DON has come to consensus on the result, it is then encoded as a uint256 and posted back to the consuming smart contract. The complete source code for this example can be found in the AWS Data Exchange GitHub repository.
This example demonstrates just one of many ways of integrating smart contracts with AWS. Developers can easily modify the universal connector to accommodate some of the other capabilities of AWS that can be accessed via APIs, such as querying and updating data on an Amazon Relational Database Service (RDS) or enabling a smart contract to execute a Lambda Function hosted on AWS.
Amazon Web Services (AWS): Connecting to IoT Devices Using AWS IoT Core
IoT devices are particularly useful for collecting, transmitting, and analyzing data from physical objects and environments. AWS IoT Core is a managed cloud service provided by Amazon Web Services (AWS) that enables secure and scalable communication between Internet-connected devices and the AWS cloud infrastructure.
Chainlink Functions is the perfect service for developers to quickly and easily connect smart contracts to the world of IoT devices and IoT Core. The devices themselves can be used to trigger events in smart contracts based on an event that happens in the real world (e.g., when a shipment reaches a location), or they can also be used to trigger an alert or action in the real world based on an onchain event.
The Use Case: Triggering an IoT Device Based on a Stablecoin Depeg Event
This use case combines Chainlink Data Feeds, Automation, and Functions to simulate a real-world alert being triggered by an onchain black swan event (i.e., a stablecoin depeg). The real-world alert involves triggering a Patlite Network Monitor IoT device to make a visual and audible alert when the black swan event occurs.
A smart contract is deployed to act as the trust-minimized backend that coordinates the entire flow. Chainlink Data Feeds is used to monitor the price of the stablecoin. Chainlink Automation is used to monitor the Chainlink Data Feed that reports the price of the stablecoin, and if/when it detects a stablecoin depeg, it initiates a Chainlink Functions call. Chainlink Functions then sends an alert to AWS IoT core, which triggers the alert on the IoT device in the real world.
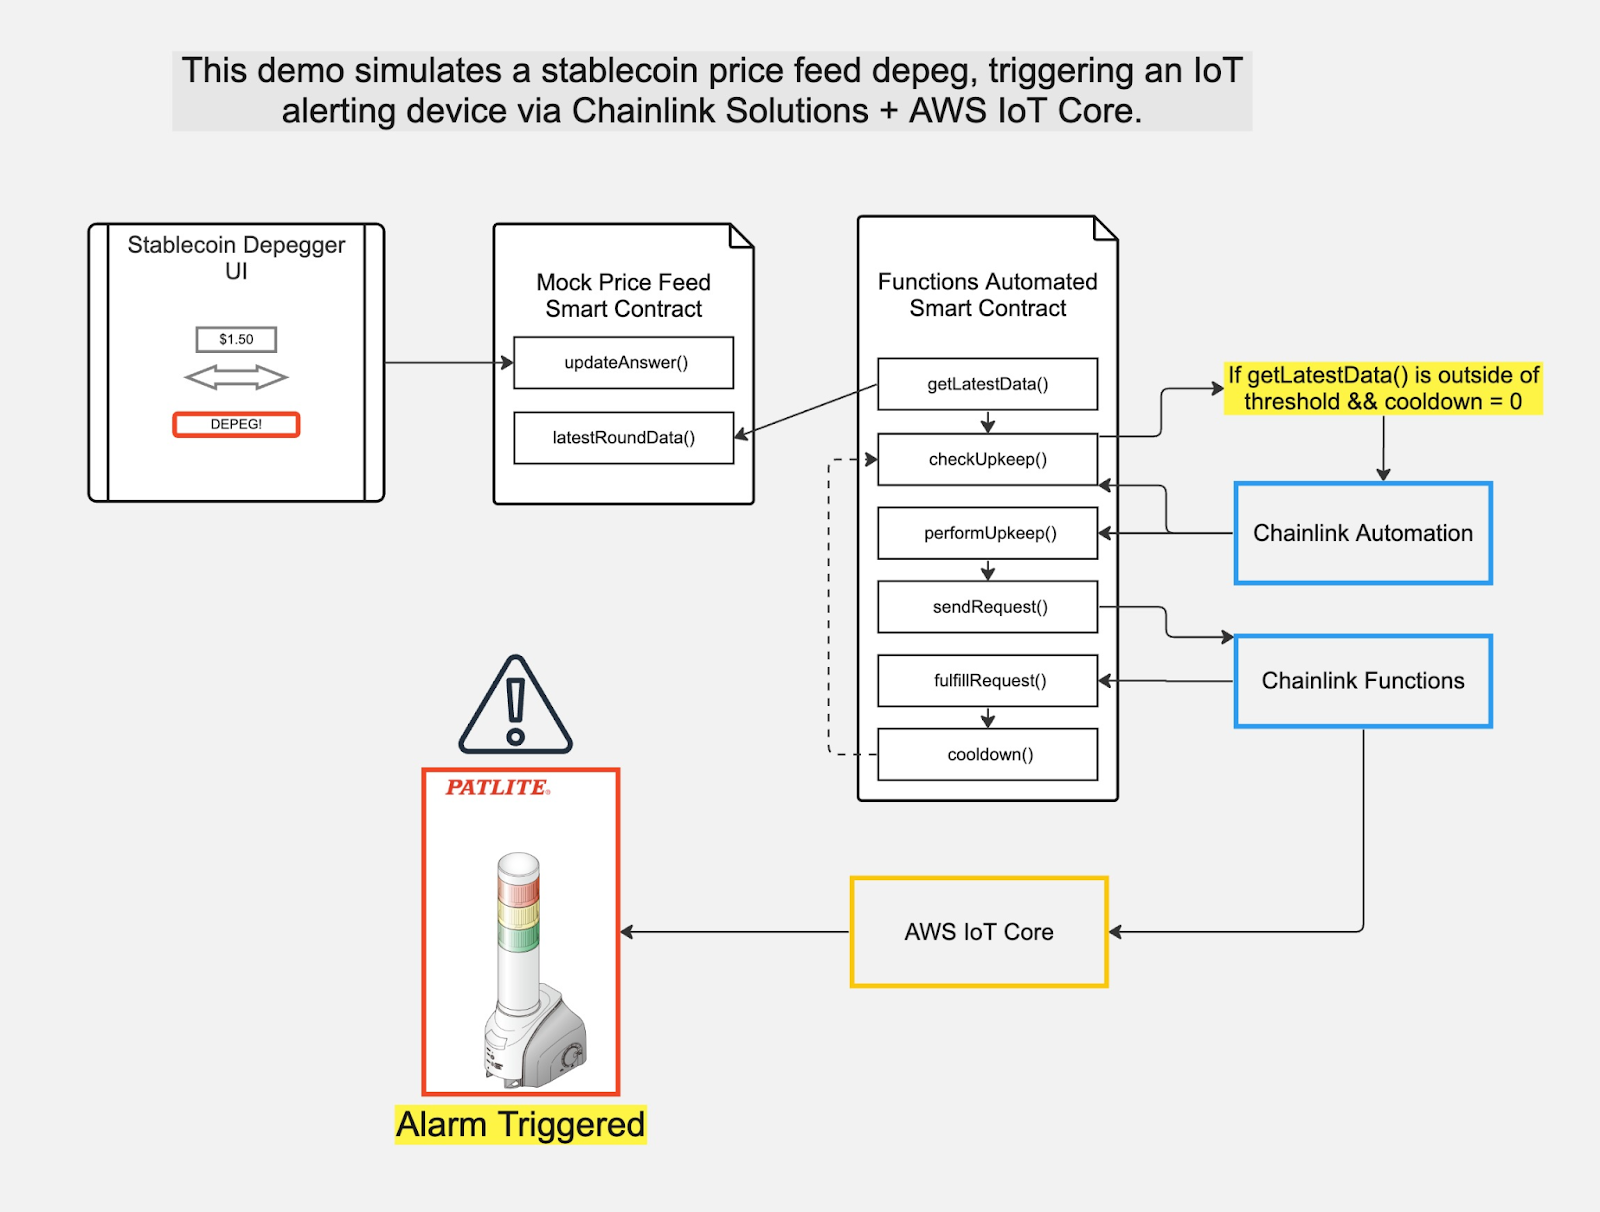
In the Solidity contract onchain, Automation checks to see if the data feed result is < 95c or more than $1.05. If either of these conditions is true, it will call performUpkeep, which will trigger a Chainlink Functions request to trigger the IoT device via IoT Core.
    function checkUpkeep(bytes memory) public view override returns (bool upkeepNeeded, bytes memory) {

        upkeepNeeded = (getLatestData() <= 9500000) || (getLatestData() >= 105000000);


    }


    function performUpkeep(bytes calldata) external override {

        (bool upkeepNeeded, ) = checkUpkeep("");

        require(upkeepNeeded, "Time interval not met");

        lastUpkeepTimeStamp = block.timestamp;

        upkeepCounter = upkeepCounter + 1;


        bytes32 requestId = s_oracle.sendRequest(subscriptionId, requestCBOR, fulfillGasLimit);


        s_pendingRequests[requestId] = s_oracle.getRegistry();

        emit RequestSent(requestId);

        latestRequestId = requestId;

    }
From there, IoT core will receive the message, and will then trigger the IoT device:

The complete source code for this example can be found in the AWS IoT Functions GitHub repository.
Google: Integrating Decentralized Applications With Google Cloud and Vertex AI
Google Cloud is a suite of public cloud computing services offered by Google. Vertex AI is a machine learning (ML) platform that lets you train and deploy ML models and AI applications, and customize large language models (LLMs) for use in your AI-powered applications.
AI/ML and Web3 technologies are very complimentary, with each of them having unique features and benefits. Chainlink Functions is a perfect way to combine these two technologies together to come up with interesting use cases, with Chainlink Functions providing the trust-minimized connection from smart contracts to Vertex AI and other Google Cloud services. This demo was created in collaboration with Google’s Web3 Customer Engineer Deep Chenna.
The Use Case: Creating Generative Art Dynamic NFTs With Google Cloud Vertex AI
In this tutorial, we’ll show you how you can use Vertex AI to generate unique NFTs with a simple predefined set of attributes.
In this example, Google Vertex AI will receive an input seed and string from a deployed NFT smart contract and then generate an image. Looking at each individual piece of the solution, Google Cloud Storage will be used to store the NFT metadata and images, Chainlink Functions will be used by the onchain NFT contract to pass the parameters to the Vertex AI API that gets deployed as a Google Cloud Function, and then also send the response back to the smart contract, where the NFT will be minted using the generated image and associated metadata.
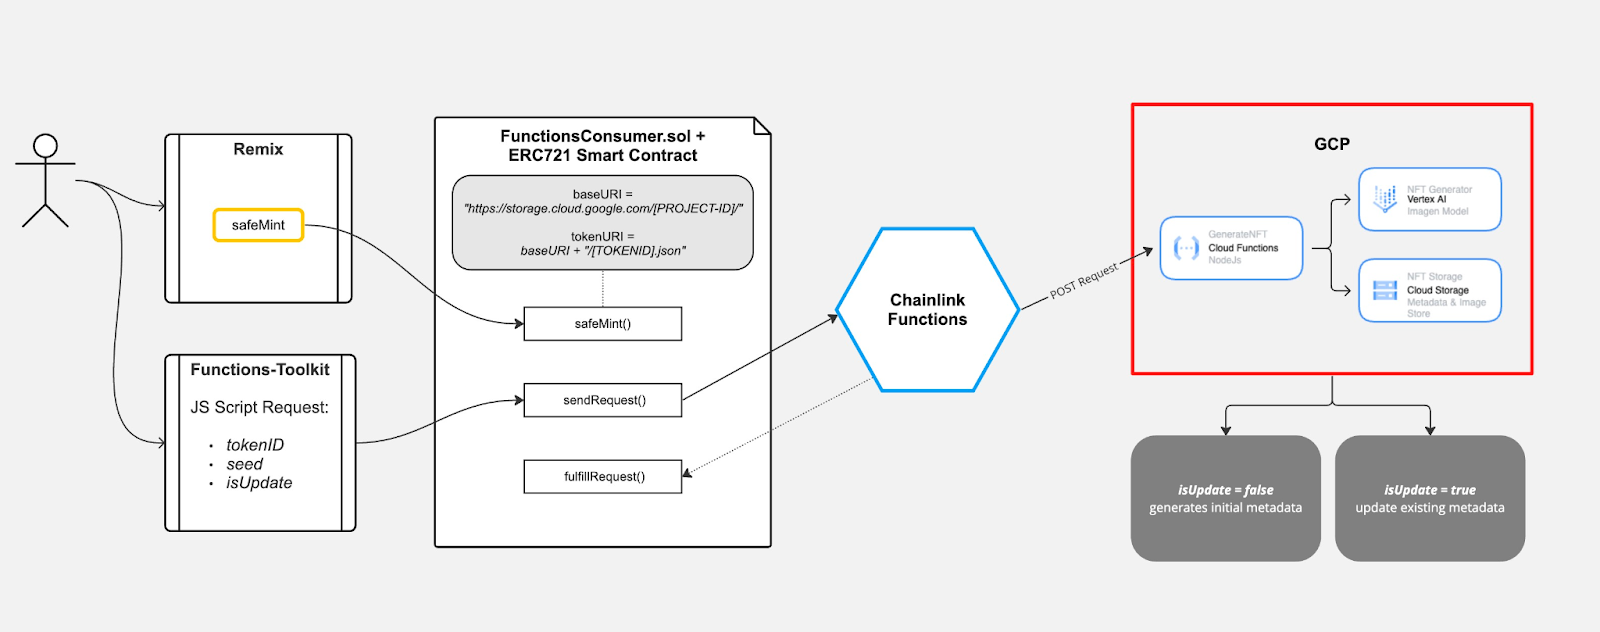
The logic in the Chainlink Function takes in a given seed, and passes it to the deployed Google Cloud Function that uses Vertex AI to generate the images. The cloud function API will then use the seed to generate a random image based on a predefined set of landmarks, store the image and metadata on Google Cloud, and then return the metadata location to Chainlink Functions.
const GCPRequest = Functions.makeHttpRequest({
url: url,
method: "POST",
timeout: 30000,
headers: {
"content-type": "application/json",
},
data: {
tokenId: 0,
seed: seed,
isUpdate: isUpdate,
},
});
// Execute the API request (Promise)
const GCPResponse = GCPRequest;
Once the Chainlink Function has returned, the NFT will be updated with the new metadata, including the newly generated image.

The complete source code for this example can be found in the Google Vertex AI GitHub repository.
Google: Bringing Cloud Datasets Onchain
Google BigQuery provides a number of free datasets for developers to use in their applications, ranging from Google search trends to international census and weather data. By using Chainlink Functions to pull data from these datasets onchain, developers can create all sorts of innovative decentralized applications.
The Use Case: Bringing GSOD Weather Data Onchain With Chainlink Functions
One of the free Google Cloud datasets is the GSOD weather data set, a database of historical weather data captured across thousands of weather stations around the world. In this use case, Chainlink Functions is used to connect to the GSOD BigQuery database, and then submit a query to extract the latest temperature for a specified location.
The first step is to follow the repositories README instructions, to create a Google Cloud account, and then obtain the necessary Google Cloud keys needed to create a valid authentication token:
{
"type": "service_account",
"project_id": "PROJECT_ID",
"private_key_id": "JF9883U948U3FJIJSOIFJSID",
"private_key": "-----BEGIN PRIVATE KEY-----\nPRIVATE_KEY\n-----END PRIVATE KEY-----\n",
"client_email": "PROJECT_ID@PROJECT_ID.iam.gserviceaccount.com",
"client_id": "34534534535",
"auth_uri": "https://accounts.google.com/o/oauth2/auth",
"token_uri": "https://oauth2.googleapis.com/token",
"auth_provider_x509_cert_url": "https://www.googleapis.com/oauth2/v1/certs",
"client_x509_cert_url": "https://www.googleapis.com/robot/v1/metadata/x509/PROJECT_ID%40PROJECT_ID.iam.gserviceaccount.com",
"universe_domain": "googleapis.com"
}
Once this has been done, they can be injected into the Chainlink Function, along with the query to be run on the BigQuery weather dataset. Chainlink Functions will generate a valid Google Cloud authentication token, connect to the BigQuery API using the generated authentication token, and then pass in the query to be executed on the GSOD dataset.
const JWT_HEADER = '{"alg":"RS256","typ":"JWT"}';
const TOKEN_URL = "https://oauth2.googleapis.com/token";
const AUDIENCE = "https://oauth2.googleapis.com/token";
const SCOPE = "https://www.googleapis.com/auth/cloud-platform.read-only";
const BIGQUERY_BASE_URL =
"https://bigquery.googleapis.com/bigquery/v2/projects/";

const OAUTH_TOKEN = secrets.authToken

const executeQuery = async query => {
const requestConfig = {
method: "post",
url: `${BIGQUERY_BASE_URL}${secrets.projectId}/queries`,
headers: {
Authorization: `Bearer ${OAUTH_TOKEN}`,
Accept: "application/json",
"Content-Type": "application/json",
},
data: {
query,
useLegacySql: false,
},
};

const response = await Functions.makeHttpRequest(requestConfig);
BigQuery will then execute the query, and return the result to the Chainlink Function. Once the Chainlink Function obtains the returned weather data, it will return it to the smart contract, where it is then stored and made available for use. The complete source code for this example can be found in the Google BigQuery Functions GitHub repository.
Google: Integrating Decentralized Applications With BigQuery and Analytics
Google Analytics is a popular web analytics service that allows website owners to track and analyze traffic and user behavior. While it was designed to be used with traditional websites, it can also be used with decentralized applications (dApps) and smart contracts.
Google BigQuery is a cloud-native data warehouse that enables businesses to analyze and query large datasets in real-time.
One particular example of integrating Google Analytics and BigQuery with smart contracts is to use Chainlink Functions and Chainlink Automation to provide live updates onchain about website or dApp user statistics. This demo was created in collaboration with Google’s Web3 Developer Advocate Allen Day.
The Use Case: Using Analytics Data To Trigger Onchain Logic
This use case showcases how a developer can use website data collected by Google Analytics to drive and influence logic in an onchain smart contract. For this particular example, a user is directed to a website where they can vote for a dog or cat, with their selection being sent to Google Analytics. The collected data is then automatically uploaded to a dataset in Google Cloud’s BigQuery. From here, Chainlink Automation will be used to regularly call a Chainlink Function to pull the vote totals from Google BigQuery and then return them onchain. The smart contract will use this analytics data to keep track of vote totals. Once the voting period has ended, a function in the smart contract will determine who the winner is.
Before a request to the Google BigQuery API can be made, Chainlink Functions must request an access token:
const jwtClaimSetObj = {
    "iss": iss,
    "scope": "https://www.googleapis.com/auth/cloud-platform.read-only",
    "aud": "https://oauth2.googleapis.com/token",
    "exp": currentTimeInSeconds + 3500,
    "iat": currentTimeInSeconds
  }

  const jwtBase64ClaimSet = Buffer.from(JSON.stringify(jwtClaimSetObj)).toString('base64')

  const stringToSign = `${jwtBase64Headers}.${jwtBase64ClaimSet}`

  const jwtBase64Signature = crypto.sign('RSA-SHA256', stringToSign, privateKey).toString('base64')

  const jwtRequest = {
    grant_type: 'urn:ietf:params:oauth:grant-type:jwt-bearer',
    assertion: `${jwtBase64Headers}.${jwtBase64ClaimSet}.${jwtBase64Signature}`
  }

  const jwtRequestString = querystring.stringify(jwtRequest)

  const tokenResponse = await Functions.makeHttpRequest({
    url: 'https://oauth2.googleapis.com/token',
    method: 'post',
    data: jwtRequestString
  })
Once this token has been obtained, it can be used in the built-up request to obtain the data from Google BigQuery for each selection:
const getSQLQuery = (propertyId) => {
  return `SELECT COUNT(DISTINCT user_pseudo_id) AS votes FROM \`${secrets.projectId}.analytics_${propertyId}.events_intraday_*\` WHERE event_name = 'page_view' OR event_name = 'user_engagement'`
}

const requestConfig = {
  method: 'post',
  url: `https://bigquery.googleapis.com/bigquery/v2/projects/${secrets.projectId}/queries`,
  headers: {
    "Authorization": `Bearer ${await getOauthToken(secrets.iss, secrets.key)}`,
    "Accept": 'application/json',
    "Content-Type": 'application/json'
  },
  data: {
    "query": getSQLQuery(secrets.property1),
    "useLegacySql": false
  }
}

const request1 = Functions.makeHttpRequest(requestConfig)

requestConfig.data.query = getSQLQuery(secrets.property2)
const request2 = Functions.makeHttpRequest(requestConfig)

const responses = await Promise.all([ request1, request2 ])
The returned results are then combined and sent back onchain to the consuming smart contract:
let item1Votes
try {
  item1Votes = parseInt(responses[0].data.rows[0].f[0].v)
} catch {
  item1Votes = 0
}

let item2Votes
try {
  item2Votes = parseInt(responses[1].data.rows[0].f[0].v)
} catch {
  item2Votes = 0
}

console.log(`Item 1 votes: ${item1Votes}\nItem 2 votes: ${item2Votes}`)

return Buffer.concat([ Functions.encodeUint256(item1Votes), Functions.encodeUint256(item2Votes) ])
Once the voting period is complete, the declareWinner function will determine which of the two animals is the winner:
function declareWinner() public onlyOwner {
    if (charity1Votes == charity2Votes) {
      winner = 'Charity #1 and #2 tied!';
    }

    if (charity1Votes > charity2Votes) {
      winner = 'Charity #1 won!';
    }

    if (charity1Votes > charity2Votes) {
      winner = 'Charity #2 won!';
    }

    emit WinnerDeclared(winner);
  }
The complete source code for this example can be found in the Google BigQuery Demo GitHub repository. This simple example is limited to specific analytics data based upon two events, but acts as a vehicle for demonstrating the possibilities that can be explored when you combine decentralized applications with services like Google Analytics and Google BigQuery.
Chainalysis: Onchain Finance
Chainalysis is a company that specializes in blockchain analysis and cryptocurrency investigation software, providing tools to track and analyze cryptocurrency transactions for law enforcement, financial institutions, and businesses to prevent fraud and illicit activities. Chainalysis also provides a set of feature-rich APIs for developers to obtain and use this data in their applications.
With its ability to obtain external data in a trust-minimized way, Chainlink Functions provides a way for smart contracts to obtain and use data from the Chainalysis APIs, which could then be used to support applicable compliance requirements for onchain financial applications (e.g., the onchain financial protocol could have a requirement to not allow transactions that originate from any addresses known to be linked to illegal or fraudulent activity).
The Use Case: Compliant Onchain Vault
This use case showcases how Chainlink Functions can be used in conjunction with Chainalysis Web3 analytics data to drive decisions for onchain financial protocols and showcase how applicable compliance requirements for onchain financial applications could be implemented.
The smart contract in this repository represents an onchain vault. It can be used to deposit and withdraw funds from a user’s wallet. Before a deposit or withdrawal can be executed, a request must be made to the Chainalysis API to check if the user’s wallet meets any applicable compliance requirements. The contract sends a request to Chainlink Functions to make the API call, and the result is used to determine if the deposit or withdrawal should be executed.
const riskResponse = await Functions.makeHttpRequest({
url: `https://api.chainalysis.com/api/risk/v2/entities/${address}`,
headers: { Token: secrets.apiKey },
})
if (riskResponse.status !== 200) {
throw Error(riskResponse.statusText || riskResponse.status)
}

const isCompliant = riskResponse.data.risk === "Low" ? 1 : 0

return Functions.encodeUint256(isCompliant)
Deposits utilize the Chainalysis Address Screening as part of the verification process to check if the user’s wallet has been involved in any applicable illicit activity criteria. Withdrawals utilize Chainalysis KYT (Know Your Transaction) by checking the user wallet for alerts and direct exposures to any applicable suspicious activity. The smart contract uses the result of the Chainlink Functions JavaScript code to determine whether to allow or block the deposit or withdraw action:
if (request.requestType == RequestType.Deposit) {
if (uint256(bytes32(response)) == 1) {
executeDeposit(request.requester, request.amount);
emit DepositRequestFulfilled(requestId, request.requester, request.amount);
} else {
payable(request.requester).transfer(request.amount);
emit DepositRequestCancelled(requestId, request.requester, request.amount);
}
} else if (request.requestType == RequestType.Withdrawal) {
if (uint256(bytes32(response)) == 1) {
executeWithdraw(request.requester, request.amount);
emit WithdrawalRequestFulfilled(requestId, request.requester, request.amount);
} else {
emit WithdrawalRequestCancelled(requestId, request.requester, request.amount);
}
}
The complete source code for this example can be found in the Functions Chainysis GitHub repository.
The Graph: Leveraging Indexed Data for DeFi Applications
The Graph is a decentralized protocol and network for indexing and querying data from blockchain networks in a trust-minimized way. It involves the concept of subgraphs—customizable data schemas and indexing configurations that define how specific data from a blockchain network should be organized, indexed, and made accessible. This data can then be used by decentralized applications.
The problem is that while this data is taken from onchain and indexed, it’s not data that a Solidity smart contract can natively access offchain. E.g., the historical volatility of a Uniswap price pair is not something you can obtain or easily calculate onchain, which is why something like The Graph exists. As a result of this, if onchain smart contracts need this data, they often rely on applications and frontends to pass it into smart contracts.
Chainlink Functions offers a way for smart contracts to make use of indexed data by The Graph at the protocol level directly from the smart contract, ensuring the data is obtained in a trust-minimized way, and without having to increase the attack surface of a decentralized application due to relying on applications and frontends to pass in valid data.
The Use Case: Onchain Trading Strategies Using Indexed Uniswap Data
This use case demonstrates how to connect the Graph API and Uniswap router using Chainlink Functions to implement a trading strategy.
In particular, the example demonstrates how to retrieve three-day trading volume data from the WETH-USD pool in Uniswap V3 through a Uniswap Subgraph. It then uses Chainlink Functions to evaluate the liquidity based on the trading volume data. It obtains this data via the Subgraph API:
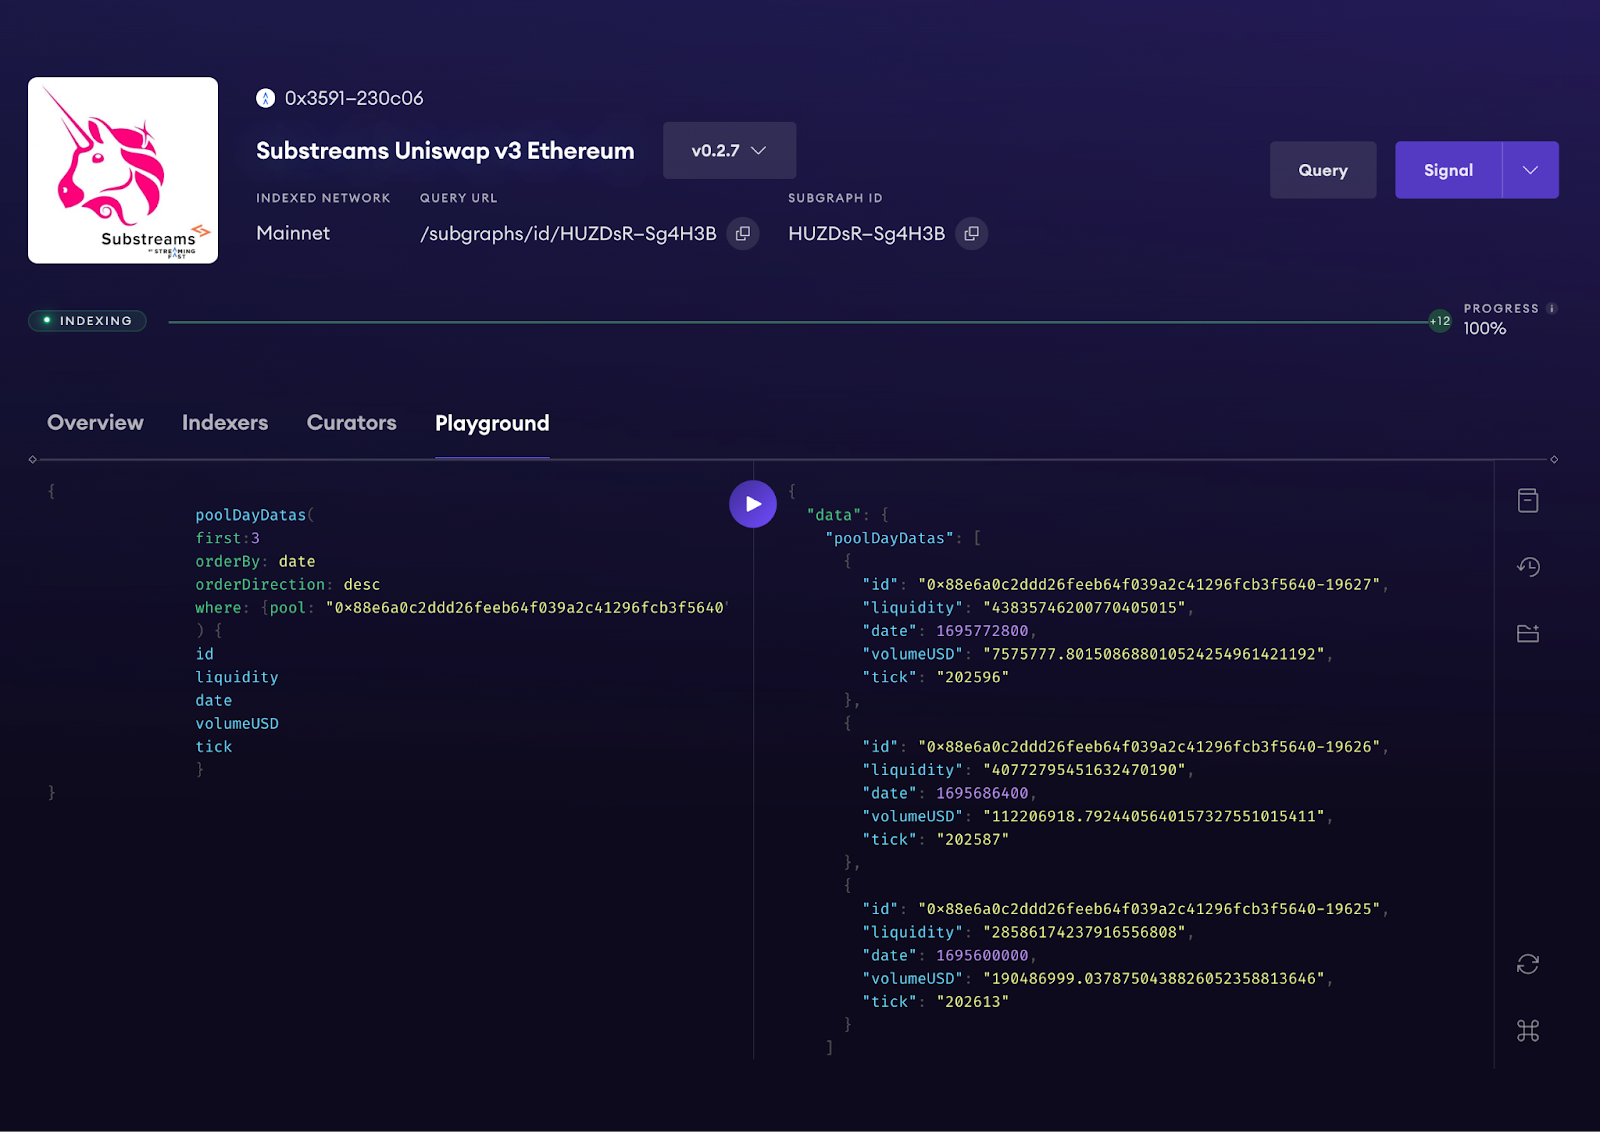
const graphKey = secrets.graphKey
const graphRequest = Functions.makeHttpRequest({
url: `https://gateway-arbitrum.network.thegraph.com/api/${graphKey}/subgraphs/id/HUZDsRpEVP2AvzDCyzDHtdc64dyDxx8FQjzsmqSg4H3B`,
method: "POST",
headers: {
"Content-Type": "application/json",
},

data: {
query: `{
poolDayDatas(
first:3
orderBy: date
orderDirection: desc
where: {pool: "0x88e6a0c2ddd26feeb64f039a2c41296fcb3f5640"}
) {
id
liquidity
date
volumeUSD
tick
}
}`,
},
})

const [graphResponse] = await Promise.all([graphRequest])
If the liquidity of the pair is increasing over all three days, Chainlink Functions triggers a function in the smart contract to swap Wrapped Matic in the contract balance to Wrapped Ether. This is done because strong liquidity implies relatively safer assets as high liquidity assets are more easily traded and typically have lower price volatility.
function fulfillRequest(bytes32 requestId, bytes memory response, bytes memory err) internal override {

    s_lastResponse = response;

    s_lastError = err;

    uint256 liquidityDrop = uint256(bytes32(response));

    if (liquidityDrop == 1) {

      swapExactInputSingle();

    }

  }


  function swapExactInputSingle() internal returns (uint256 amountOut) {

    uint256 amountIn = checkBalance();

    require(amountIn > 0, "Please transfer some Wrapped MATIC to the contract");

    ISwapRouter.ExactInputSingleParams memory params = ISwapRouter.ExactInputSingleParams({

      tokenIn: WMATIC,

      tokenOut: WETH,

      fee: poolFee,

      recipient: address(this),

      deadline: block.timestamp,

      amountIn: amountIn,

      amountOutMinimum: 0,

      sqrtPriceLimitX96: 0

    });
With this example, using Chainlink Functions allows for a more accurate assessment of whether to exchange Wrapped Matic for WETH based on the current liquidity conditions, enabling better risk management. It also demonstrates how data indexed by The Graph can be retrieved back onchain and used in DeFi protocols or applications to drive decisions around asset management. The complete source code for this example can be found in The Graph Uniswap GitHub repository.
Decentralized Insurance: Leveraging Offchain Weather Data for Parametric Insurance
Decentralized insurance involves using blockchain technology and smart contracts to replace traditional insurance agreements, offering a superior insurance product for both insurance companies and their clients thanks to data-driven automation, highly secure, tamper-proof digital agreements in the form of smart contracts, and instant and automated claims processing.
The biggest issue for bringing the world of parametric insurance to Web3 is the availability of high-quality, verifiable data. With Chainlink Functions, developers can easily create their own offchain data feed by accessing and aggregating data from multiple sources and then have Chainlink Functions reach consensus on what the result of the offchain data aggregation is before reporting the final result onchain.
The Use Case: Parametric Insurance Contract Using Multiple Data Sources
This use case showcases how a developer can pull weather data from three different data sources, aggregate the three results offchain, then have each node in the Chainlink Functions DON reach a consensus on the median value returned by each node before posting it onchain.
This data will be used to determine if an insurance contract should be paid out to a client. The insurance contract ParametricInsurance will check to see what the temperature is in a given city (in this case, New York). If the temperature falls below 60 degrees Fahrenheit for three consecutive days, the contract will payout the agreed value to the client. The ParametricInsurance contract defines the terms of the agreement, such as agreed value, and the parametric parameters for the paying out of the contract:
function fulfillRequest(
        bytes32 requestId,
        bytes memory response,
        bytes memory err
    ) internal override {
      latestResponse = response;
      latestError = err;
      emit OCRResponse(requestId, response, err);
      // once callback happens, mark the timestamp
      currentTempDateChecked = block.timestamp;
      currentTemperature = uint256(bytes32(response));

      // if current temperature is under temperature which considered as cold, number of cold days increment
      if (currentTemperature > coldTemp) {
          consecutiveColdDays = 0;
      } else {
          consecutiveColdDays += 1;
      }

      // pay the client and shut down the contract
      if(consecutiveColdDays >= COLD_DAYS_THRESHOLD) {
          payoutContract();
      }
    }
The Parametric-insurance-example.js Chainlink Function performs API calls to three different weather data sources, aggregates the result, then come to consensus on the median result of each node before passing the weather data back to the ParametricInsurance smart contract.
const openWeatherRequest = Functions.makeHttpRequest({
  url: `http://api.openweathermap.org/data/2.5/weather?lat=${cityLat}&lon=${cityLon}&appid=${secrets.openWeatherApiKey}&units=imperial`,
})

const worldWeatherRequest = Functions.makeHttpRequest({
  url: `http://api.worldweatheronline.com/premium/v1/weather.ashx?key=${secrets.worldWeatherApiKey}&q=${cityName}&format=json`,
})

const ambeeDataRequest = Functions.makeHttpRequest({
  url: `http://api.ambeedata.com/weather/latest/by-lat-lng?lat=${cityLat}&lng=${cityLon}`,
  headers: { "x-api-key": `${secrets.ambeeWeatherApiKey}` }
})

// wait data returned by multiple APIs
const [openWeatherResponse, worldWeatherResponse, ambeeDataResponse] = await Promise.all([
    openWeatherRequest,
    worldWeatherRequest,
    ambeeDataRequest])
The complete source code for this example can be found in the Parametric Insurance GitHub repository. This example is specific to parametric insurance, but the idea showcases how easy it is to consume data from multiple sources, perform offchain computation such as aggregation on it, and then use Chainlink Functions’ OCR consensus protocol to further verify the result of the computation before delivering it onchain.
Conclusion
From social media to cloud computing and insurance protocols, Chainlink Functions opens up a plethora of smart contract use cases by enabling developers to easily and securely access offchain data and computation in a highly secure and trust-minimized way.
To see more use cases, or to submit your own, we encourage you to visit Use Chainlink Functions, a website that displays community-submitted Chainlink Functions use cases and examples.
Bringing all the world’s data and APIs to decentralized applications will unleash an explosion of new use cases, similar to how Chainlink Price Feeds was the catalyst for the growth of DeFi. But the difference with Chainlink Functions is that Chainlink isn’t just a price data oracle—it becomes an any data oracle—enabling developers to access any data onchain and unlocking exciting use cases across the entire Web3 space.
Chainlink Functions is now in mainnet beta. Explore the Functions playground and sign up for beta access today.
This tutorial offers educational examples of how to use a Chainlink system, product, or service and is provided to demonstrate how to interact with Chainlink’s systems, products, and services to integrate them into your own. This template is provided “AS IS” and “AS AVAILABLE” without warranties of any kind, it has not been audited, and it may be missing key checks or error handling to make the usage of the system, product, or service more clear. Do not use the code in this example in a production environment without completing your own audits and application of best practices. Neither Chainlink Labs, the Chainlink Foundation, nor Chainlink node operators are responsible for unintended outputs that are generated due to errors in code.


