Using Chainlink Oracles on Polygon
Since Polygon (formerly known as Matic) went live earlier this year, the network has quickly become a popular layer 2 solution for Ethereum developers, thanks to its secure and scalable infrastructure and instant transactions. Polygon’s high-performance, low fee infrastructure provides a viable platform for DeFi applications to facilitate large-scale adoption. Similarly in the blockchain oracle space, Chainlink has become the preferred oracle solution for DeFi protocols, with Chainlink Price Feeds now securing billions in USD value. In this technical article, we’ll show you how to use Chainlink oracles in your Polygon DeFi application, and how to make use of Chainlink’s Price Feeds to give your application access to high-quality, tamper-resistant data that isn’t prone to risks such as oracle exploits and flash loan attacks.
The Need for Scalable and Secure DeFi Protocols
This year has seen an explosive growth in DeFi protocols, with the total value locked (TVL) in DeFi skyrocketing from $680M in January, to now over $14B. However, along with this growth comes increased levels of on-chain transactions, as well as unwanted attention from malicious actors that try to exploit these protocols for their own benefit.
The increased levels of on-chain transactions due to the growth of DeFi have often hindered the performance of the Ethereum blockchain, due to its scalability limitations and low throughput. This has a flow-on effect that frustrates the user experience of DeFi protocols with high fees and slow transaction times.
Slow transaction speeds and high transaction costs are two of the most limiting factors preventing DeFi from crossing into the mainstream. Layer 2 networks such as Polygon can unlock the next stage of growth in DeFi thanks to its increased scalability, high throughput, and low-cost transactions. Polygon sidechains are also composable and fully EVM-compatible. One of the core values of DeFi is its permissionless composability, so Polygonoffers a compelling option for developers looking to build all kinds of useful DeFi applications that scale, offer low-cost transactions, ensure permissionless composability, and provide a seamless user experience.
However, these DeFi applications still need access to high-quality and reliable external data. As we have seen many times this year, DeFi protocols can be subject to various forms of attacks such as price oracle attacks, where a malicious actor combines a flash loan with a low-quality oracle to manipulate the market to their advantage, at the detriment of other users.
Chainlink Price Feeds mitigate the risk of DeFi applications being prone to these attacks by providing aggregated data from various high-quality data providers, fed on-chain by decentralized oracles on the Chainlink Network. Chainlink’s decentralized architecture and wide array of premium data sources ensure the final price reflects broad market coverage, which essentially means the price is determined after aggregating a diverse set of prices across the entire market, rather than just a small subset.
Now that we understand the advantages of building a DeFi protocol on PolygonNetwork, and the crucial role Chainlink oracles and Price Feeds play, we’ll now go through an example of using a Chainlink Price Feeds when building a DeFi application on Polygon.
Using Chainlink Price Feeds on Polygon Network
Chainlink Price Feeds use multiple high quality data inputs, and combine them with a network of Chainlink oracles feeding price data into reference contracts, where the results are then aggregated. It’s extremely important that DeFI protocols take data quality and integrity seriously, and Chainlink Price Feeds offer the best battle-hardened in-production solution for these protocols looking to protect themselves against the various DeFI exploits that have occurred due to data quality or delivery.
Both tutorials below are also available as a single complete smart contract in Remix.
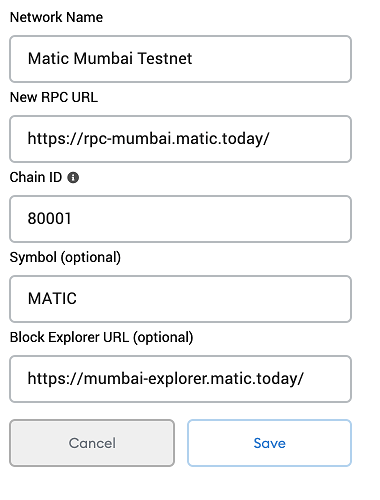
The first step in using Chainlink Price Feeds and oracles on Polygon Network is to setup your MetaMask wallet to connect to the Mumbai Testnet, then you are ready to obtain some Mumbai Testnet MATIC tokens to use in your DeFi smart contract.
Obtaining Testnet MATIC
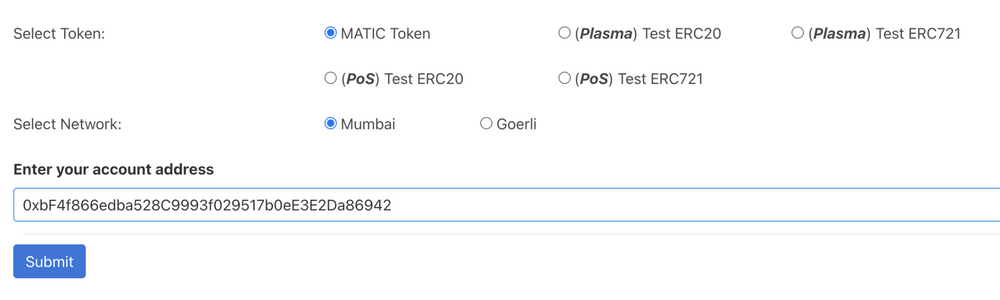
MATIC is the native token of the Polygon network. This is similar to Ether in Ethereum. To interact with the Polygon network, MATIC tokens are required to pay gas fees. To obtain Mumbai Testnet MATIC, head over to the MATIC Faucet, select the MATIC token and the Mumbai Testnet network, enter in your MetaMask Wallet address and press Submit.
Creating the Smart Contract
The easiest way to start building a smart contract that uses Chainlink Price Feeds on Polygon is to begin with the standard Price Consumer contract. This is a basic standardized contract for initiating requests to Chainlink Price Feeds. So we will open this contract in Remix and modify it to suit our needs. For the purposes of this demo we will use the ETH/USD Price Feed. The first step is to initialize a Polygon Price Feed reference contract in our constructor. The ETH/USD Price Feed reference contract on the Mumbai Testnet is deployed at the address 0x0715A7794a1dc8e42615F059dD6e406A6594651A.
priceFeed = AggregatorV3Interface(0x0715A7794a1dc8e42615F059dD6e406A6594651A);
Next, we need a function to obtain the latest price from the Price Feed Aggregator contract that was instantiated in the constructor above. To do this, we already have function that calls the latestRoundData function from the Aggregator contract. This is the function that returns the current state of the Aggregator contract, and in this case we are taking the current price and returning it in our consuming function.
function getLatestPrice() public view returns (int) {
    (
        uint80 roundID,
        int price,
        uint startedAt,
        uint timeStamp,
        uint80 answeredInRound
    ) = priceFeed.latestRoundData();
    return price;
}
Deploying and Testing the Smart Contract
Now we are ready to deploy and test our contract. Compile the contract in remix, then on the deployment tab, change the environment to “Injected Web3”, and ensure the wallet address below is the one in your MetaMask wallet that contains your MATIC tokens, press the deploy button, and follow the steps. The end result is you have your smart contract deployed to the Mumbai testnet. You should take note of the deployed contract address via the transaction output in the remix console.
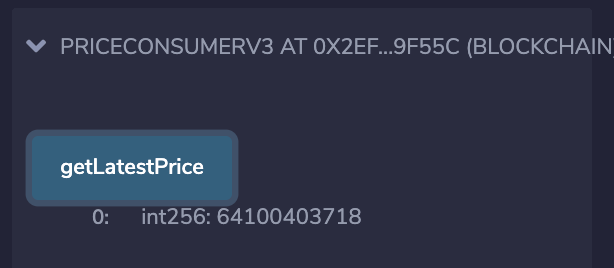
Once deployed, we simply need to execute the “getLatestPrice” function. The result should be that the function returns the latest price from the ETH/USD Aggregator contract, which can then be used in our DeFi application on Polygon network.
Using Chainlink Oracles on PolygonNetwork
There may be scenarios when you need off-chain data in your smart contract on Polygon that isn’t available using Chainlink Price Feeds. This is where you can make use of a Chainlink oracle. We will now modify our smart contract to obtain a market price that is unavailable using Chainlink Price Feeds, in this case the ETH/EUR price.
Obtaining Testnet LINK
You will need to obtain some Testnet LINK to send requests to Chainlink oracles. To obtain Mumbai Testnet LINK, join the Polygon Discord and post your MetaMask wallet address from the step above, asking for a Polygon team member to send you some Mumbai Testnet LINK. Once you have some MATIC and LINK in your wallet you can then move onto the smart contract.
Creating the Smart Contract
The easiest way to start building a smart contract that uses Chainlink oracles on Polygon is to begin with the standard Chainlink APIConsumer contract. This is a basic standardized contract for initiating requests for external data via a Chainlink oracle. So we will open this contract in Remix and modify it to suit our needs.
First we will rename the “volume” parameter to “ethPrice”, and the “requestVolumeData” function to “requestEthereumPrice”. Once that’s done, we need to modify the constructor as follows:
- The address of the LINK token on the Mumbai testnet is 0x70d1F773A9f81C852087B77F6Ae6d3032B02D2AB, so we pass it into a “setChainlinkToken” function
- As specified in the Polygon documentation, there is one oracle contract running on Mumbai testnet at 0x1cf7D49BE7e0c6AC30dEd720623490B64F572E17, so we set the oracle variable to this.
- The API we will be consuming is obtained via a HTTP GET request, and the value returned will be an unsigned integer. The oracle running on the Mumbai testnet has various job specifications that can be used. As per the list of jobs in the Polygon documentation, the one suitable for us based on these requirements is d8fcf41ee8984d3b8b0eae7b74eca7dd, because we want to perform a HTTP GET request, and the data returned is an unsigned integer, so we set the “jobId” variable to this value.
- Modify the “fee” variable to 1 LINK. by removing the “0.1” prefix. This is the payment sent to the oracle along with the request for external data.
constructor() public {
    setChainlinkToken(0x70d1F773A9f81C852087B77F6Ae6d3032B02D2AB);
    oracle = 0x1cf7D49BE7e0c6AC30dEd720623490B64F572E17;
    jobId = "d8fcf41ee8984d3b8b0eae7b74eca7dd";
    fee = 10 ** 18; // 1 LINK
}
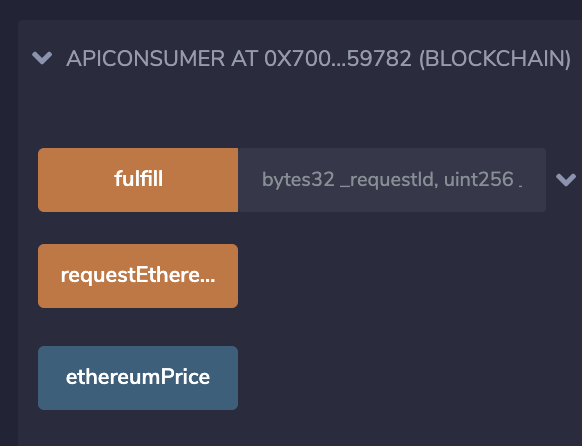
Now that we have the constructor completed we can move onto the “requestEthereumPrice” and “fulfill” functions.
Requests to Chainlink oracles work using the Chainlink request and response design pattern, where an on-chain function creates and emits a request, the oracle detects the request, and then the response is sent back to another function in the same contract. In our case, the “requestEthereumPrice” function creates and emits the request, and the “fulfill” function processes the response, as defined by this.fulfill.selector.
The API we will be consuming is the crypto.com public API for the ETH/EUR price. If you open this link in a browser, you can see the data returned in JSON format.
In our “requestEthereumPrice” function, we modify it as follows:
- Sets the URL to the ETH/EUR API endpoint
- Sets the “path” variable in the request to “EUR”. This is the path of the JSON response that we want to find and return, as per the output of the API endpoint we saw in the browser, it contains the current price of Ethereum
- Multiplies the result by 100, because Solidity can’t handle decimals in numbers
- Sends the request off to the Chainlink oracle
function requestEthereumPrice() public returns (bytes32 requestId) {
    Chainlink.Request memory request = buildChainlinkRequest(jobId, address(this), this.fulfill.selector);

    // Set the URL to perform the GET request on
    request.add("get", "https://min-api.cryptocompare.com/data/price?fsym=ETH&tsyms=EUR");

    // Set the path to find the desired data in the API response, where the response format is:
    // {"USD":243.33}
    request.add("path", "EUR");

    // Multiply the result by 100 to remove decimals
    request.addInt("times", 100);

    // Sends the request
    return sendChainlinkRequestTo(oracle, request, fee);
}
In the “fulfill” function, we can see that the oracle sends back a response into the _price parameter, which is then stored in the contract in our ethereumPrice variable.
function fulfill(bytes32 _requestId, uint256 _price) public recordChainlinkFulfillment(_requestId) {
    ethereumPrice = _price;
}
Now our contract is ready to be compiled and deployed to the Mumbai testnet.
Deploying and Testing the Smart Contract
Compile the contract in Remix, then deploy the contract to the Mumbai Testnet like we did with the Price Feeds contract.
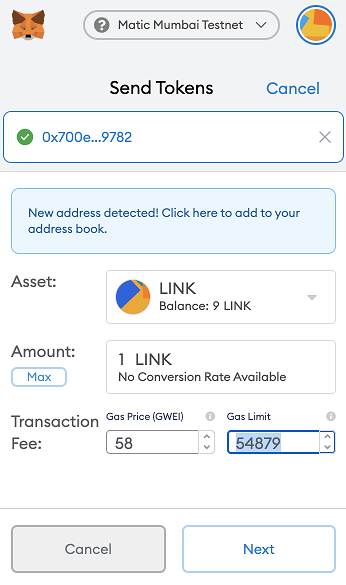
The next step is to fund the contract with LINK so it can send requests to Chainlink oracles. To do this, simply take the deployed contract address from the step above, and then send it 1 LINK token from your MetaMask wallet.
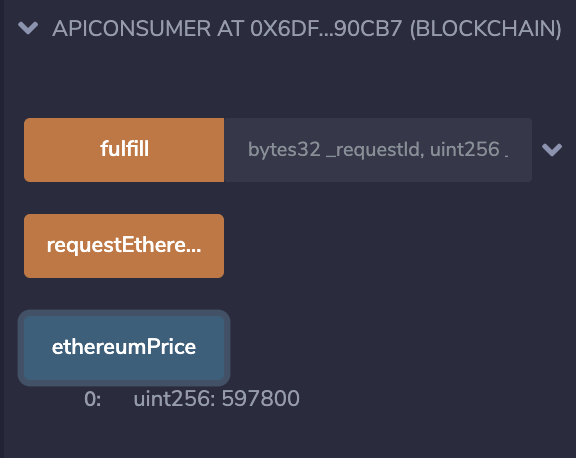
Once the contract is deployed and funded with LINK, we can press the “requestEthereumPrice” function to send the request for the current Ethereum price to the Chainlink oracle. This will also send the LINK payment to the Chainlink oracle as payment for fulfilling the request.
Once the request is made, the Chainlink oracle will fulfill it, and then the fulfill function in our contract will be called by the Chainlink nodes oracle contract. This will take a few seconds to complete, then we can see the result of the API request by executing the “ethereumPrice” getter function. The result should be the current price of Ethereum in EUR is now stored in the contract and ready to be used in a DeFi application running on Polygon Network.
Summary
The Polygon Network offers a viable layer 2 option for DeFi protocols to be built upon, with its fast, cheap, and reliable transactions. The value proposition for building DeFi protocols on Polygon is further enhanced with Chainlink oracles and Chainlink Price Feeds, giving these protocols access to external data and events, including high-quality aggregated price data that can be used in all kinds of useful DeFi applications, such as decentralized exchanges (DEX), liquidity pools, lending protocols, decentralized insurance, and automated market makers (AMMs).
If you’re a developer and want to quickly get your application connected to Chainlink Price Reference Data, visit the developer documentation and join the technical discussion in Discord. If you want to schedule a call to discuss the Polygon/Chainlink integration more in-depth, reach out here.
Website | Twitter | Reddit | YouTube | Telegram | Events | GitHub | Price Feeds | DeFi


