How To Create a PoW Blockchain Network
- How To Create a PoW Blockchain Network
- Installing Geth
- Consensus Algorithms
- Blockchain Network Folder
- Create a Local Node With Geth
- Running Geth
- Geth JavaScript Console
- Create the Second Node
- geth attach Using IPC For Node2
- Creating an Account For Node2
- Enode From Node2
- Connecting the Nodes
- Verifying the Network
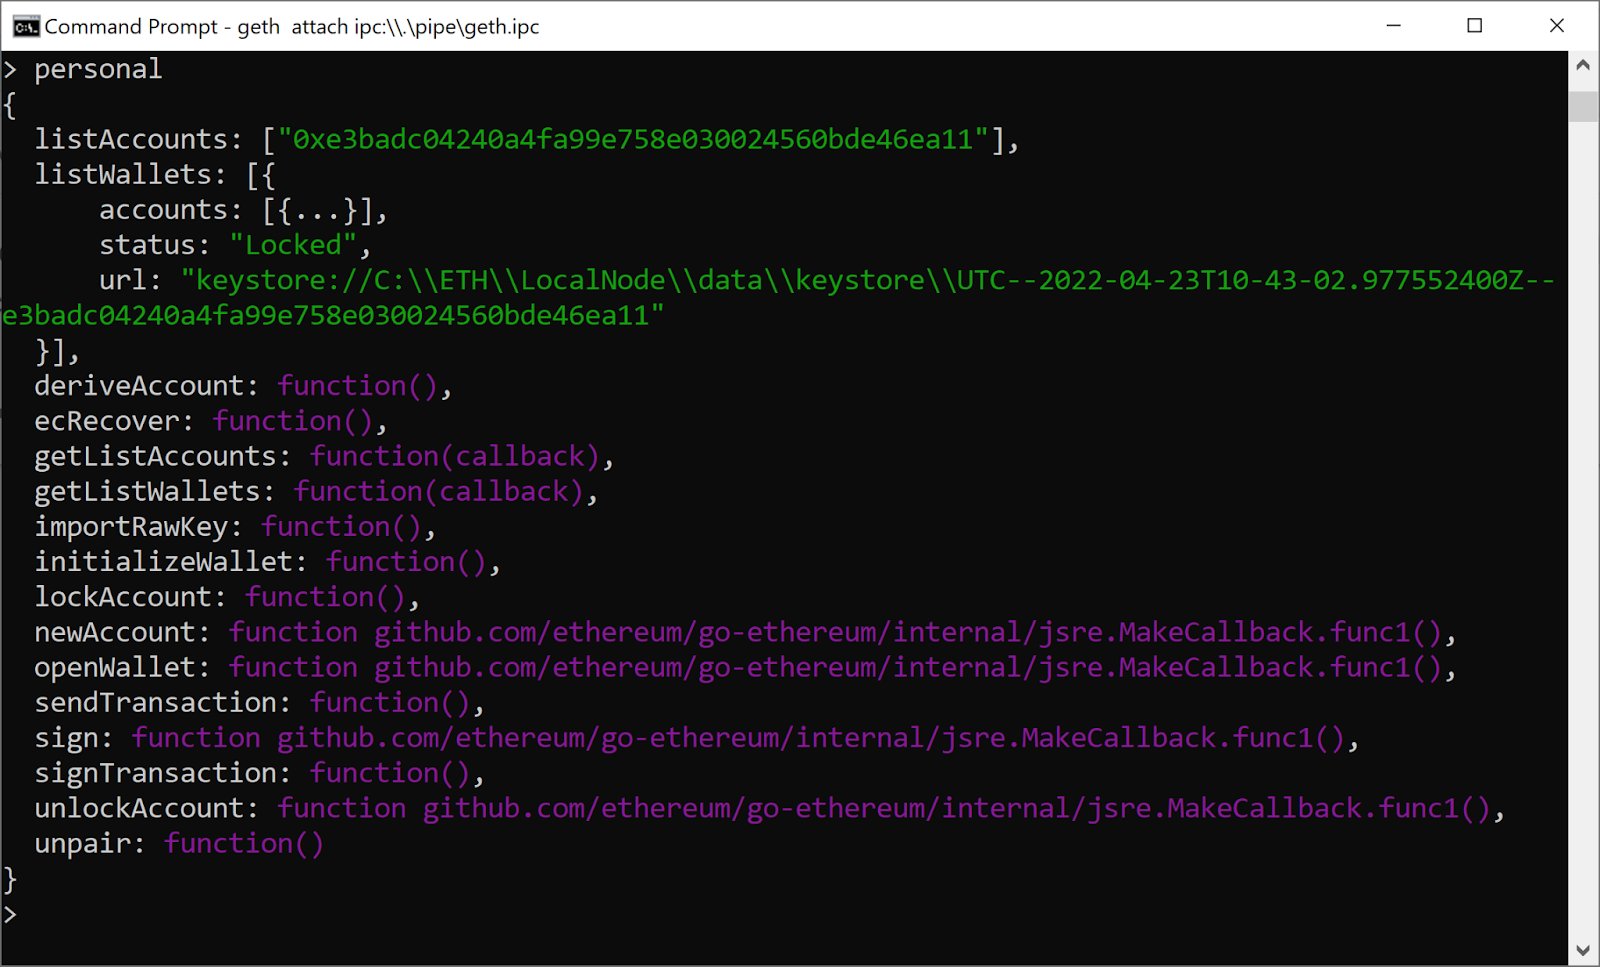
- Accounts
- Mining
- Next Steps
Ever wondered how to create your own blockchain network?
While networks like Ethereum and Bitcoin are large public networks, it’s possible to use an Ethereum client to set up a new private blockchain network for your own purposes (in this context, private does not mean protected or secure, but rather reserved or isolated).
In this tutorial, you’ll learn how to get started creating your own blockchain network using Geth, the Go language implementation of Ethereum.
Installing Geth
There are several ways to install Geth:
- Using a package manager
- Downloading a standalone pre-built bundle
- Running it in a docker container
- Building it yourself
Your choice will be informed by your computer, operating system, and prior knowledge. Check out the official documentation to learn how to install Geth.
Check That Geth Is Installed
You can check whether you have the Geth client installed by checking its version.
In the terminal, run this command. If it runs and returns details of the version you’re using, Geth has been successfully installed:
geth version
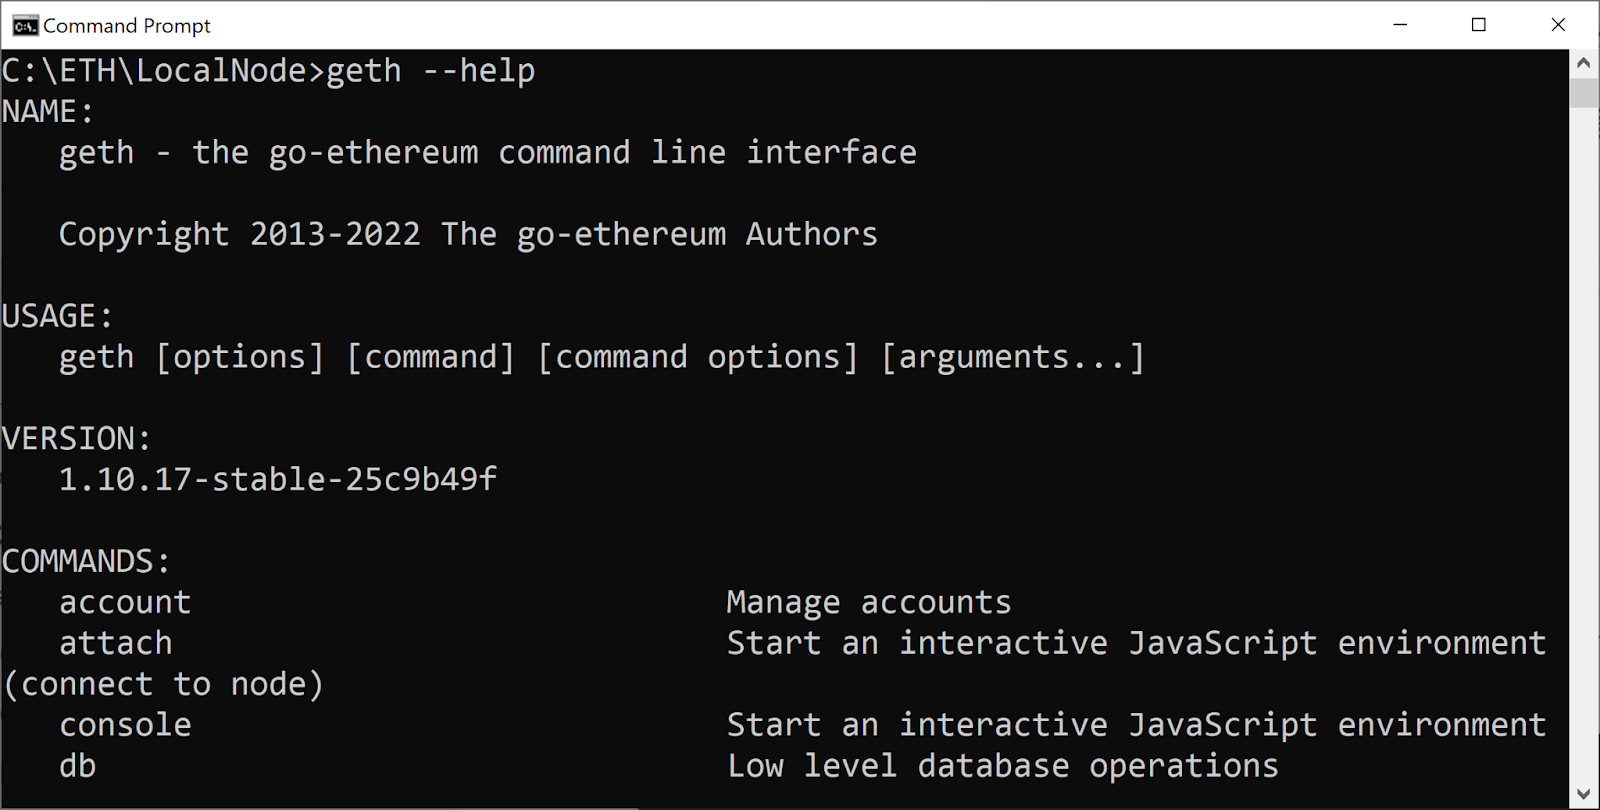
Geth Help
Geth comes with a useful help command, which you can run like so:
geth --help
Running Geth
By default, Geth runs a mainnet node and it will start to download the entire database for Ethereum mainnet.
If your goal is to use Geth to create your own blockchain, don’t run geth without specifying parameters.
Consensus Algorithms
Ethereum mainnet uses the proof-of-work (PoW) ethash to secure the blockchain. It is possible to create a private blockchain using the same consensus algorithm.
Geth also supports the “clique” proof-of-authority (PoA) consensus algorithm as an alternative for private networks, where new blocks can be created by authorized “signers” only. The initial list of authorized signers is configured in the genesis block. The clique consensus protocol is specified in EIP-225.
In this tutorial, we’re using the PoW consensus algorithm in order to demonstrate the miner process.
Blockchain Network Folder
Let’s create the blockchain network in the folder C:\ETH\LocalNode. The examples below are for Windows OS.
On the command prompt, run these commands:
cd C:\ETH
mkdir LocalNode
cd LocalNode
Create a Local Node With Geth
After installing the Geth client, the next step is to create a local node.
All participating computers in the network must complete this step in order to create your blockchain network.
Genesis File
Every blockchain starts with the genesis block. This is a special genesis.json file, customized for creating your blockchain network.
In your text editor of choice, create a file named genesis.json.
Copy and paste this configuration:
{
    "config": {
        "chainId": 9183,
        "homesteadBlock": 0,
        "eip150Block": 0,
        "eip155Block": 0,
        "eip158Block": 0,
        "byzantiumBlock": 0,
        "constantinopleBlock": 0,
        "petersburgBlock": 0
    },
    "difficulty": "0x1",
    "gasLimit": "8000000",
    "alloc": {}
}
Understanding The Parameters
There are some comments related to parameters that are important for you to understand when you are creating your own blockchain network.
chainID
In our blockchain network the chainID will be the same as the network ID, an integer number that isolates Ethereum peer-to-peer networks.
Connections between blockchain nodes will occur only if both peers use the same genesis block and chainID. In order to create a private blockchain network, you must use a number that has not been used yet. You can find a community-run registry of Ethereum networks at https://chainid.network.
The main network has the ID “1”. If you supply your own custom network ID that’s different from the main network or other known networks, your nodes will not connect to other nodes and will instead join a private blockchain network.
Note: the chainId in the genesis files must be the same for all participants in this blockchain network. In our network, the chainId is 9183.
You can find more on this in the docs.
difficulty
Notice how difficulty is set extremely low, to just 1.
gasLimit
This is the initial block gas limit (gasLimit). It impacts how much EVM computation can happen within a single block.
Initialize Your Blockchain
Go to the folder where you created the genesis.json file in the terminal and run this command to initialize a new blockchain:
geth init --datadir data genesis.json
The blockchain’s database will be located in the folder data:

Running Geth
The command below will start the client node:
geth --datadir ".\data" --networkid 9183 --identity "Node1"
You should expect to see an output similar to this:

If you received the error message “Snapshot extension registration failed”, the error is on the other peer’s side and for now you are alone in the network—that peer will be dropped. Your node is functioning fine, you have nothing to worry about.
IPC Path
The IPC path will be used later to connect to your node, so write it down.
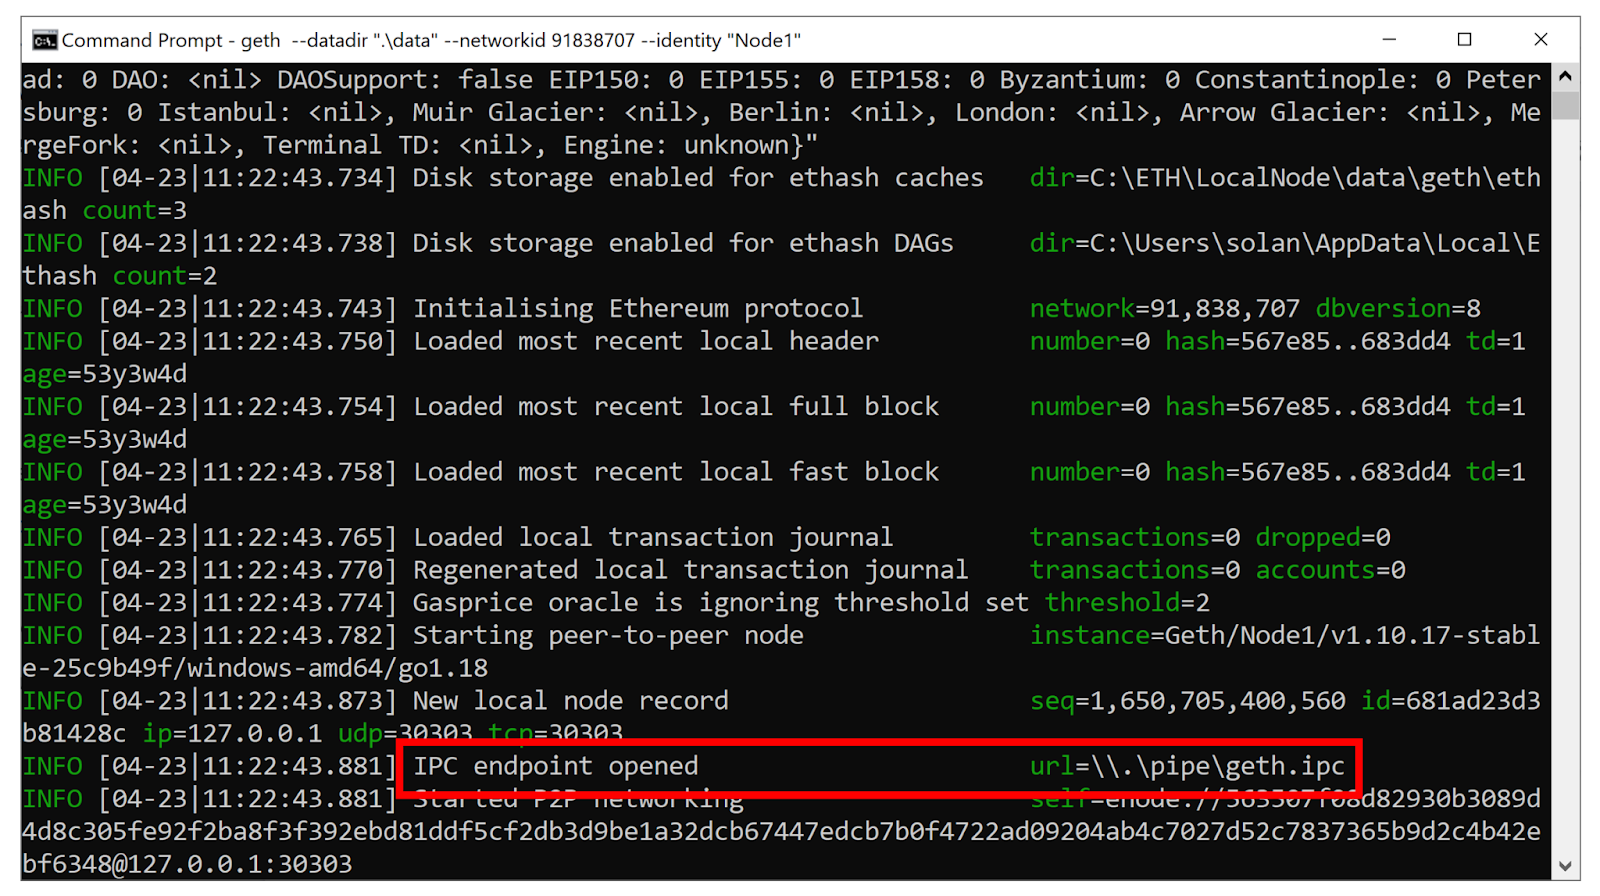
In this example, the IPC path is:
\\.\pipe\geth.ipc
Geth JavaScript Console
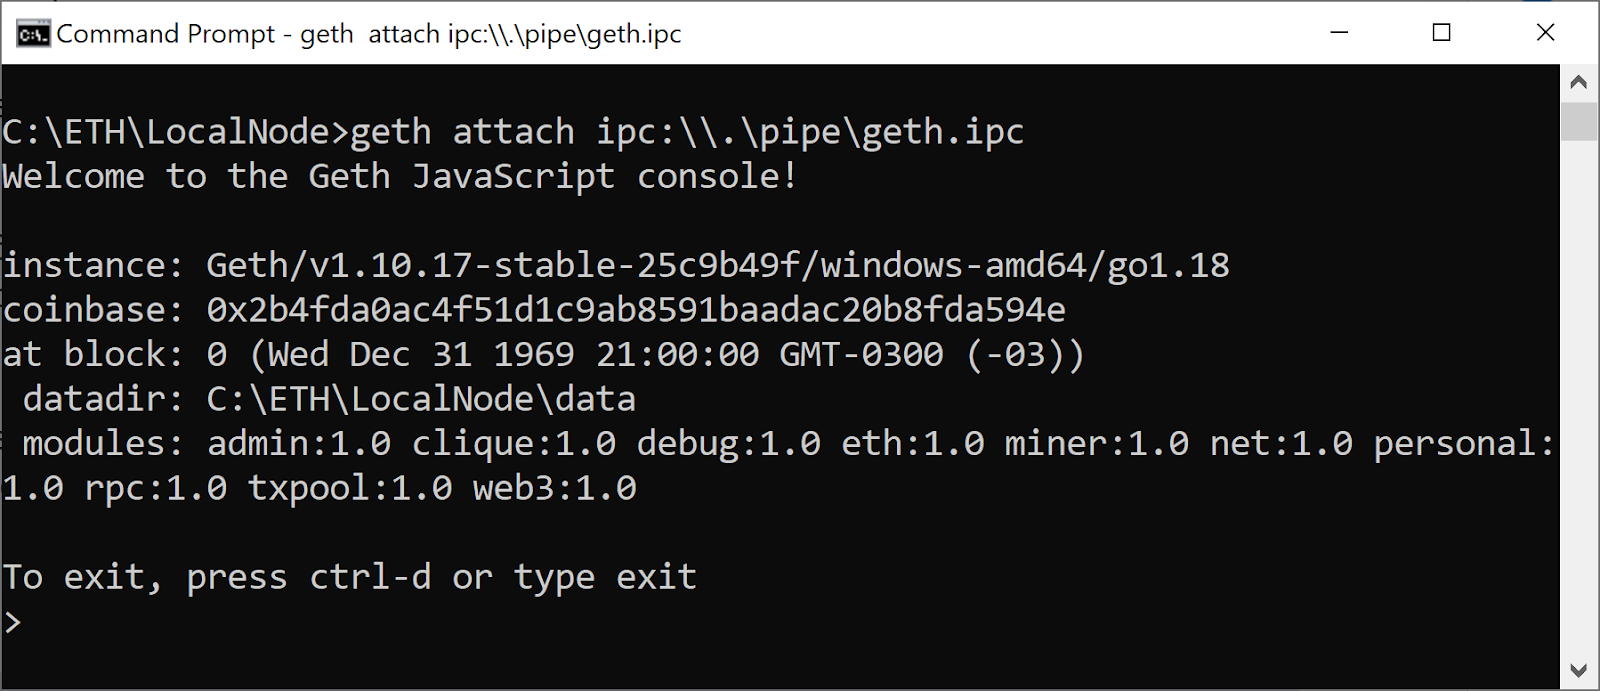
Geth has a JavaScript console that can be used in a Geth node to send commands to it. Here’s how to use the geth attach command to connect to a Geth local node that’s already running and run some commands inside it.
Geth Attach Using IPC
Open a second terminal window.
The IPC path can be obtained when the node is executed (you received it in the previous step).
Run this command:
geth attach ipc:\\.\pipe\geth.ipc
This is the result:
Warning
This procedure is only for a node running on your machine or on a network that you have access to. geth attach gives you full control of the remote instance, so do not expect someone else to give you such access to their machine.
Creating an Account
Each node must have at least one account, especially if is to receive miner rewards. Inside the Geth terminal attached, run the command below:
personal.newAccount("yourpassword")
The “yourpassword” text is the password used to encrypt your private key. If you forget it, you will no longer be able to use your account.

The account created on Node1 is 0xe3badc04240a4fa99e758e030024560bde46ea11.
Create the Second Node
Our aim for this tutorial is to create a network running two Geth nodes inside the same computer, connected to different ports.
Let’s create the second node, Node2.
Here’s the information we’ll use in Node2:
- data directory: data2
- listening port: 30305
- ipc path: geth2
- identity: Node2
Now let’s create the second node in the folder C:\ETH\LocalNode2.
It’s important to remember that this example uses Windows OS—if you’re using another operating system you’ll need to adapt accordingly.
On the command prompt, run:
cd C:\ETH
mkdir LocalNode2
cd LocalNode2
The final path is C:\ETH\LocalNode2.
Geth Init Node2
Copy the genesis.json file from LocalNode1 to LocalNode2.
Run this command to initialize Node2:
geth init --datadir data2 genesis.json
The blockchain’s database will be located in the folder data2.
geth attach Using IPC For Node2
We’ve defined that the Node2 will have the geth2 IPC.
The IPC path can also be obtained when the node is executed. Check it out in IPC path as you did for Node1.
Open a second terminal window and run this command:
geth attach ipc:\\.\pipe\geth2.ipc
Creating an Account For Node2
Node2 also must have at least one account. Inside the Geth terminal attached, run the command below:
personal.newAccount("yourpassword")
The “yourpassword” text is the password used to encrypt your private key, if you forget it, you will no longer be able to use your account.
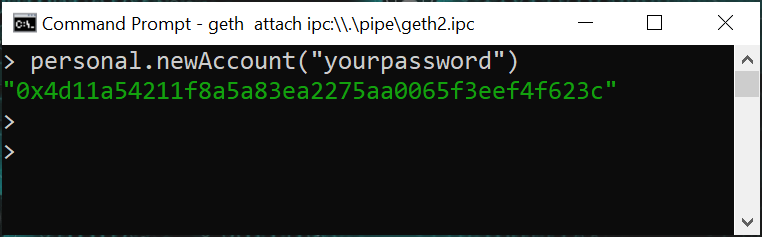
The account on Node2 is 0x4d11a54211f8a5a83ea2275aa0065f3eef4f623c.
Configure the Blockchain Network
In order to create your blockchain network, you need to know the enode of one of your nodes so that your nodes can communicate with one another.
Enode From Node2
In the terminal running geth attach, connect to Node2 and run this command to discover the enode:
admin.nodeInfo.enode
This is the enode for Node2:
"enode://b9b9200ee68b324f0b4486cd9719f876763a3b9c8c9fe9cfe20a13221055472b664af3f31bdf1c85f8895c9e54b47680d818d4a3ff66a6ec735f90afa5d7756f@89.20.185.250:30305"
Our goal is to set up the blockchain network running Geth nodes on the same computer, so let’s update the IP to our local IP:
127.0.0.1
After updating the IP, the enode for node2 should be:
"enode://b9b9200ee68b324f0b4486cd9719f876763a3b9c8c9fe9cfe20a13221055472b664af3f31bdf1c85f8895c9e54b47680d818d4a3ff66a6ec735f90afa5d7756f@127.0.0.1:30305"
Using Different Computers
While in this tutorial we’re creating a network running two Geth nodes inside the same computer through different ports, if you want to create your blockchain network using different computers, you need to know each computer’s IP.
Setting up peer-to-peer networking depends on your requirements. If you connect nodes across the Internet, you’ll need to ensure that your bootnode and all other nodes have public IP addresses assigned and that both TCP and UDP traffic can pass the firewall.
Connecting the Nodes
Let’s run our blockchain network!
Go to the terminal running geth attach in Node1 and add the enode for Node2.
Update the enode2 in the command admin.addPeer.
admin.addPeer("enode")
Like this:
admin.addPeer("enode://b9b9200ee68b324f0b4486cd9719f876763a3b9c8c9fe9cfe20a13221055472b664af3f31bdf1c85f8895c9e54b47680d818d4a3ff66a6ec735f90afa5d7756f@127.0.0.1:30305")
This is the result:
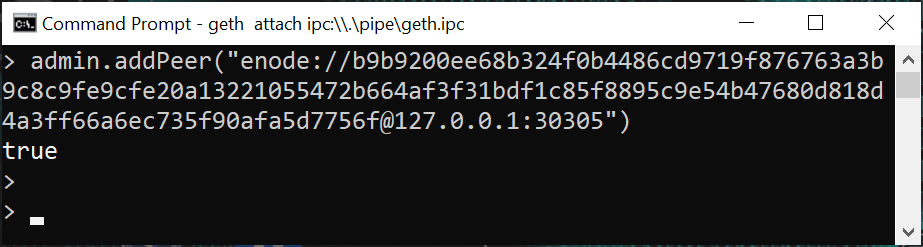
Done! Now one node knows that the other exists.
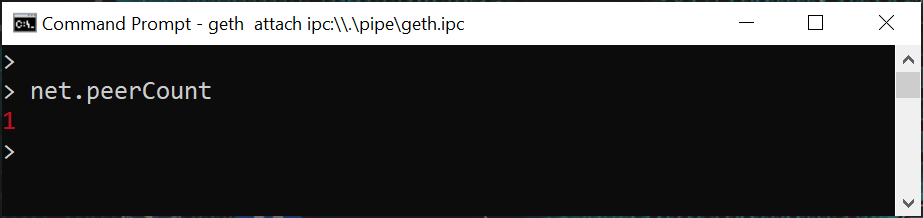
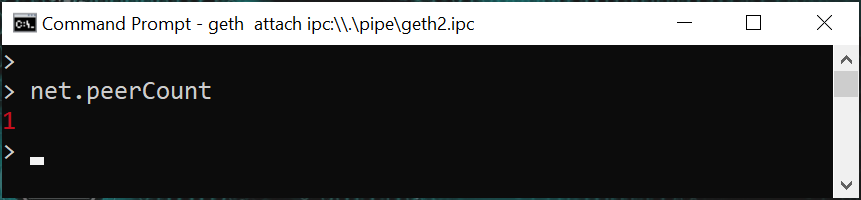
Verifying the Network
net.peerCount
This command tells you how many nodes are connected to yours.
In any of the Geth-attached terminals, you can run:
net.peerCount
The result should be 1, because we have one node connected in another node, as you can see below:
Node1
Node2

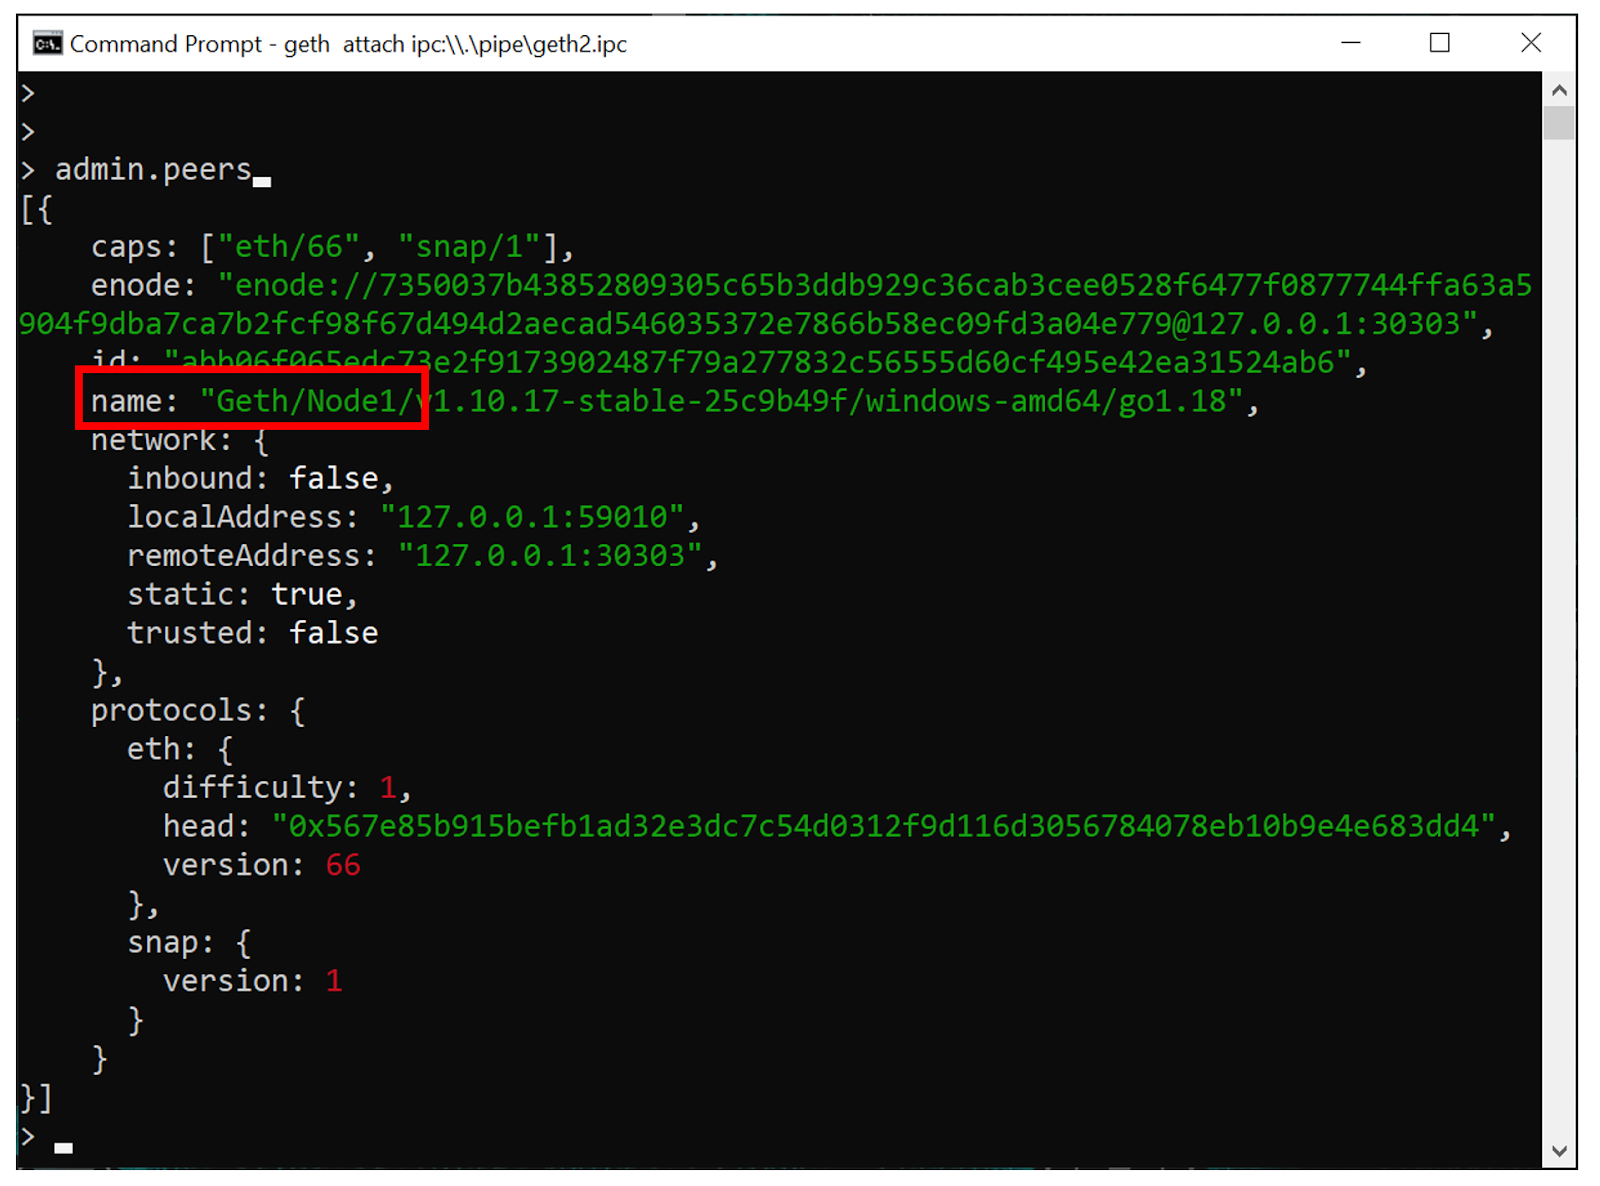
admin.peers
This command presents the details of the other nodes that are connected to yours. Run it in the Geth-attached terminal:
admin.peers
You can see that Node2 is connected to Node1:
And also that Node1 is connected to Node2:
Accounts
Let’s get to know some more commands related to accounts.
personal
This command lists details of all accounts in a node.
personal
This is the result for Node1:
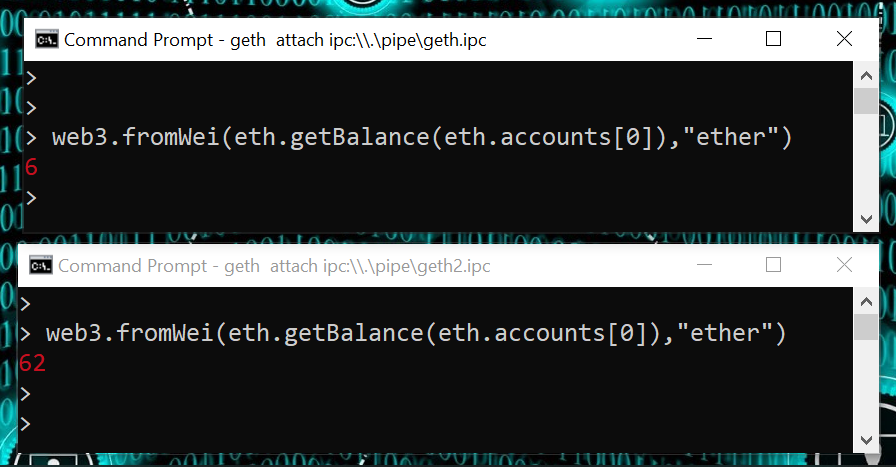
Balance
This command retrieves the balance of an account:
eth.getBalance(eth.accounts[0])
If we run this command, we’ll get a large number as a result because the result is denominated in wei. Let’s convert to ether:
web3.fromWei(eth.getBalance(eth.accounts[0]),"ether")
![Screenshot of the result of running web3.fromWei(eth.getBalance(eth.accounts[0]),ether)](https://blog.chain.link/wp-content/uploads/2022/04/Screenshot-of-the-result-of-running-web3.fromWeieth.getBalanceeth.accounts022ether22-.png)
Balance of a Specific Account
Let’s check an account’s balance using this address: 0x942b17d335321128225d23bd7e8451fe78ce9547.
web3.fromWei(eth.getBalance("0x942b17d335321128225d23bd7e8451fe78ce9547"),"ether")
The result:

Mining
If we want to create new blocks on our blockchain, they’ll need to be mined because we’re using a PoW consensus algorithm.
We already have two nodes configured in the network, so let’s mine and get some ether! Remember that these tokens are not worth anything—they only exist on our private network.
Start Mining
In Geth-attached terminals for both nodes, run:
miner.start(1)
The parameter 1 is the number of threads that are used in the computer. In our case, we are not enabling parallel mining threads. The default is the total number of processor cores.
You can learn more about mining here.
Balances After Mining
In each Geth-attached node, check the balance after a few minutes.
web3.fromWei(eth.getBalance(eth.accounts[0]),"ether")
Take a look at the image below: Node2 has more ether than Node1.
You are using the same computing power for mining on both nodes, so when the second one starts, the first one will no longer be able to earn rewards through mining.
Mount the network using different computers to avoid this problem.
Geth Exit
To exit any geth console, run:
exit
Next Steps
Now that you’ve created your own PoW blockchain network, there are many possibilities available to you: You could transfer ether from one node to another, publish smart contracts, or interact with other published smart contracts—although the utility of your network will be somewhat limited considering it’s private.
Learn more about Chainlink by visiting chain.link or reading the documentation at docs.chain.link. To discuss an integration, reach out to an expert.


