如何开发并部署Solana智能合约
Chainlink 2021秋季黑客松将于十月22日开启。快来注册吧.!
如果你想学习如何开发Solana智能合约和项目,那么你来对地方了。
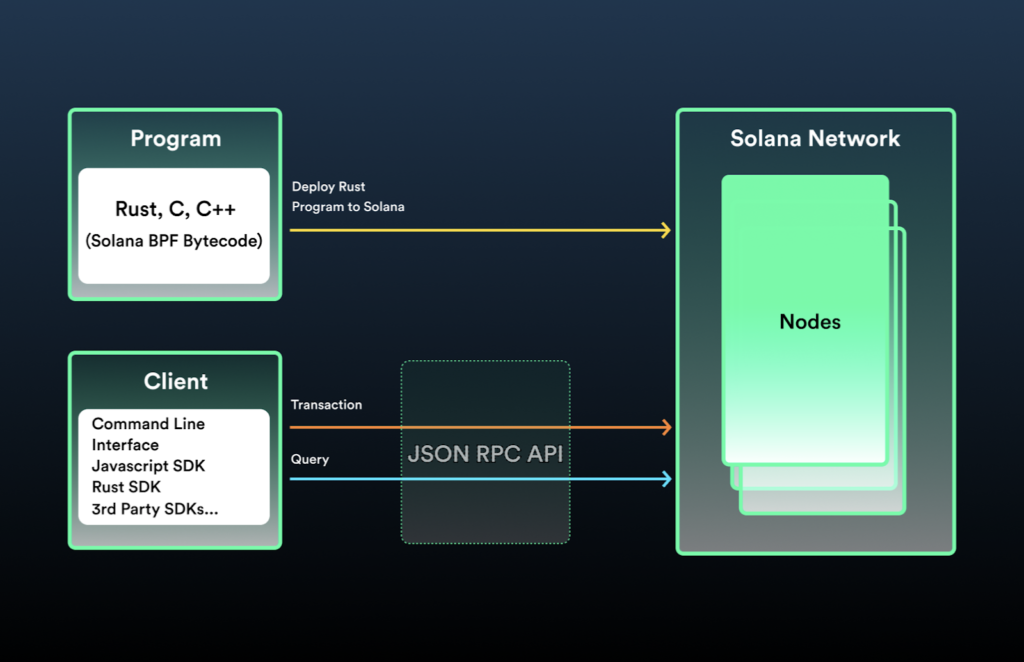
Solana是一个新兴的高性能的无许可的公链,它提供了快速、便宜且可扩展的交易体验,并且它还支持使用Rust,C++和C语言来编写智能合约。
在本技术教程中,我们将一起看一看如何在Solana Devnet(测试网)编写、部署合约并与之进行交互,以及如何在Solana智能合约中使用Chainlink Price Feeds。
Solana的架构和编程模型
Solana是一个高性能的区块链,每秒能够处理数千笔交易,并且出块时间达到了亚秒级。它通过拜占庭容错(BFT)共识机制实现了这一点,该机制利用了一种称之为历史证明(PoH)的创新的密码学函数。
历史证明
历史证明 (PoH) 通过使用高频可验证延迟函数(VDF),随着时间的推移建立可通过密码验证的事件顺序(在本例中为交易)。 从本质上讲,这意味着 PoH 就像一个加密时钟,可以帮助网络就时间和事件顺序达成一致,而无需等待其他节点的消息。这就像古老的水钟可以通过观察水位上升来记录时间的流逝一样,历史证明的区块链状态哈希的连续输出能够给出可验证的事件顺序。
这允许并行处理有序事件来帮助提升网络的性能,而在传统的区块链场景中,单个进程验证并打包要包含在下一个块中的所有交易。
一个简单的类比是想象一个100块的大型拼图。在正常情况下,完成拼图需要一个或多个人一定的时间。但是想象一下,如果事先所有拼图块都印有与其位置相对应的数字,从拼图的左上角到右下角,并按顺序排列成一行。 因为拼图的确切顺序和它们在拼图中的位置是事先知道的,所以可以让多人专注于每个部分,可以更快地解决拼图。 这是相对时间而言具有可验证的事件序列对共识机制的影响;它使得将事务分解为多个并行进程成为可能。
智能合约架构
Solana提供了一种不同于传统的基于EVM的区块链的智能合约模型。在传统的基于EVM的链中,合约代码/逻辑和状态被组合成一个部署在链上的合约。Solana中智能合约(或程序)是只读或无状态的,并且只包含程序逻辑。一旦部署后,智能合约就可以通过外部账户进行交互。Solana中与程序交互的账户会存储与程序交互相关的数据。这创建了状态(帐户)和合约逻辑(程序)的逻辑分离。这是Solana 和基于EVM的智能合约之间的关键区别。以太坊上的账户与Solana 上的账户不同,Solana 账户可以存储数据(包括钱包信息),而以太坊账户并不存储数据。
除此之外,Solana还提供了CLI(命令行) 和 JSON RPC API,这些可以用于去中心化应用程序与Solana区块链进行交互。还可以使用现有的SDK,用于客户端与区块链和Solana程序对话。
部署第一个Solana智能合约
在本节,你将会创建并部署一个“hello world”的Solana程序,使用Rust进行编写。
要求
在继续之前,应安装以下工具:
- NodeJS v14或更高版本 & NPM
- 最新的稳定版本的Rust
- Solana CLI v1.7.11或者更高版本
- Git
HelloWorld程序
该HelloWorld 程序是一个智能合约,它可将输出打印到控制台,并统计给定的帐户调用该程序的次数,并将该数字存储在链上。我们将代码分解成不同的部分来讲解。
第一部分定义了一些标准的 Solana 程序参数并定义了程序的入口(“process_instruction”函数)。 此外,它还使用borsh对传入和传出部署程序的参数进行序列化和反序列化。
use borsh::{BorshDeserialize, BorshSerialize};
use solana_program::{
    account_info::{next_account_info, AccountInfo},
    entrypoint,
    entrypoint::ProgramResult,
    msg,
    program_error::ProgramError,
    pubkey::Pubkey,
};

/// Define the type of state stored in accounts
#[derive(BorshSerialize, BorshDeserialize, Debug)]
pub struct GreetingAccount {
    /// number of greetings
    pub counter: u32,
}

// Declare and export the program's entrypoint
entrypoint!(process_instruction);
process_instruction函数接受program_id,这是一个公钥,也即程序部署后的地址;以及accountInfo,这是用于和合约交互的账户。
pub fn process_instruction(
    program_id: &Pubkey, // Public key of the account the hello world program was loaded into
    accounts: &[AccountInfo], // The account to say hello to
    _instruction_data: &[u8], // Ignored, all helloworld instructions are hellos
ProgramResult是写程序的主要逻辑的地方。在本教程中,它只是打印一条消息,然后遍历“accounts”来选择帐户。 但是,在我们的示例中,将只有一个帐户。
    ) -> ProgramResult {
    msg!("Hello World Rust program entrypoint");

    // Iterating accounts is safer then indexing
    let accounts_iter = &mut accounts.iter();

    // Get the account to say hello to
    let account = next_account_info(accounts_iter)?;
接下来,程序会检查该帐户是否有权修改指定帐户的数据。
    // The account must be owned by the program in order to modify its data
    if account.owner != program_id {
        msg!("Greeted account does not have the correct program id");
        return Err(ProgramError::IncorrectProgramId);
    }
最后,该函数会将现有帐户存储的数字加一并将结果写回,然后显示一条消息。
    // Increment and store the number of times the account has been greeted
    let mut greeting_account = GreetingAccount::try_from_slice(&account.data.borrow())?;
    greeting_account.counter += 1;
    greeting_account.serialize(&mut &mut account.data.borrow_mut()[..])?;

    msg!("Greeted {} time(s)!", greeting_account.counter);

    Ok(())
部署程序
第一步是复制代码。
git clone https://github.com/solana-labs/example-helloworld
cd example-helloworld
完成后,可以设置当前的环境为devnet。这是为Solana开发者们准备的编写和测试合约的网络的测试网。
solana config set --url https://api.devnet.solana.com
接下来,需要为账户创建一个密钥对。这对于在Solana测试网上部署合约来说是必要的。注意:这种存储密钥对的方法不安全,应该仅用于demo目的。为了安全,系统将提示你输入密码。
solana-keygen new --force
现在已经创建了一个帐户,可以使用空投程序来获取一些SOL通证。需要一些lamports(部分SOL通证)来部智能合约。 该命令请求获取SOL通证到你新生成的帐户中:
solana airdrop 5
现在已准备好构建 hello world 程序。 可以通过运行以下命令来构建它:
npm run build:program-rust
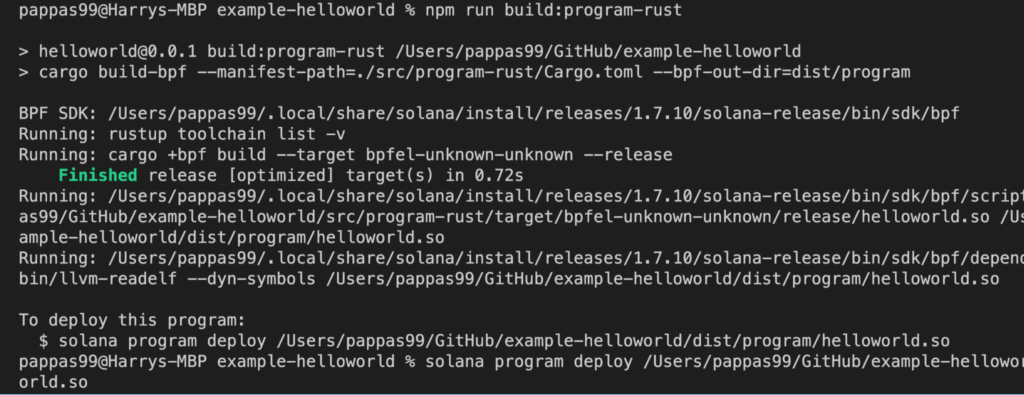
程序构建完成后,就可以将其部署到devnet上。上一个命令的输出将为你提供接下来需要运行的命令,但它应该类似于下面这种:
solana program deploy dist/program/helloworld.so
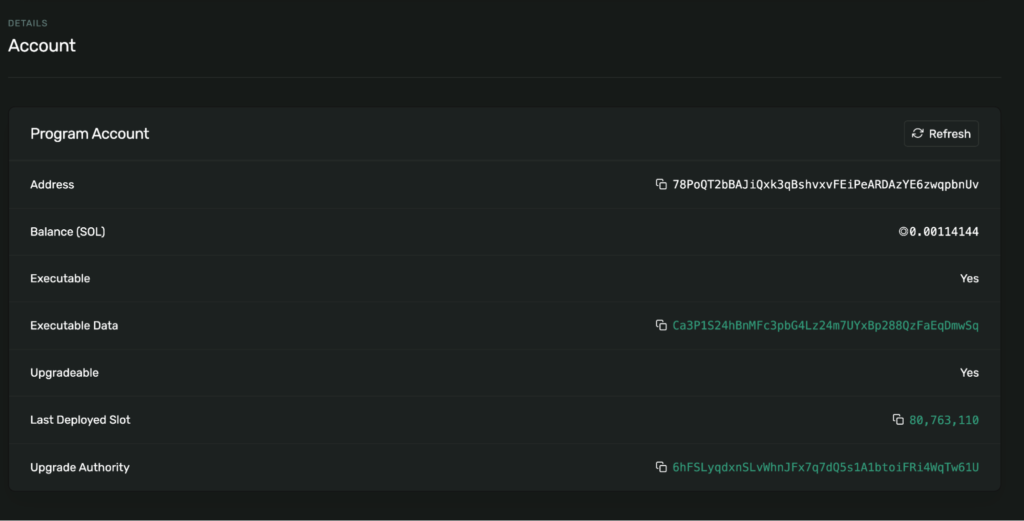
最终结果是成功将 hello world 程序部署到devnet上,并且有一个指定的Program Id。这可以在Solana Devnet 浏览器上进行检查。

与部署的程序交互
为了与部署好的程序交互,hello-world代码库提供了一个简单的客户端。这个客户端是用Typescript编写的,使用了Solana的web3.js库和Solana web3 API。
客户端
客户端入口是main.ts文件,它按特定顺序执行任务,其中大部分任务都包含在hello_world.ts文件中。
首先,客户端会建立一个和节点的连接,使用的的函数是establishConnection:
export async function establishConnection(): Promise {
  const rpcUrl = await getRpcUrl();
  connection = new Connection(rpcUrl, 'confirmed');
  const version = await connection.getVersion();
  console.log('Connection to cluster established:', rpcUrl, version);
}
然后会调用establishPayer函数来确保有一个能支付的账户,如果没有的话就按需创建一个新的。
export async function establishPayer(): Promise {
  let fees = 0;
  if (!payer) {
    const {feeCalculator} = await connection.getRecentBlockhash();

    // Calculate the cost to fund the greeter account
    fees += await connection.getMinimumBalanceForRentExemption(GREETING_SIZE);

    // Calculate the cost of sending transactions
    fees += feeCalculator.lamportsPerSignature * 100; // wag

    payer = await getPayer();
  }
客户端然后会调用“checkProgram”函数,该函数从 ./dist/program/helloworld-keypair.json中加载部署程序的密钥对,并使用密钥对的公钥来获取程序帐户。如果程序不存在,客户端会报错并停止。如果该程序确实存在,它将创建一个新帐户存储程序状态,并将程序指定为其所有者,在这种情况下,它是指程序已执行的次数。
 export async function checkProgram(): Promise {
  // Read program id from keypair file
  try {
    const programKeypair = await createKeypairFromFile(PROGRAM_KEYPAIR_PATH);
    programId = programKeypair.publicKey;
  } catch (err) {
    const errMsg = (err as Error).message;
    throw new Error(
      `Failed to read program keypair at '${PROGRAM_KEYPAIR_PATH}' due to error: ${errMsg}. Program may need to be deployed with \`solana program deploy dist/program/helloworld.so\``,
    );
  }

  // Check if the program has been deployed
  const programInfo = await connection.getAccountInfo(programId);
  if (programInfo === null) {
    if (fs.existsSync(PROGRAM_SO_PATH)) {
      throw new Error(
        'Program needs to be deployed with `solana program deploy dist/program/helloworld.so`',
      );
    } else {
      throw new Error('Program needs to be built and deployed');
    }
  } else if (!programInfo.executable) {
    throw new Error(`Program is not executable`);
  }
  console.log(`Using program ${programId.toBase58()}`);

  // Derive the address (public key) of a greeting account from the program so that it's easy to find later.
  const GREETING_SEED = 'hello';
  greetedPubkey = await PublicKey.createWithSeed(
    payer.publicKey,
    GREETING_SEED,
    programId,
  );
然后客户端调用“sayHello”函数并向程序发送“hello”交易事务。该交易包含一条指令,该指令包含要调用的 helloworld程序帐户的公钥以及客户端希望与其交互的帐户。每次客户端对一个帐户执行此交易时,程序都会增加目标帐户数据存储中的计数。
  export async function sayHello(): Promise {
  console.log('Saying hello to', greetedPubkey.toBase58());
  const instruction = new TransactionInstruction({
    keys: [{pubkey: greetedPubkey, isSigner: false, isWritable: true}],
    programId,
    data: Buffer.alloc(0), // All instructions are hellos
  });
  await sendAndConfirmTransaction(
    connection,
    new Transaction().add(instruction),
    [payer],
  );
}
最后,客户端调用“reportGreetings”查询账户数据以检索账户当前调用sayHello事务的次数。
 export async function reportGreetings(): Promise {
  const accountInfo = await connection.getAccountInfo(greetedPubkey);
  if (accountInfo === null) {
    throw 'Error: cannot find the greeted account';
  }
  const greeting = borsh.deserialize(
    GreetingSchema,
    GreetingAccount,
    accountInfo.data,
  );
  console.log(
    greetedPubkey.toBase58(),
    'has been greeted',
    greeting.counter,
    'time(s)',
  );
运行客户端
在运行客户端从部署的程序中读取数据之前,还需要安装客户端的依赖项。
npm install
这步完成后,可以开启客户端。
npm run start
可以从输出中看到程序成功执行,并且会展示账户已经打招呼的次数。再运行一次会增加该数值。
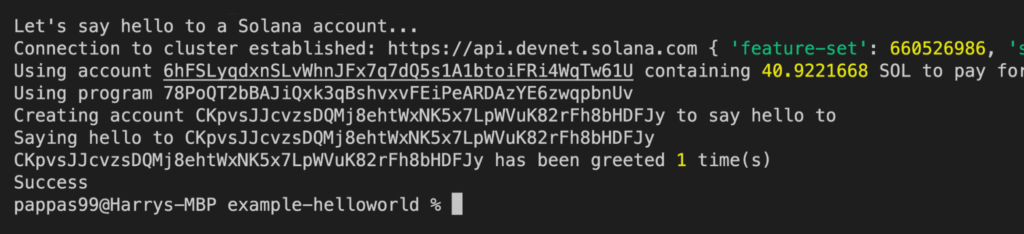
恭喜!你已经成功在Solana测试网上部署了程序并与之交互了。现在我们进入另一个Solana的程序和客户端案例,但这次我们来使用Chainlink的Price Feeds。
Solana上使用Chainlink Price Feeds
Solana上的DeFi应用生态正在加速增长。为了支持基本的DeFi机制并执行关键的链上功能,例如以公平市场价格发放贷款或清算抵押不足的头寸,这些dApp都需要访问高度可靠和高质量的市场数据。
Solana最近在他们的devnet网络上集成了Chainlink Price Feeds,为开发者提供高度去中心化、高质量、亚秒级更新的价格参考数据,用于构建混合智能合约。
结合Solana每秒支持多达 65,000 笔交易的能力及其极低的交易费用,Chainlink Price Feeds 有可能增强 DeFi 协议基础设施,使其能够在交易执行和风险管理质量方面与传统金融系统竞争。
在接下来的代码案例中,我们将在Solana测试网上部署合约并与其交互。
要求
- NodeJS v14或更高版本 & NPM
- 最新的稳定版本的Rust
- Solana CLI v1.7.11或更高版本
- Git
Chainlink Solana Demo程序
Chainlink Solana Demo程序是一个智能合约,只需连接到devnet上的 Chainlink Price Feed帐户,即可获取并存储指定价格对的最新价格。
Solana上的Chainlink Price Feeds都使用同一个程序,每个单独的Price Feed都有一个单独的帐户,该帐户使用该程序提交价格更新。
第一部分包括使用 borsh 对传入和传出部署程序的参数进行序列化和反序列化的正常包含和声明。 除此之外,还设置了一些结构体来存储Price Feeds结果和十进制数据。
use borsh::{BorshDeserialize, BorshSerialize};
use solana_program::{
    account_info::{next_account_info, AccountInfo},
    entrypoint,
    entrypoint::ProgramResult,
    msg,
    pubkey::Pubkey,
};

struct Decimal {
    pub value: u128,
    pub decimals: u32,
}

/// Define the type of state stored in accounts
#[derive(BorshSerialize, BorshDeserialize, Debug)]
pub struct PriceFeedAccount {
    /// number of greetings
    pub answer: u128,
}

impl Decimal {
    pub fn new(value: u128, decimals: u32) -> Self {
        Decimal { value, decimals }
    }
}
接下来,程序将入口声明为“process_instructions”函数。
// Declare and export the program's entrypoint
entrypoint!(process_instruction);
最后,“process_instruction”函数是包含智能合约主要逻辑的程序部分。它接收具有指定Price Feed地址的交易,并处理在链上查询和存储价格数据的步骤。该函数还从chainlink-solana包中调用get_price()函数 ,该包需要通过Cargo.toml文件从GitHub导入。该函数使用指定的Price Feed的地址获取价格并存储。
pub fn process_instruction(
    _program_id: &Pubkey, // Ignored
    accounts: &[AccountInfo], // Public key of the account to read price data from
    _instruction_data: &[u8], // Ignored
) -> ProgramResult {
    msg!("Chainlink Solana Demo program entrypoint");

    let accounts_iter = &mut accounts.iter();
    // This is the account of our our account
    let my_account = next_account_info(accounts_iter)?;
    // This is the account of the price feed data
    let feed_account = next_account_info(accounts_iter)?;

    const DECIMALS: u32 = 9;

    let price = chainlink::get_price(&chainlink::id(), feed_account)?;

    if let Some(price) = price {
        let decimal = Decimal::new(price, DECIMALS);
        msg!("Price is {}", decimal);
    } else {
        msg!("No current price");
    }

     // Store the price ourselves
     let mut price_data_account = PriceFeedAccount::try_from_slice(&my_account.data.borrow())?;
     price_data_account.answer = price.unwrap_or(0);
     price_data_account.serialize(&mut &mut my_account.data.borrow_mut()[..])?;
部署程序
第一步是复制代码。
git clone https://github.com/smartcontractkit/chainlink-solana-demo
cd chainlink-solana-demo
完成后,可以设置当前的环境为devnet。这是为Solana开发者们准备的编写和测试合约的网络的测试网。
solana config set --url https://api.devnet.solana.com
接下来,需要为账户创建一个密钥对。这对于在Solana测试网上部署合约来说是必要的。注意:这种存储密钥对的方法不安全,应该仅用于demo目的。为了安全,系统将提示你输入密码。
mkdir solana-wallet
solana-keygen new --outfile solana-wallet/keypair.json
现在已经创建了一个帐户,可以使用空投程序来获取一些SOL通证。需要一些lamports(部分SOL通证)来部智能合约。 该命令请求获取SOL通证到你新生成的帐户中。
solana airdrop 5 $(solana-keygen pubkey solana-wallet/keypair.json)
如果这步不行的话,可以通过下面的指令查看公钥,并使用该地址从solfaucet水龙头中请求一些SOL通证。
solana-keygen pubkey ./solana-wallet/keypair.json
现在就可以使用 Solana BPF构建Chainlink Solana演示程序了。
cargo build-bpf
程序构建完成后,就可以将其部署到devnet上。上一个命令的输出将为你提供接下来需要运行的命令,但它应该类似于下面这种。注意在命令后面添加的–keypair选项。
solana program deploy target/deploy/chainlink_solana_demo.so --keypair solana-wallet/keypair.json
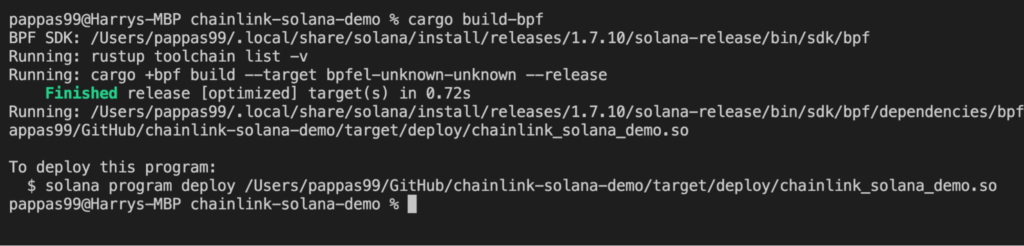
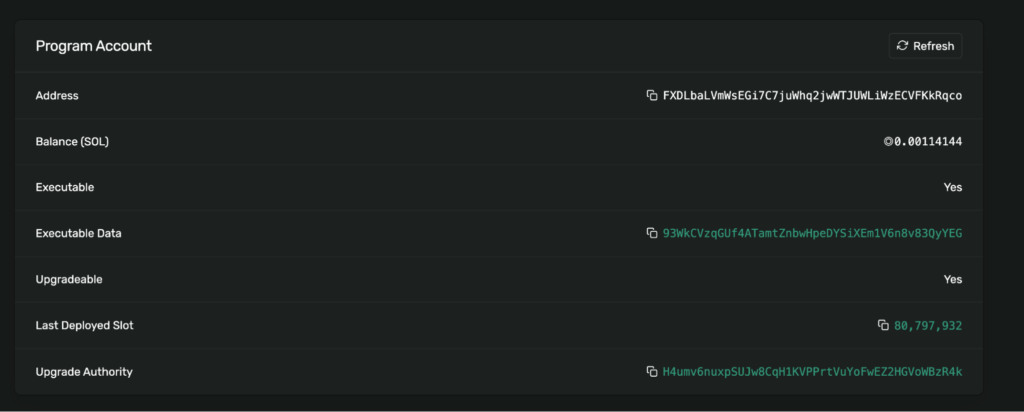
最终结果是成功将此程序部署到devnet上,并且有一个指定的Program Id。这可以在Solana Devnet 浏览器上进行检查。

与部署后的程序交互
为了与部署好的程序交互,hello-world代码库提供了一个简单的客户端。这个客户端是用Typescript编写的,使用了Solana的web3.js库和Solana web3 API。
客户端
客户端入口是main.ts文件,它按特定顺序执行任务,其中大部分任务都包含在hello_world.ts文件中。首先,客户端会建立一个和节点的连接,使用的的函数是establishConnection。
export async function establishConnection(): Promise {
  const rpcUrl = await getRpcUrl()
  connection = new Connection(rpcUrl, 'confirmed')
  const version = await connection.getVersion()
  console.log('Connection to cluster established:', rpcUrl, version)
}
然后会调用establishPayer函数来确保有一个能支付的账户,如果没有的话就按需创建一个新的。
export async function establishPayer(): Promise {
  let fees = 0
  if (!payer) {
    const { feeCalculator } = await connection.getRecentBlockhash()

    // Calculate the cost to fund the greeter account
    fees += await connection.getMinimumBalanceForRentExemption(AGGREGATOR_SIZE)

    // Calculate the cost of sending transactions
    fees += feeCalculator.lamportsPerSignature * 100 // wag

    try {
      // Get payer from cli config
      payer = await getPayer()
    } catch (err) {
      // Fund a new payer via airdrop
      payer = await newAccountWithLamports(connection, fees)
    }
  }
客户端然后会调用“checkProgram”函数,该函数从 ./dist/program/helloworld-keypair.json中加载部署程序的密钥对,并使用密钥对的公钥来获取程序帐户。如果程序不存在,客户端会报错并停止。如果该程序确实存在,它将创建一个新帐户存储程序状态,并将程序指定为其所有者。
export async function checkProgram(): Promise {
  // Read program id from keypair file
  try {
    const programKeypair = await createKeypairFromFile(PROGRAM_KEYPAIR_PATH);
    programId = programKeypair.publicKey;
  } catch (err) {
    const errMsg = (err as Error).message;
    throw new Error(
      `Failed to read program keypair at '${PROGRAM_KEYPAIR_PATH}' due to error: ${errMsg}. Program may need to be deployed with \`solana program deploy dist/program/helloworld.so\``,
    );
  }

  // Check if the program has been deployed
  const programInfo = await connection.getAccountInfo(programId);
  if (programInfo === null) {
    if (fs.existsSync(PROGRAM_SO_PATH)) {
      throw new Error(
        'Program needs to be deployed with `solana program deploy dist/program/chainlink_solana_demo.so`',
      );
    } else {
      throw new Error('Program needs to be built and deployed');
    }
  } else if (!programInfo.executable) {
    throw new Error(`Program is not executable`);
  }
  console.log(`Using program ${programId.toBase58()}`);

  // Derive the address (public key) of a greeting account from the program so that it's easy to find later.
  const GREETING_SEED = 'hello';
  greetedPubkey = await PublicKey.createWithSeed(
    payer.publicKey,
    GREETING_SEED,
    programId,
  );
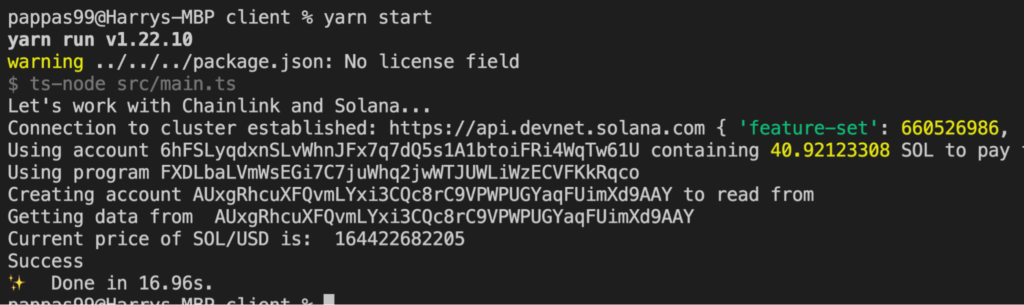
然后,客户端调用“getPrice”函数并向程序发送交易。交易包含一个Price Feed帐户作为参数。在本例中,发送的是Chainlink Solana Devnet Price Feeds页面中列出的SOL/USD Feed帐户。指令发送完成后,它就会等待交易确认。
export async function getPrice(): Promise {
  console.log('Getting data from ', readingPubkey.toBase58())
  const priceFeedAccount = "FmAmfoyPXiA8Vhhe6MZTr3U6rZfEZ1ctEHay1ysqCqcf"
  const AggregatorPublicKey = new PublicKey(priceFeedAccount)
  const instruction = new TransactionInstruction({
    keys: [{ pubkey: readingPubkey, isSigner: false, isWritable: true },
    { pubkey: AggregatorPublicKey, isSigner: false, isWritable: false }],
    programId,
    data: Buffer.alloc(0), // All instructions are hellos
  })
  await sendAndConfirmTransaction(
    connection,
    new Transaction().add(instruction),
    [payer],
  )
}
最后,客户端会查询账户数据以检索出SOL/USD Price Feed存储的价格数据。
export async function reportPrice(): Promise {
  const accountInfo = await connection.getAccountInfo(readingPubkey)
  if (accountInfo === null) {
    throw new Error('Error: cannot find the aggregator account')
  }
  const latestPrice = borsh.deserialize(
    AggregatorSchema,
    AggregatorAccount,
    accountInfo.data,
  )
  console.log("Current price of SOL/USD is: ", latestPrice.answer.toString())
}
运行客户端
在运行客户端从部署的程序中读取数据之前,还需要安装客户端的依赖项。
cd client
yarn
这步完成后,可以开启客户端。
yarn start
可以从输出中看到程序成功执行,并且它应该显示存储的当前 SOL/USD 价格数据。
总结
Solana为构建智能合约和去中心化应用程序提供了高速、低成本、可扩展的区块链。使用Solana智能合约和 Chainlink Price Feeds,开发者们能够利用Chainlink Price Feeds 提供的高质量数据和Solana区块链上可用的亚秒级更新等优势,创建快速、可扩展的DeFi应用程序。
探索更多Chainlink技术教程,可以查看官方Chainlink YouTube上工程相关的视频教程播放列表,并访问 docs.chain.link上的 Chainlink文档。如果要讨论集成相关,可以点击此处联系专家。
Chainlink 2021 秋季黑客马拉松将于 2021年10月22日拉开帷幕。无论你是开发者、创作者、艺术家、区块链专家,还是该领域的新手,本次黑客马拉松都是开启你的智能合约开发之旅并向行业领先的导师学习的理想场所。
立即锁定席位,争夺超过30万美元的奖品吧!


