Create a dApp To Pay Recording Artists Based on Their Spotify Streams
Web3 is new Internet infrastructure that uses decentralized and distributed networks to enable peer-to-peer interactions without the need for intermediaries. It is underpinned by blockchain technology, which is a shared ledger that provides high levels of security, transparency, and immutability.
Blockchain technology provides many benefits through its highly secure design, but blockchains have a notable functional limitation commonly referred to as the “blockchain oracle problem.” Essentially, blockchain networks are inherently closed systems that cannot natively access real-world data or computation. The oracle problem has significantly limited the types of applications blockchain developers can create, since most advanced use cases require some form of real-world data or computation.
Chainlink was created to solve the oracle problem and connect all of the world’s data and systems to blockchains. Chainlink’s highly secure data and computation capabilities have fueled the growth of “DeFi” or decentralized finance (enabling over $12T in transaction value since the start of 2022), gaming, NFTs, and many other Web3 verticals.
In this tutorial, we’ll show you how to use Chainlink Functions—a decentralized serverless computing platform that can help you connect the world’s APIs to blockchains. You will learn how to build a Web3 decentralized application (or dApp for short) that acts as a digital agreement between a record label and a music artist.
Smart Contracts for Musical Artists
The logic for the digital agreement defines how much an artist should be paid per music stream, and is stored in a smart contract deployed on the blockchain.
A “smart contract” is a simple program that contains logic to determine what output it should give—including transferring value—executed across hundreds or thousands of nodes on a blockchain, providing extremely high levels of security, and guaranteed execution.
When this program is executed, it will use Chainlink Functions to call an API to get the number of streams for the artist, as well as interact with the Twilio SendGrid Email API to send an email to the artist about their payment. In this case, Chainlink Functions acts as a middleware layer between the program deployed on the blockchain and the external Web, and carries out your computational “heavy lifting” in a cost-effective manner without any loss of the cryptographic guarantees that the blockchain offers.
Prerequisites
Before you begin, you’ll need to set up a few free accounts and install some software if you haven’t yet:
- Sign up to Chainlink Functions beta.
- A free Twilio Sendgrid account.
- A sender email address that you control, verified by Twilio (note: It’s best to use a public email service provider like Gmail or Hotmail, and this step could take more than a day).
- Node.js v16+, NPM, and Git.
- A Web3 wallet set up in your browser, such as MetaMask.
- Free RPC URLs for blockchain access through Infura or Alchemy.
Sometimes these steps can take a day or two, so don’t get frustrated—just bookmark this blog.
When you’re set-up, let’s get started!
Set Up Your Dev Environment
We can start by cloning the Chainlink Functions Sample Repository to your development machine. This repository contains all the code needed to deploy and execute this example. You should take a few minutes to read the README as well. Once cloned, use the terminal to `cd` into your project directory and install all the dependencies with:
npm install
You also want to set up your Web3 wallet (for example, Metamask) and ensure it’s funded with the right tokens—in this case you’ll need some ETH and LINK. You need to use this wallet account and the tokens in it to pay for broadcasting and submitting transactions to the blockchain network. You can think of it like a travel pass that you need to keep funded to access public transport.
You can use Ethereum’s Sepolia test network, the Polygon Mumbai test network, or the Avalanche Fuji test network to deploy this code. These are copies of the production networks that developers use to build and test applications.
In this post, we’ll use the Ethereum Sepolia network.
You will also need to get access to the Sepolia network by adding it to your MetaMask Web3 wallet. The easiest way to do this is to head to the Chainlist website and pressing the “Add to MetaMask” button:
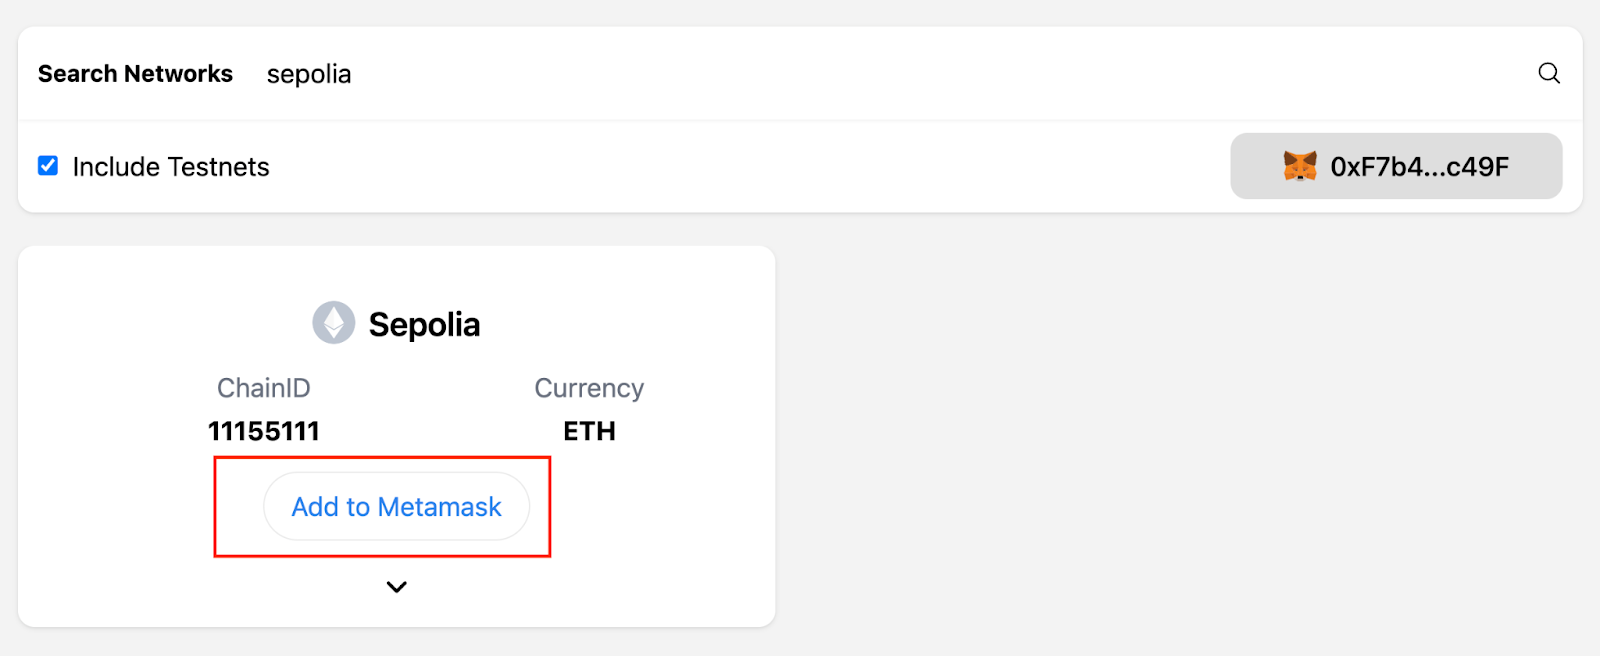
Alternatively, you can sign up for your own free API key via an external RPC provider such as Infura or Alchemy, then manually add the network to your MetaMask wallet. You will also need these keys when configuring the environment variables in your code.
The next step, as mentioned above, is to make sure you’ve funded your wallet with Sepolia ETH and LINK. The ETH is required as “gas” to broadcast and submit transactions to the network. LINK is required to pay the Chainlink oracle network for servicing your requests to reach out to APIs. You can add the LINK token to your MetaMask wallet’s assets list by going here and clicking “Add to Wallet”.
Now we have to create a Functions Subscription. This is how the decentralized execution of your custom Functions source code is funded. Go to the Functions Dashboard, connect your wallet to Ethereum Sepolia and click “Create Subscription”. Metamask will open two consecutive windows – one to “sign” the Functions Terms of Service and the other to authorize the creation of your Subscription.
Take a note of your subscription. Once you create a Subscription, follow the prompts to add about 5 Link to your subscription (a little bit of this balance will be used each time you invoke Chainlink Functions on the Decentralized Oracle Network and will fund the callback to your smart contract etc). It’s like a travel pass that you keep topped up, and everytime you travel, some amount is taken from your balance.
You cannot add a Consumer contract yet because you’ve not yet deployed it! We’ll get back to that very soon.
Lastly, if you want to run the local simulation of your Functions code, please install the Deno runtime.
Now that you’re all set in terms of connection to the network and funds to do things on it, we can move on to the code!
Set Up Your Environment Variables
You will need to use environment variables to store API secrets and other sensitive information outside of your repository’s codebase.
The env vars you need for this sample application are:
MUMBAI_RPC_URL // Get from Alchemy or Infura as part of Setup steps
GITHUB_API_TOKEN= // see next instruction for how to get this.

#AND

PRIVATE_KEY // get this from Metamask as instructed in Setup
SECOND_PRIVATE_KEY // get this from Metamask as instructed in Setup

#AND

# Spotify wrapper API keys [see: https://doc.api.soundcharts.com/api/v2/doc]

SOUNDCHART_APP_ID="soundcharts"
SOUNDCHART_API_KEY="soundcharts"


# EMAIL SERVICE
TWILIO_API_KEY // From Twilio/Sengrid API docs
ARTIST_EMAIL // an email address you can check emails at
VERIFIED_SENDER // your email address that is verified by Twilio. Use gmail, yahoo etc as protonmail often has access problems.
For security best practices, we discourage the use of .env files. Instead, we will use the env-enc package that we shipped with the repo to encrypt all your keys at rest, on your machine, with a password that you provide.
The Twilio API key can be obtained from the settings once you’re logged into your SendGrid account. Your wallet private keys (you need two for this example!) can be extracted from your MetaMask Web3 wallet. The Soundchart variables can be obtained from the Soundcharts API documentation. Note for this sample app we will use the sandboxed API data, which is a snapshot and not hooked to real-time data.
To encrypt your environment variables, you will need to do the following:
- Set up your GitHub private gist access token.
- Configure the
env-encpackage with a password it can use to encrypt your env vars. - Set each env var in the tool so that the encrypted env vars are stored in your project root in the
.env.encfile that is not human readable.
You can achieve all of the above by following the instructions in the README under the Setup & Environment Variables section.
Set Up the Sample App
The Recording Artist contract example app uses CLI tooling built on top of the Hardhat CLI.
If you’re wondering how the Hardhat CLI tooling knows what data to pass to our smart contract, that is found in the ./Functions-request-config.js file.
The requestConfig object contains all the data needed for sendRequest() in the smart contract RecordLabel.sol and also other data necessary for the CLI tooling to process data returned from the decentralized oracle network. Your request configuration object in the config file has the following properties:
   js
const requestConfig = {
// String containing the source code to be executed
source: fs.readFileSync("./Twilio-Spotify-Functions-Source-Example.js").toString(),
// Location of source code (only Inline is currently supported)
codeLocation: Location.Inline,
// Optional. Secrets can be accessed within the source code with `secrets.varName`
secrets: {
soundchartAppId: process.env.SOUNDCHART_APP_ID,
soundchartApiKey: process.env.SOUNDCHART_API_KEY,
twilioApiKey: process.env.TWILIO_API_KEY,
},
secretsLocation: Location.Remote,
// Args (string only array) can be accessed within the source code with `args[index]`
// init with 1000 listeners
args: [TONES_AND_I, "Tones&I", "1000", process.env.ARTIST_EMAIL, process.env.VERIFIED_SENDER],
// Code language (only JavaScript is currently supported)
codeLanguage: CodeLanguage.JavaScript,
// Expected type of the returned value
expectedReturnType: ReturnType.int256,
}
Code Explanation
The repository includes Solidity smart contracts that run on EVM-based chains, and JavaScript code that provides tooling using the Hardhat smart contract development framework.
The sample smart contract that houses the logic for paying the music artist is in the ./contracts/sample-apps/RecordLabel.sol file. This smart contract represents the financial contract between an Artist and the record company, and tracks artist metadata such as the listener count for a given artist.
For the purposes of this demo we create a mock StableCoin called STC, which is an ERC20 token and is used to pay the Music Artist. We use your second Metamask wallet account as the music artist’s wallet for the purposes of this sample app.
For the RecordLabel.sol contract, the key functionality is contained in the sendRequest() method and the fulfillRequest() callback. Of these two methods fulfillRequest() is a necessary interface for using Chainlink Functions as the Functions Oracle contracts call that function with the returned response.
Take a look at sendRequest() below
function sendRequest(
string calldata source, // your custom JS code to execute
FunctionsRequest.Location secretsLocation, // (User Hosted (Remote), or DON hosted)
bytes calldata encryptedSecretsReference, // Reference to the secrets
string[] calldata args, // dynamic arguments to inject into your source at runtime.
bytes[] calldata bytesArgs, // (optional) the args, but in bytes type. Injected into your source at runtime.
uint64 subscriptionId, // The Functions Subscription ID that you created earlier
uint32 callbackGasLimit // the upper limit for gas to fund the call to fulfillRequest()
) external onlyOwner {
FunctionsRequest.Request memory req;
req.initializeRequest(FunctionsRequest.Location.Inline, FunctionsRequest.CodeLanguage.JavaScript, source);
req.secretsLocation = secretsLocation;
req.encryptedSecretsReference = encryptedSecretsReference;
if (args.length > 0) {
req.setArgs(args);
}
if (bytesArgs.length > 0) {
req.setBytesArgs(bytesArgs);
}
latestRequestId = _sendRequest(req.encodeCBOR(), subscriptionId, callbackGasLimit, donId);
latestArtistRequestedId = args[0];
}
The custom JavaScript will be the sourceargument. If that source code gets passed data, that will be in args. Secrets like API keys will be passed in secrets, and they are encrypted so that they cannot be misused when they’re on the public blockchain. The API keys for Twilio and the SoundCharts API will be encrypted and stored in a Github Gist (Secrets Location is Remote), and the reference to the secrets is in secretsReference so the DON knows where to retrieve the encrypted secrets from.
Finally, we will pass in a subscriptionIdand the callbackGasLimit which specifies the maximum gas when the Chainlink Oracle calls fulfillRequest().
Now let’s consider the kind of arbitrary code that can be supplied as part of the source argument. For the beta, only JavaScript code is supported, and this code will be executed in a Deno runtime. For our Artist / Record Label smart contract, we pass in the code that is in the ./Twilio-Spotify-Functions-Source-Example.js file.
This code pulls off the arguments passed into the sendRequest() method in the args parameter—this is how we pass arguments into our custom code. It then proceeds to make a HTTP Get request to the music API that gives us the latest streaming numbers for that artist.
If the artist has grown their stream count, we send an HTTP Post request to the Twilio SendGrid email API and pass in all the details we need to send the artist an exciting payout email like this:

The code also calculates what the increase or decrease in the artist’s music streams are, and computes the amount of STC payable to the artist. The custom code accesses the Functions library at runtime, which is injected into the global scope inside the remote code execution environment (sandboxed VM) where our custom JavaScript is being run. We must use this Functions library to make HTTP requests, because a smart contract running on a blockchain cannot natively access off-chain APIs.
Whether or not a payment is due to the artist, we return the latest monthly stream count to the oracle nodes, where they independently arrive at consensus on the returned data, and then post that returned result back to the blockchain.
When our custom JavaScript code returns data to our consuming smart contract, it must return the data as a NodeJS Buffer type (a bytes array). These bytes can then be decoded on-chain in the smart contract using solidity’s abi.decode(). While in beta, the custom JavaScript code must encode the returned data into strings or integers (the list of supported return data types is here). Once again, we use the injected Functions library to encode return data into Buffers.
This is where the fulfillRequest() callback method in the RecordLabel.sol smart contract kicks in. It receives the data that the Chainlink decentralized oracle nodes achieved consensus on, and that data is used to compute the payment due to the Artist onchain and make that payment to the Artist without any need for human intervention.
function fulfillRequest(bytes32 requestId, bytes memory response, bytes memory err) internal override {
latestResponse = response;
latestError = err;
emit OCRResponse(requestId, response, err);

// Artist contract for payment logic here.
// Artist gets a fixed rate for every addition 1000 active monthly listeners.
bool nilErr = (err.length == 0);
if (nilErr) {
int256 latestListenerCount = abi.decode(response, (int256));

string memory artistId = latestArtistRequestedId;
uint256 lastListenerCount = artistData[artistId].lastListenerCount;

int256 diffListenerCount = latestListenerCount - int256(lastListenerCount);
if (diffListenerCount <= 0) {
// No payments due.
return;
}

// Pay the artist at 'artistData[latestArtistRequestedId].walletAddress'.
uint8 stcDecimals = IStableCoin(s_stc).decimals();
// Artist gets 1 STC per 10000 additional streams.
uint256 amountDue = (uint256(diffListenerCount) * 1 * 10 ** stcDecimals) / 10000;

payArtist(artistId, amountDue);

// Update Artist Mapping.
artistData[artistId].lastListenerCount = uint256(latestListenerCount);
artistData[artistId].lastPaidAmount = amountDue;
artistData[artistId].totalPaid += amountDue;
}
}
Deploying the Application
Now that we have a good idea of how the code is laid out, let’s run it! The following steps are listed in the repo’s /README file.
Before we deploy the RecordLabel.sol smart contract to the Sepolia testnet, let’s compile the code and simulate its execution locally on our machine, without actually executing and creating transactions on-chain.
First, run the simulator to compile the smart contracts, and simulate executing the JavaScript code.
npx hardhat functions-simulate-twilio --gaslimit 300000
This command will spin up a local VM sandbox and execute your JS code, print console.log outputs, communicate with external APIs and give you the latest monthly streaming numbers for the artist Tones & I to the console, the payout calculated, and then confirm that an email has been sent to the artist. Note that you need to have installed the Deno runtime for this to work.
Next, let’s break down the various steps in setting up this application on the actual Sepolia testnet. You can also see these steps in the README, where the most up-to-date information is likely to reside.
First we need to deploy the STC token contract (SimpleStableCoin.sol) so that we have tokens to pay the artist with. Note that most (but not all) of these tasks are in ./tasks/Functions-client-twilio-spotify/<STEP #>_<<TASK NAME>>.js
With this set up, all you have to do is run the right task to deploy or interact with the relevant smart contract on Sepolia or Mumbai testnet.
Note that SimpleStableCoin.sol mints 1 million STC immediately on deployment and gives that to the deployer of the STC contract. This means that the tokens are held by the deployer account (your wallet account that is allowlisted when you registered for using Chainlink Functions!).
npx hardhat functions-deploy-stablecoin --network ethereumSepolia --verify true
You should see logs on your screen like this:
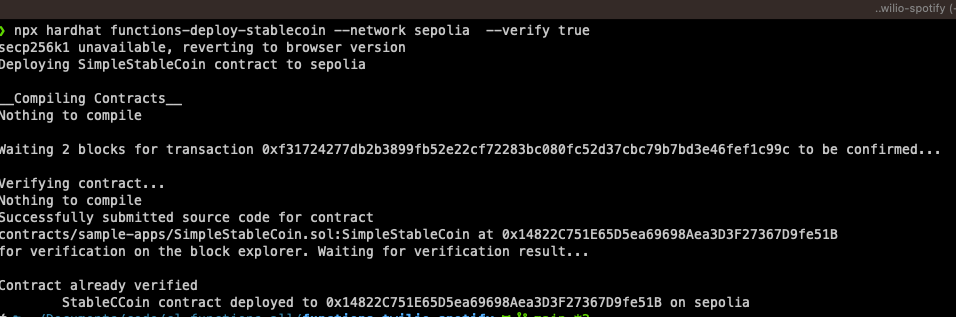
Take a note of your stablecoin contracts address on-chain. We will need this in future commands.
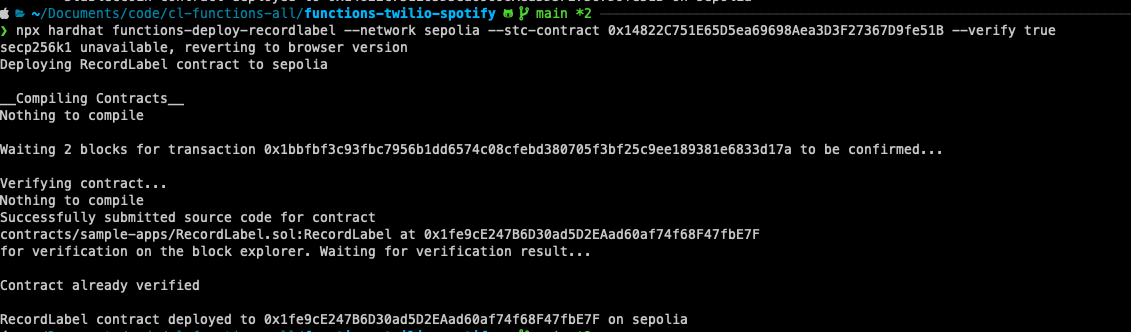
Next, let’s deploy our RecordLabel.sol smart contract to the Sepolia testnet. This is our “Functions Consumer” contract. Run:
npx hardhat functions-deploy-recordlabel --network ethereumSepolia --stc-contract <<0x-contract-address>> --verify true
Once deployed, take a note of your deployed RecordLabel contract’s address on your testnet. You will need to use this address for subsequent tasks as it is the “client contract”:
Also, this is the right time to return to the Functions Dashboard, go into our subscription and add our Record Label contract as an authorized consumer of our Subscription balance.
The next step is something specific to how ERC-20s work, but we need to approve our RecordLabel contract to spend the stablecoin that is owned by the deployer of the stablecoin (remember how 1 million STC was minted to the deployer when we deployed the STC contract?)
Therefore we need to authorize the RecordLabel contract to pay artists using those minted STCs:
npx hardhat functions-approve-spender --network sepolia --client-contract <<0x-contract-address>> --stc-contract <<0x-contract-address>>
Once successful, you should see the following:

We should also initialize some metadata relating to our artist so that the RecordLabel smart contract has some starting information on the artist, such as the artist’s wallet (which will be your second MetaMask account, for this example) and its last listener count etc. For that, we run:
npx hardhat functions-initialize-artist --network sepolia --client-contract <<0x-contract-address>>
In our example we add some metadata for the artist “Tones & I,” which we have obtained from the Soundcharts documentation, and assign them our second wallet address.

You can skip this step if you’re happy with using the Functions Dashboard to create and fund subscriptions. But if you want to create and fund a Subscription programmatically and add a consumer to it, then run:
npx hardhat functions-sub-create --network sepolia --amount 2.5 --contract <<0x-client-contract-address>>
This command will do three things:
- Create a Chainlink Functions subscription.
- Register our deployed
RecordLabelcontract as a consumer. - Fund our subscription with 2.5 LINK from your Web3 wallet. Note that we recommend funding with at least 2.5 LINK to ensure that network gas price spikes don’t cause transactions to fail. Since you can always recover your test LINK when you cancel your subscription, you can put more LINK there to remove the risk of your transactions running out of LINK due to gas spikes on the testnet.
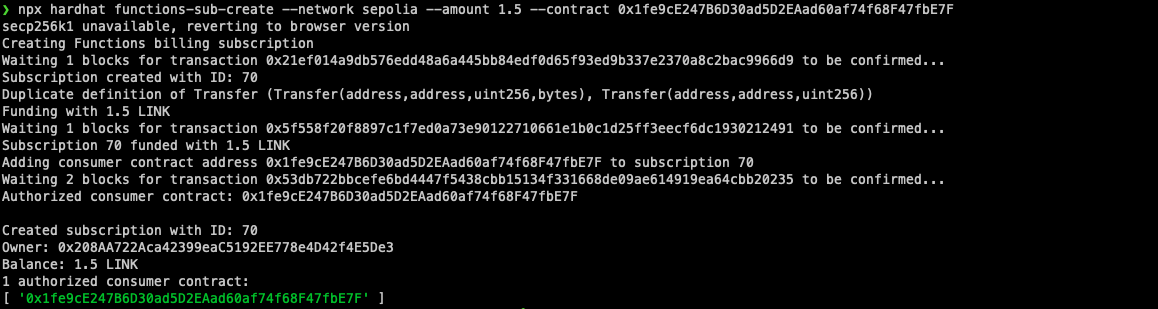
Once the subscription is created and funded, a summary of your subscription will be printed to your terminal. Take a note of your subscription ID; you will also need this for subsequent steps.
Now we need to encrypt our secrets for use by the DON when running our custom JS code. We will encrypt and host the API keys (secrets) in a secret Gist on Github – this is known as Remote Secrets. The other way to host these secrets is on the DON directly. When using Remote (user hosted) Secrets, they’re encrypted, so even if someone were to access the gists, they’d still be secure.
Generate the encrypted secrets JSON file, with npx hardhat functions-build-offchain-secrets --network ethereumSepolia
This should create a gitignored json file called offchain-encrypted-secrets.json in your project root, which has the encrypted secrets.
Run the Application
Now that the smart contract is deployed to the Sepolia test network, our final step is to send the code in ./Twilio-Spotify-Functions-Source-Example.js to the RecordLabel Contract to initiate Chainlink Functions’ execution. This will fetch the artist’s latest streaming numbers, calculate payouts, and post that data on-chain. This step will also include the code to upload the encrypted secrets to our Github Gist (assuming you’ve set the Github API token env var!)
When you run the following command, be sure to replace the subscription ID value with the generated subscription ID from the previous step and the deployed contract address value with the deployed contract address from the “Deploy the Application“ section of this blog post.
npx hardhat functions-request --network sepolia --contract <<0x-client-contract-address>> --subid<__Subscription Id from previous step__>> --gaslimit 300000
As you can see, we pass the network, the RecordLabel contract’s address, our newly created and funded subscription ID, and also the maximum amount of gas we want Chainlink Functions to call our `fulfillRequest()` function with as parameters to the CLI tool.
This command will first simulate the execution of the source JavaScript locally (unless you pass in --simulate false). Then, if you approve submitting the transactions on-chain, the tool programmatically takes the data in the ./Functions-request-config.js file, fetches the encrypted API secrets from the gist URL you provided, connects to the Sepolia testnet, and sends that data to the deployed RecordLabel contract.
From there, sendRequest() triggers a series of on-chain events that gets picked up by the Chainlink decentralized oracle network, and each node in that network independently runs the custom JavaScript code in ./Twilio-Spotify-Functions-Source-Example.js. Chainlink’s OCR consensus protocol kicks in to ensure consensus on the data returned by each node, and that agreed-upon, cryptographically verifiable response is submitted back on-chain and is sent to RecordLabel in the fulfillRequest() callback.
All of this can be seen in the terminal output when you run npx hardhat functions-request:
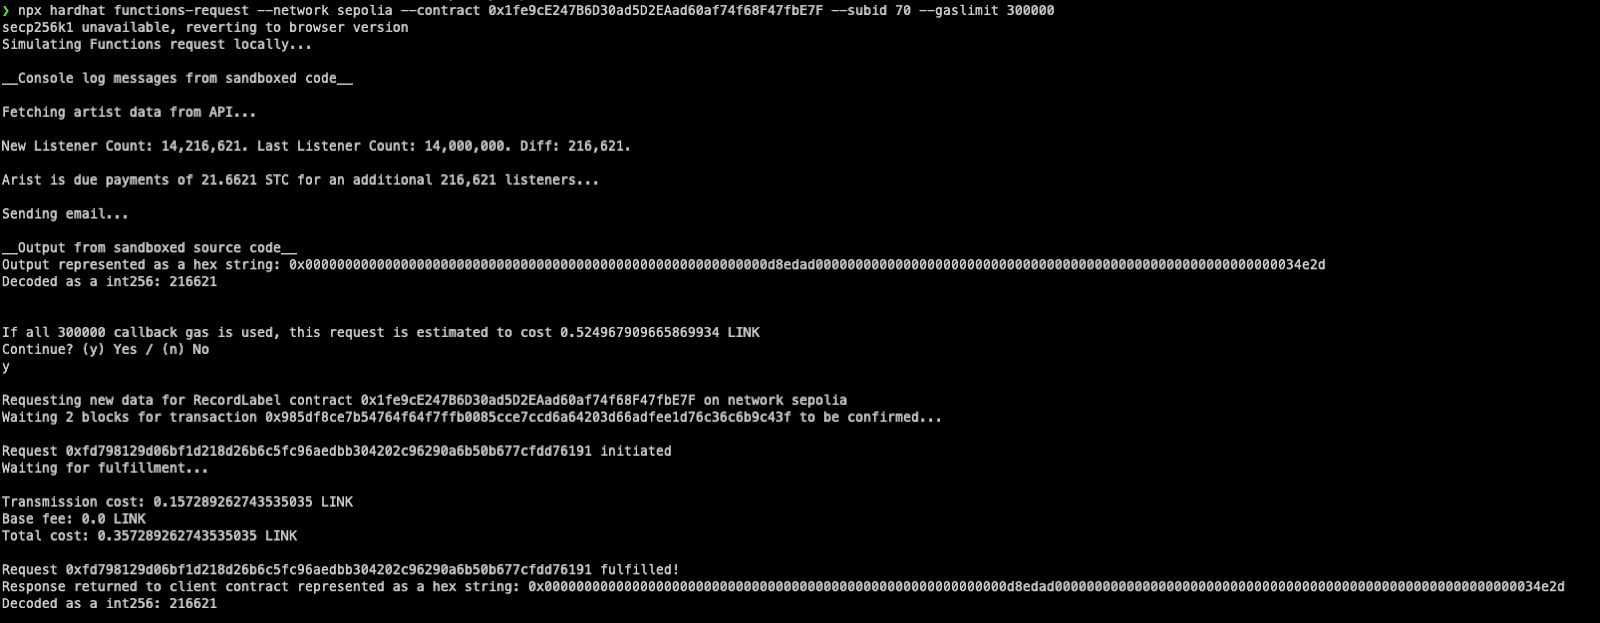
To summarize this step, when we run the CLI command, the following things will happen:
- There will be an end-to-end estimation of gas and LINK costs, and you must confirm you wish to proceed by entering “Y”.
- The simulator will run the simulation locally (i.e it internally does the same as
npx hardhat functions-simulate-twilio –gaslimit 300000). - The
env-encpackage will connect to your GitHub account using your access token, and temporarily create a private GitHub gist file with your encrypted secrets (this gets deleted, for security reasons, after your request completes!) - The request object in the Request Config file gets sent to the
RecordLabelcontract’ssendRequestmethod. - The Chainlink decentralized oracle network receives the request payload, parses out its pieces, and each node separately executes your custom JS code.
- The results are put through the Chainlink DON consensus algorithm, and a single final agreed response is posted back on-chain and sent to the
fulfillRequestcallback in theRecordLabelcontract. - The hex string of the returned value and its decoded value.
- A summary of the billing in LINK.
The hardhat scripts use the Functions Toolkit NPM Package. This package can be used without Hardhat tooling as well. The package is extremely powerful, and you can run a bunch of other commands relating to topping up or transferring, canceling your subscription, simulation of the JS, creating a local test network for end-to-end simulations, managing requests, listening to on-chain request fulfillment, etc. You can check out all the commands in the toolkit’s documentation.
Checking the Results
Now there are a couple of ways you can check your results!
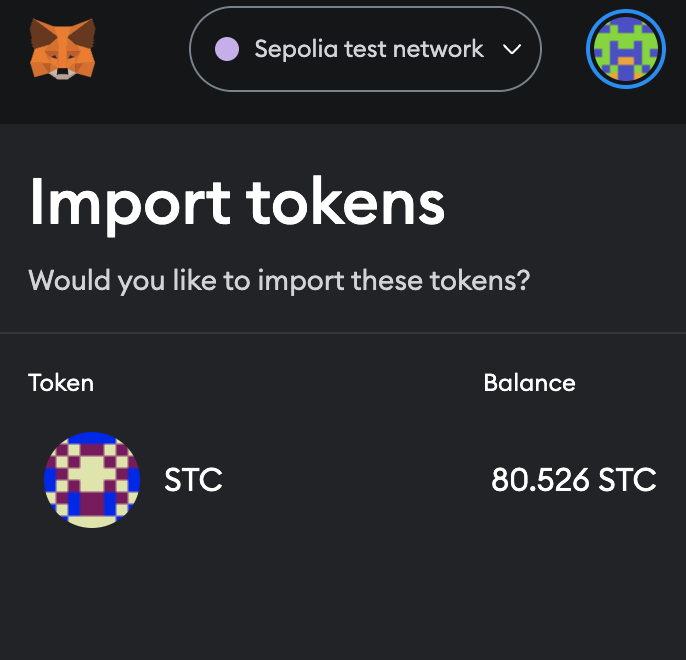
The coolest way is to check MetaMask! Switch to the second wallet address that you used (this is the one that also receives the artist’s payments) and make sure you’ve added LINK as a recognized asset to that wallet account. Then take your STC contract address and import it as a token to your MetaMask wallet. You should see the same amount of STC in your wallet address as the amount that was printed to your terminal as being paid to the artist!
Or you could go to https://sepolia.etherscan.io/ and type in your second wallet address and look at the tokens that it has. Each time you deploy an STC contract there will be an entry because each contract address is treated as a separate token.
Conclusion
This example showcases how Chainlink Functions can be used to get data from absolutely any API and bring it on-chain or push data in the opposite direction. You can connect your smart contract to the outside world using Chainlink Functions. You can interact with third-party services, such as Spotify APIs, Twilio’s email services, etc., to enhance your dApp, which unlocks new features and functionality that native Web3 applications cannot access on their own. You can also use the Functions Toolkit NPM package to do powerful end-to-end simulations right from your machine and without spending on test ETH or gas.
The code for this example is available in the following repository. To learn more about Web3 and decentralized applications, check out this blog post and check out this free Web3 Educational Resource. To learn more about Chainlink Functions, head to the Chainlink website.
Authors:
Zubin Pratap – Developer Relations Engineer, Chainlink Labs (Twitter)
Harry Papacharissiou – Developer Advocate Manager (Twitter)


