Blockchain Fintech Tutorial: Lending and Borrowing With Python
- Blockchain Fintech Tutorial: Lending and Borrowing With Python
- Introduction
- Introduction to Web3.py and Brownie
- The Setup
- Getting WETH
- Depositing Collateral
- Borrowing Against the Collateral / Taking Out a Loan
- Wait… Why didn’t I make a transaction?
- Getting the Borrowable Asset Value
- Converting the Value to Borrow
- Repaying Our Debt
- Summary
Prerequisites:
*This tutorial is for anyone with a little familiarity with Python, and little to no Solidity/smart contract experience. *
Introduction
The classic fintech world is full of tools that enable a user to make sophisticated algorithmic trading models and systems. The decentralized finance (DeFi) world offers users and developers those very same tools, with significantly more transparency and flexibility around the underlying financial protocols and instruments, giving rise to DeFi quantitative and research engineers. DeFi developers and DeFi quants can even leverage derivatives of those tools and compose them into new services to build innovative financial positions that have no equivalent in the traditional fintech world. One of the fundamental tools for DeFi developers is the ability to lend and borrow cryptocurrency assets in a non-custodial way. Some of the massive advantages of working with DeFi lending and borrowing protocols are:
- Frictionless short selling
- Obtaining liquidity without closing out your positions
- Gain yield on your deposited collateral
- Things impossible in the traditional fintech world, like flash loans.
A large portion of the fintech world uses Python, due to its wonderful developer experience. With smart contracts, you can use the exact same Python tools you are familiar with. You don’t need to know Solidity or how to write smart contracts in order to engage with quantitative DeFi or build your own cryptocurrency hedge fund or shop. However, if you do decide to learn Solidity, your DeFi prowess will be multiplied tenfold, as you’ll be able to engage in decentralized quantitative finance and pool your resources more efficiently.
In this tutorial, we will learn how to:
- Deposit collateral into the Aave Lending Pool
- Get the conversation rate between our collateral and another asset
- Use that collateral to borrow a different asset (take out a loan)
- Repay the loan
Learning how to do this will allow us to leverage trades in the DeFi ecosystem that are far less approachable in the traditional fintech world, and sometimes, not even possible.
Introduction to Web3.py and Brownie
Like most systems, the blockchain world currently has two Pythonic interfaces: web3.py and brownie. Web3.py is the raw and most granular (other than writing your own web3.py package yourself!) way to interact with the blockchain. Brownie is a framework built on top of web3.py, and abstracts away a lot of the difficulties of transactions on the blockchain. In this tutorial, we are going to show you how to write these scripts and interact on-chain using Brownie. Brownie makes life a lot easier and is a great way to abstract some of the more confusing parts of working with the blockchain. You can use web3.py with Brownie as well if you’re already familiar with web3.py. If you’d prefer raw web3.py, we also did all the examples in a web3.py repository, too.
Let’s get started and explain what is going on.
The Setup
To get started, let’s clone the repo.
git clone https://github.com/PatrickAlphaC/aave_brownie_py
cd aave_brownie_py
You’ll see a directory like this.
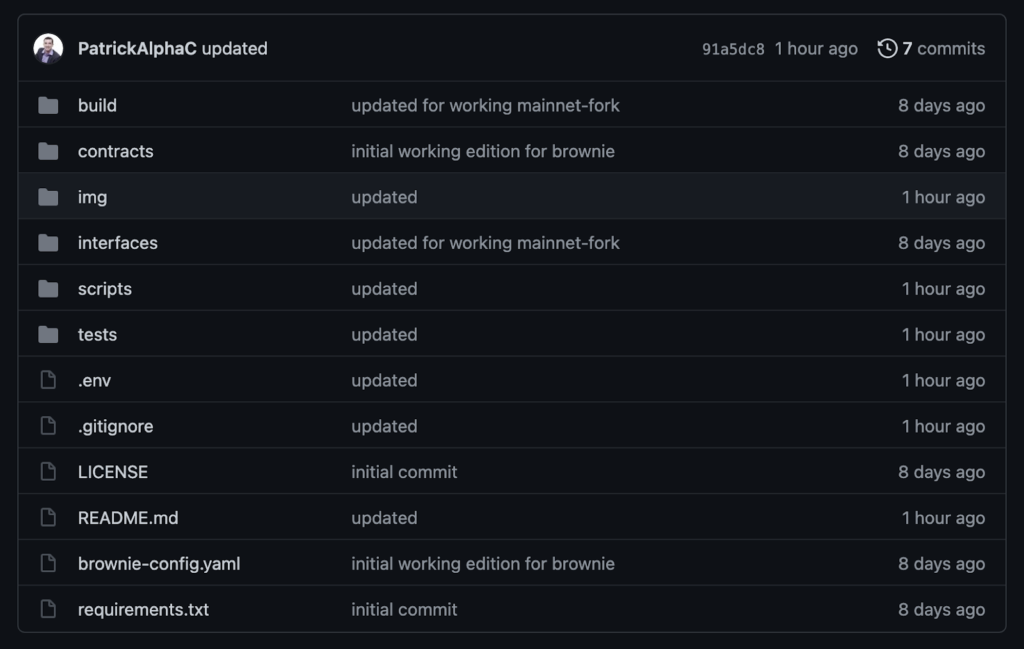
If you ever get lost, you can always go through the README for some helpful tips as well.
- Install the requirements
You’ll need Python installed here. You’ll also want Nodejs installed to run our tests and developments quicker, but we can skip that step for now.
Once Python is installed, let’s run:
pip install -r requirements.txt
This will get the eth-brownie and python-dotenv installed. eth-brownie is the brownie package, and comes with web3.py.
If you run into issues, you can just install eth-brownie with pipx:
pip install --user pipx
pipx ensurepath
# restart your terminal
pipx install eth-brownie
You’ll know you have done it right if you can run brownie --version and get something like:
Brownie v1.14.6 - Python development framework for Ethereum
- Get an ETH wallet and Setup Environment Variables
You’ll need an Ethereum Wallet, you can download MetaMask here or watch this video to get started. Once you have MetaMask, you’ll need 2 environment variables, WEB3_INFURA_PROJECT_ID and PRIVATE_KEY.
Your WEB3_INFURA_PROJECT_ID will be your project id from Infura. Infura is a node infrastructure solution for connecting to and interacting with the Ethereum blockchain.
# DO NOT SEND THESE TO GIT/GITHUB
export WEB3_INFURA_PROJECT_ID=<PROJECT_ID>
export PRIVATE_KEY=<PRIVATE_KEY>
You can add them to the file labeled .env, and then run source .env to add the environment variables to your shell/terminal. Just note, if you close out your shell/terminal, you’ll have to run source .env where your .env file is located next time you open the shell/terminal back up. You can also learn more about setting environment variables from this Twilio blog.
NOTE: DO NOT SEND YOUR PRIVATE KEYS WITH ANY REAL MONEY TO GITHUB. Please always use a different account for testing then the account you have real funds in.
- Get some testnet ETH
For those who are going to run a local chain, you can skip this step. If you don’t understand what I mean by “local chain” then just keep reading and follow these steps.
Use this faucet link to get to the Kovan faucet. If the following steps don’t work, you can always visit the Chainlink documentation LINK Token Contract page to find the latest faucets. Input your new wallet address, and get some testnet ETH. You should see your balance update in MetaMask.
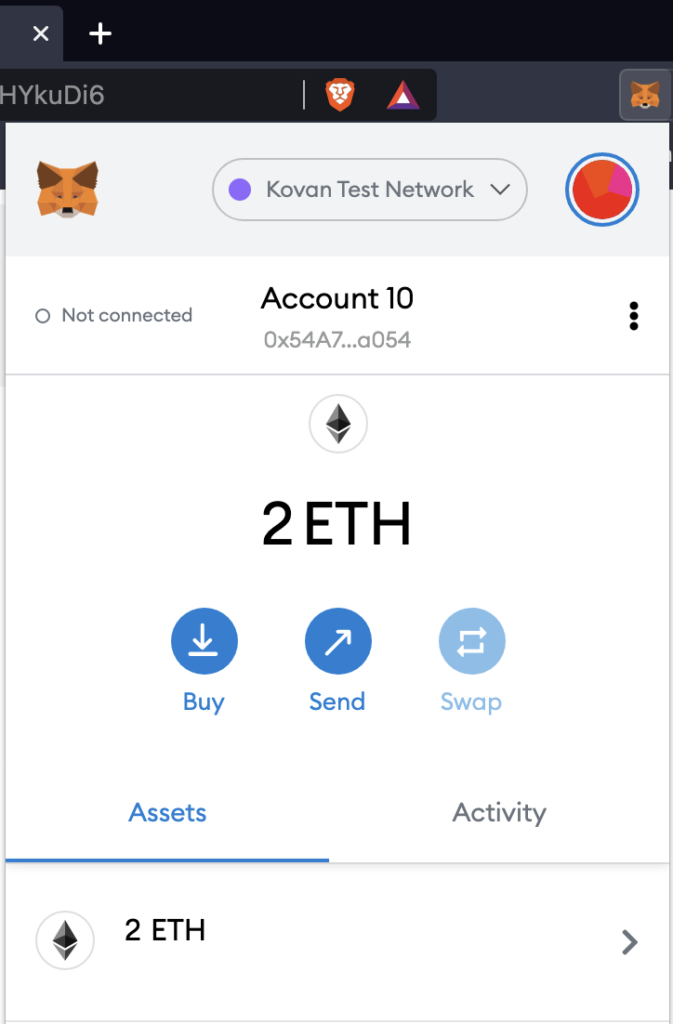
We are going to be running on the Kovan testnet. A testnet is a simulation of what interacting with a real blockchain looks like.
- Swap your ETH for WETH
If you start with 2 ETH, you will have a balance of about 0.99ish ETH and 1 WETH after following this step. Let’s proceed.
To interact with the Aave protocol, we are going to swap our ETH for an ERC20 version of the ETH, called WETH (also known as wrapped ETH). It makes it easier for us to interact with the AAVE protocol. For those unfamiliar, ERC20 is a common token standard on Ethereum.
brownie run scripts/get_weth.py --network kovan
**For those of you who want to run these on a mainnet fork (locally), just remove the --network kovan part of the command. If that confuses you, ignore this. **
You should see your MetaMask balance decrease. This is because we are swapping out ETH for WETH. In order to see our new balance, go into MetaMask, and hit add token. Then, under custom tokens enter the address 0xd0a1e359811322d97991e03f863a0c30c2cf029c. This is the contract address for the Wrapped Ether token on the Kovan testnet.
You’ll notice that there is now less than a total of 2 ETH (1 + 0.99 != 2). This is because every time you make a transaction on the blockchain, you have to pay a little bit of gas. Gas is a way of paying the miners and validators a small fee for delivering your transaction. As you learn more (not covered in this tutorial), you’ll find out there are two kinds of gas: Transaction Gas and Oracle Gas.
We only need to focus on transaction gas for this tutorial.
And if you’re new here, this is your first transaction on a testnet! Congratulations!
- Put down collateral, borrow LINK, then repay the borrowed amount, all in one script!
brownie run scripts/aave_borrow.py --network kovan
Or, forking mainnet:
brownie run scripts/aave_borrow.py --network mainnet-fork
You should get an output like this:
Brownie v1.14.6 - Python development framework for Ethereum
AaveBrowniePyProject is the active project.
Running 'scripts/aave_borrow.py::main'...
Approving ERC20...
Transaction sent: 0x04b86b3c11d8b45ad410ecb580becb8f1ef57fb1f72d3ac3944365317b99ca21
  Gas price: 2.0 gwei   Gas limit: 50695   Nonce: 3
  IERC20.approve confirmed - Block: 25241881   Gas used: 46087 (90.91%)
  IERC20.approve confirmed - Block: 25241881   Gas used: 46087 (90.91%)
Approved!
Depositing...
Transaction sent: 0xade4ab7c979e96dcb8ca6ebfda4206f8927d12fc078b32c59a723c3ae4883bca
  Gas price: 2.0 gwei   Gas limit: 253974   Nonce: 4
  ILendingPool.deposit confirmed - Block: 25241883   Gas used: 212742 (83.77%)
Deposited!
You have 0.100000012276459112 worth of ETH deposited.
You have 0 worth of ETH borrowed.
You can borrow 0.08000000982116729 worth of ETH.
LETS BORROW IT ALL
The DAI/ETH price is 0.0003642722357682
We are going to borrow 208.6351960638322 DAI
Transaction sent: 0x07b07852de7ac7cf492b34e0c929c65f38f1f83bf5953c14011ba9f659475247
  Gas price: 2.0 gwei   Gas limit: 392549   Nonce: 5
  ILendingPool.borrow confirmed - Block: 25241886   Gas used: 351754 (89.61%)
  ILendingPool.borrow confirmed - Block: 25241886   Gas used: 351754 (89.61%)
Congratulations! We have just borrowed 208.6351960638322
You have 0.100000036829377336 worth of ETH deposited.
You have 0.076000009330108915 worth of ETH borrowed.
You can borrow 0.004000020133392954 worth of ETH.
Approving ERC20...
Transaction sent: 0xede77fa7f91db8cda493a9aad092b4771c3dcf16718b086da64fe1b3b20dda9f
  Gas price: 2.0 gwei   Gas limit: 50798   Nonce: 6
  IERC20.approve confirmed - Block: 25241888   Gas used: 46180 (90.91%)
  IERC20.approve confirmed - Block: 25241888   Gas used: 46180 (90.91%)
Approved!
Transaction sent: 0xfda598cede32c2af0b8309b330bb93d08a8ccb2787adedef0de485220ee7d88a
  Gas price: 2.0 gwei   Gas limit: 242655   Nonce: 7
  ILendingPool.repay confirmed - Block: 25241889   Gas used: 187617 (77.32%)
  ILendingPool.repay confirmed - Block: 25241889   Gas used: 187617 (77.32%)
Repaid!
Woah there is a lot going on here! Let’s break down what just happened…
Breaking it down
Getting WETH
So the first thing we did here was we swapped some ETH for WETH. We did this with our get_weth function in our ./scripts/get_weth.py script.
def get_weth(account=None):
   """
   Mints WETH by depositing ETH.
   """
   account = (
       account if account else accounts.add(config["wallets"]["from_key"])
   )  # add your keystore ID as an argument to this call
   weth = interface.WethInterface(
       config["networks"][network.show_active()]["weth_token"]
   )
   tx = weth.deposit({"from": account, "value": 1000000000000000000})
   print("Received 1 WETH")
   return tx
In order to make a transaction or call on Ethereum, you must always do it from an account if you want to modify the state of the blockchain. We are modifying the state of the blockchain, because we are going to modify our ETH and WETH balance.
We use the account we get from our configuration, located at brownie-config.yaml. We see near the bottom that it uses our PRIVATE_KEY environment variable.
wallets:
 from_key: ${PRIVATE_KEY}
 from_mnemonic: ${MNEMONIC}
Don’t worry about MNEMONIC for now.
We add that account to our list of Brownie accounts with:
accounts.add(config["wallets"]["from_key"])
Now, we have an account to work with in our script.
Next, we need to get the WETH contract object so we can interact with it. We want to deposit our ETH into the contract, so it will mint us the same amount of WETH. We can always convert our WETH back to ETH with this contract at any time. All ERC20 tokens (like LINK, WETH, AAVE, etc) are themselves contracts on chain. To interact with a contract, we always need two things.
- The contract ABI/Interface
- The contract Address
We have the Interface in our interfaces folder. We also have the ABI. The compiled project puts contracts into the build folder. If we look in the interfaces folder under build we can see a file named WethInterface.json. In that folder, there is a key called abi. We can use the interface because it compiles down to an ABI.
ABI stands for Application Binary Interface and is the standard way for programs to know how to interact with the contracts, including Python.
We can get both the address and ABI added to an object for us to interact with by creating a weth variable like so:
weth = interface.WethInterface(
       config["networks"][network.show_active()]["weth_token"]
   )
Once again, we are getting the weth_token address from our config file. You’ll notice that different tokens have different addresses, depending on the chain that you’re working on. If we were to print(type(weth)) we would get:
<class 'brownie.network.contract.Contract'>
A Contract object is like a class and it represents the contract on-chain. We can then call that contract’s functions on-chain.
Then, we call the deposit function on the contract:
tx = weth.deposit({"from": account, "value": 1000000000000000000})
The Solidity contract weth has a deposit function. In fact, we can see the code on-chain. This link leads to Etherscan, a block explorer. It’s a way to visualize all the things happening on a blockchain.
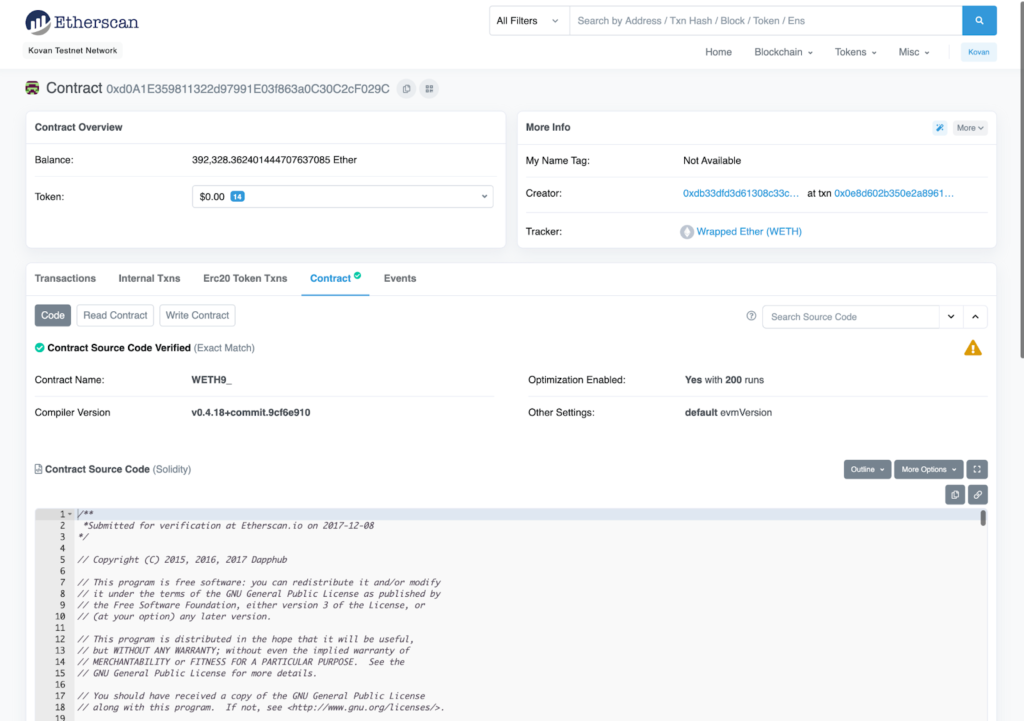
We can see the Code section below, which has all the code from the contract. You’ll sometimes come across contracts that don’t have a code section. This is because they haven’t verified with the block explorer. If we go to the Write Contract section, we can see that same deposit function.
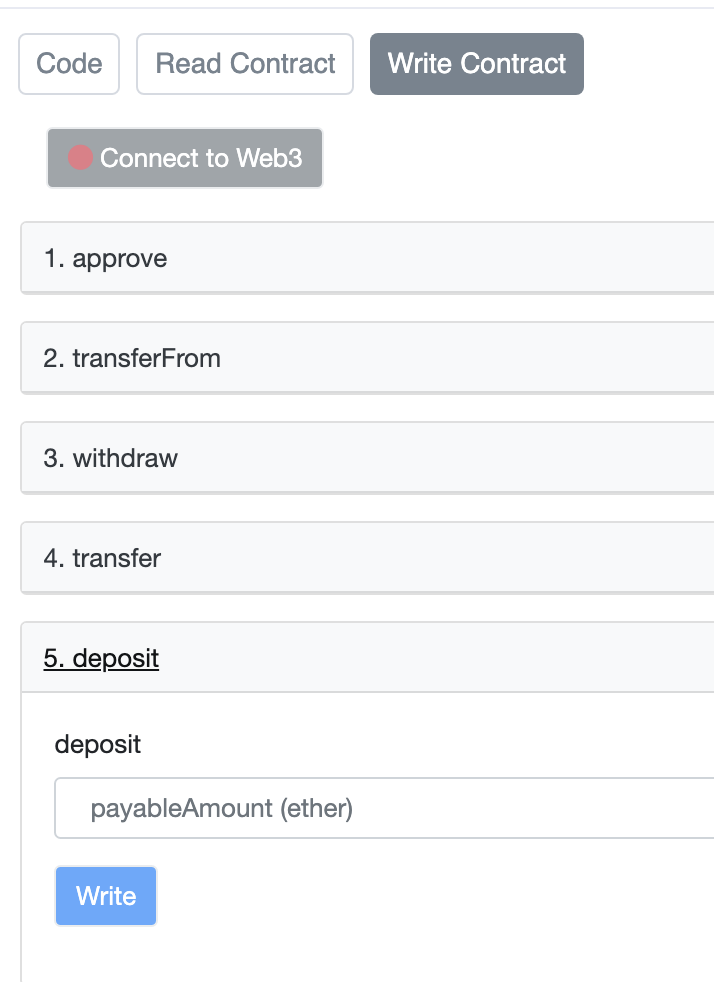
So we could have also received WETH this way too!
Whenever we make a function call and modify the state of the blockchain, we make a transaction. In the output above, we saw something like:
Transaction sent: 0x888bb9d6657b1de2e5eec465bf9641b401647a61a2bd428b51d8a95d5a3e329a
You could then copy this transaction hash into a block explorer to see the details of that transaction.
Whew! A lot of work went on there. Let’s recap.
- We got our account in Python
- We learned how to interact with contracts via their address and ABI
- We learned how to send transactions with function calls
- We learned about block explorers
Awesome, now let’s get into the borrowing and lending aspect.
Depositing Collateral
Next, we ran the aave_borrow.py script, which did 4 things:
- Deposited collateral into the Aave Lending Pool
- Got the conversation rate between our collateral and another asset
- Use that collateral to borrow a different asset (take out a loan)
- Repaid the loan
Let’s look at the start of the main function:
def main():
   account = get_account()
   erc20_address = config["networks"][network.show_active()]["weth_token"]
   if network.show_active() in ["mainnet-fork"]:
       get_weth(account=account)
   lending_pool = get_lending_pool()
We first got our address (which again pulls from our config if we are on a testnet), from our config file. If you’re testing on a local chain, we just use the first account that is generated by it. This is defined in the get_account function. Then, we get the address of the WETH token from the config file as well, and if we are on a local chain, we call that same get_weth function we called before. This is to make sure that if we are using a local chain, we have WETH in our wallet.
And last, we get the address of the lending_pool. The lending_pool is the smart contract on-chain that governs the functionality of borrowing and selling, hence its name. You can see the functions in the Aave documentation, or you can go see the contract right on-chain. Here is what the contract looks like on the Ethereum Mainnet.
We see a number of helpful functions in this contract:
- Borrow
- Deposit
- getUserAccountData
- Repay
These are the functions that we are going to use. Remember, smart contracts on-chain are the same as objects or classes in traditional software engineering, and each has functions associated with them. If you were to print(type(lending_pool)) we would get this type:
<class 'brownie.network.contract.Contract'>
This means that the lending pool is a contract, just like WETH! Our get_lending_pool() function actually did a few extra steps to get the lending_pool contract. Let’s look at that function:
def get_lending_pool():
   lending_pool_addresses_provider = interface.ILendingPoolAddressesProvider(
       config["networks"][network.show_active(
       )]["lending_poll_addresses_provider"]
   )
   lending_pool_address = lending_pool_addresses_provider.getLendingPool()
   lending_pool = interface.ILendingPool(lending_pool_address)
   return lending_pool
Remember, we need 2 things to interact with a smart contract:
- ABI/Interface
- Address
We have the Interface of the lending pool located in the interfaces folder. You’ll notice a popular convention for interfaces is to have them start with the letter “I”. We have a mix in this example to show that it doesn’t have to start with “I” though.
In order for us to get the address of the lending pool, we actually have to go through the address of the LendingPoolAddressesProvider. This is a contract on-chain that holds all the addresses of the lending pools for Aave. Sometimes, the lending pool addresses change, but the lending pool provider address never changes, so we can always use that contract’s address to get the address of a lending pool. You’ll see we call the function getLendingPool on the lending_pool_addresses_provider variable.
Let’s get back to the main function. After we get the address of the lending_pool contract, we want to deposit collateral. This is the first step we need to do, since we can only take out a loan if we have placed collateral. We could also hypothetically just deposit collateral and call it a day! Depositing collateral will let us:
- Gain Yield – The protocol pays users who deposit collateral into the platform. They give them a portion of the fees generated by those who take out loans on the platform.
- Take out loans – We can only take out a loan/borrow if we have enough collateral. Aave has a function called liquidationcall that anyone can call and get rewarded for calling if you don’t have enough collateral. Value of the collateral must be maintained greater than the value of the loan which is why this is known as overcollateralized lending.
- Liquidity Mine – Also known as “yield farming”, liquidity mining is a DeFi mechanism that enables users to earn rewards, in the form of governance or some other type of token, for providing liquidity to the protocol.
In order for us to deposit some tokens though, we have to approve the smart contract to take the tokens out of our wallet. Remember, we are going to be putting down our WETH as collateral.
approve_erc20(amount, lending_pool.address, erc20_address, account)
Let’s look at our approve_erc20 function.
def approve_erc20(amount, lending_pool_address, erc20_address, account):
   print("Approving ERC20...")
   erc20 = interface.IERC20(erc20_address)
   tx_hash = erc20.approve(lending_pool_address, amount, {"from": account})
   tx_hash.wait(1)
   print("Approved!")
   return True
amount: How much of the ERC20, in wei, to allow for the protocol to make use of.weiis the smallest unit of measure in the blockchain world.- 1 ETH == 1000000000000000000wei
lending_pool_address: The address of the lending pool.erc20_address: The address of the ERC20 token.account: Our account we want to trade from.
When working with ERC20 tokens, if we want another contract to “pull” from our wallet, we have to give that contract approval first. We call the approve function on the ERC20 contract (our WETH), and then we “wait” for that transaction to move on.
tx_hash.wait(1)
Now that we’ve given the contract approval, we can deposit our collateral in the lending_pool contract back in our main function.
print("Depositing...")
   lending_pool.deposit(erc20_address, amount, account.address, 0, {"from": account})
   print("Deposited!")
We can see here, we call the deposit function on the contract, and we give it:
erc20_address: The token to deposit (in our case WETH)amount: The amount in wei to deposit.account.address: Who we want to take the loan out for, in this case us.0: This is the referral code (depreciated, always use 0)
We can learn more about the deposit function in the smart contract from the Aave documentation.
Now here is where stuff gets REALLY cool: if you’ve done this part correctly, you’ll get a transaction hash that will show you what’s going on. Let’s look at an example on the Kovan Testnet on Etherscan.
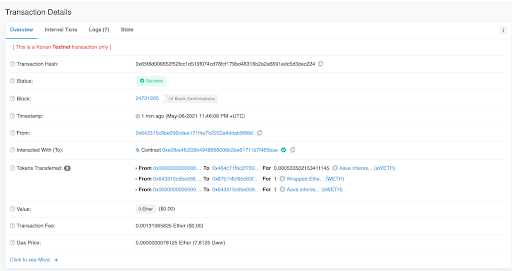
Let’s hone in on what happened. If we look at the Tokens Transferred section, we can see 3 transactions happened with our 1 deposit transaction. In order, those are:
- Some aToken is minted for us depositing (aWETH)
- We sent 1 WETH to the
lending_poolcontract (this is us depositing) - We are sent some aToken
So the middle token transfer makes sense—we are sending the lending pool some WETH. This makes sense. But what are the other tokens?
An aToken is an interest bearing token that is minted upon deposit and burned when redeemed. So when you go to take your deposit back out, you burn your aToken for an equivalent amount of the underlying asset. The cool part of aTokens is that they go up in value each and every second! The balance goes up because people are using the Aave protocol and borrowing your asset, so you get paid for it!
You can look at someone’s balance and refresh every few seconds to see the balance going up in real time.
Whenever we want to redeem or withdraw our WETH, we will withdraw however much aWETH we have, and that aWETH will be burnt.
Same as the WETH token, you can now see the aWETH in your MetaMask wallet. Just go into your MetaMask, and do the add token section we did above, but with the Kovan WETH address of 0x87b1f4cf9bd63f7bbd3ee1ad04e8f52540349347.
Borrowing Against the Collateral / Taking Out a Loan
Now that we have some collateral deposited, we can take out a loan. Now why would we want to take out a loan?
- Frictionless short selling
- Obtaining liquidity without closing out your positions
You can borrow an asset to keep exposure to your underlying collateral, while also trading or paying with another asset. Just be sure to keep your health factor above 1.

Your health factor is the amount of collateral against your loan. Let’s say I have 1 ETH deposited and 0.5 ETH borrowed. If the Liquidation Threshold were to be 1, my health factor would then be 2.
The liquidation threshold is the percentage at which a loan is defined as undercollateralised. For example, a Liquidation threshold of 80% means that if the value rises above 80% of the collateral, the loan is undercollateralised and could be liquidated.
But let’s say I have 2 ETH borrowed and 1 ETH as collateral, with 1 as the liquidation threshold. My health factor would be 0.5, and I’d be subject to a liquidation call. This is where liquidators repay part or all of the outstanding borrowed amount on behalf of the borrower, while receiving a discounted amount of collateral in return (also known as a liquidation ‘bonus”). Liquidators can decide if they want to receive an equivalent amount of collateral aTokens, or the underlying asset directly. When the liquidation is completed successfully, the health factor of the position is increased, bringing the health factor above 1.
This way the protocol stays solvent. So keep that loan healthy!
To borrow against our collateral, we first want to take scale of how much we have down as collateral. We can call the getUserAccountData function on the lending_pool to find this out.
We wrapped it up into a function called get_borrowable_data
borrowable_eth, total_debt_eth = get_borrowable_data(lending_pool, account)
.
.
.
def get_borrowable_data(lending_pool, account):
   (
       total_collateral_eth,
       total_debt_eth,
       available_borrow_eth,
       current_liquidation_threshold,
       tlv,
       health_factor,
   ) = lending_pool.getUserAccountData(account.address)
   available_borrow_eth = Web3.fromWei(available_borrow_eth, "ether")
   total_collateral_eth = Web3.fromWei(total_collateral_eth, "ether")
   total_debt_eth = Web3.fromWei(total_debt_eth, "ether")
   print(f"You have {total_collateral_eth} worth of ETH deposited.")
   print(f"You have {total_debt_eth} worth of ETH borrowed.")
   print(f"You can borrow {available_borrow_eth} worth of ETH.")
   return (float(available_borrow_eth), float(total_debt_eth))
getUserAccountData returns:
- totalCollateralETH
- totalDebtETH
- availableBorrowsETH
- currentLiquidationThreshold
- Ltv
- healthFactor
You can read what each of these does in the Aave documentation. We are just going to focus on available_borrow_eth and total_debt_eth, this way we will know:
- How much we can borrow
- How much debt we currently have
Wait… Why didn’t I make a transaction?
You may have noticed that this is making a function call to a smart contract, and we just said above that we have to make a transaction in order to call a function, so what gives? Well, there are 2 types of smart contract functions that you don’t need to make a transaction on to call.
- View functions
- Pure functions
These are functions that do not modify the state of the blockchain, so we can call them because we are simply reading the state of the smart contract. Remember, it only costs gas if you modify the state of the blockchain.
Back to loans.
Each asset has a different loan to borrow ratio, which tells your liquidation threshold in order for you to borrow an asset.
Once we get how much we can borrow, we can then borrow it!
borrowable_eth, total_debt_eth = get_borrowable_data(lending_pool, account)
print(f"LETS BORROW IT ALL")
erc20_eth_price = get_asset_price()
amount_erc20_to_borrow = (1 / erc20_eth_price) * (borrowable_eth * 0.95)
print(f"We are going to borrow {amount_erc20_to_borrow} DAI")
borrow_erc20(lending_pool, amount_erc20_to_borrow, account)
Getting the Borrowable Asset Value
Now when we borrow, we are told the amount of an asset that we have in terms of ETH. However, maybe we want to borrow a different token, like DAI. If we want to borrow DAI with ETH as collateral, we first have to get the conversion rate of ETH -> DAI.
Chainlink is the standard for getting data and executing external computation in the DeFi and smart contract ecosystem, and it’s what Aave uses to get rates as well! They have a Price Oracle section, which describes how to get Chainlink data via their smart contract APIs. If you learn to use Chainlink data generally, you can use it across protocols, even if they aren’t using Chainlink, or don’t have a price oracle mechanism!
Chainlink gets data through a decentralized oracle network, where multiple nodes aggregate data across many APIs and services to arrive at a single decentralized source of truth that is validated and recorded on-chain for us to use. We can see a list of currently available data feeds on the data.chain.link page or the documentation. As you know, data is the backbone of most quantitative systems, algorithmic traders, and the entire DeFi ecosystem, so you want to always be sure you’re pulling from a decentralized system so you can have the most accurate, reliable, and safe data.
Additionally, if some data isn’t there that you’d like, you can call from any API into your smart contract, get provably random numbers, and a number of other different services. These make smart contract data feeds secure, reliable, and decentralized.
But let’s get back to the Python!
We have a function called get_asset_price which reads from the dai_eth_price_feed, like so:
def get_asset_price():
   # For mainnet we can just do:
   # return Contract(f"{pair}.data.eth").latestAnswer() / 1e8
   dai_eth_price_feed = interface.AggregatorV3Interface(
       config["networks"][network.show_active()]["dai_eth_price_feed"]
   )
   latest_price = Web3.fromWei(dai_eth_price_feed.latestRoundData()[1], "ether")
   print(f"The DAI/ETH price is {latest_price}")
   return float(latest_price)
The Chainlink contract AggregatorV3Interface we pull in from the interfaces, which we have stored in our config file. On that contract, we call the latestRoundData function.
You’ll notice we don’t have to make a transaction for this one either, this is also a view function!
Another way you’ll see people getting Chainlink data feed prices with Brownie is with:
from brownie import Contract

print(Contract(f"{pair}.data.eth").latestAnswer() / 1e8)
This uses ENS to get the address of a price pair. ENS is a way to take smart contract addresses and make them human readable. For example, you could do something like:
print(Contract(f"eth-usd.data.eth").latestAnswer() / 1e8)
To get the latest price of Ethereum in terms of USD. Just note, ENS only works on a mainnet network, so you’d have to be using --network mainnet or --network mainnet-fork when you run brownie.
Converting the Value to Borrow
Now that we have the conversion rate between our collateral and the asset we want to borrow, we can set up a variable that identifies how much we want to borrow.
amount_erc20_to_borrow = (1 / erc20_eth_price) * (borrowable_eth * 0.95)
We get the reciprocal of ETH/DAI price and multiply it by how much (in units of ETH) we can borrow. We also multiply it by 0.95, just to be safe. Then, we call the borrow function!
borrow_erc20(lending_pool, amount_erc20_to_borrow, account)
.
.
.
def borrow_erc20(lending_pool, amount, account, erc20_address=None):
   erc20_address = (
       erc20_address
       if erc20_address
       else config["networks"][network.show_active()]["aave_dai_token"]
   )
   # 1 is stable interest rate
   # 0 is the referral code
   transaction = lending_pool.borrow(
       erc20_address,
       Web3.toWei(amount, "ether"),
       1,
       0,
       account.address,
       {"from": account},
   )
   transaction.wait(1)
   print(f"Congratulations! We have just borrowed {amount}")
Hopefully now you’re getting the hang of this. The borrow function takes a few parameters:
- The address of the asset (in our case, DAI token)
- The amount we want to borrow, in wei
- The
interestRateMode, (0, 1, 2: 1 is stable, 2 is variable… don’t worry about 0 for now) - Referral Code (ignore)
- The
onBehalfOfvalue, aka whoever is going to incur the debt
Let’s look at a sample of this transaction on Etherscan to make sense of what just happened.
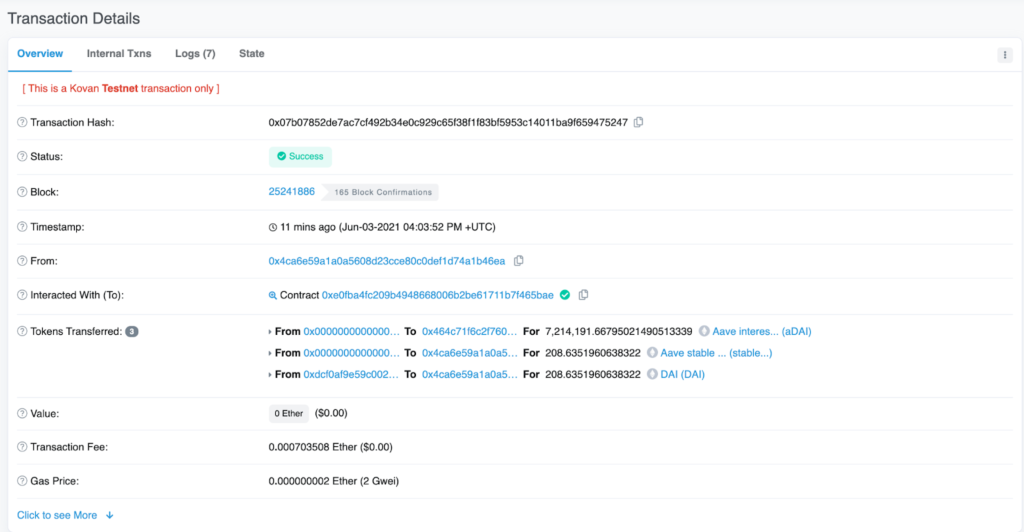
In order, the Tokens Transferred movements are:
- The Aave protocol being minted some aDAI
- Our wallet being minted some
Aave Stable Debt Bearing DAI - Our wallet getting some DAI
IMPORTANT NOTE: Aave changes its testnet tokens around sometimes. Be sure you have the right testnet DAI address by checking the deployed contract addresses. and checking the official JSON list.
This time, we get a different type of interest bearing token, a debt token. This is how much we will have to pay back, and like the aToken, it also grows in value. If you owe more debt (symbolized by this debt token), someone can liquidate you and take all your collateral! So be vigilant about how much debt you have.
We can see the borrowed asset in our MetaMask again by adding the new token address. We can also see our debt by adding the debt token address.
This is really where the fun starts. One of the easiest ways to short sell is now to just sell our asset. If the price of the asset goes down, we will have to pay back less than we borrowed. The sky’s the limit with your creativity here!
However, I’m getting nervous that I’m going to get liquidated. Let’s repay our debt.
Repaying Our Debt
By now, you’ve gotten the hang of this. We want to figure out how much we owe, and then pay that back! We can do that with these functions:
borrowable_eth, total_debt_eth = get_borrowable_data(lending_pool, account)
amount_erc20_to_repay = (1 / erc20_eth_price) * (total_debt_eth * 0.95)
repay_all(amount_erc20_to_repay, lending_pool, account)
.
.
.
def repay_all(amount, lending_pool, account):
   approve_erc20(
       Web3.toWei(amount, "ether"),
       lending_pool,
       config["networks"][network.show_active()]["aave_dai_token"],
       account,
   )
   tx = lending_pool.repay(
       config["networks"][network.show_active()]["aave_dai_token"],
       Web3.toWei(amount, "ether"),
       1,
       account.address,
       {"from": account},
   )
   tx.wait(1)
   print("Repaid!")
A little verbose, but if done correctly, you should be mostly paid up!
Summary
We have gone through just about all the steps of working with Aave.
- Deposit collateral
- Take out a loan
- And repay it
Woot! You’re becoming a blockchain fintech pro! Some of the next steps you’d want to do are:
- Trading assets with a protocol like Synthetix or Bancor
- Take out a flash loan
- Learn how to stake and participate in governance
And more! You can also learn how to become a smart contract developer, build decentralized protocols in Solidity, and discover the broad capabilities of smart contracts. Your journey is just beginning!
Now here’s the thing: everything we’ve done in this tutorial—depositing our collateral, taking out a loan, repaying—you can also do all through the Aave UI! UIs are great, but they don’t give us the flexible creativity and sophisticated quantitative approaches that programming does.
- How to Fetch the Current Price of Ethereum, Bitcoin, and Other Cryptocurrencies in Solidity
- Fetch Foreign Exchange Rates in Solidity Smart Contracts
- Fetch Commodity Prices in Solidity Smart Contracts
- Get Index Prices in Solidity Smart Contracts
- The Top Ways for Smart Contract Developers to Use Chainlink
Website | Twitter | Discord | Reddit | YouTube | Telegram | Events | GitHub | Price Feeds | DeFi


