How to Call a Smart Contract From Another Smart Contract
Smart contracts are computer programs published and executed in a blockchain environment. As they run on blockchains, they can be run without a central party or server. They are commonly written in the Solidity language.
On the Ethereum blockchain, smart contracts can interact with existing deployed contracts. This also applies to any other EVM-compatible blockchain (any blockchain that was created using the Ethereum virtual machine).
Here are some example of smart contracts that interact with other smart contracts:
- Token minters or issuers have permission to call a token’s smart contract and issue it.
- Decentralized exchanges interact with other smart contracts all the time, in the form of traded tokens.
- When you get a quote for an asset using Chainlink Data Feed, your smart contract is interacting with the asset’s price aggregator, which is another smart contract.
- When you use Chainlink VRF, the verifiable random number generator, your contract sends a request to the VRF Coordinator, which will send the numbers back to your smart contract.
- To automate the execution of a smart contract using Chailink Keepers, you create a Keepers Upkeep, which will check conditions and execute instructions on the deployed smart contract.
Why Call a Function From Another Smart Contract?
Sometimes an application needs to be split into several smart contracts. For example, I once created an application that was already separated into three smart contracts that interacted with each other, but I couldn’t publish it on Ethereum mainnet because the size in bytes exceeded the allowed limit. I had to refactor the application to split it into five smart contracts in order for the app to be published.
Another interesting use case is upgradeable contracts. Blockchains are immutable, which means it’s not possible to change the code of a smart contract once it has been deployed. But it is possible to create a proxy delegating function calls to another contract that contains the actual business logic.
If you would like to change the logic, you can provide a different target address to the proxy contract, for example a new deployed version with some improvements. It is possible to separate logic and data into different smart contracts. The logic contract could be updated or swapped out via proxy while retaining all information in the data contract.
This feature is very powerful as it allows code to be reused and some deployed contracts to be used like libraries. It can also reduce deployment costs because the contract which uses the library doesn’t need to include all the code itself.
Calling Another Smart Contract With Solidity
Let’s use Remix, an online web tool. Go to remix.ethereum.org to get started.
Create a File For Your Smart Contracts
Create a file to add smart contracts to. Yes, it is possible to have more than one smart contract in the same file!
- In Remix, click on the second icon on the left bar, “File Explorers”.
- Click on the button “Create a new file”.
- Name your file Contracts.sol
You’ll write and deploy two smart contracts in Solidity inside this file.
First of all, define the SPDX license type and compiler version. Copy and paste this part:
// SPDX-License-Identifier: MIT

pragma solidity 0.8.16;
Counter Contract
The first contract is the “Counter,” a script to increment a number.
Copy and paste this example:
contract Counter {

    uint public number;


    function increment() external {

        number += 1;

    }

}
This Counter contract has:
- A public variable number, of unsigned integer type, which will store the value of increment.
- A function increment to increase the value of the number variable by one. It is an external function, which means it can be called from other contracts and via transactions.
Compile the Counter contract
- Locate in the left bar a button called “Solidity compiler”.
- Click on the button “Compile Contracts.sol”.
- Enable the auto-compile option.
- Check the green sign at the button with the message compilation successful.
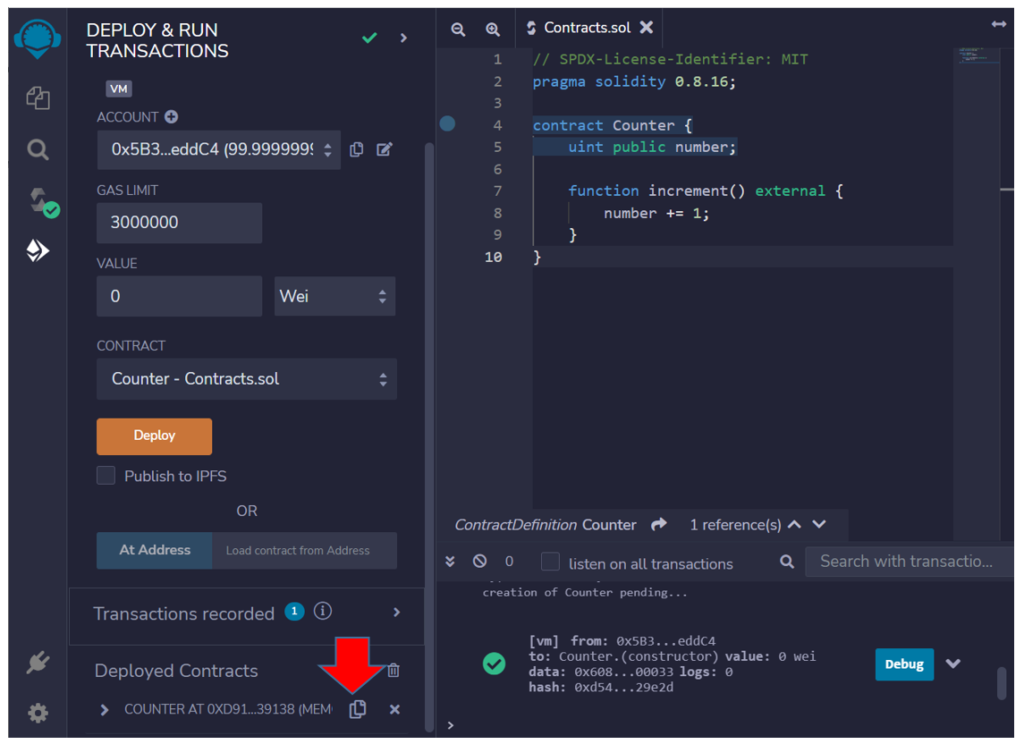
Deploy the Counter contract
- In the left side panel, go to the button “Deploy and run transactions”.
- For now, we have only one smart contract, so “Counter” is automatically selected in the dropdown “Contracts”.
- Click on the button “Deploy”.
Locate the contract at the bottom of the left panel and copy its address. For example, mine is:
0xd9145CCE52D386f254917e481eB44e9943F39138
You should see something like the image below:
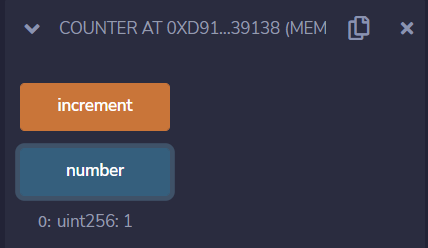
Interacting With the Counter
Expand the Counter contract and:
- Click on the “number” button and check that it is 0.
- Click on the “increment “button to send a transaction to increase the number.
- Click on the “number” button again and check that now it is 1.
This is the final result:
CounterCaller Contract
Now that we have our first contract deployed, let’s create another contract which will use the Counter increment function. This is a mechanism like dependency injection. The caller can instantiate the contract it wants to call and knows the type signature of the functions and public variables.
Copy and paste this code at the end of the Contracts.sol file:
contract CounterCaller {

    Counter public myCounter;


    constructor(address counterAddress) {

        myCounter = Counter(counterAddress);

    }


    function counterIncrement() external {

        myCounter.increment();

    }

}
The CounterCaller contract has:
- A public variable called myCounter, of type Counter. It means that we are using the contract we want to call as a type, getting the specification for the public functions and variables of the Counter Contract.
- The constructor, a function that is called only during the deploy process and used to initialize myCounter with the address of the Counter deployed previously.
- The function counterIncrement which will call the function increment on myCounter, which is like a “pointer” to the smart contract Counter.
Check it out the whole file Contracts.sol:
// SPDX-License-Identifier: MIT

pragma solidity 0.8.16;


contract Counter {

    uint public number;


    function increment() external {

        number += 1;

    }

}


contract CounterCaller {

    Counter public myCounter;


    constructor(address counterAddress) {

        myCounter = Counter(counterAddress);

    }


    function counterIncrement() external {

        myCounter.increment();

    }

}
Compile the CounterCaller contract
- If you already enabled the auto-compile option, it is compiled.
- Check the green sign at the button with the message compilation successful.
- Otherwise, follow the instructions to compile the Counter Contract, explained before.
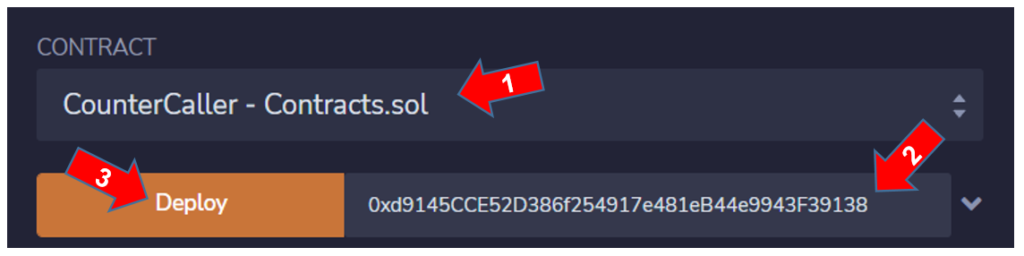
Now, let’s deploy the CounterCaller contract. In the left side panel, go to the button “Deploy and run transactions”.
- In the dropdown Contract, select CounterCaller.
- Paste the Counter address in the field at the right side of the button Deploy.
- Click on the button “Deploy”.
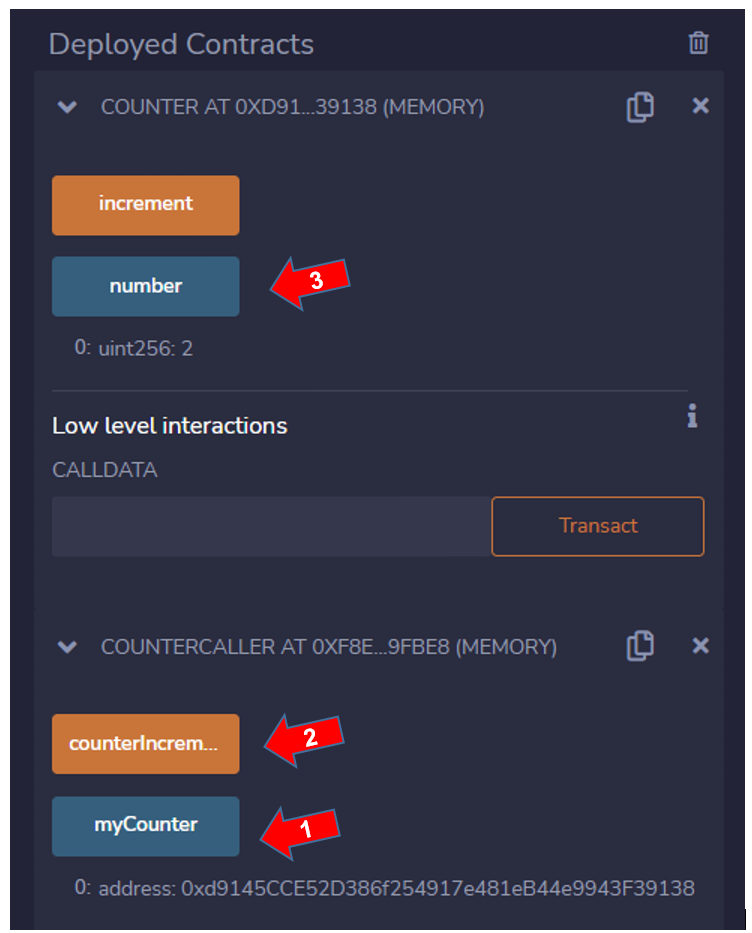
Interacting With the CounterCaller
Locate the CounterCaller contract at the bottom of the left panel and expand it.
- Click on “myCounter” button and check that it is the Counter address.
- Click on the “counterIncrement” button to send a transaction calling the function increment on the Counter contract.
- Go to the Counter contract and click on the number button to verify that it increased again, now it should be 2.
This is the final result:
This is a basic example to help you learn how to call a smart contract from another smart contract using Solidity.
There are other ways to delegate calls between contracts in Solidity. It is important to notice that a deployed contract always has an address and if you know the functions and public variables, another smart contract can call it.
Now that you know how to call a smart contract from another smart contract, a whole host of use cases and abilities are open to you. You can:
- Split a contract into multiple contracts
- Design the architecture of complex dApps
- Enable reusability
- Create a factory contract (a smart contract which can create others contracts)
If you’re a developer and want to secure your smart contracts, dApp, or protocol, consider using Chainlink in your smart contract applications. For more learning and reference resources, check out the blockchain education hub, developer documentation, or reach out to an expert. You can also dive right into hooking up your smart contracts to real-world data via decentralized oracles.


