How To Stake Chainlink (LINK)
Follow this blog for step-by-step instructions on how to stake your LINK in the latest version of Chainlink Staking (v0.2).
Jump To:
- Staking Prerequisites
- How To Migrate LINK
- How To Stake LINK (Individual wallet tutorial)
- How To Stake LINK (Multisig wallet tutorial)
- More Resources on Chainlink Staking
Why Stake LINK?
As a core initiative of Chainlink Economics 2.0, Chainlink Staking enables LINK token holders and node operators to earn rewards for helping increase the cryptoeconomic security of oracle services. With the Chainlink Network having enabled more than $12 trillion in transaction value since the beginning of 2022, it’s crucial for the security of the network to scale over time to match the increasing amount of value secured within Chainlinked applications.
The previous version of Chainlink Staking (v0.1) was originally launched in December 2022, representing a key milestone in Chainlink’s new era of sustainable growth and security. While v0.1 served as the initial Staking program, Staking v0.2 has been rearchitected into a fully modular, extensible, and upgradable Staking platform. Specifically, v0.2 takes learnings from the v0.1 release and builds upon its foundation by focusing on the following goals:
- Greater flexibility for Community and Node Operator Stakers via a new unbonding mechanism, while retaining a secure non-custodial design.
- Improved security guarantees for oracle services secured by Chainlink Staking via the slashing of node operator stake.
- Modular architecture to iteratively support future improvements and additions to Chainlink Staking, such as expansion to more services.
- Dynamic rewards mechanism that can seamlessly support new external sources of rewards in the future, such as user fees.
At launch, v0.2 features an expanded pool size of 45,000,000 LINK in total, representing 8% of the current circulating supply, increasing the accessibility of Chainlink Staking to a more diverse audience of LINK token holders. 40,875,000 LINK is allotted for community members, with the remainder of the staking pool allocated to Chainlink node operators currently servicing Chainlink Data Feeds.
For more information on Chainlink Staking v0.2, including the new features and specific parameter configurations, read Introducing the Chainlink Staking Platform: v0.2 Upgrade and Launch Details.
Staking and Migration Prerequisites
In order to migrate LINK from v0.1 to v0.2, you must:
- Have staked LINK in Chainlink Staking v0.1.
- Have access to the Web3 wallet used to stake LINK in Staking v0.1 (i.e., have ownership and control of the private key/seed phrase of the address used to stake in v0.1).
- Have a sufficient amount of ETH to pay the Ethereum transaction fees.
In order to stake LINK as a new participant, you must:
- Hold your LINK tokens on Ethereum mainnet in a self-custodial Web3 wallet or hardware wallet supported by Web3 wallets such as MetaMask.
- Have a sufficient amount of ETH to pay the Ethereum transaction fees.
- Have a minimum of at least 1 LINK to stake.
Note that Ethereum transaction fees can be unpredictable and volatile, as they are dynamically determined by network activity. For an estimate of current gas fees, refer to the Etherscan Gas Tracker. Make sure you check the transaction fee amount and that you are comfortable with the amount before signing a transaction.
Staking v0.2 Launch Phases
Chainlink Staking v0.2 is being rolled out in three separate, chronological phases.
Priority Migration
- Start Date: November 28, 2023 at 12PM ET
- End Date: December 7, 2023 at 12PM ET
- Duration: Nine days in total
- Eligibility Criteria: Must have already staked LINK in staking v0.1
- Migration Cap: v0.1 stakers can migrate up to the amount of LINK they have staked in v0.1, in addition to accrued v0.1 rewards, during Priority Migration.
- Important Information: v0.1 stakers have guaranteed access to the v0.2 Staking Pool, but only during the nine-day Priority Migration window. Additional LINK can be staked during Early Access, which migrators are automatically eligible for.
Early Access
- Start Date: December 7, 2023 at 12PM ET
- End Date: December 11, 2023 at 12PM ET
- Duration: Four days in total
- Eligibility Criteria: LINK token holders and community members can check their eligibility on staking.chain.link/eligibility. Read this blog for an overview of the Early Access eligibility criteria.
- Total Staking Cap: 15,000 LINK
- Important Information: Staking v0.2 Early Access is first come, first served. Being eligible for Early Access provides an opportunity, but not a guarantee, to stake in v0.2. Note the capped v0.2 pool may fill during Early Access.
General Access
- Start Date: December 11, 2023 at 12PM ET
- End Date: N/A
- Duration: Indefinite until the conclusion of v0.2
- Eligibility Criteria: During the General Access phase, the v0.2 Staking Pool is open to all users.
- Total Staking Cap: 15,000 LINK
- Important Information: Staking v0.2 General Access is first come, first served. Anyone can stake during General Access, provided that the pool has not yet been filled. If the pool is at capacity, then an existing staker will have to withdraw before a new participant can enter.
Verify which launch phase you are eligible for in seconds: staking.chain.link/eligibility
Self-Custody
Chainlink Staking v0.2 supports a wide range of popular Web3-enabled wallets, including MetaMask, Coinbase Wallet, WalletConnect-compatible wallets, and smart contract wallets such as Argent and Safe (via WalletConnect). Hardware wallets such as Trezor and Ledger can also be connected to Web3 wallets like MetaMask in order to access the Staking v0.2 interface.
If you don’t have self-custody of your LINK tokens yet, check out the video below for a walkthrough of the process of self-custodying Ethereum-based tokens in a MetaMask, Trezor One, and Ledger Nano S wallet.
If you have—or plan to set up—a hardware wallet, the video tutorial below provides step-by-step instructions on how to connect it to MetaMask.
Specific questions regarding your Web3 wallet should be directed to the official support channels of your wallet provider before reaching out to Chainlink Labs.
Staking Security
Be cautious of any illegitimate phishing/scam websites spoofing the Chainlink Staking web page. Such websites may be hosted with malicious intent.
The official web page for Chainlink Staking v0.2 for both migrating and staking LINK is located at: https://staking.chain.link
For maximum security, bookmark the official page and verify the URL each time you visit the page.
How To Migrate LINK
Note: These tutorials are based on a pre-production build of the Chainlink Staking v0.2 Interface using the Ethereum Sepolia testnet with placeholder values. The screenshots are for demonstration purposes only. While these tutorials accurately reflect the staking process, the specific staking parameters, gas fees, and user interface (UI) elements shown below may differ from the interface deployed for the mainnet implementation of Chainlink Staking v0.2. For more information on Staking v0.2 parameters, read this blog.
Video Tutorial
Step-by-Step Tutorial
For this tutorial, we will showcase how to migrate staked LINK from v0.1 to v0.2 using a MetaMask wallet, but the process should look similar for other Web3 wallets.
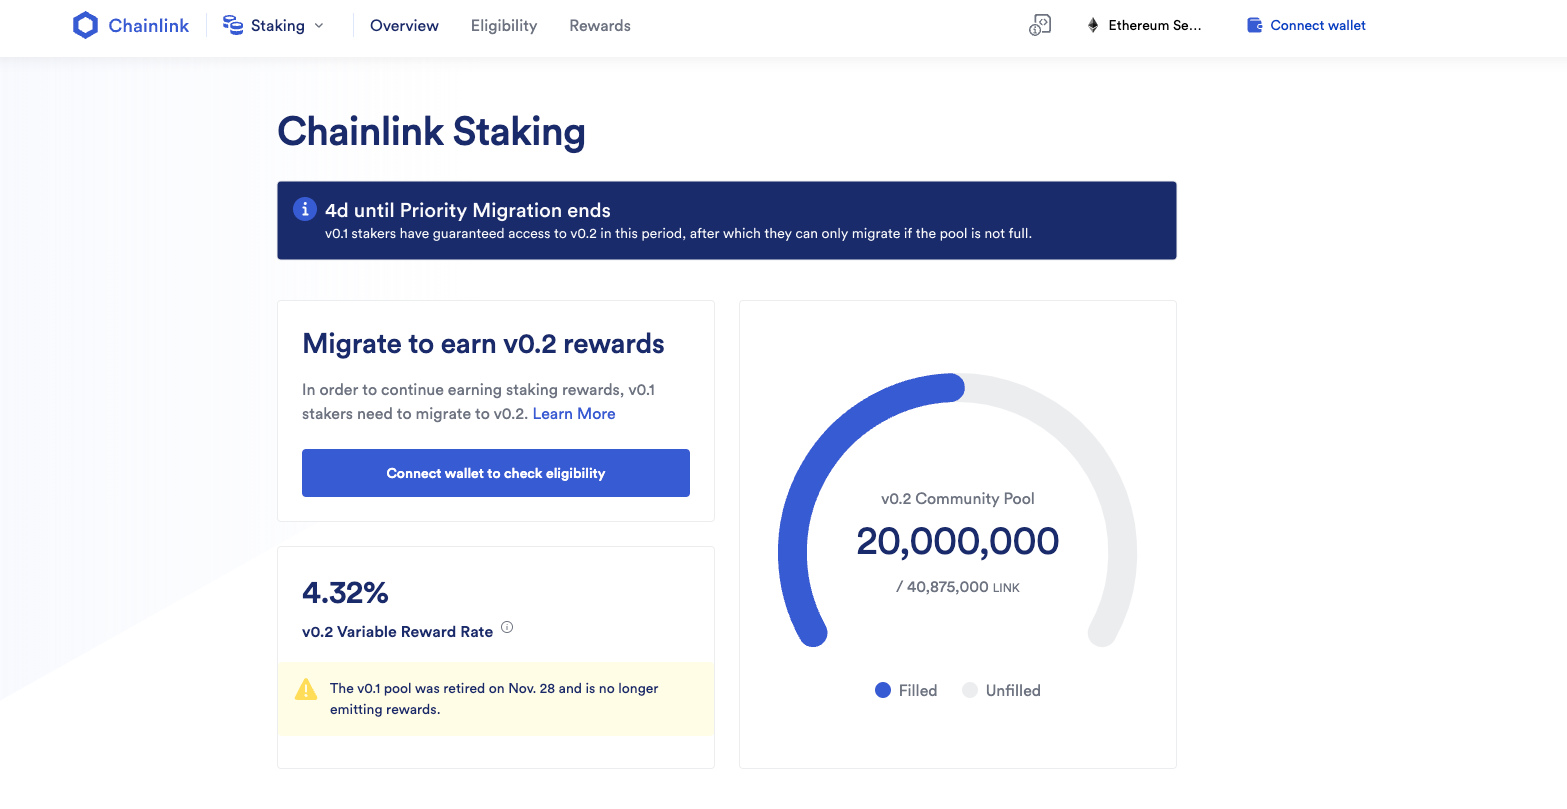
1. Go to the Chainlink Staking web page
Make sure to verify that the URL in your browser is the official Chainlink Staking website: https://staking.chain.link
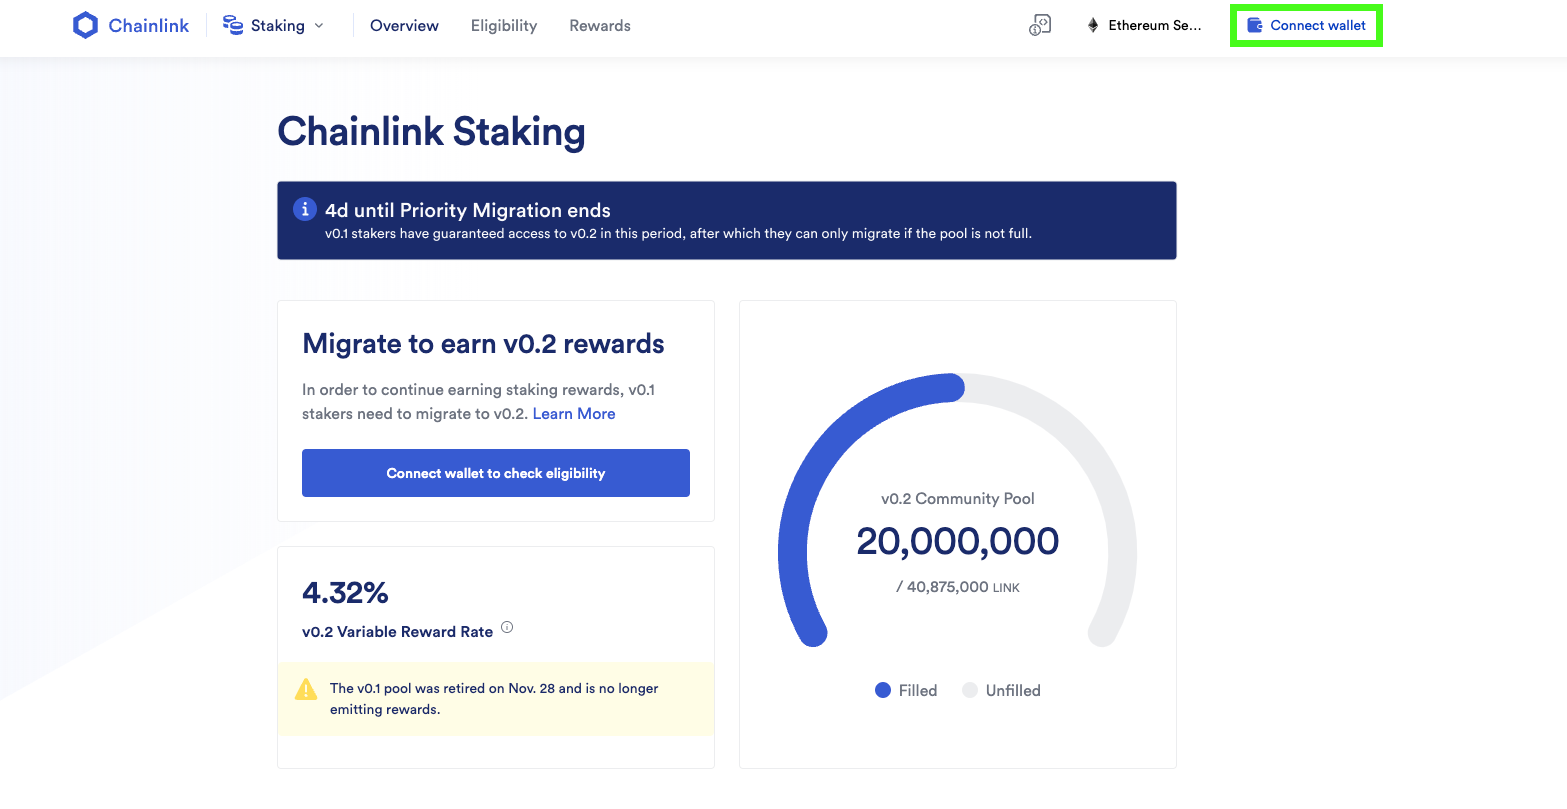
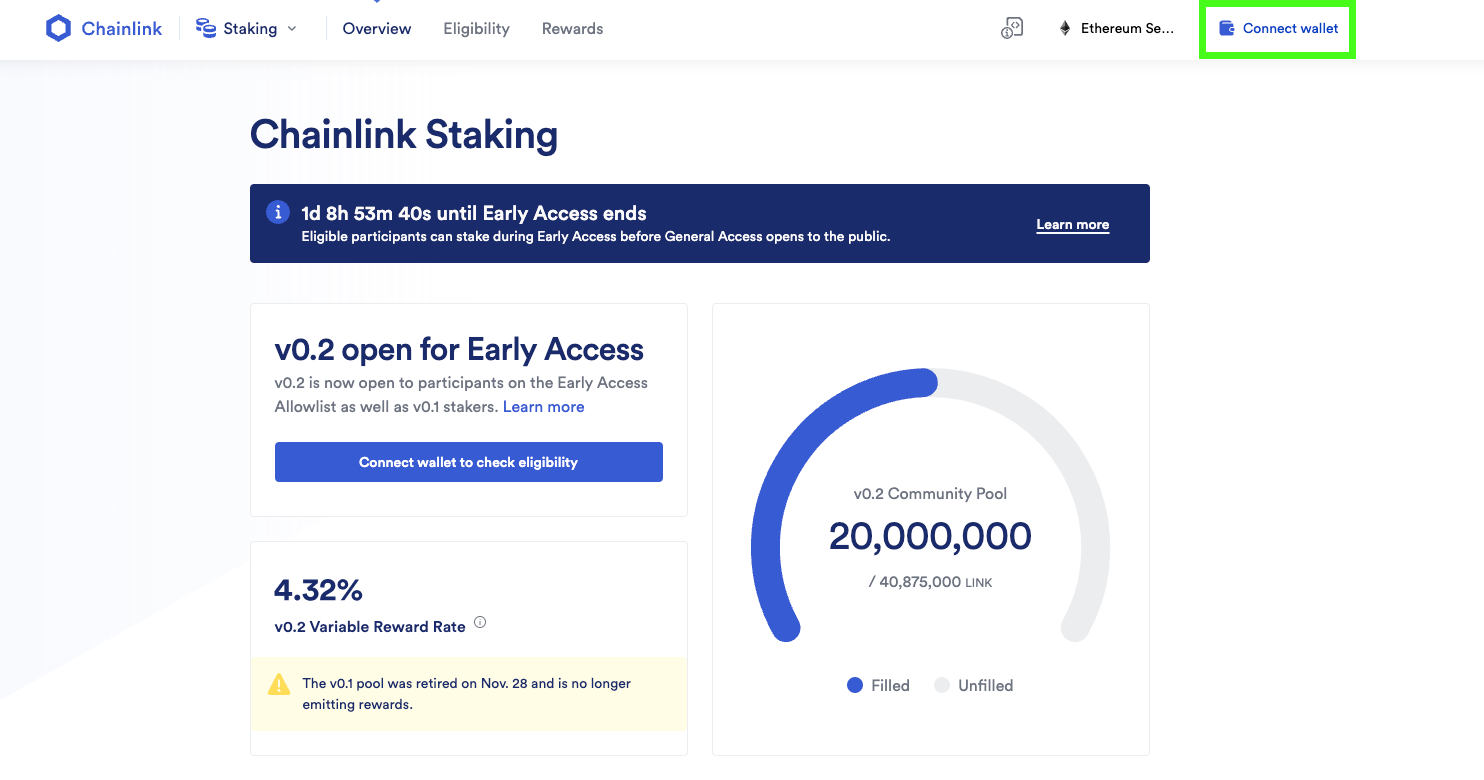
2. Click “Connect wallet”
Click the “Connect wallet” button at the top right of the page.
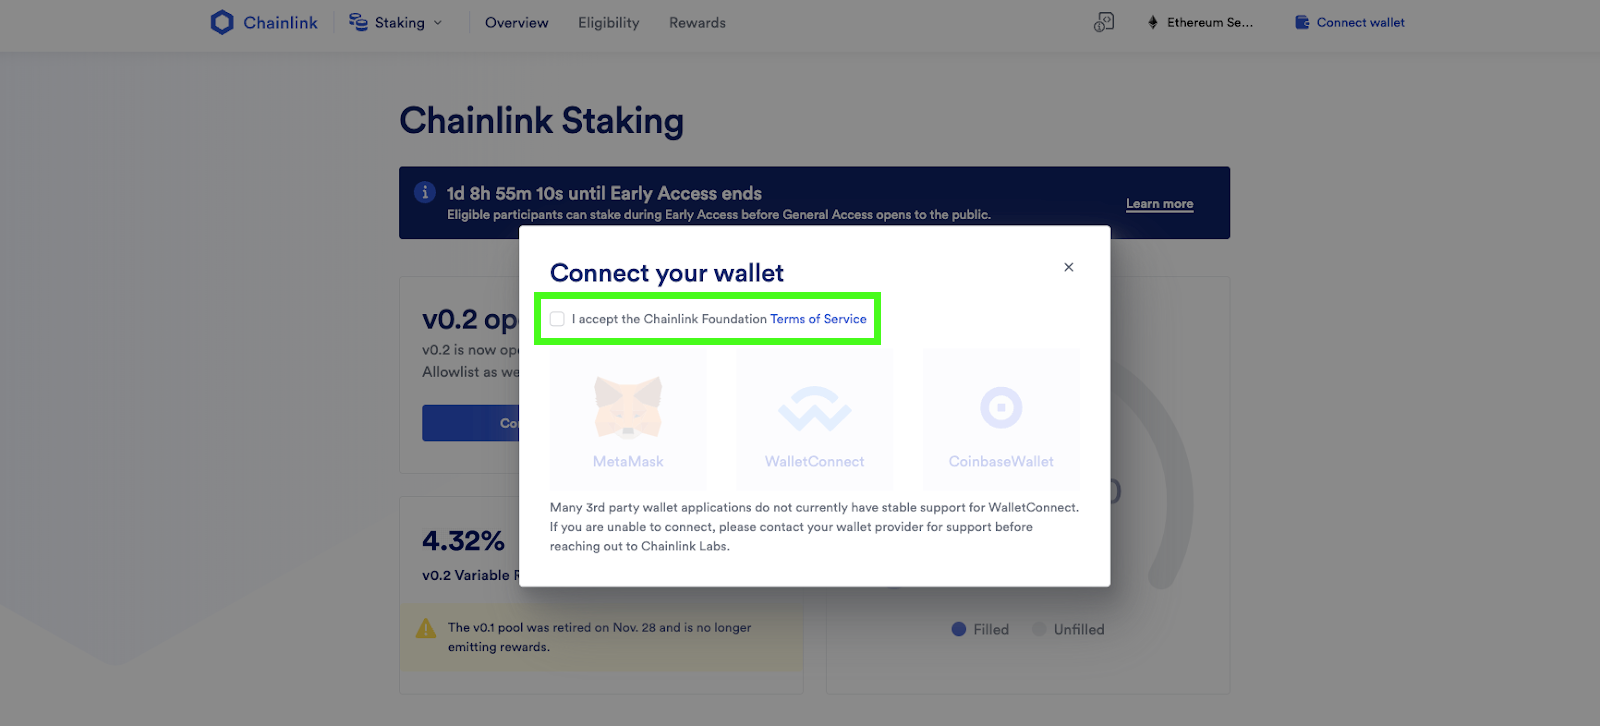
3. Accept the Terms of Service
Read the Terms of Service and then check accept.
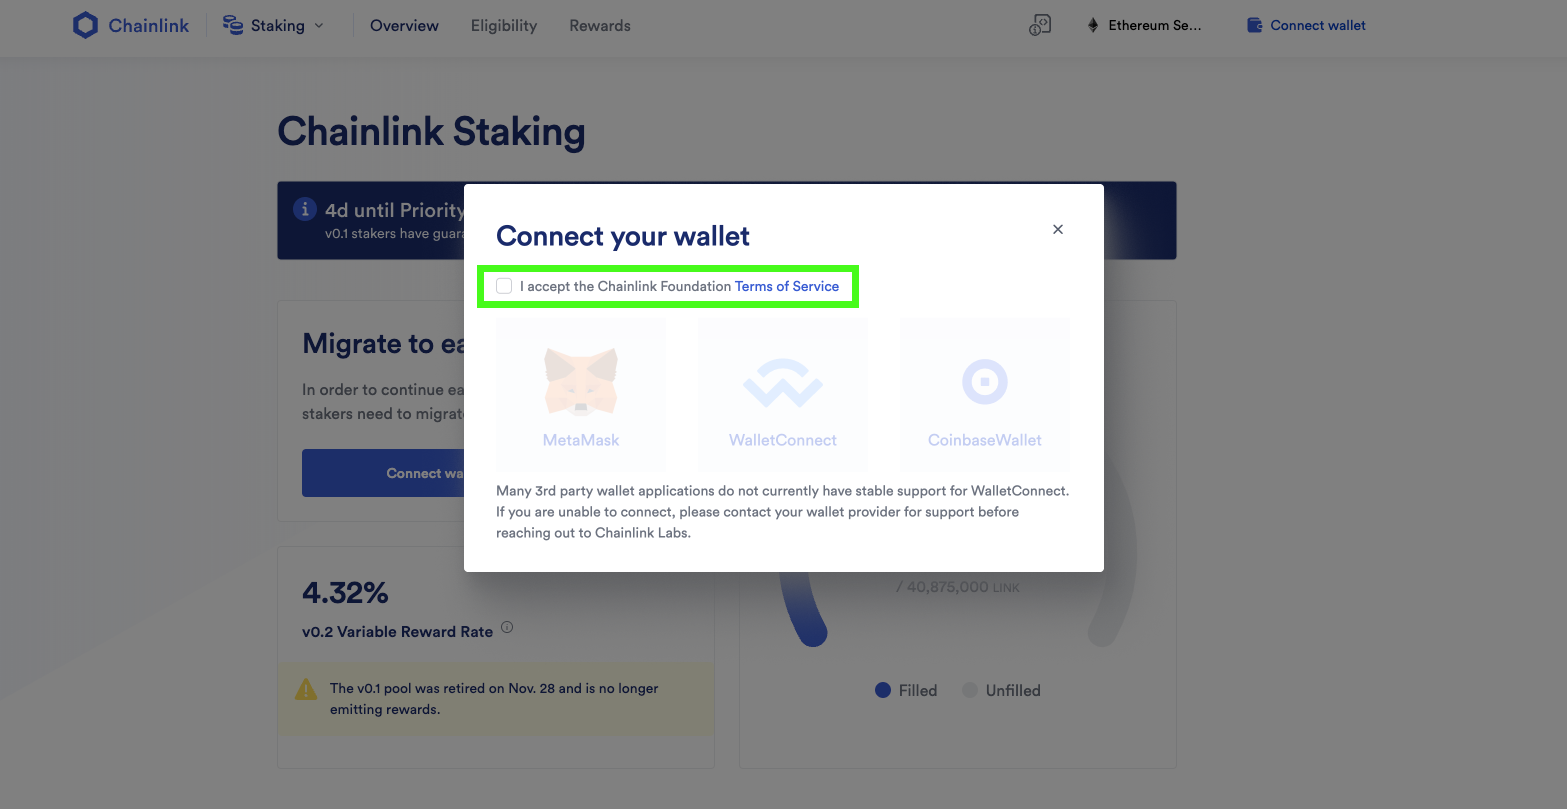
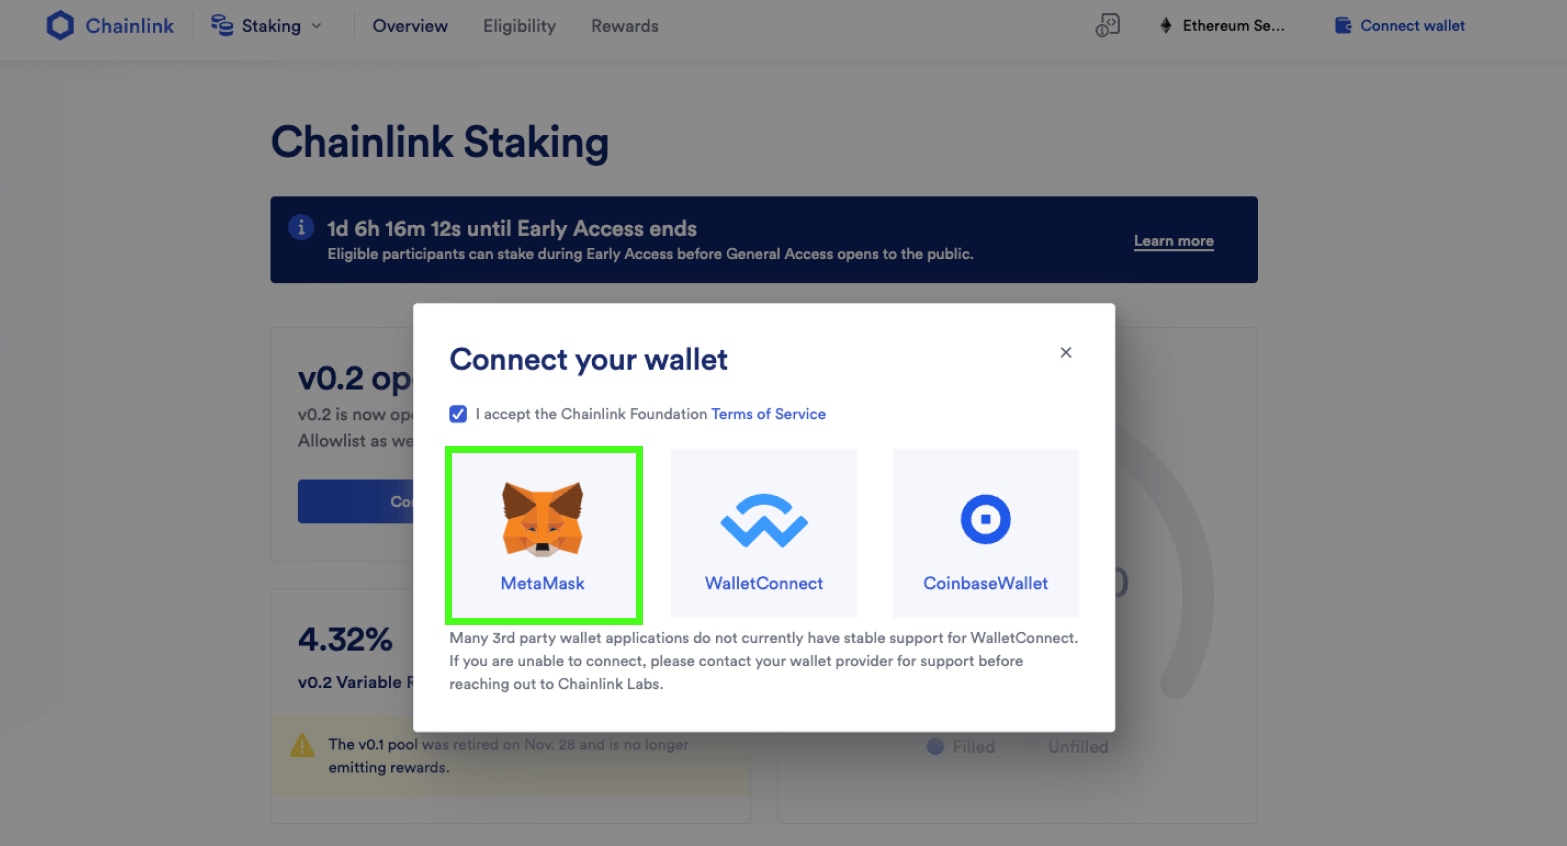
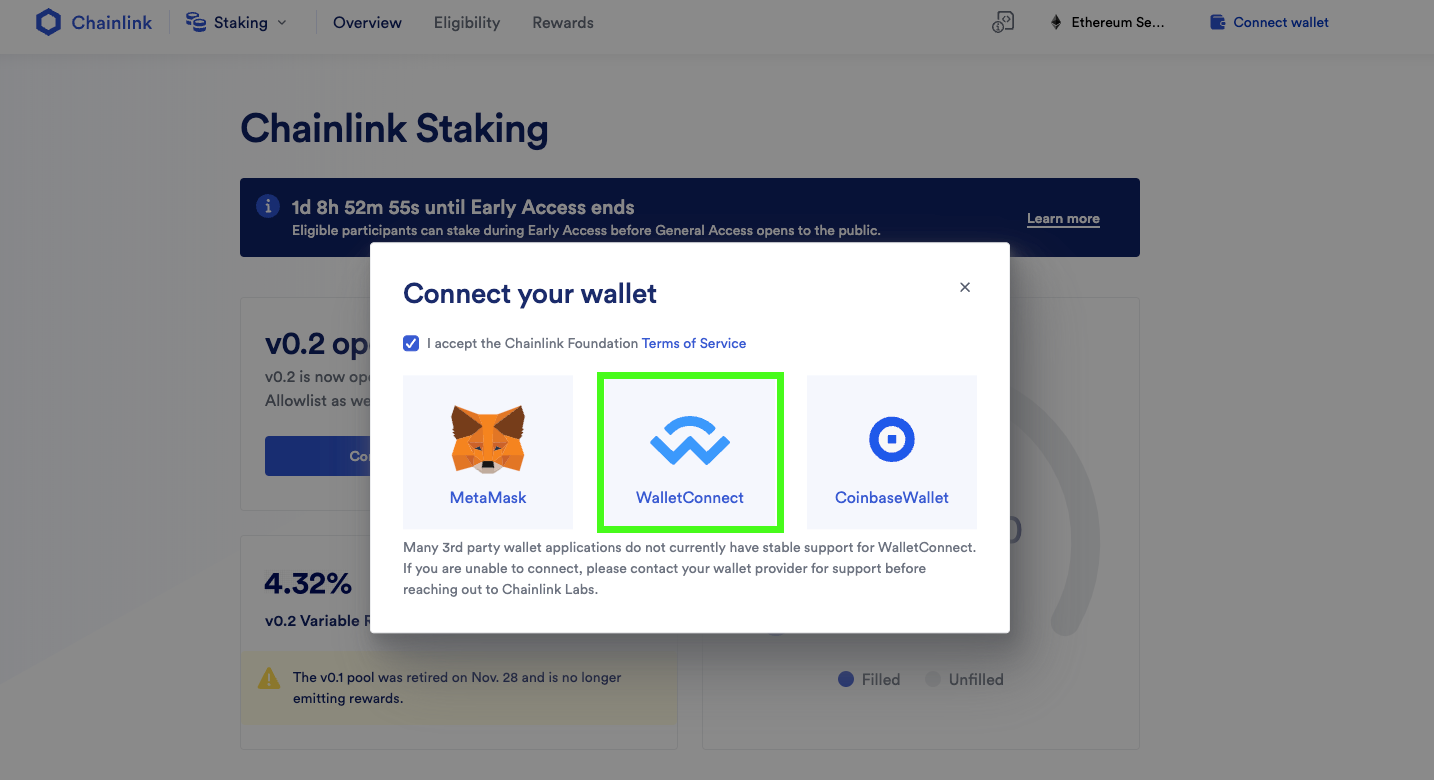
4. Choose your wallet
Choose the Web3 wallet that holds your LINK tokens and ETH. In this example, we’ll be using MetaMask.

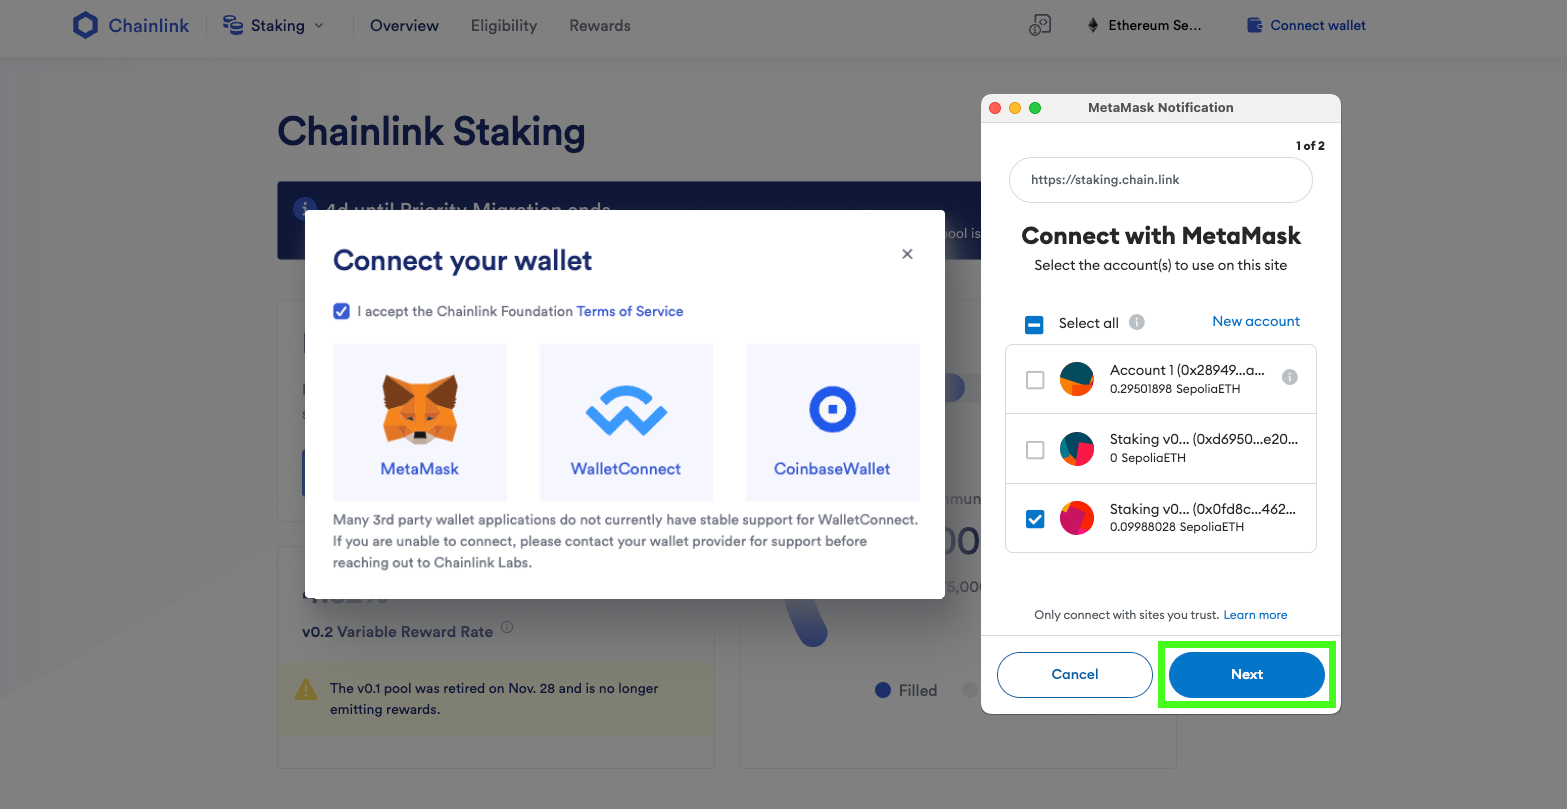
5. Choose your wallet account
If you have only one account, click the only option.
If you have more than one wallet connected to your MetaMask, click the wallet address that holds your LINK tokens and ETH.
Then press “Next.”
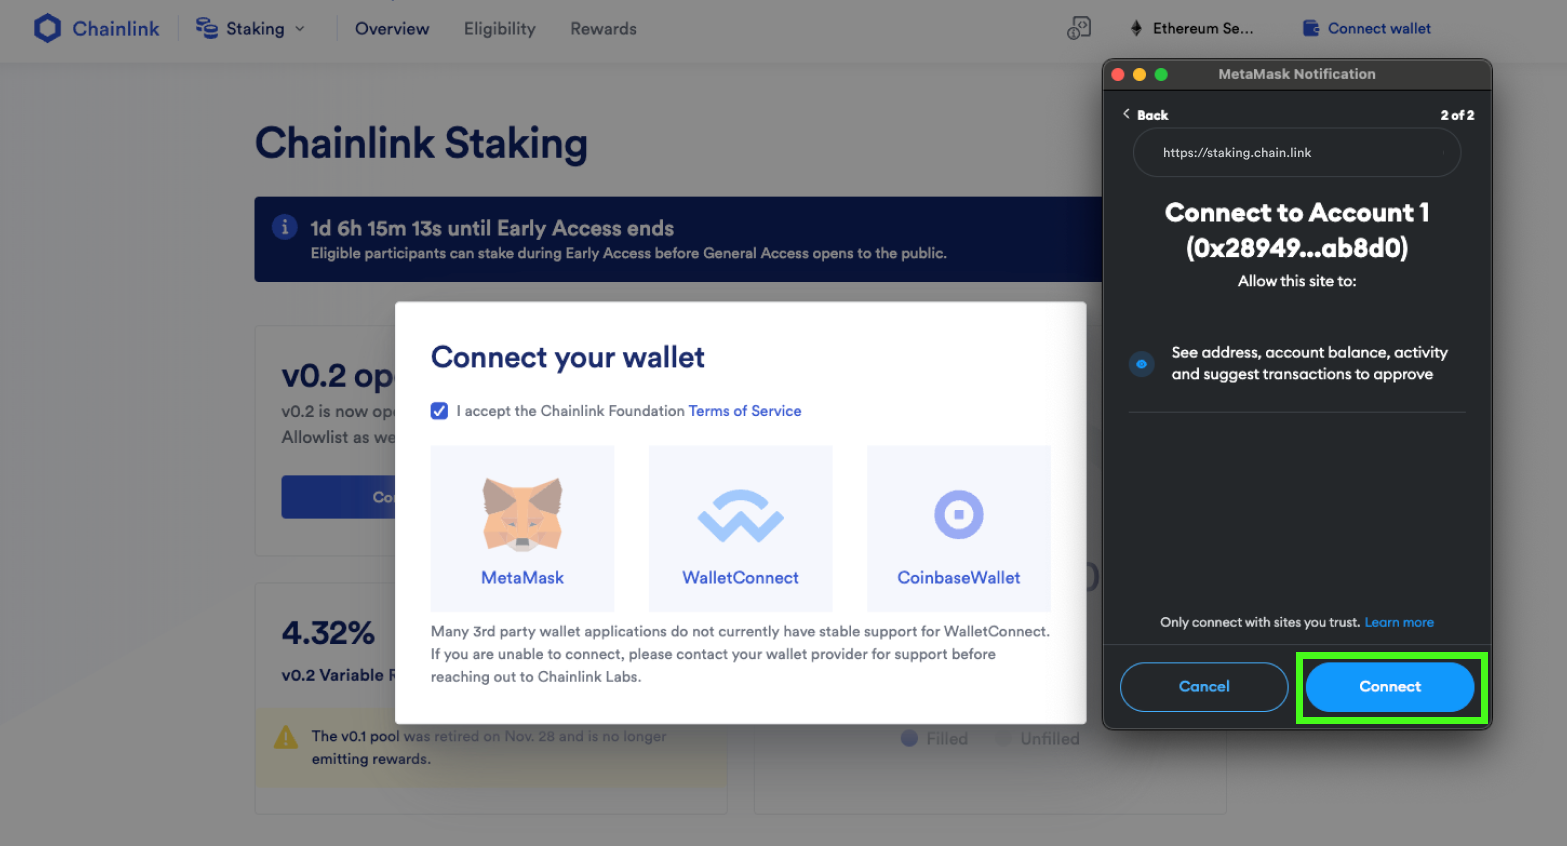
6. Press “Connect”
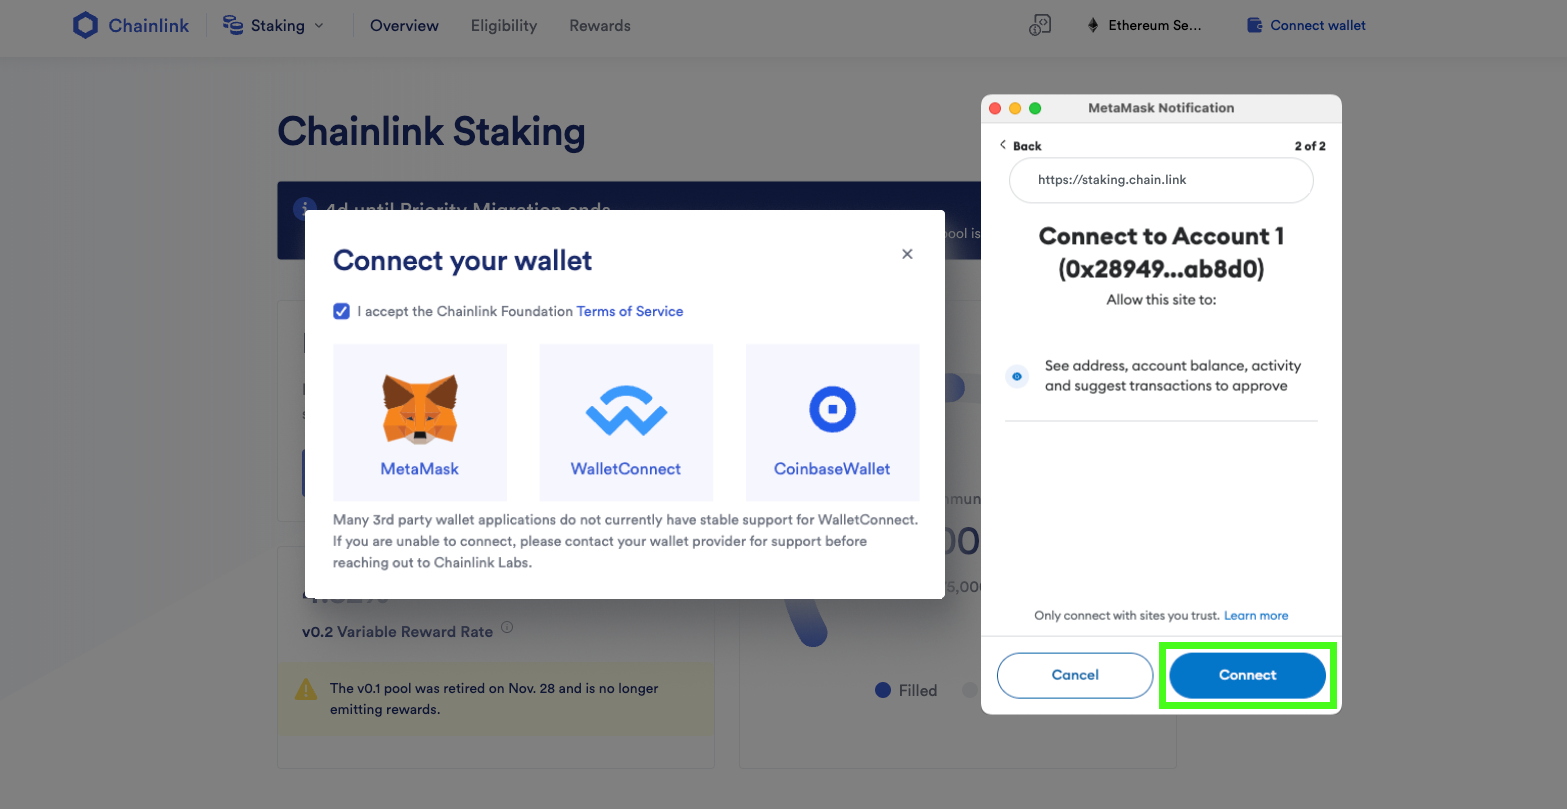
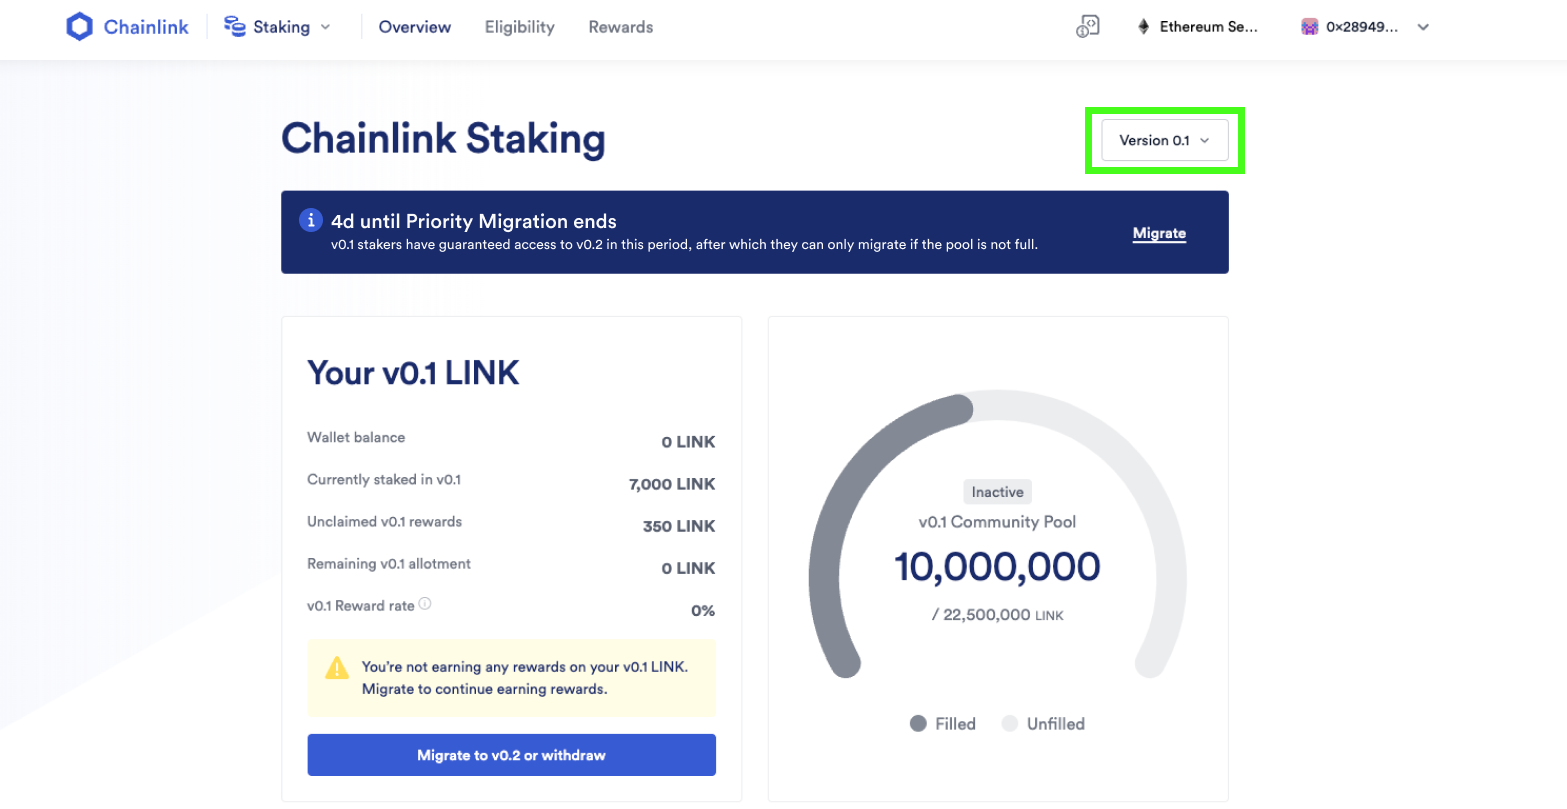
After this step, you should be returned to the Chainlink Staking web page, with your wallet address in the top-right corner.
You should also be able to see your wallet balance, how much LINK you currently have staked in v0.1, and your unclaimed rewards balance.
Note: Please verify that you’re on Version 0.1 in the dropdown menu on the top right of the Chainlink Staking page. If you’re not, press the dropdown menu and press Version 0.1.
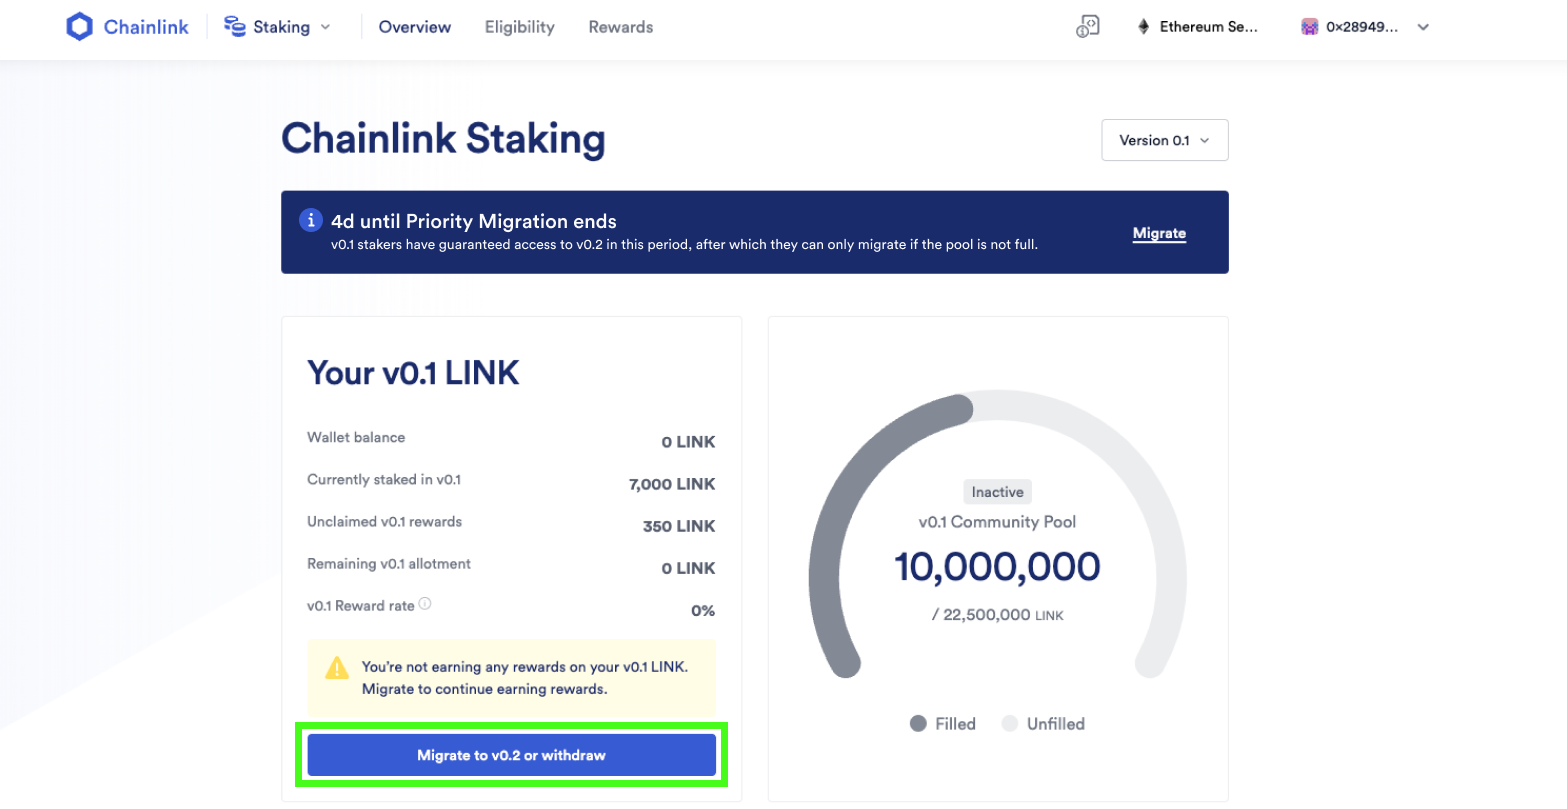
7. Press “Migrate to v0.2 or withdraw”
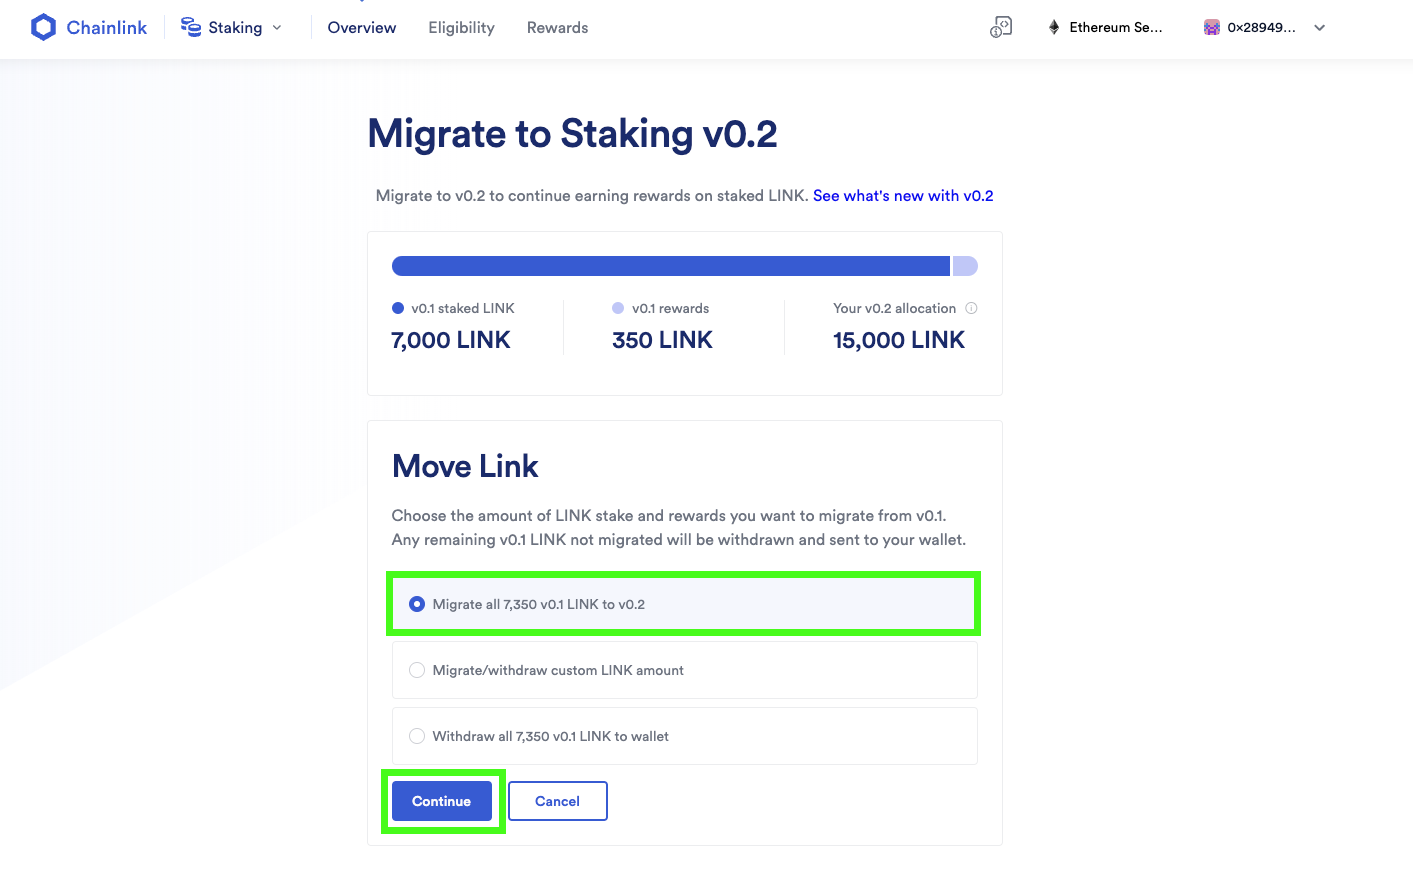
8. Choose from three options
- Option 1: Migrate all of your v0.1 staked LINK and accrued rewards.
- Option 2: Migrate a portion of your v0.1 staked LINK and accrued rewards. Note that if you choose this option, all non-migrated v0.1 staked LINK and rewards will be automatically withdrawn to your wallet.
- Option 3: Withdraw all of your v0.1 staked LINK and accrued rewards.
For this tutorial, we will be migrating all of our v0.1 staked LINK and accrued rewards by clicking on the circle next to “Migrate all 7,350 v0.1 LINK to v0.2.”
Then click “Continue.”
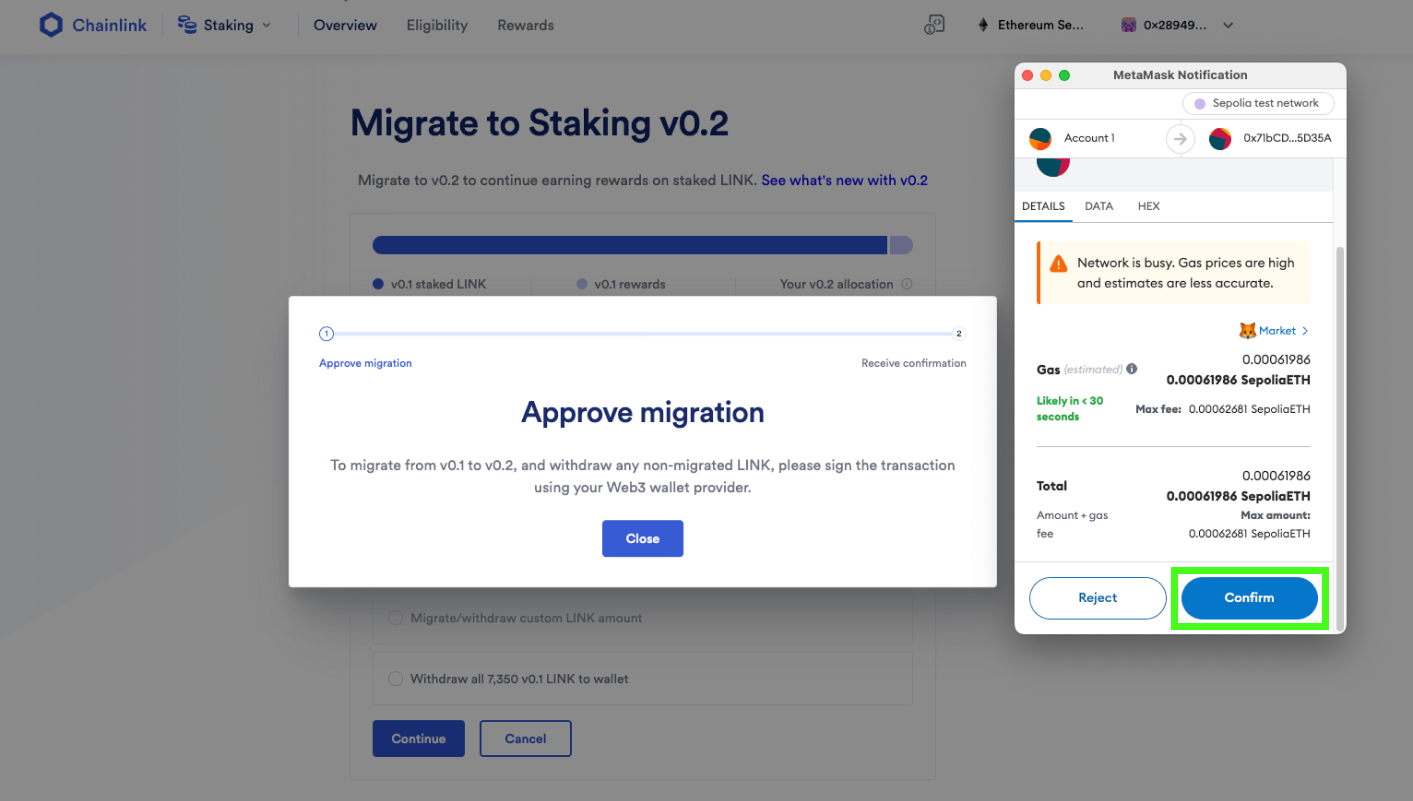
9. Press “Confirm”
A Web3 wallet popup should automatically appear on your screen. If you don’t see a popup, click on your wallet’s extension icon in the browser extension dropdown menu. Verify the transaction fee amount before pressing “Confirm” to continue. The amount of ETH spent on network transaction fees will depend on network resource availability on Ethereum mainnet at the time of transaction.
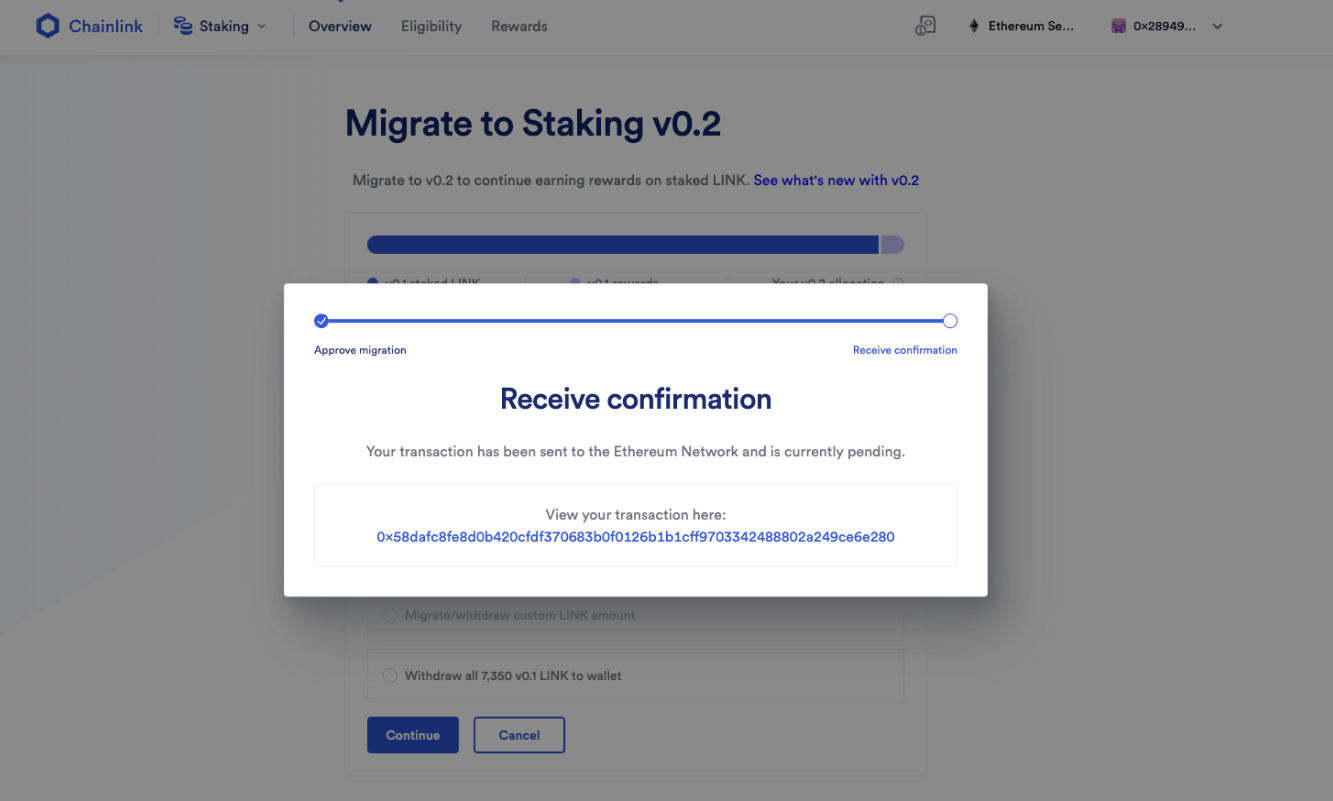
10. Wait for confirmation
You should see the following popup on the screen, which provides a link to Etherscan for the pending transaction. Please wait for the Ethereum network to receive and confirm your transaction.
If the transaction fee was too low for current Ethereum network conditions, the transaction may take longer than expected to process. In many Web3 wallets, such as MetaMask, you can increase the transaction fee amount to speed up the process.
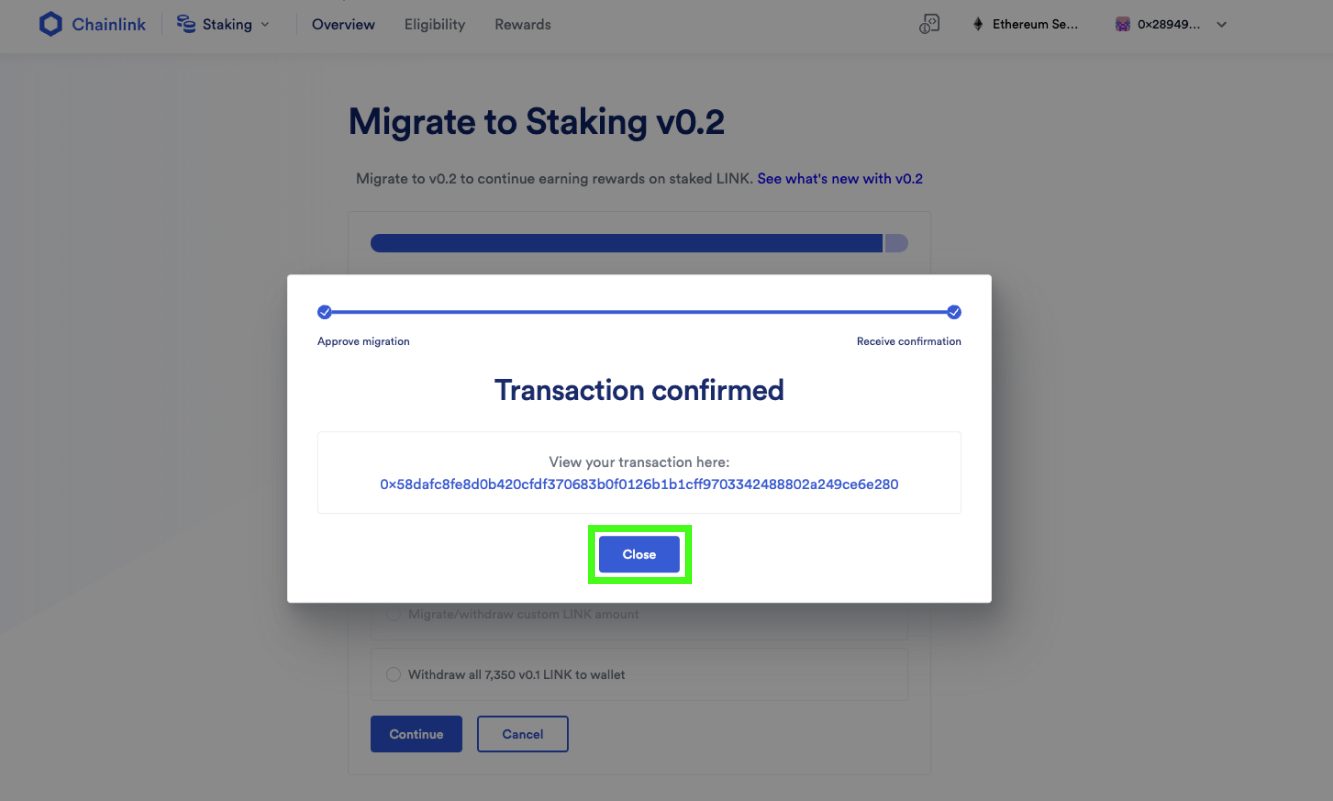
After the Ethereum network confirms the transaction, the popup will automatically update to the below. Click the button to continue.
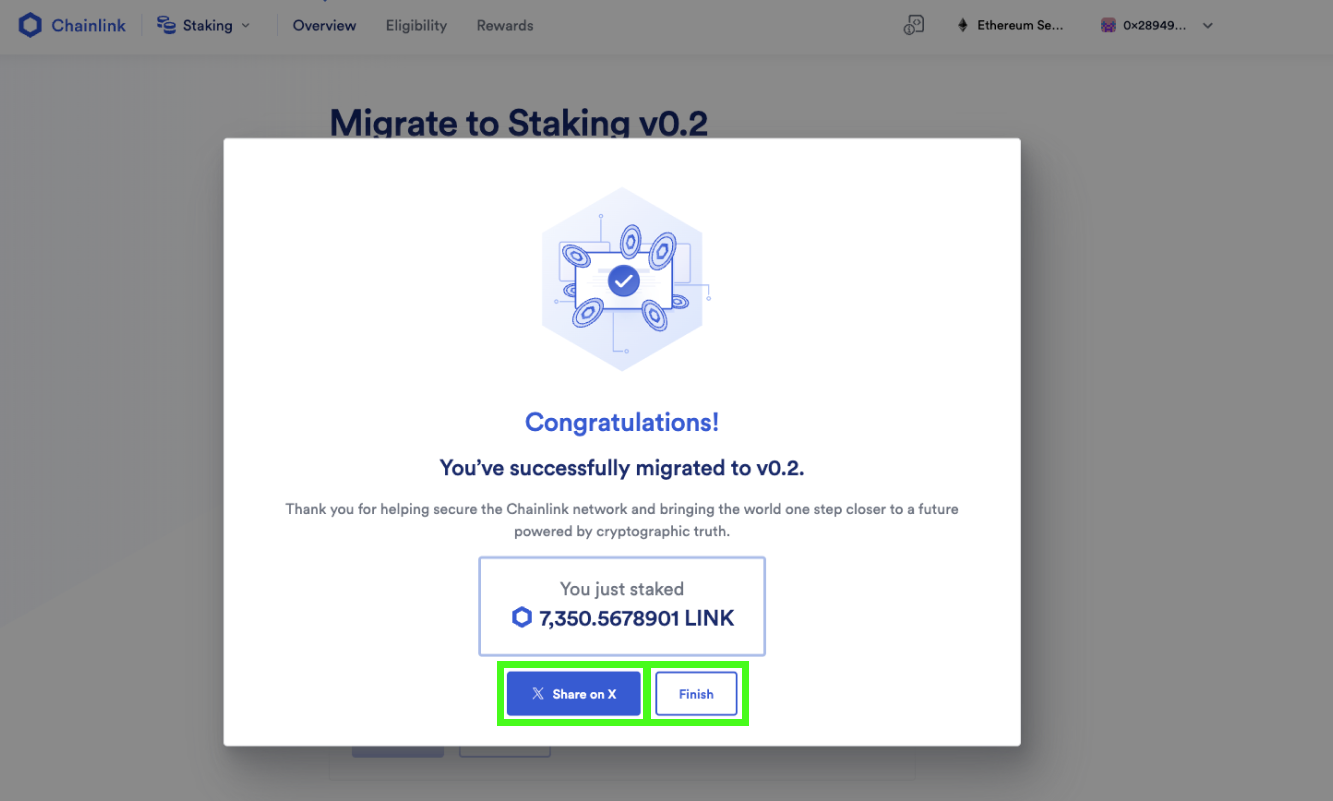
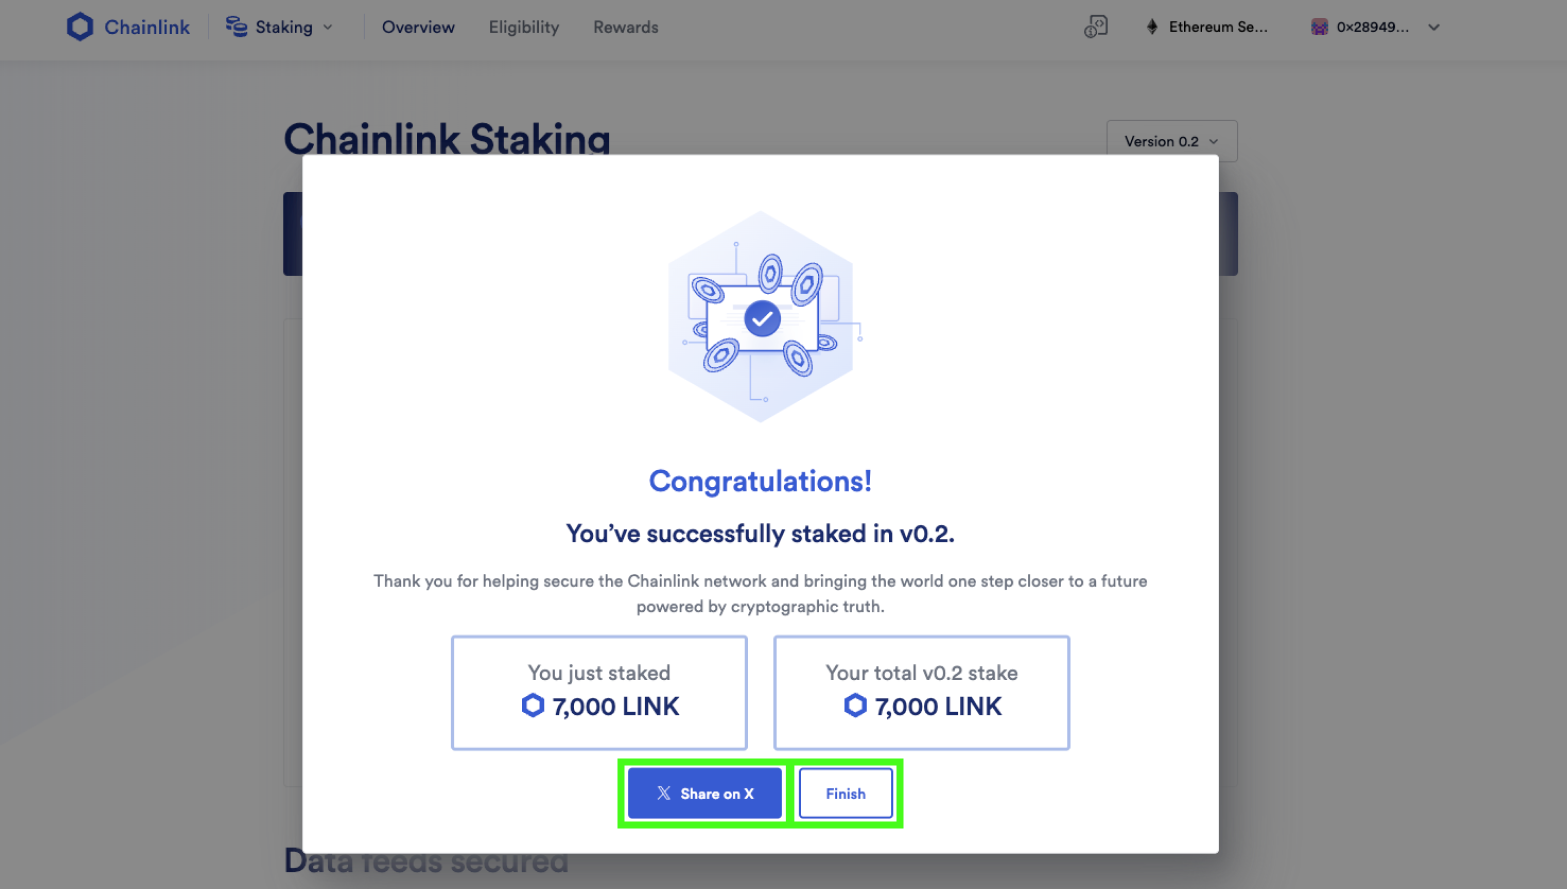
11. Share on X and press “Finish”
Congratulations! You’ve successfully migrated your v0.1 staked LINK and accrued rewards to v0.2.
If you want to share your participation on social media, you can press the “Share on X” button to let your friends and community know that you are now helping secure the Chainlink Network as a Community Staker.
Then click “Finish.”
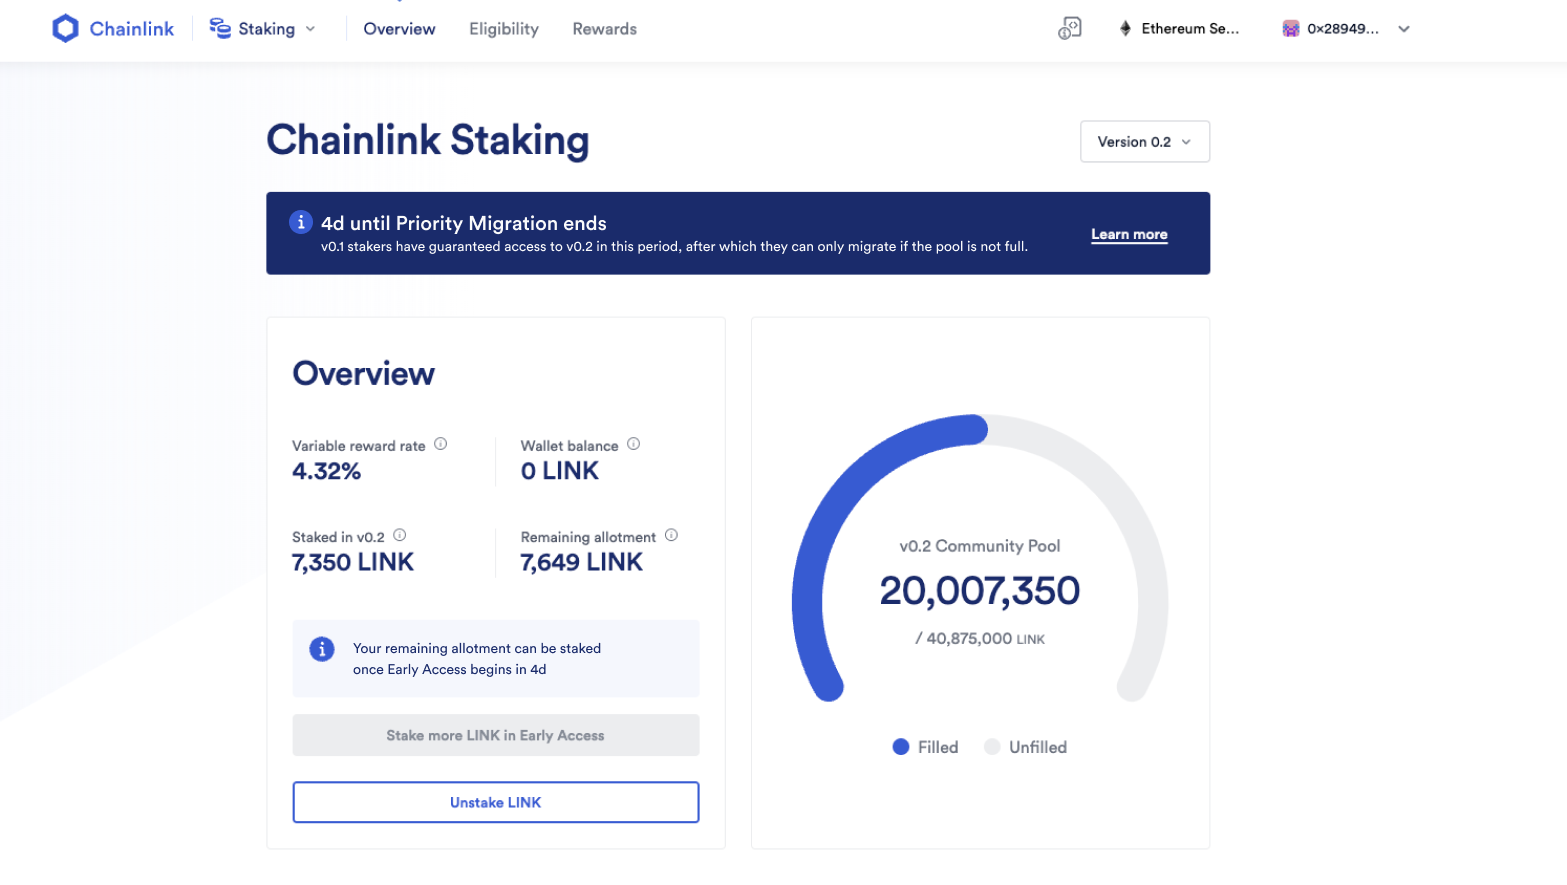
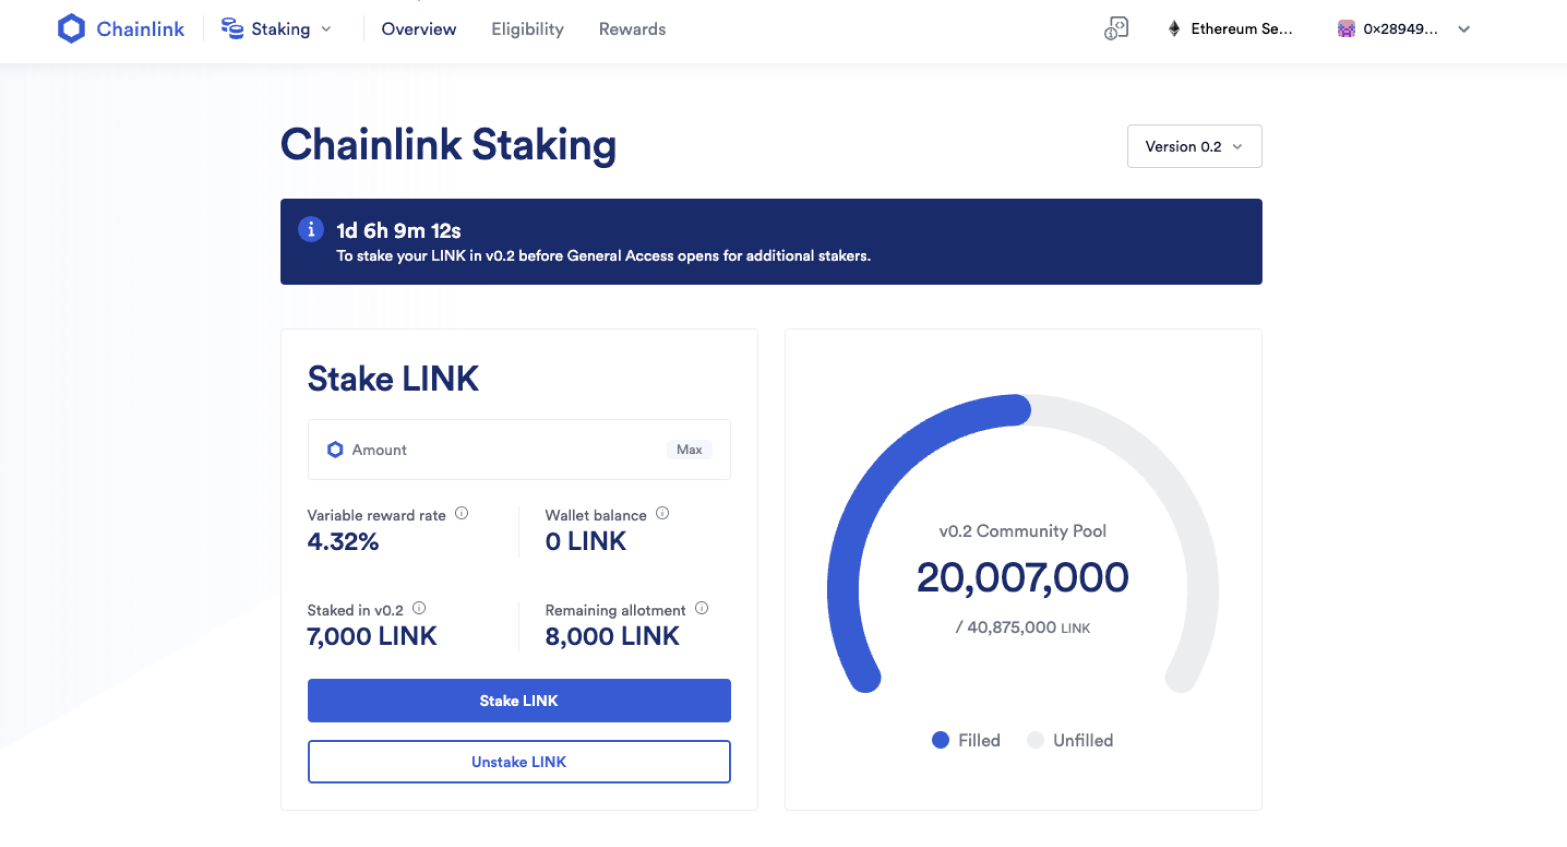
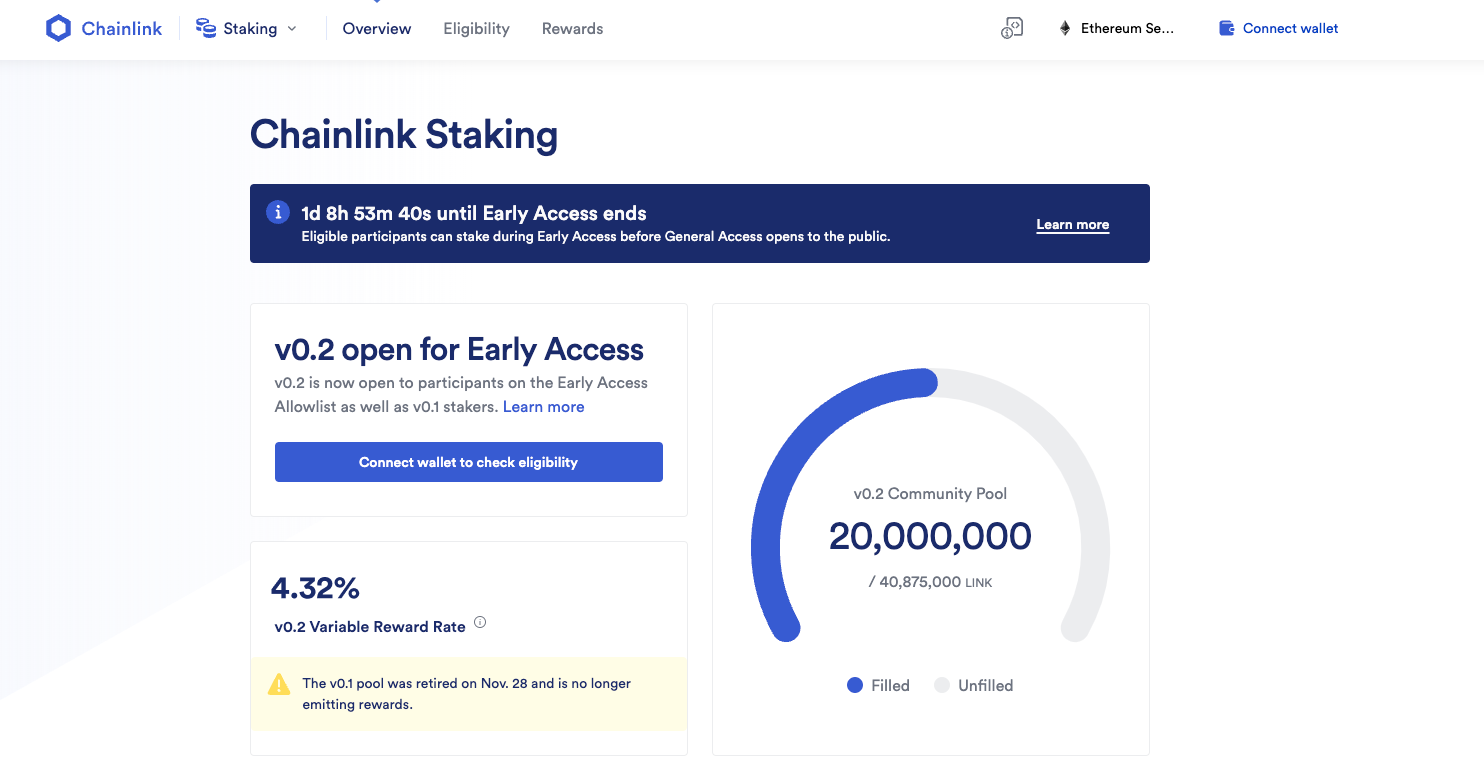
12. Explore the Staking UI
Explore the Chainlink Staking UI for more information on reward rates, the v0.2 Community Pool fill rate, and more. Note that this screenshot is based on a pre-production build of the Staking v0.2 interface using placeholder parameters.
If you’d like to stake additional LINK during the Early Access or General Access phase, continue reading for tutorials on how to stake LINK.
How To Stake LINK
Note: These tutorials are based on a pre-production build of the Chainlink Staking v0.2 Interface using the Ethereum Sepolia testnet with placeholder values. The screenshots are for demonstration purposes only. While these tutorials accurately reflect the staking process, the specific staking parameters, gas fees, and user interface (UI) elements shown below may differ from the interface deployed for the mainnet implementation of Chainlink Staking v0.2. For more information on Staking v0.2 parameters, read this blog.
Video Tutorial
Step-by-Step Tutorial
For this tutorial, we will showcase how to stake LINK in v0.2 using a MetaMask wallet, but the process should look similar for other Web3 wallets.
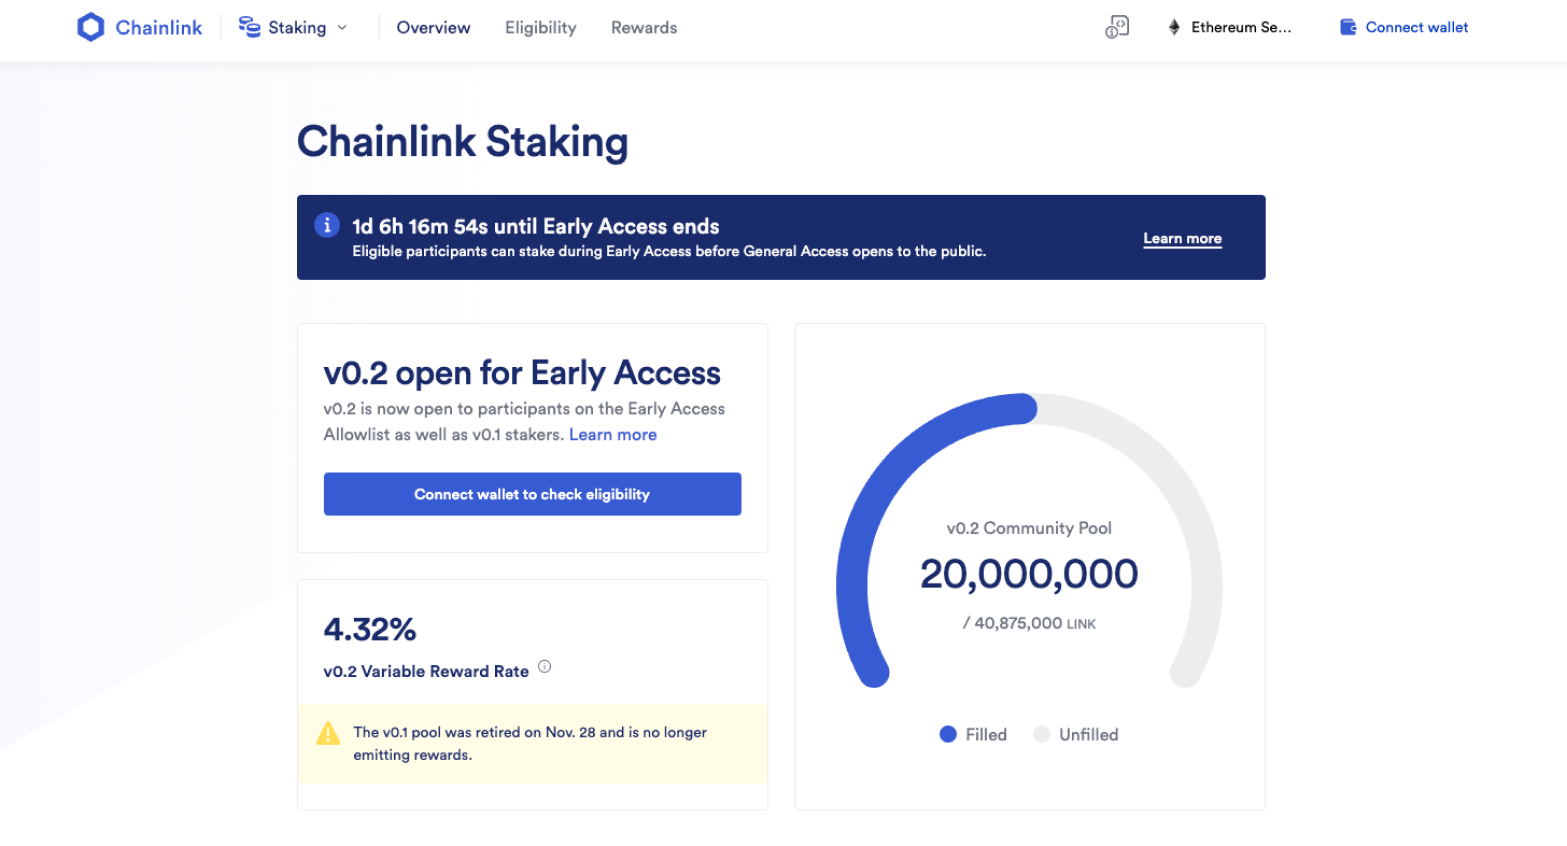
1. Go to the Chainlink Staking web page
Make sure to verify that the URL in your browser is the official Chainlink Staking website: https://staking.chain.link
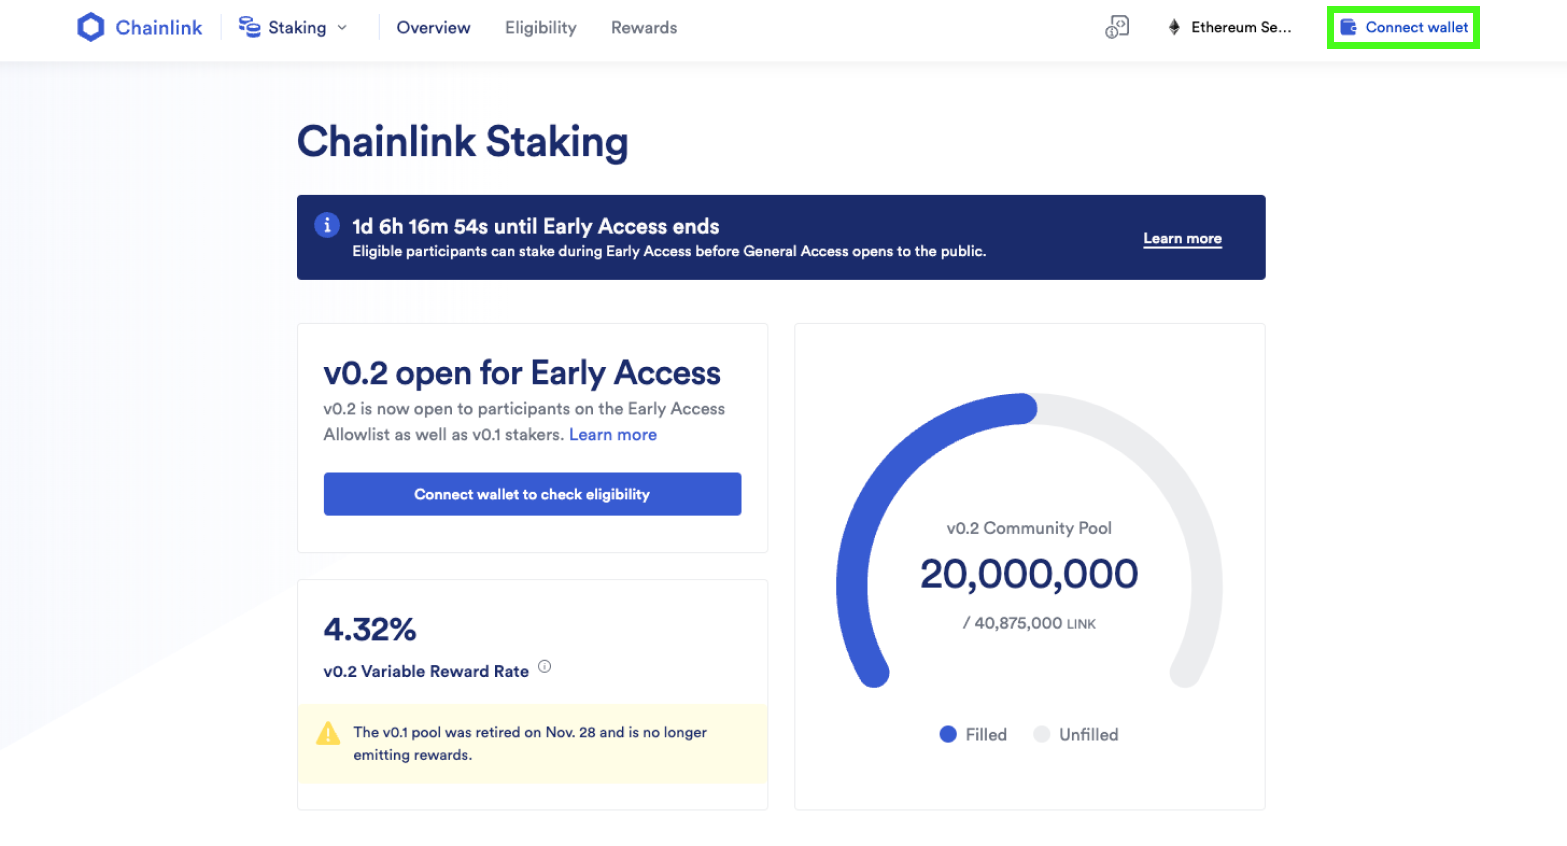
2. Click “Connect wallet”
Click the “Connect wallet” button at the top right of the page.
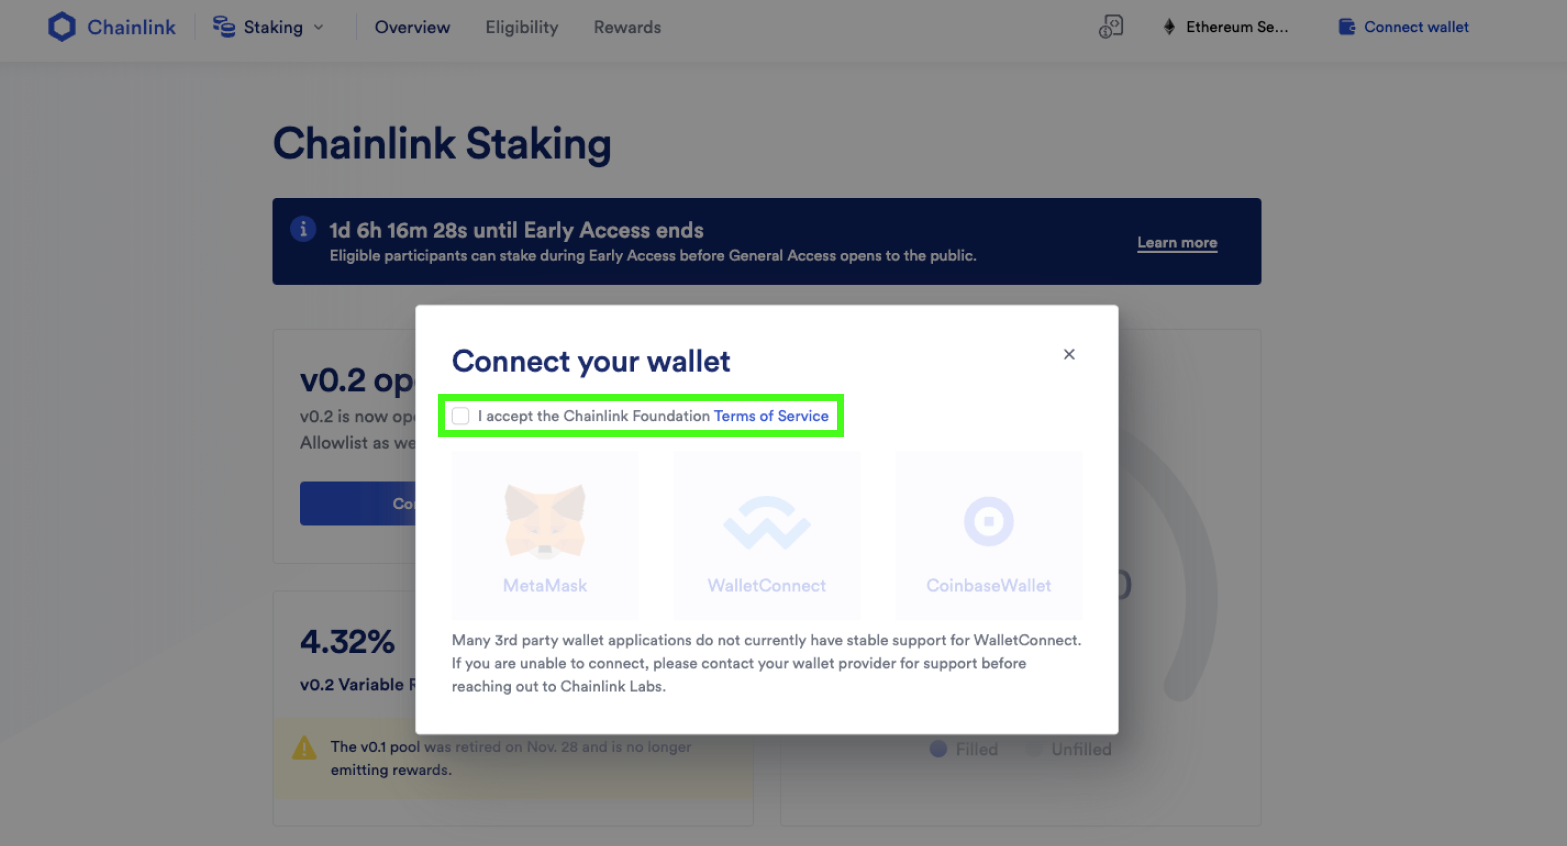
3. Accept the Terms of Service
Read the Terms of Service and then check accept.
4. Choose your wallet
Choose the Web3 wallet that holds your LINK tokens and ETH. In this example, we’ll be using MetaMask.
5. Choose your wallet account
If you have only one account, click the only option.
If you have more than one wallet connected to your MetaMask, click the wallet address that holds your LINK tokens and ETH.
Then press “Next.”

6. Press “Connect”
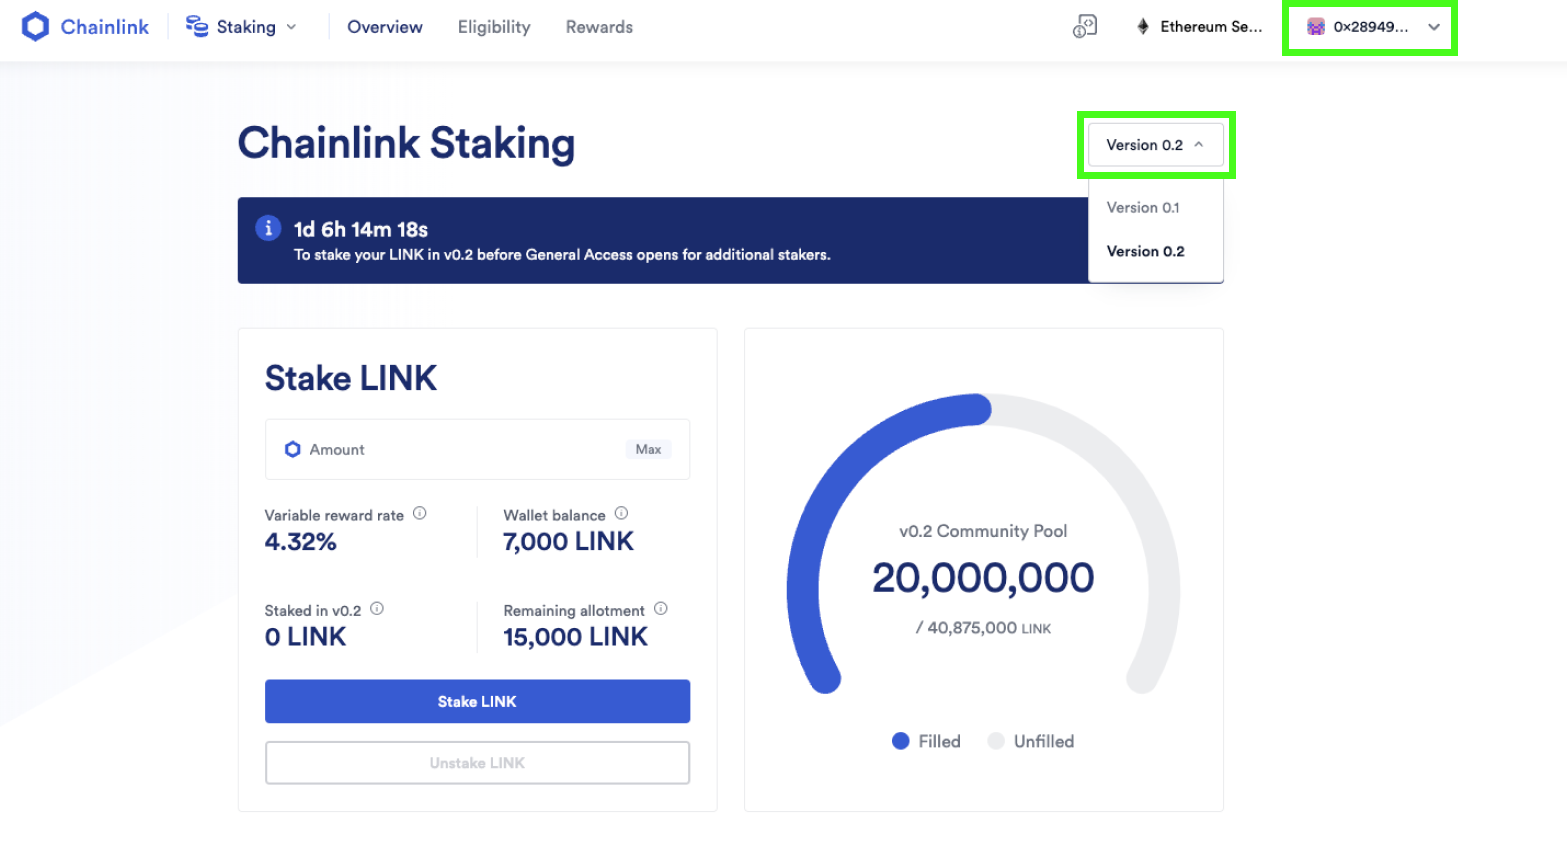
After this step, you should be returned to the Chainlink Staking web page, with your wallet address in the top-right corner. You should also be able to see your wallet balance, remaining allotment, variable reward rate, and more.
Note: Please verify that you’re on Version 0.2 in the dropdown menu on the top right of the Chainlink Staking page. If you’re not, press the dropdown menu and press Version 0.2.
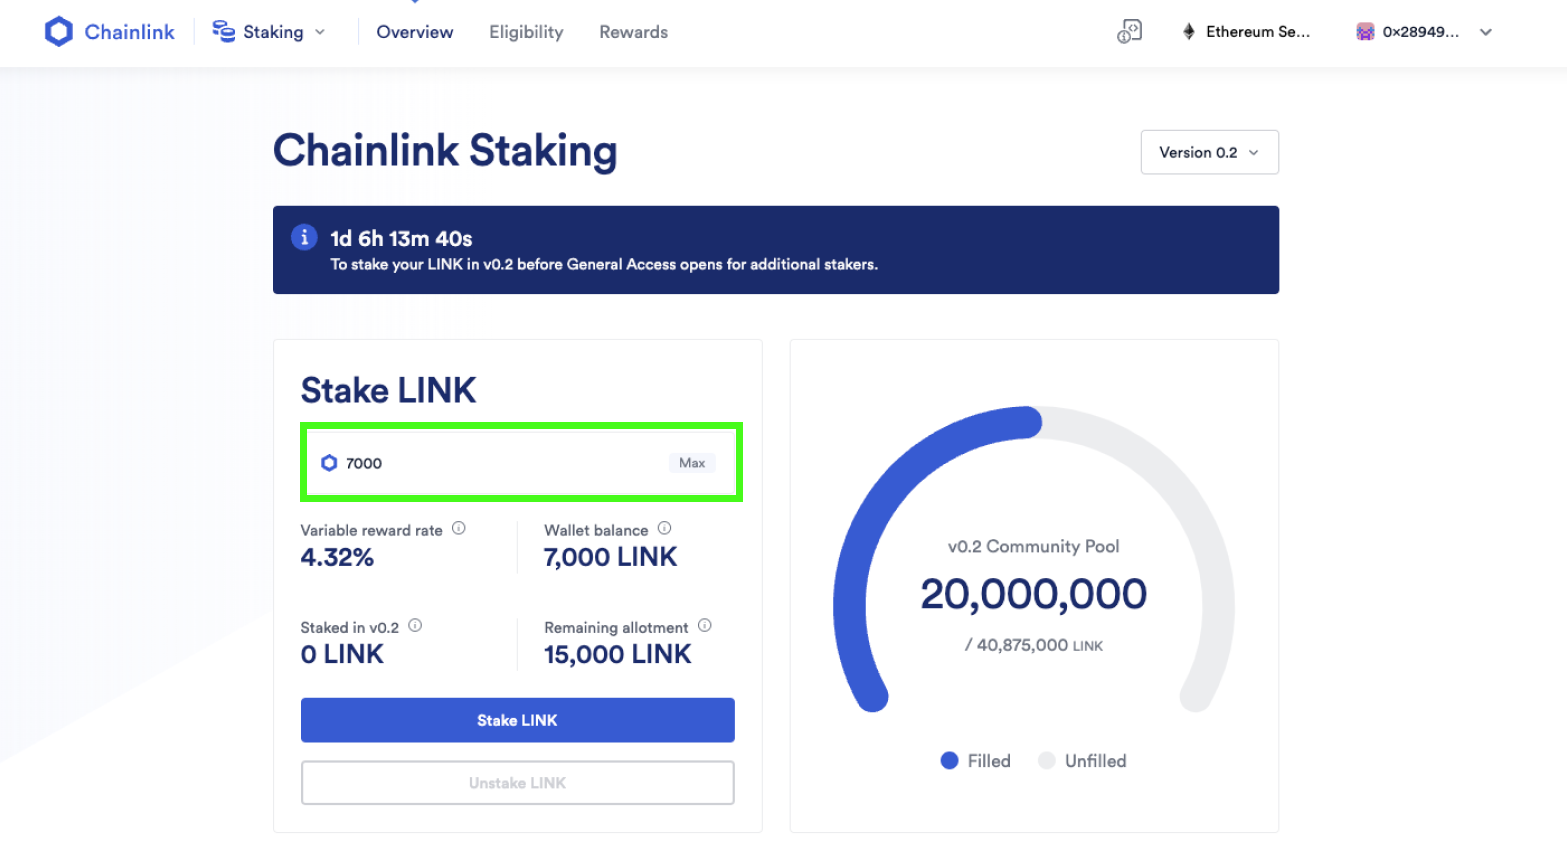
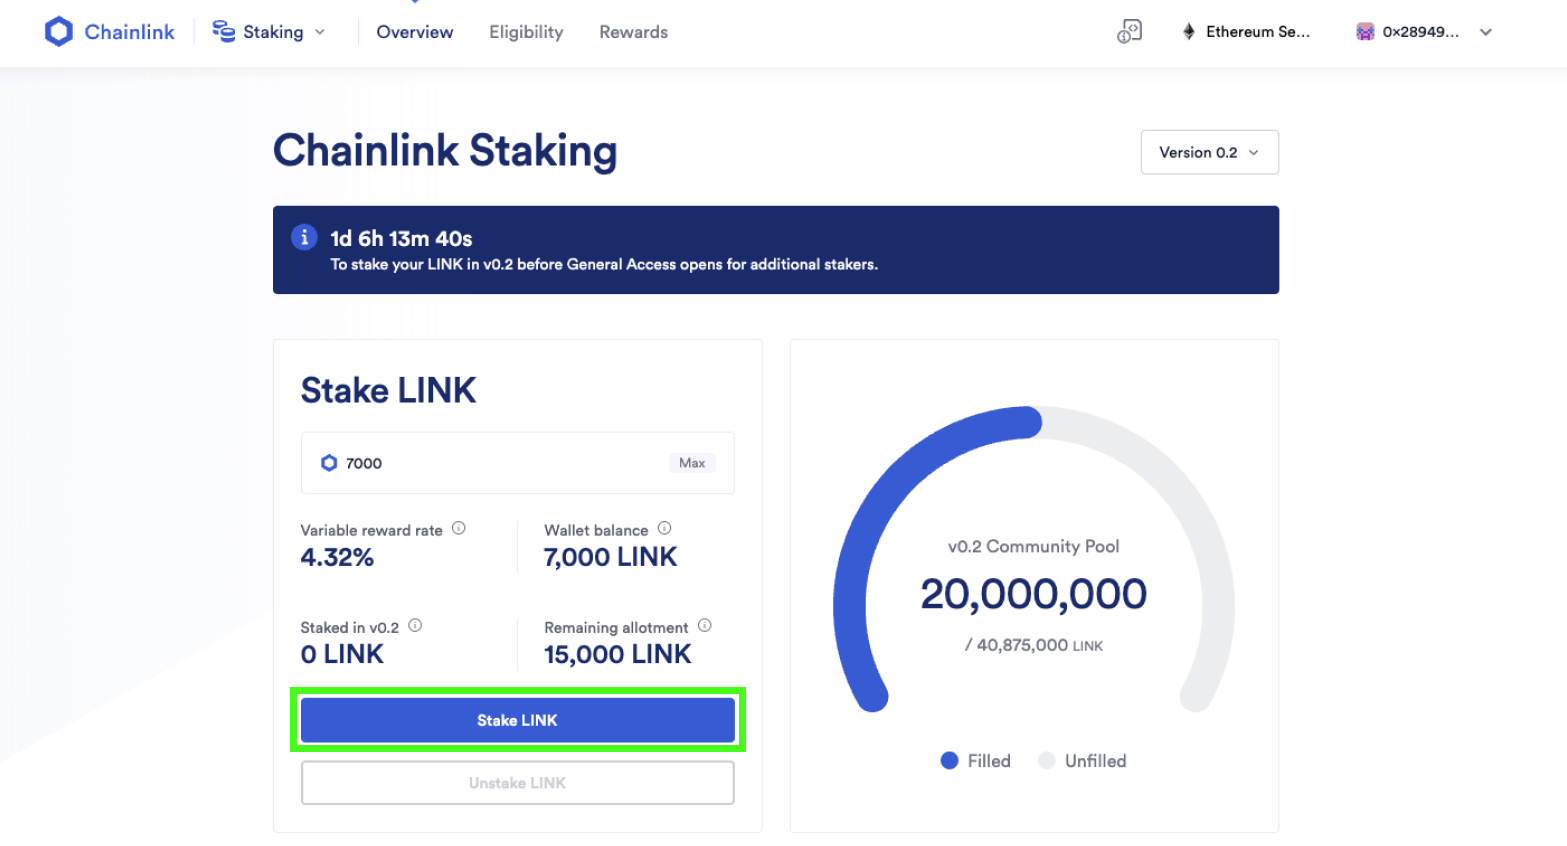
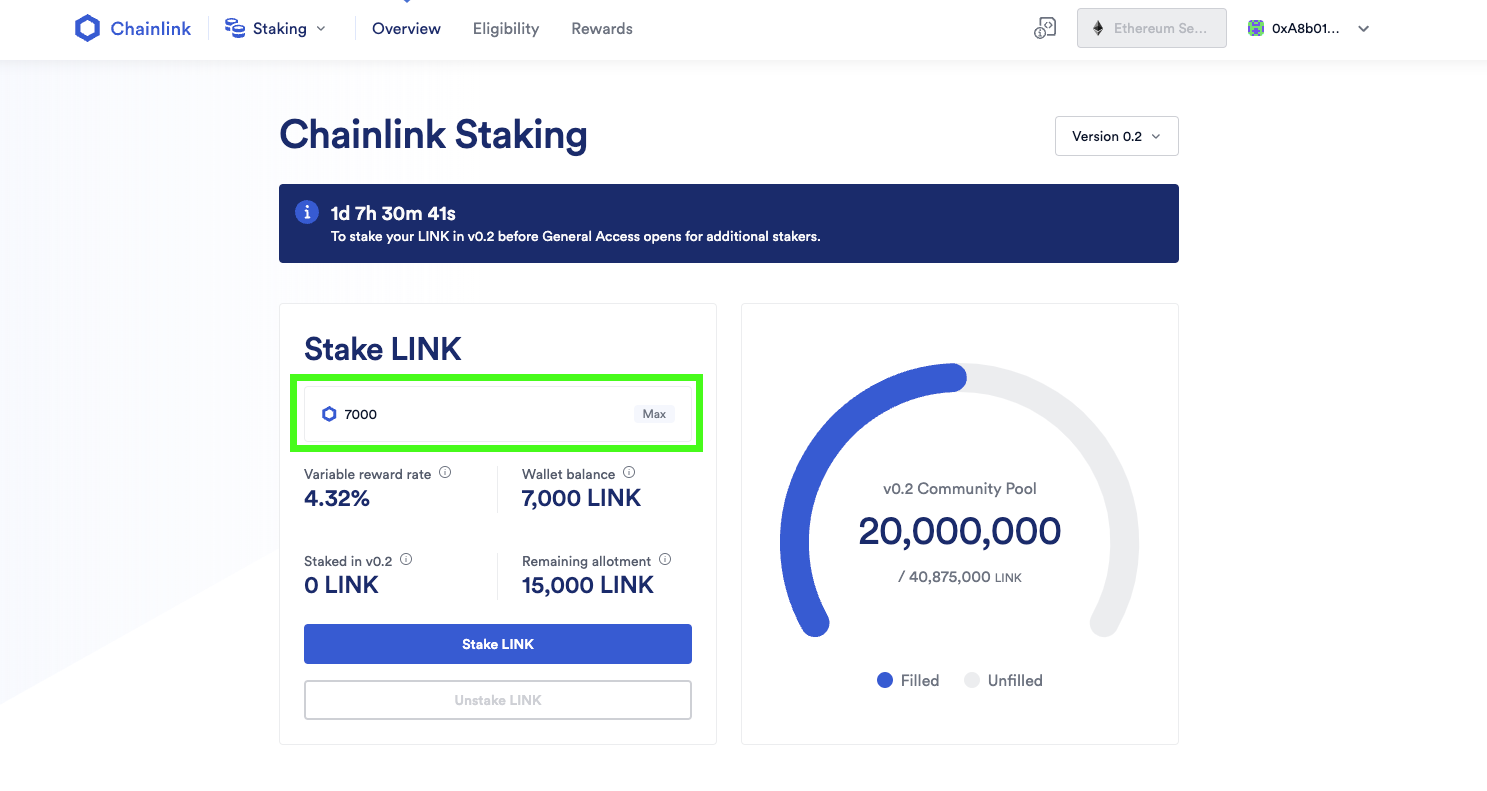
7. Enter your staking amount
In the text entry box, input the amount of LINK you’d like to stake. If you plan on staking all the LINK in your wallet, up to the per-address maximum, press “Max.”
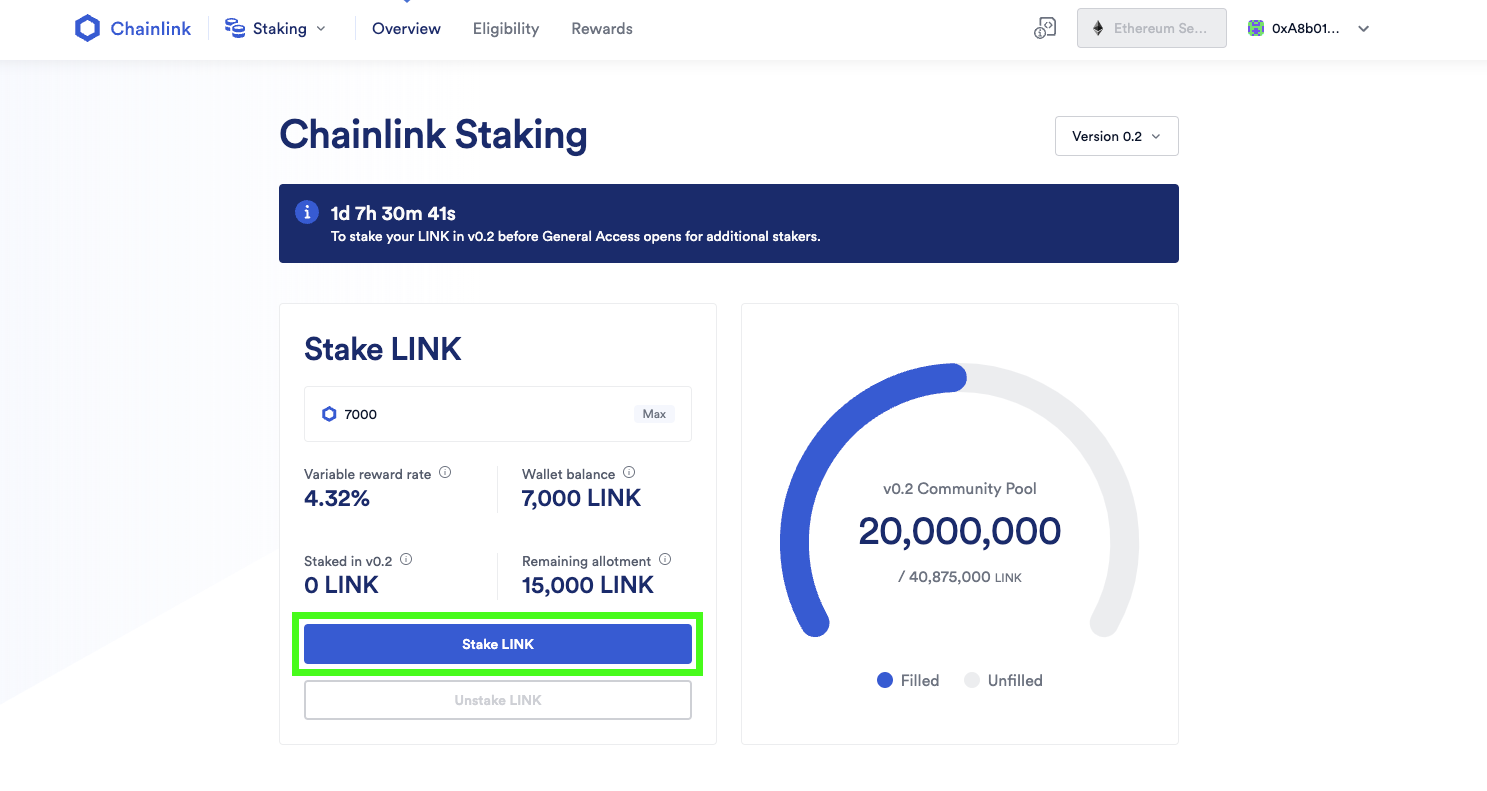
8. Click the “Stake LINK” button
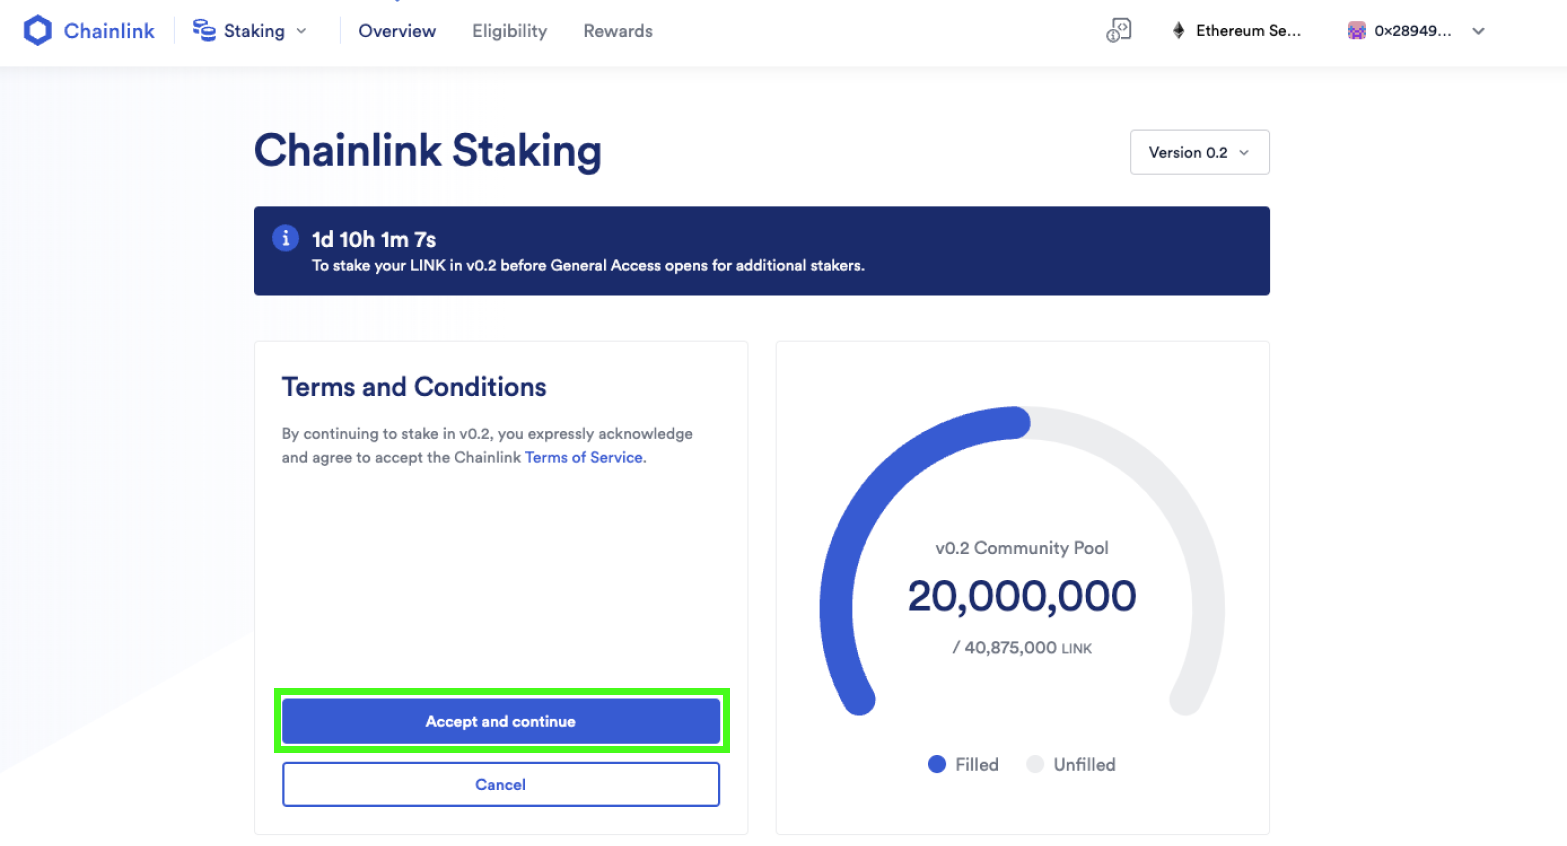
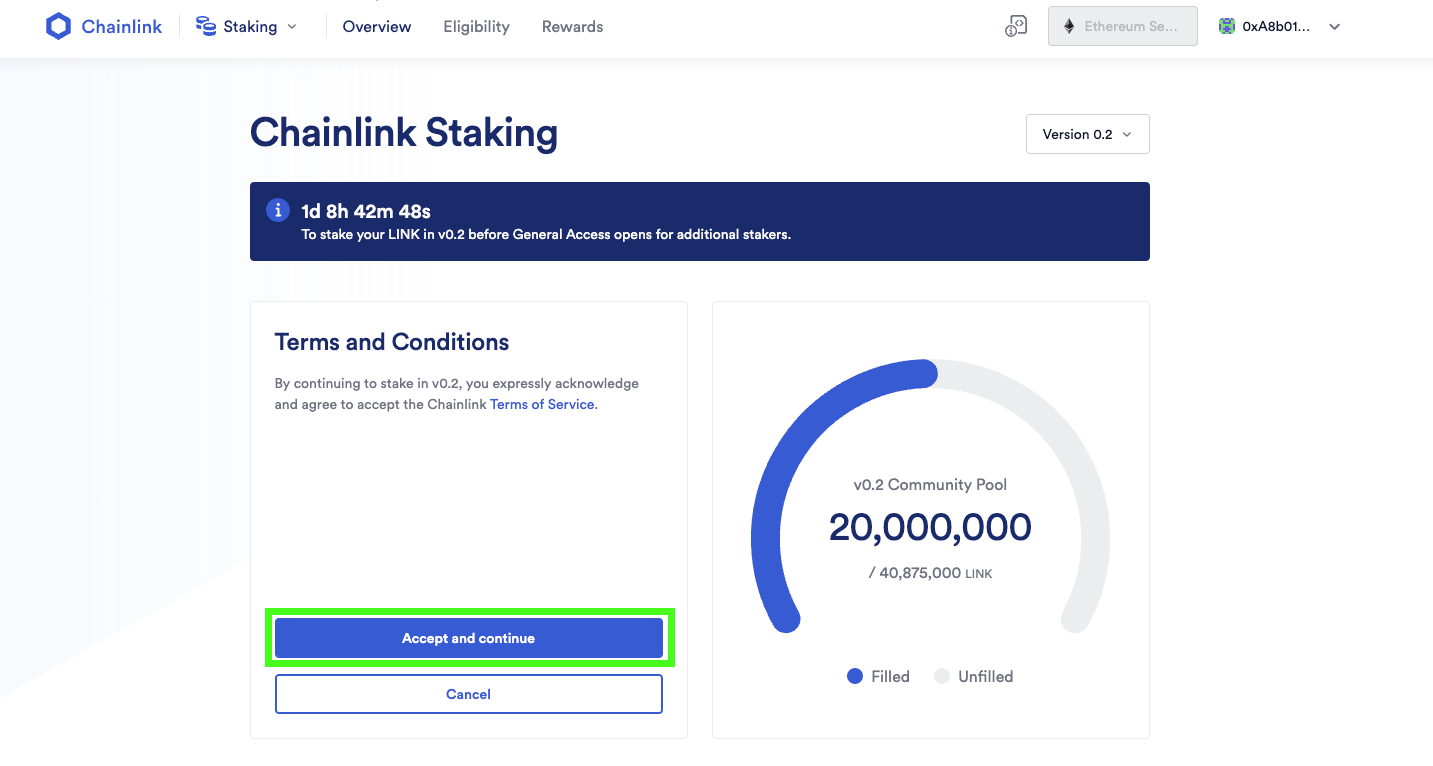
9. Read the Terms of Service
After reading the Terms of Service, press “Accept and continue.”
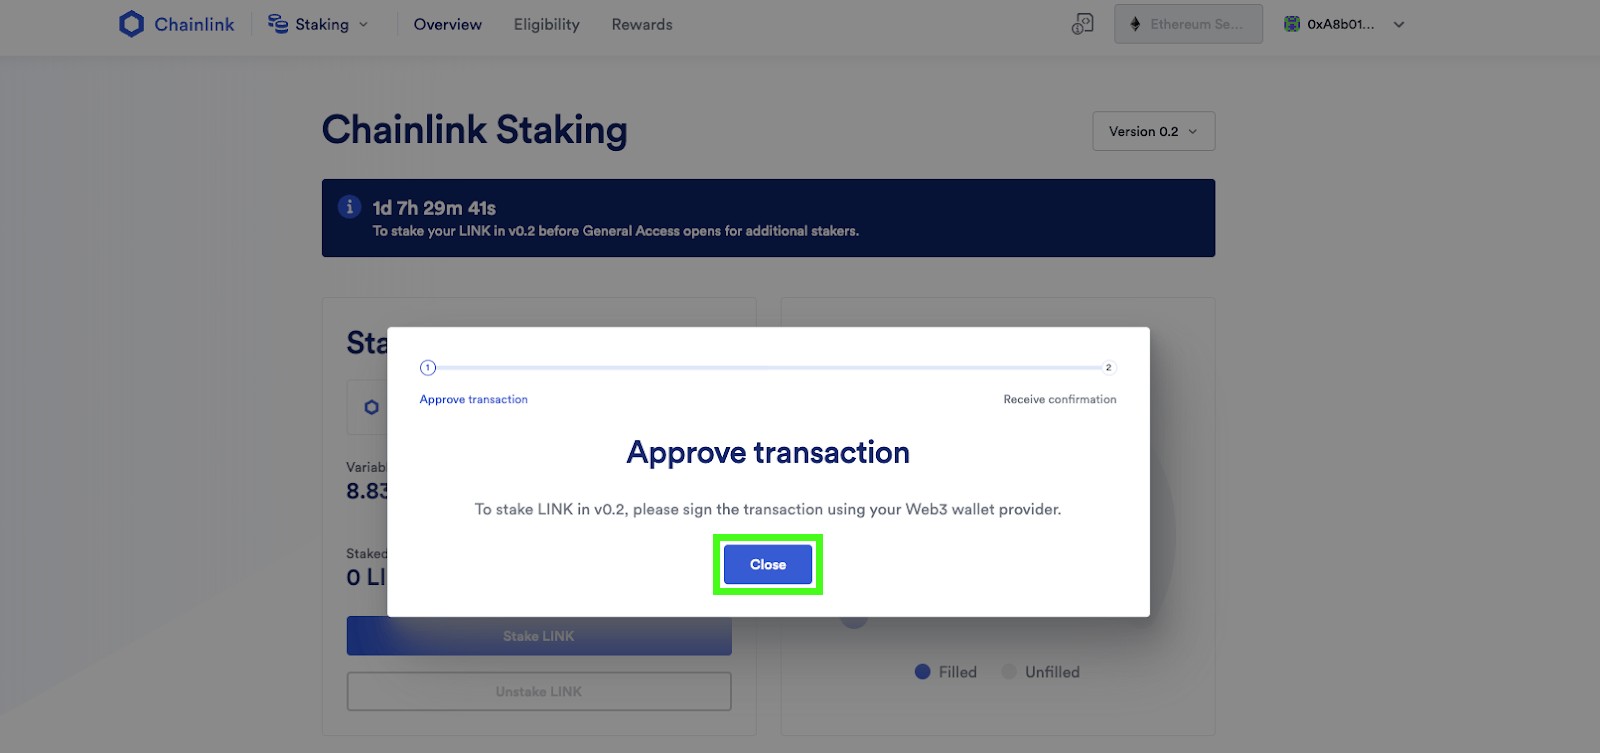
10. Press “Confirm”
A Web3 wallet popup should automatically appear on your screen. If you don’t see a popup, click on your wallet’s extension icon in the browser extension dropdown menu.
Verify the transaction fee amount before pressing “Confirm” to continue. The amount of ETH spent on network transaction fees will depend on network resource availability on Ethereum mainnet at the time of transaction.

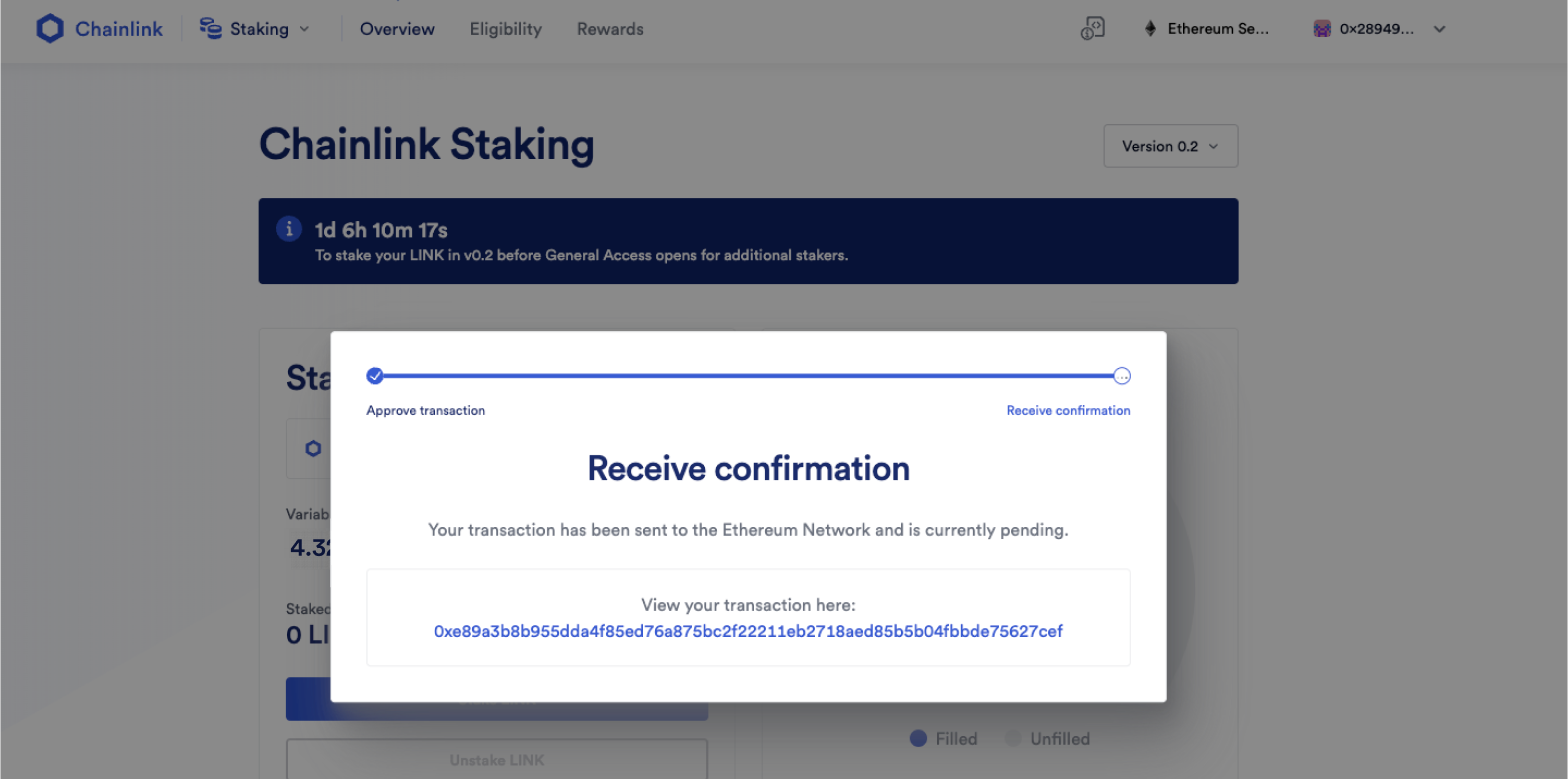
11. Wait for confirmation
You should see the following popup on the screen, which provides a link to Etherscan for the pending transaction. Please wait for the Ethereum network to receive and confirm your transaction.
If the transaction fee was too low for current Ethereum network conditions, the transaction may take longer than expected to process. In many Web3 wallets, such as MetaMask, you can increase the transaction fee amount to speed up the process.
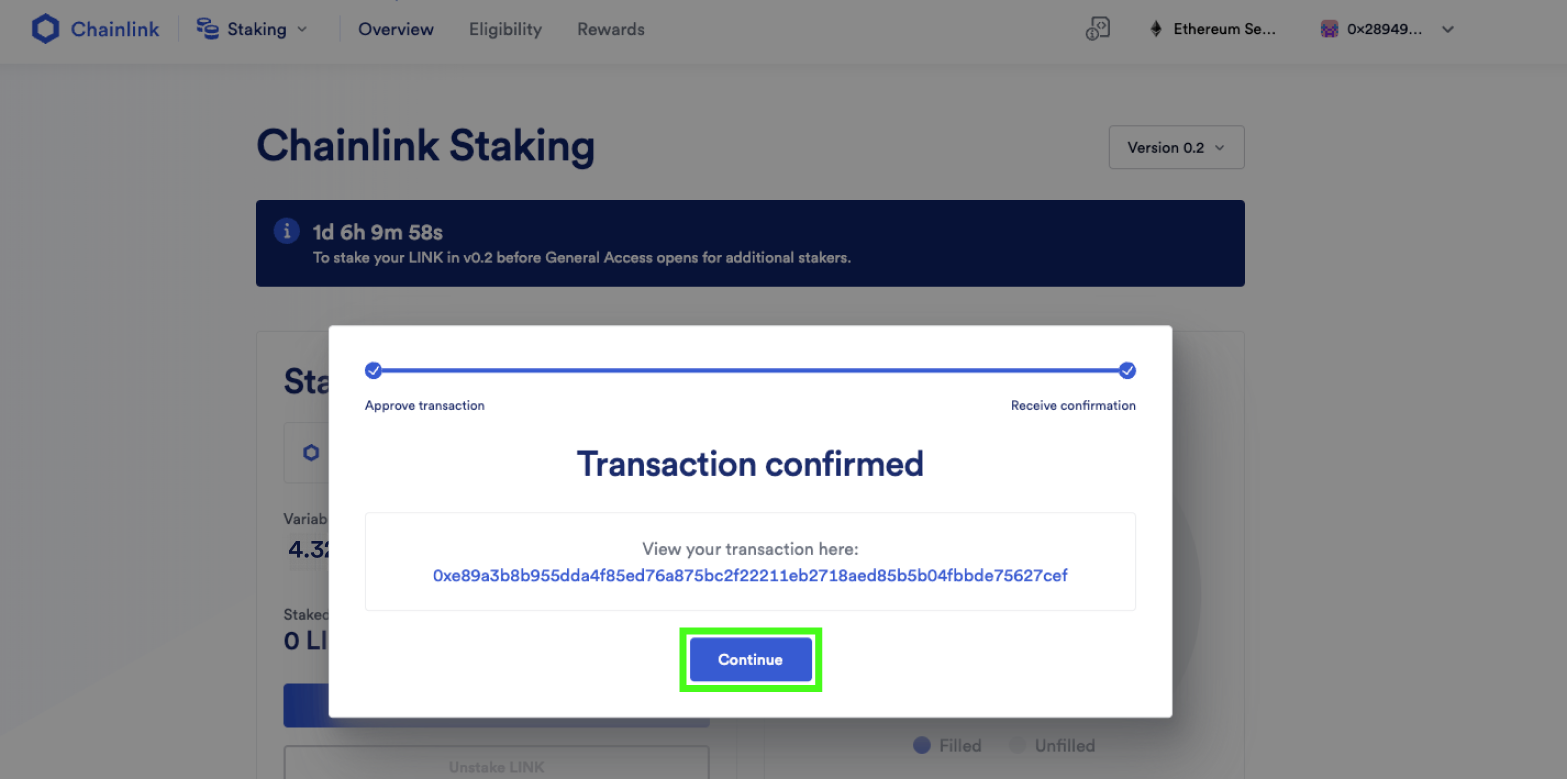
After the Ethereum network confirms your transaction, the popup will automatically update to the below. Click the button to continue.
12. Share on X (Twitter) and press “Finish”
Congratulations! You’ve successfully staked your LINK in the v0.2 Staking Pool.
If you want to share your participation on social media, you can press the “Share on X” button to let your friends and community know that you are now helping secure the Chainlink Network as a Community Staker.
Then click “Finish.”
This will bring you back to the staking UI, where you can view your wallet balance, the v0.2 Community Pool fill rate, your staked LINK balance, your remaining allotment, and more. Note that this screenshot is based on a pre-production build of the Staking v0.2 interface using placeholder parameters.
How To Stake LINK Using a Safe Multisig Wallet
Note: These tutorials are based on a pre-production build of the Chainlink Staking v0.2 Interface using the Ethereum Sepolia testnet with placeholder values. The screenshots are for demonstration purposes only. While these tutorials accurately reflect the staking process, the specific staking parameters, gas fees, and user interface (UI) elements shown below may differ from the interface deployed for the mainnet implementation of Chainlink Staking v0.2. For more information on Staking v0.2 parameters, read this blog.
Below is a step-by-step guide on how to set up a Safe (previously known as Gnosis Safe) multisig wallet and use it to stake LINK in v0.2.
How To Set Up and Fund a Safe Wallet
1. Go to the Safe Application
Make sure to verify that the URL in your browser is the official Safe application website. Bookmark it for future reference: https://app.safe.global/welcome
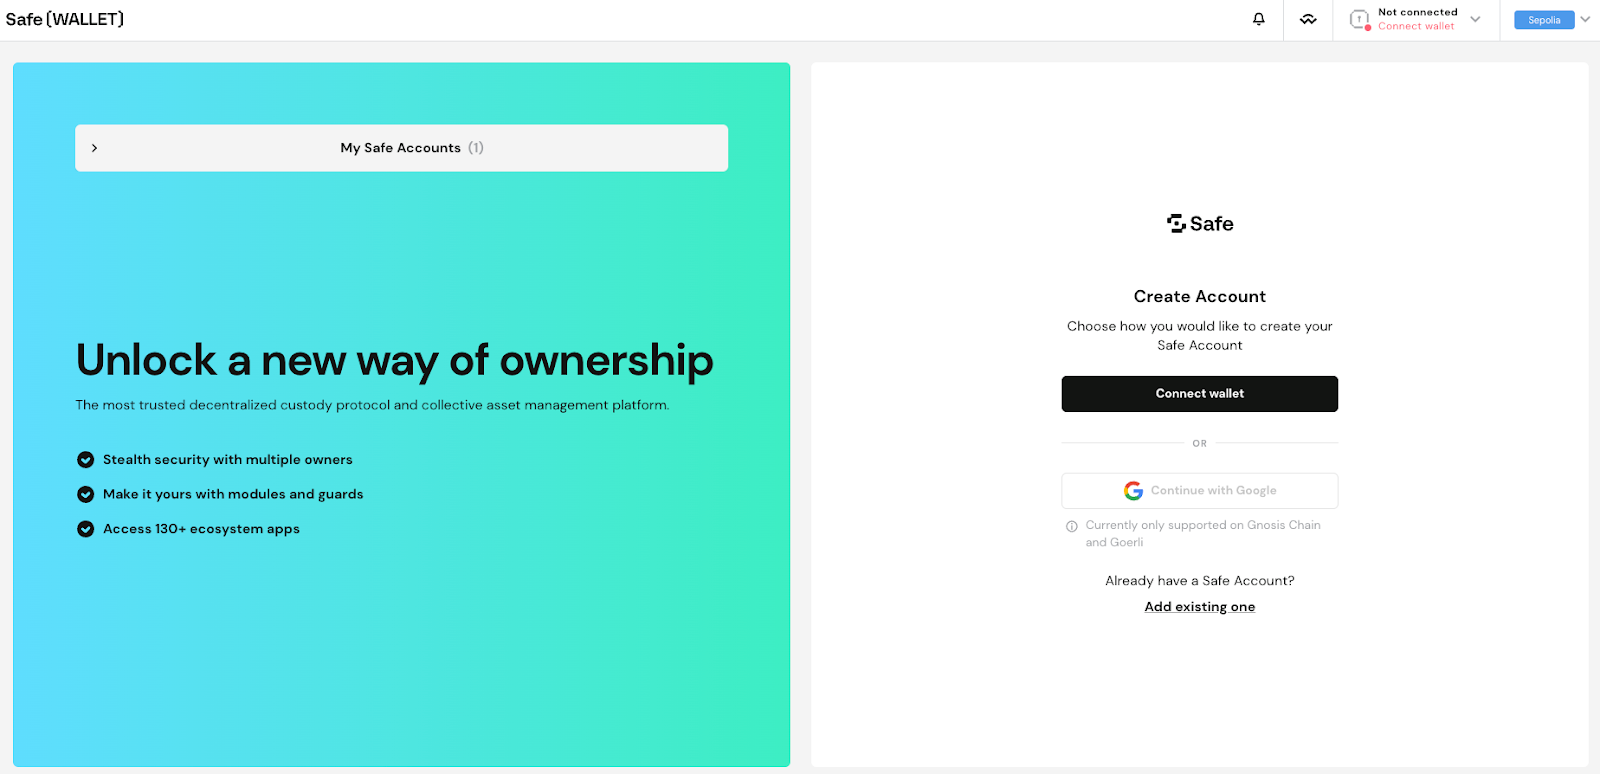
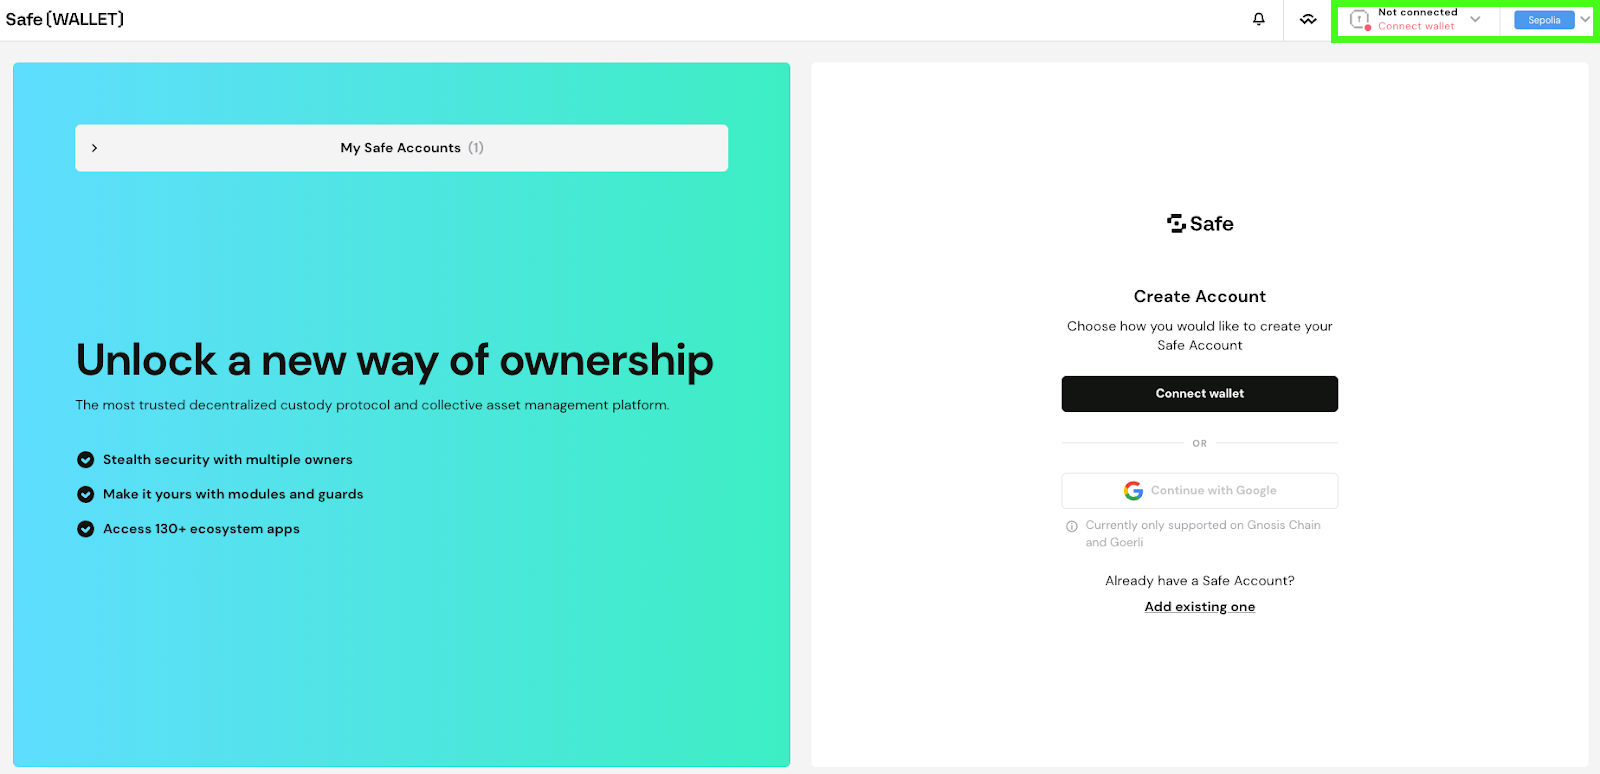
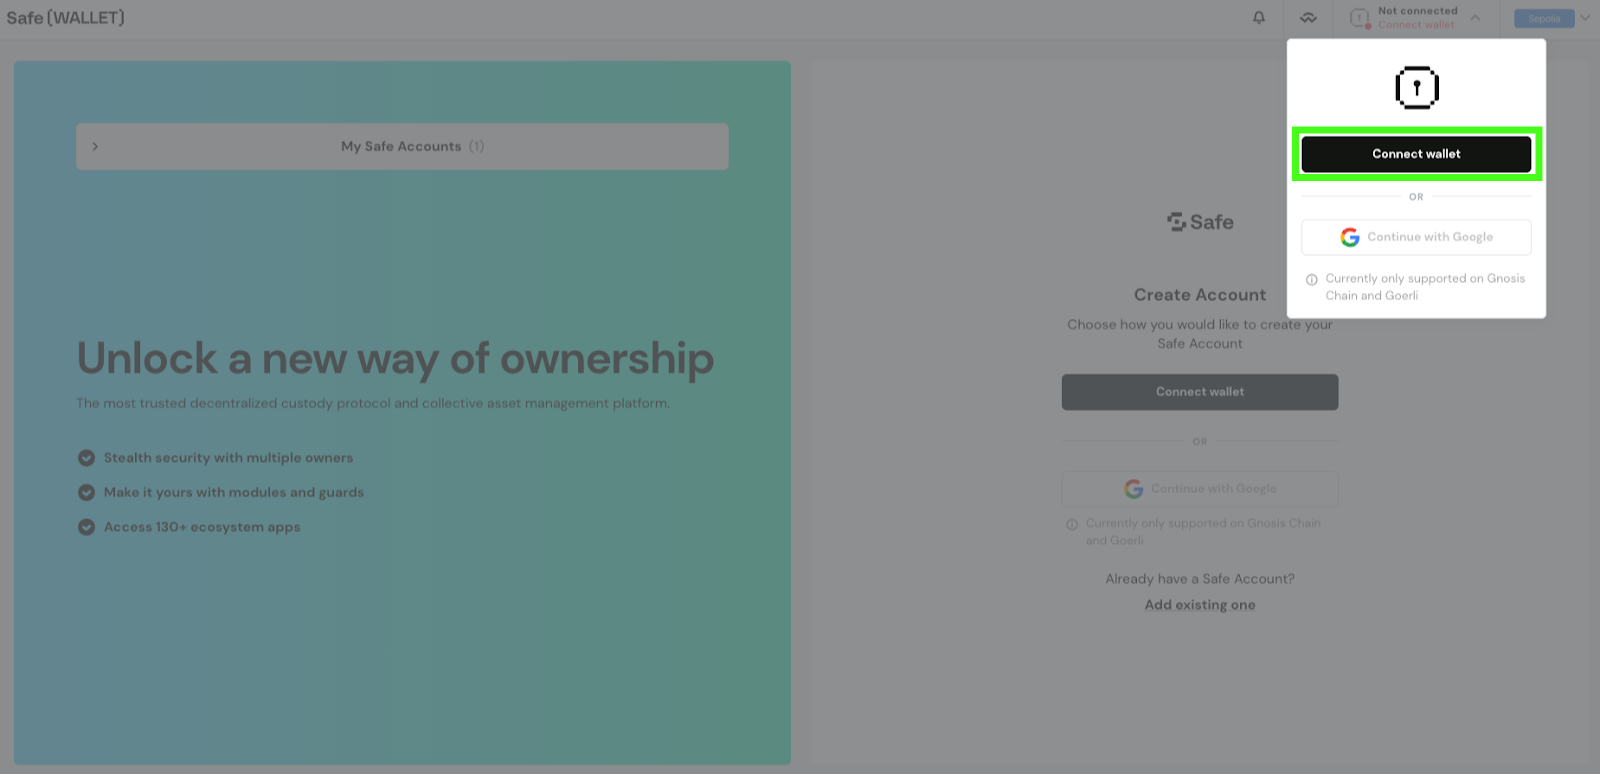
Verify that you’re connected to the Ethereum network. To choose the network, press the drop-down icon to the right of “Connect wallet.”
Then press the “Connect wallet” button at the top-right corner of the screen to connect your wallet.
Note: Do not connect to Sepolia testnet. This is only for demonstration purposes.
Press the “Connect Wallet” button again in the dropdown.
2. Choose your wallet
This tutorial will use the MetaMask wallet.
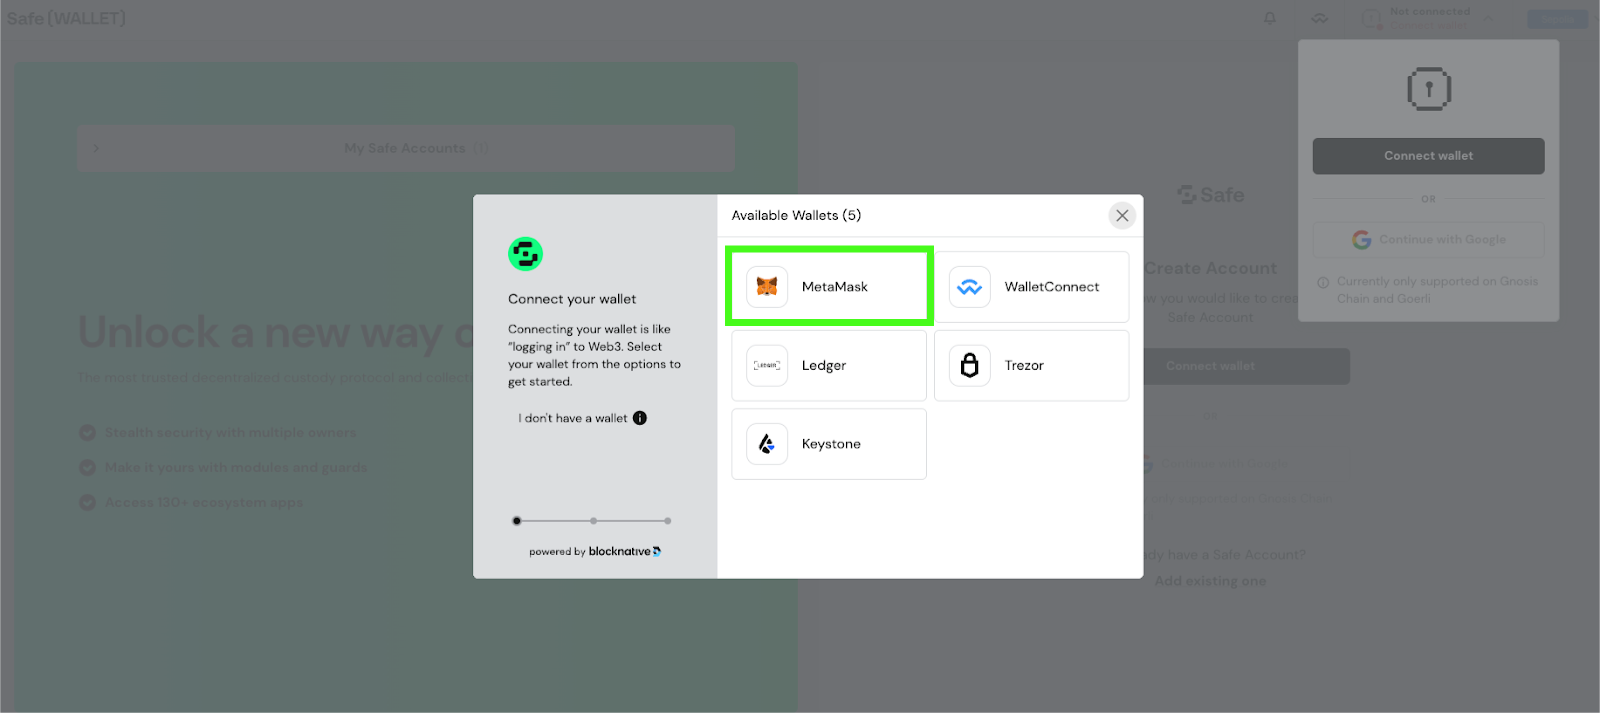
Click “Next” on the wallet popup.
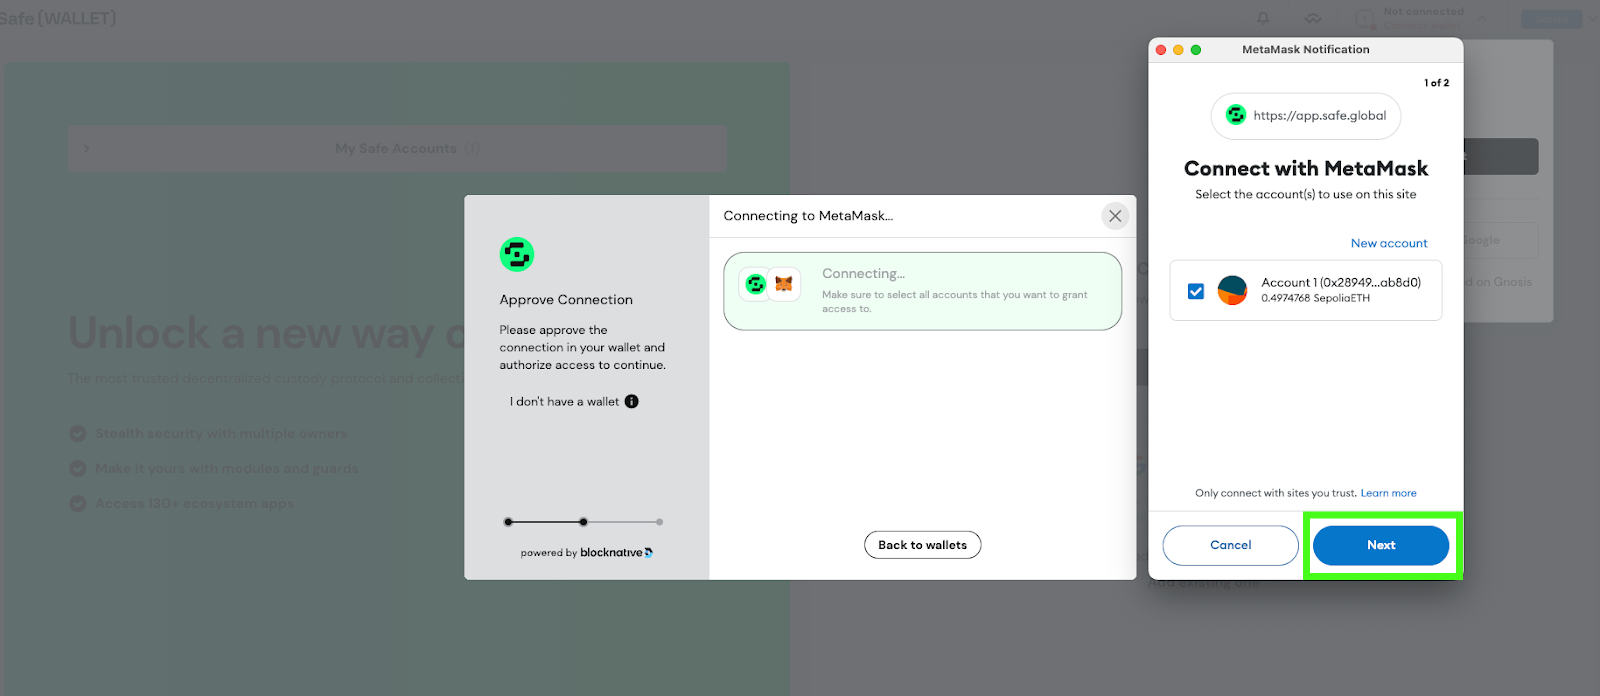
Then press “Connect.”
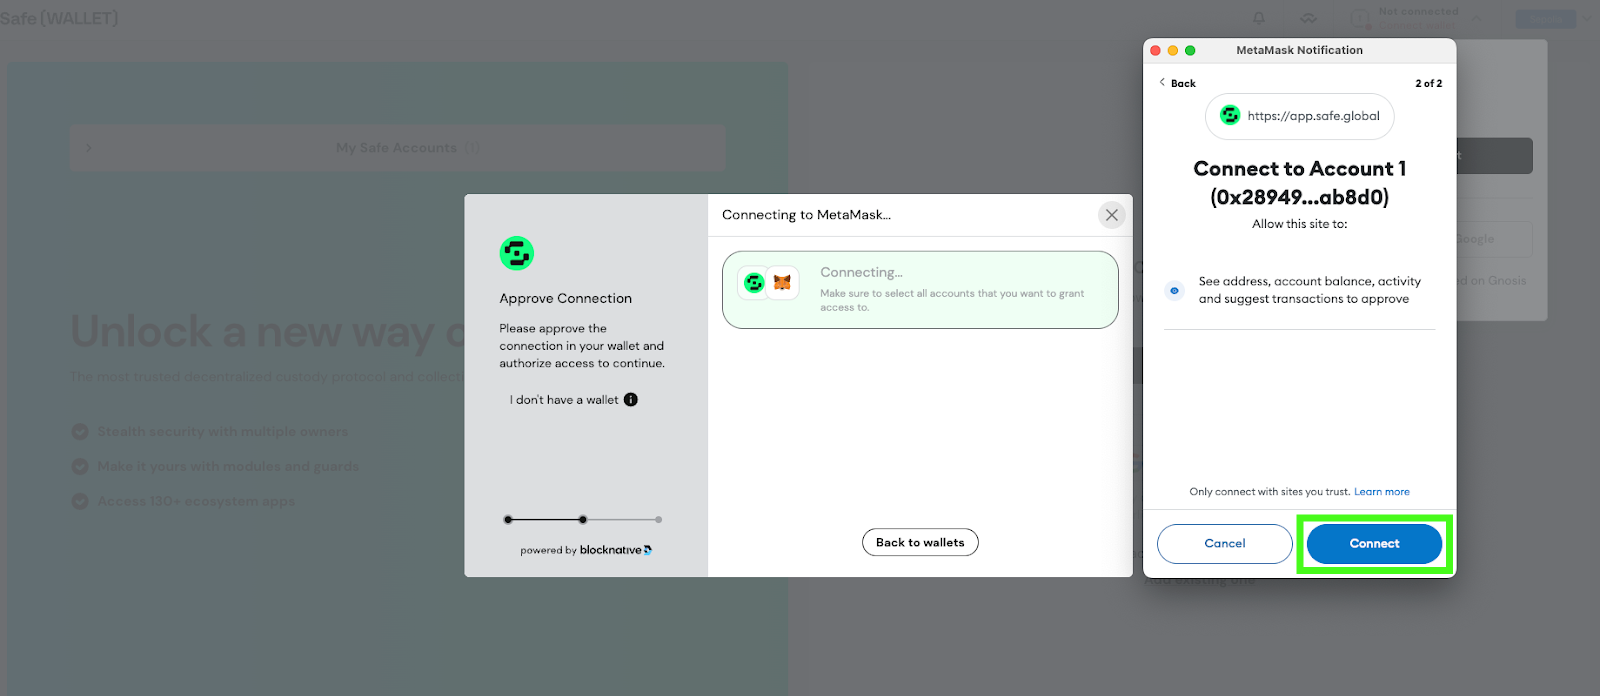
After this, your wallet should be connected.
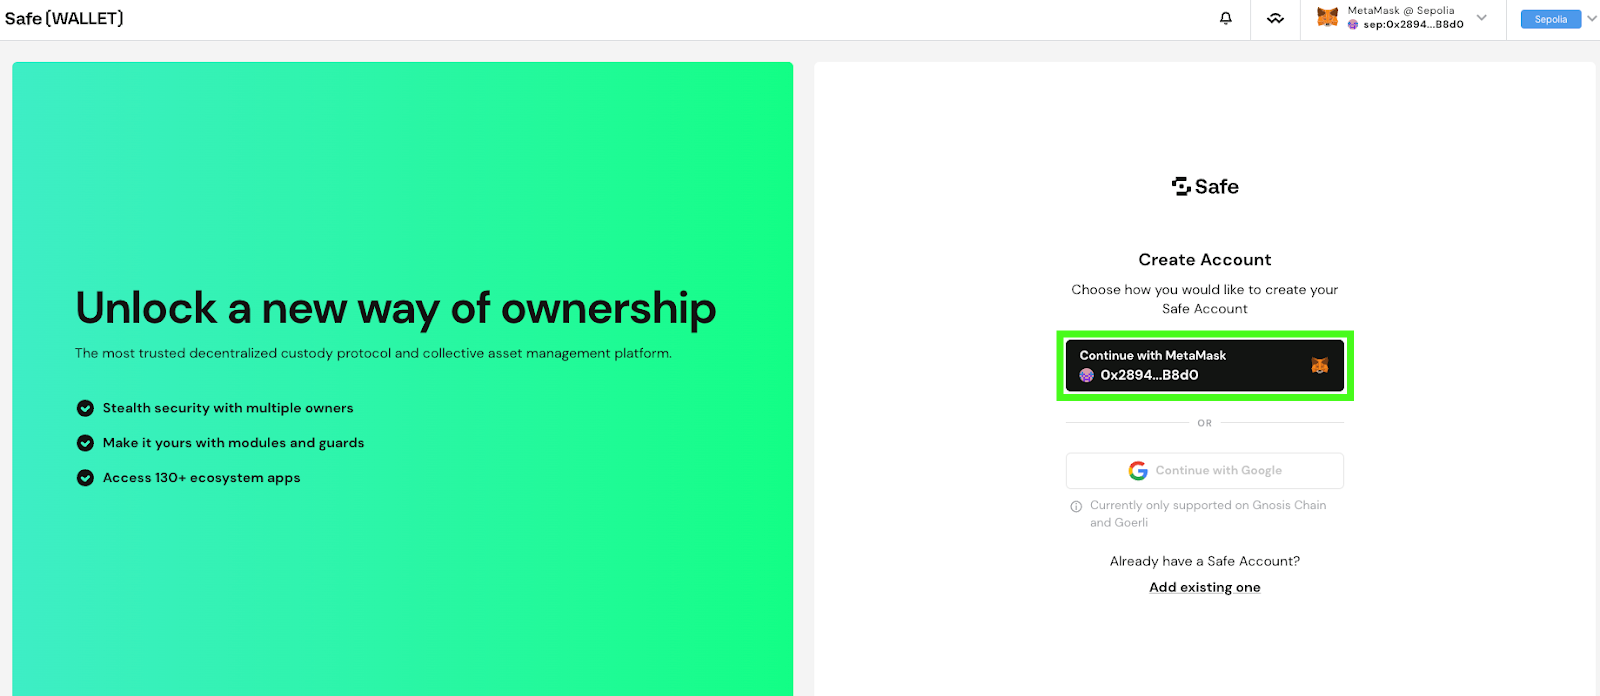
3. Create a Safe account
Press “Continue with MetaMask.”
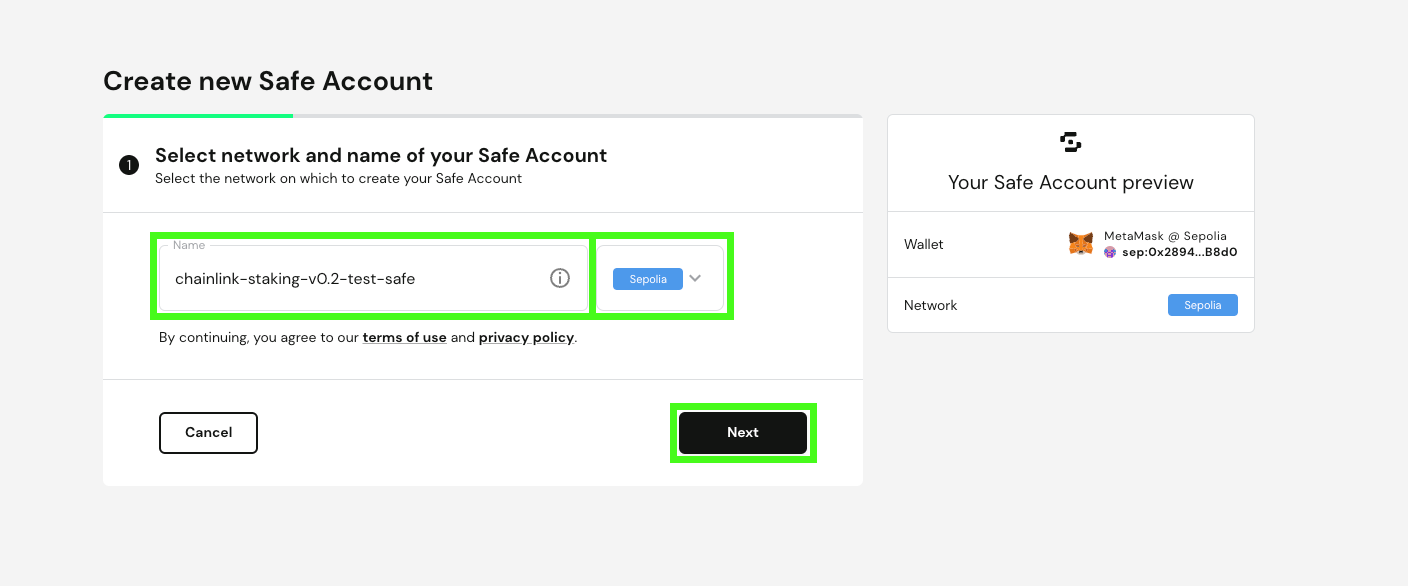
Input the name of your Safe Account and choose Ethereum in the network dropdown.
Note: Do not choose Sepolia testnet. This is only for demonstration purposes.
Then press “Next.”
4. Set up your multisig wallet
Enter the name of the multisig wallet owners and the wallet addresses that will be used for multisig transaction confirmations.
Click the “Add new owner” button and add as many owners as necessary for your purposes.

Then, input the desired confirmation threshold. To better understand this step, see the following example screenshot. For best practices, check out Safe’s best practices.
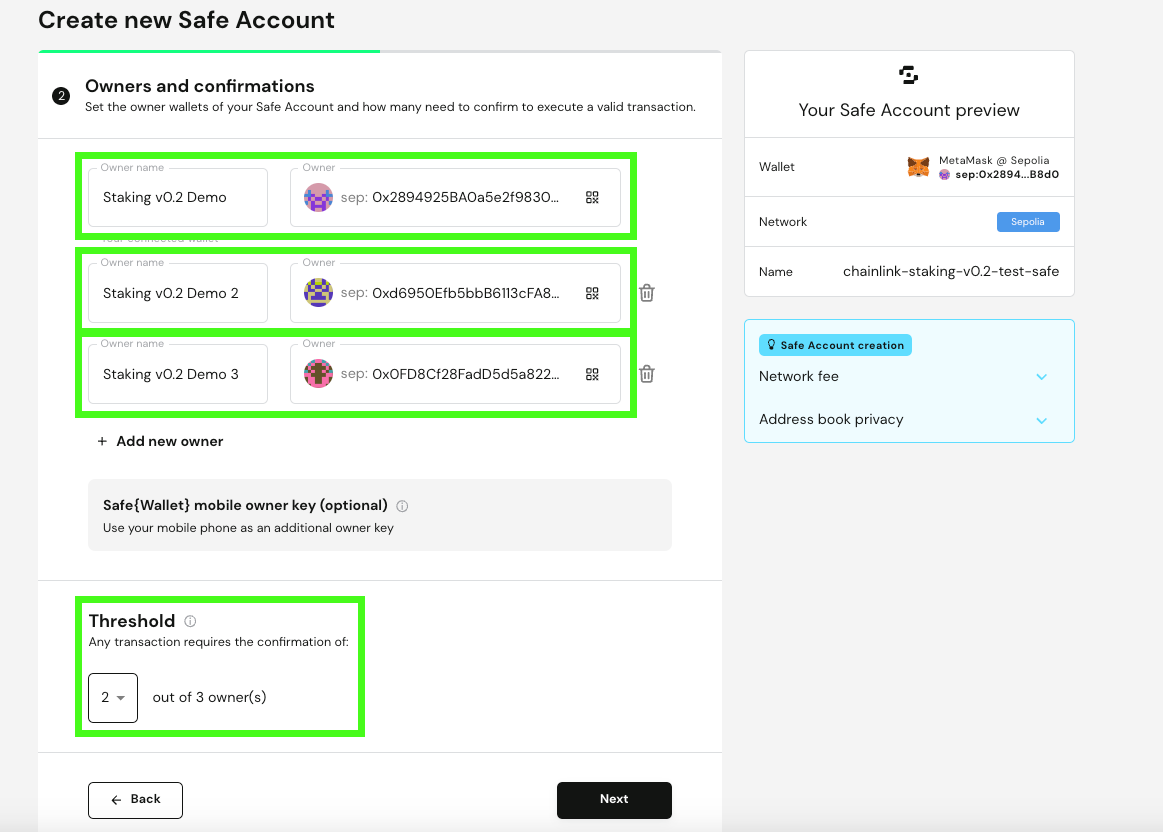
In this example, there are three owners of the multisig wallet. The threshold is two out of three owners, which means that any transaction from the multisig wallet will require at least two of the three owners to confirm the transaction.
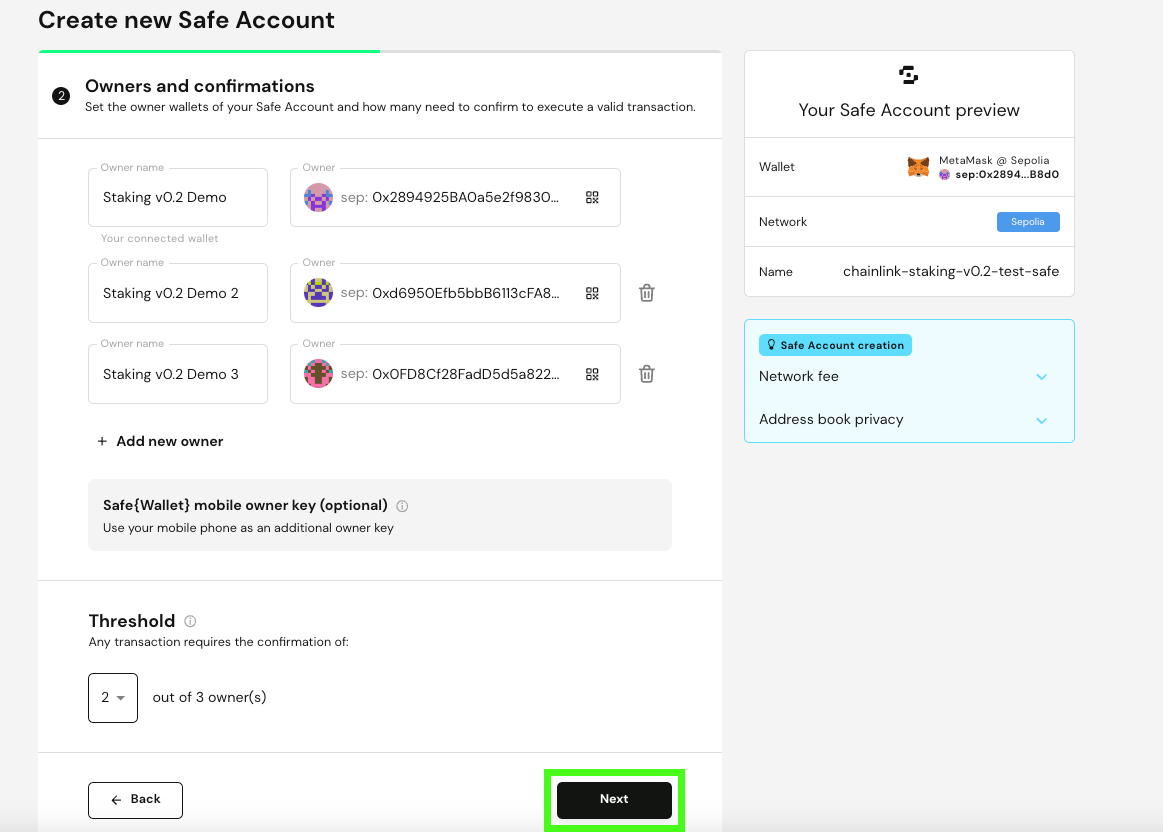
Once you are satisfied with your multisig setup, click “Next.”
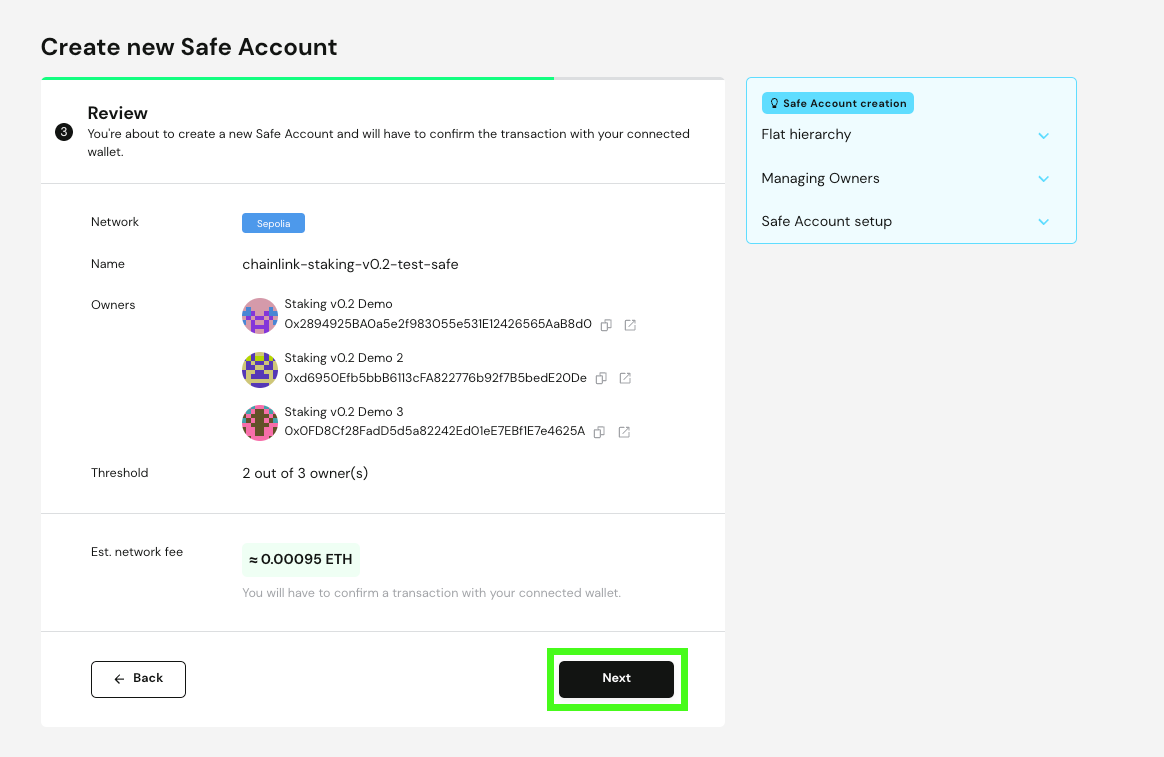
5. Review your multisig wallet details
Make sure that the wallet addresses have been correctly inputted and verify that the wallet will be created on the Ethereum network.
Then click “Next”—your wallet plugin should pop up.
Press the “Confirm” button on the wallet popup.
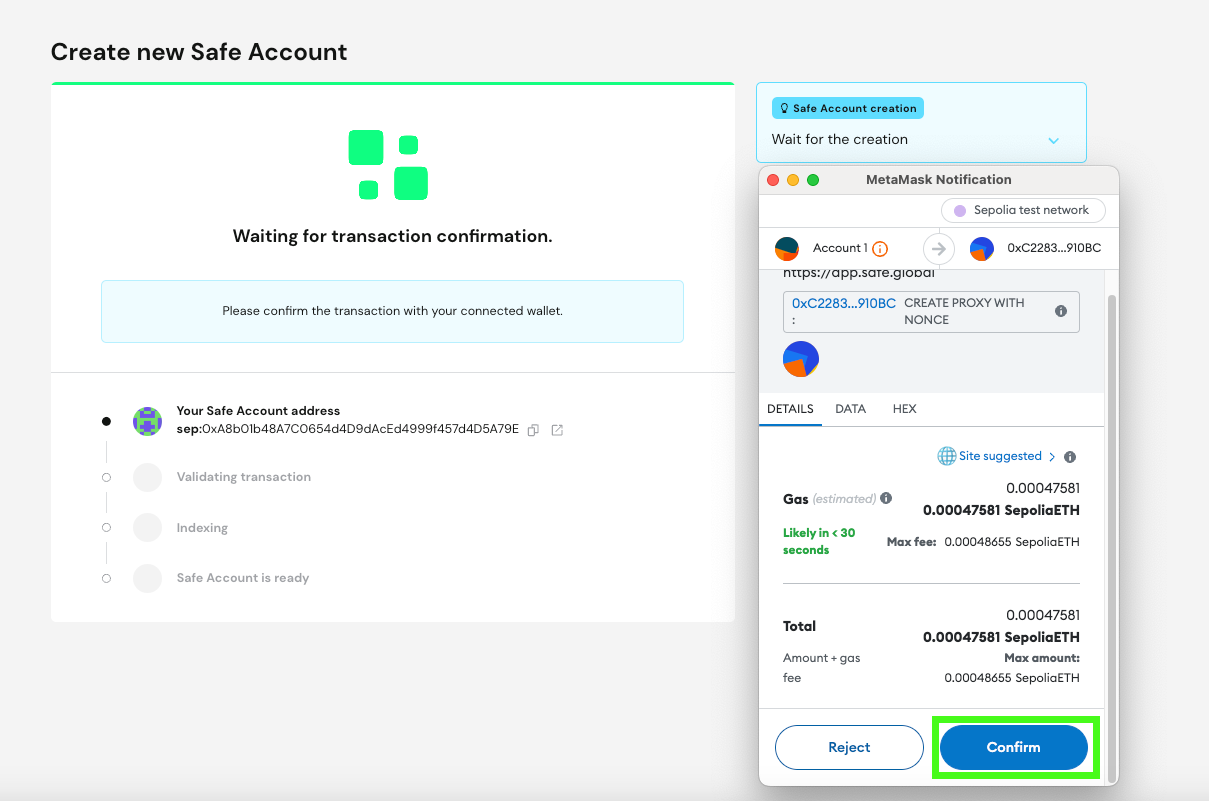
Then wait for the Safe Wallet to be created. Please do not exit the page.
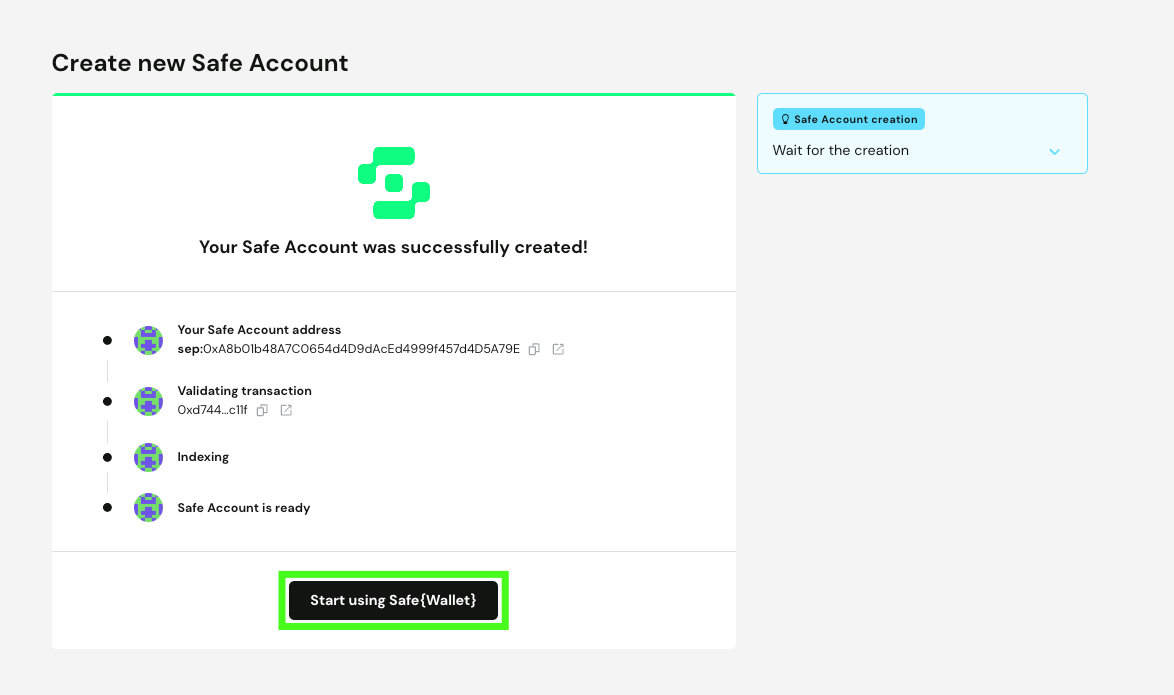
After your Safe Account has been successfully created, press “Start using Safe{Wallet}.”
You should now see your Safe Wallet dashboard.
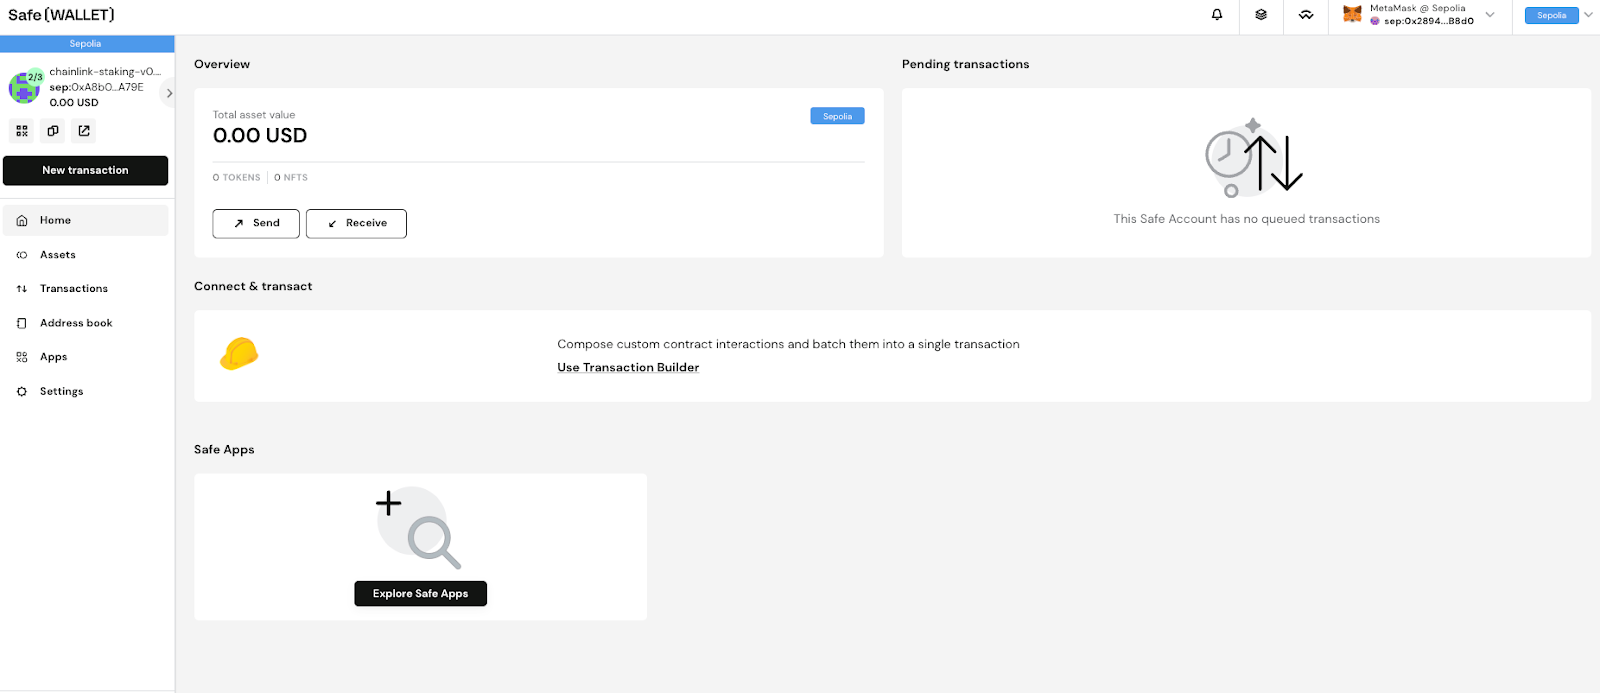
6. Copy the Safe Wallet address
To stake LINK in v0.2, your new Safe wallet will need to hold your desired amount of LINK tokens to stake.
From the homepage above, navigate to “Assets” using the left-hand sidebar.
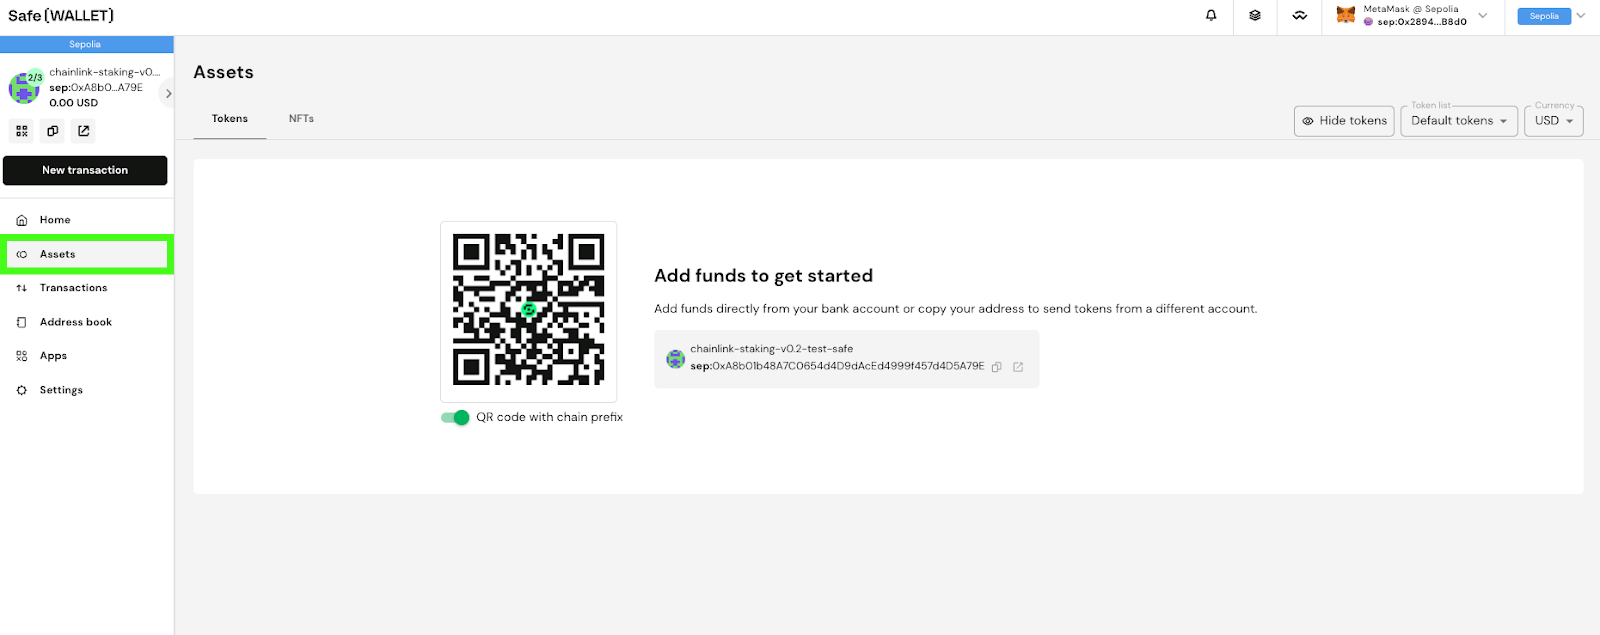
Press the copy icon (see screenshot below) to copy the wallet address.
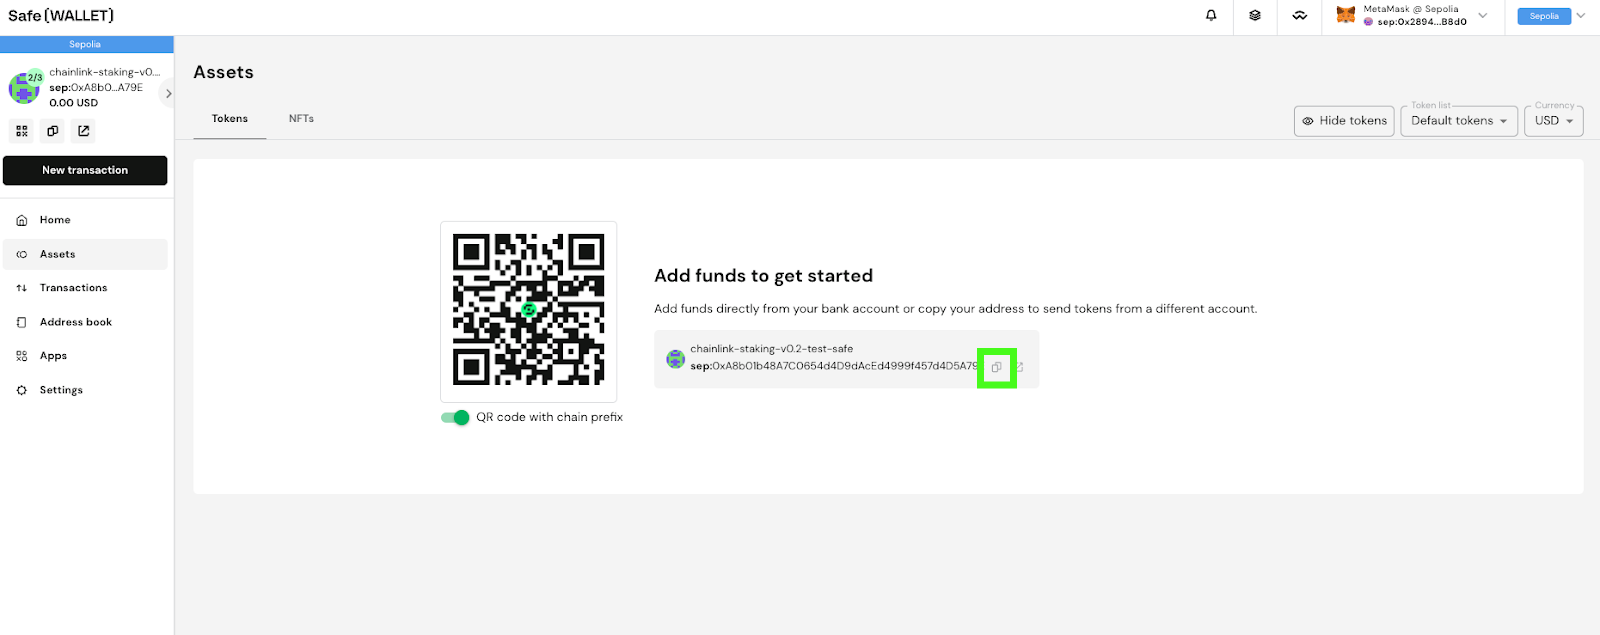
Now you can send LINK tokens to the Safe wallet using the copied wallet address.
Note: To stake your LINK using the Safe, the wallet address that executes multisig transactions will need to have ETH to cover network fees. The Safe wallet itself does not need any ETH.
The following steps will use the MetaMask browser wallet. If you’re using another wallet, the steps will be similar.
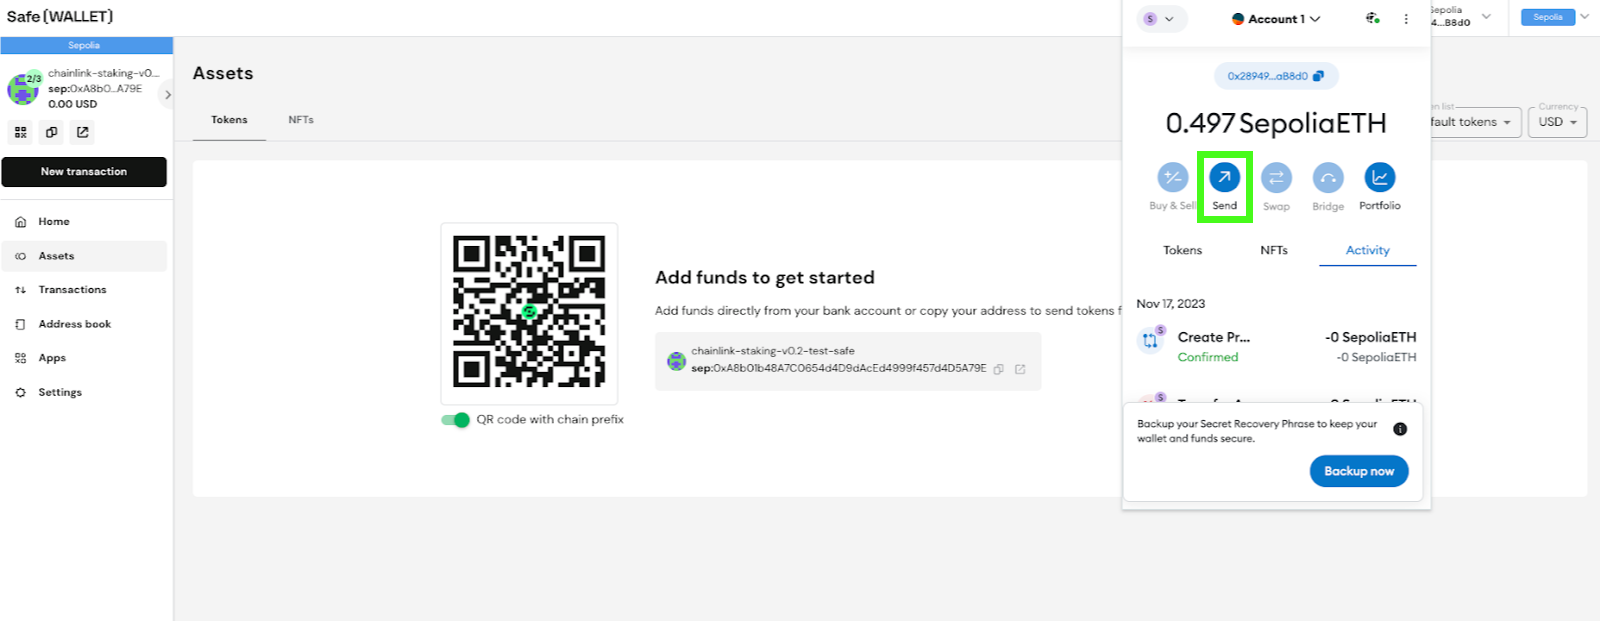
7. Open your wallet and press the “Send” button
Note: Any address can send LINK to this address. It does not necessarily have to be the address used to create the Safe wallet.
Then enter the wallet address. Refer back to step 6 if you’re unsure if you have the correct Safe Wallet address.
Note: The copied Safe Wallet address may include the network in front of it—for example, “sep:0xf7dk2…” This will not work. Make sure to start the address at “0x”.
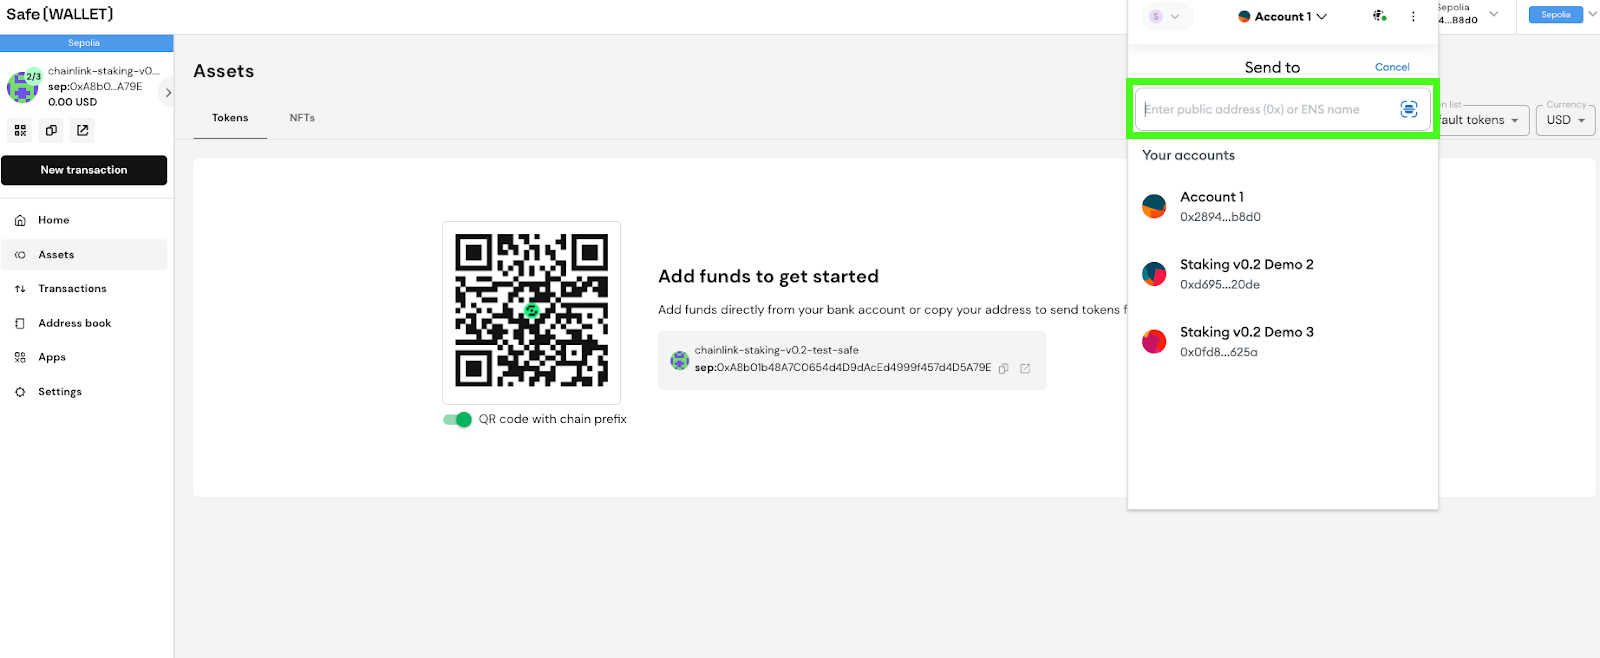
Enter the desired amount of LINK you want to transfer to the multisig wallet, and then press “Next.”
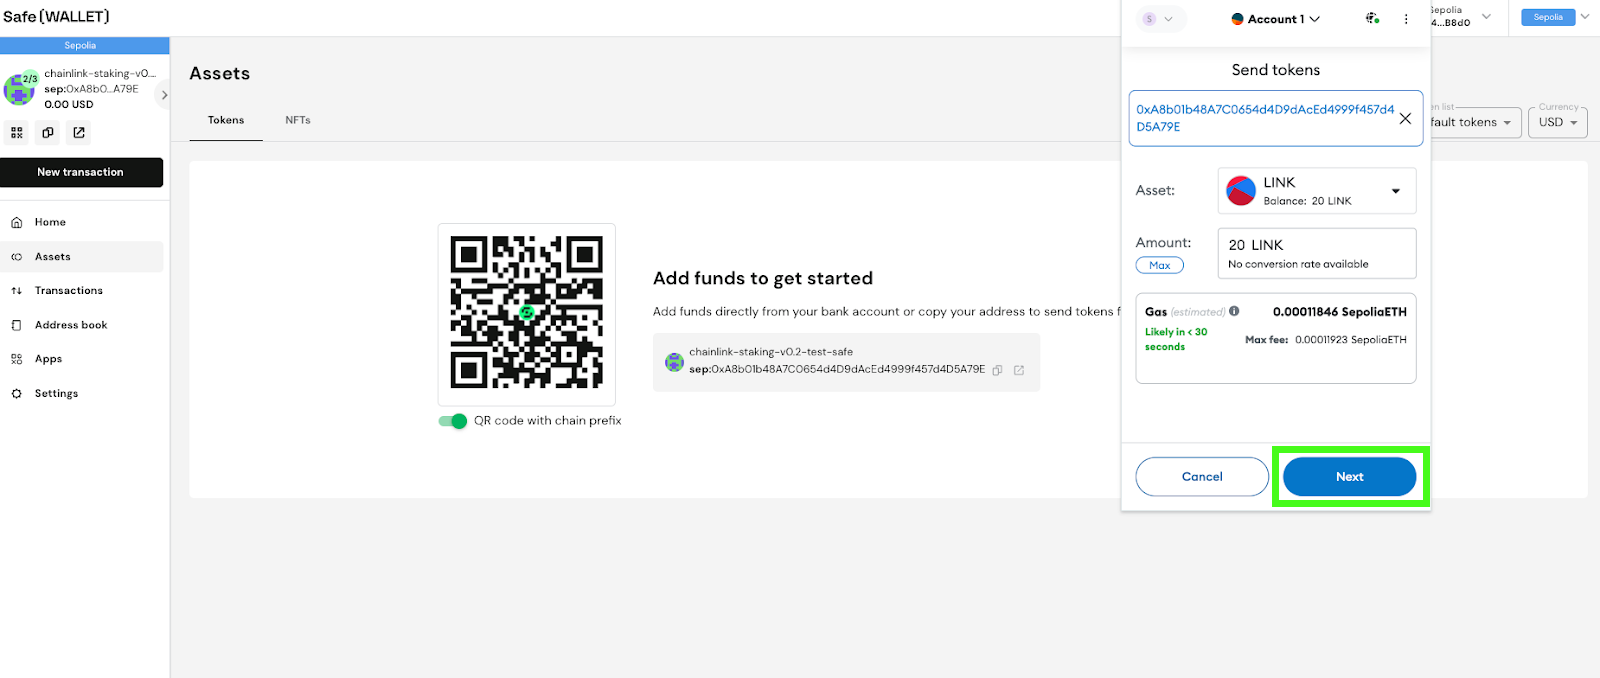
Then press “Confirm.”
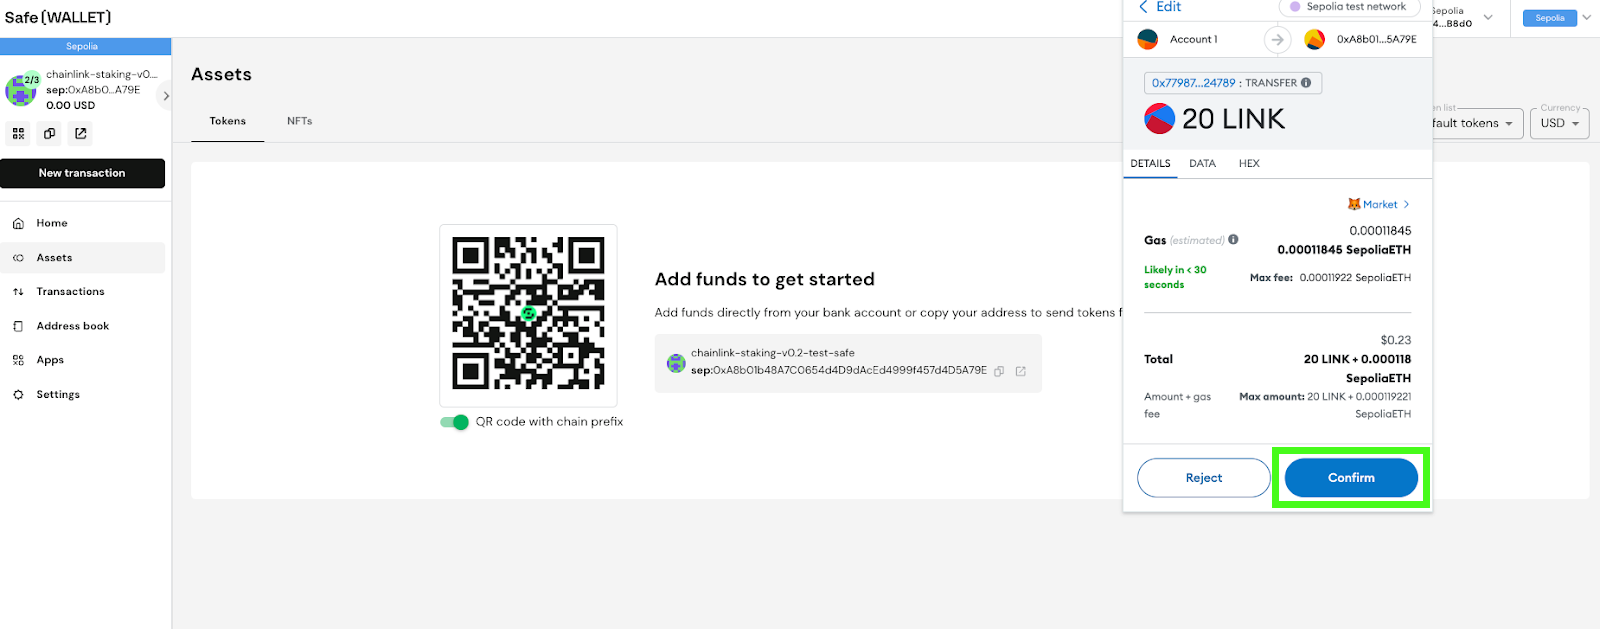
8. Wait for your transaction to execute
After you confirm, the transaction will be pending. The time it takes for the transaction to execute varies depending on network activity on Ethereum mainnet.
You’ll be able to see the pending transaction on the “Activity” tab of your wallet.

Once the transaction has been executed, you should see the LINK token in your assets tab. If you don’t see it, make sure that the “Token List” dropdown menu on the top right says “All tokens.”
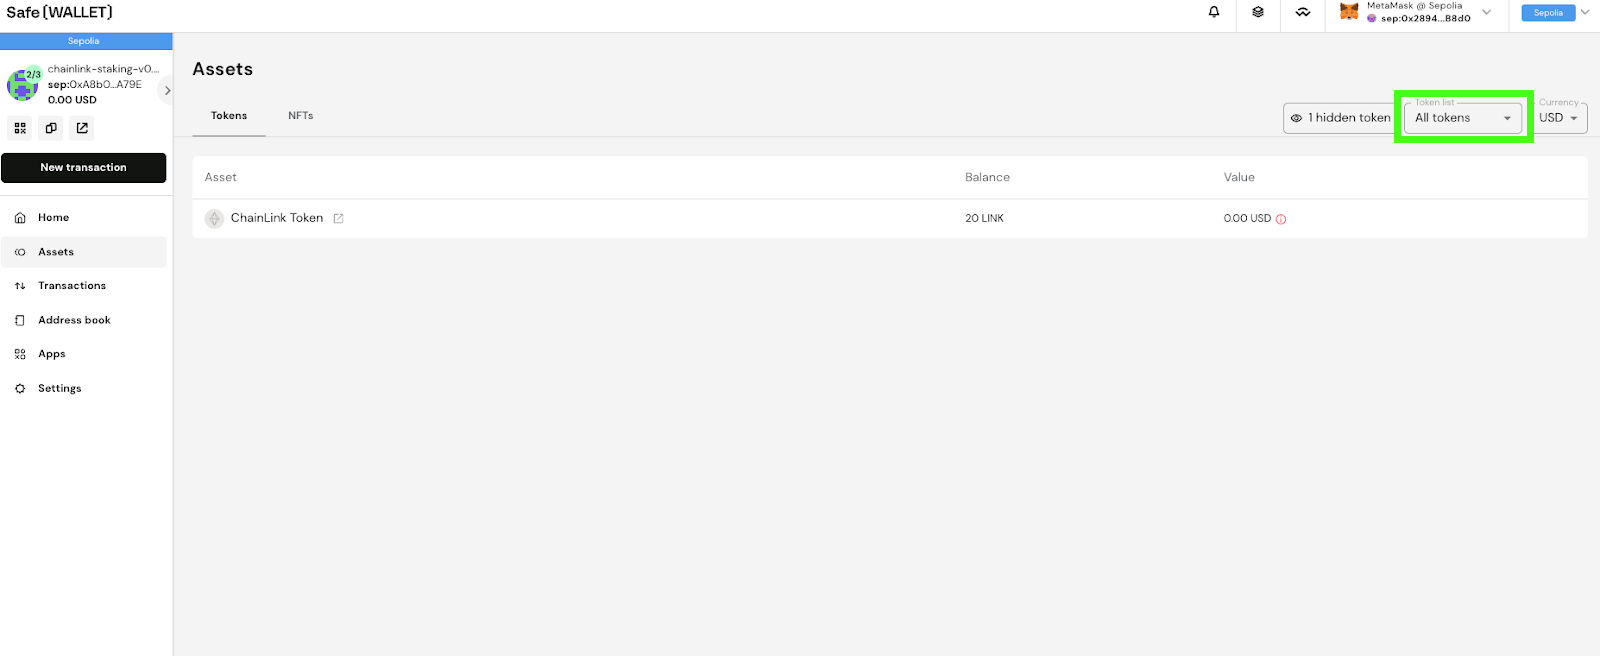
You’ve successfully funded your Safe multisig wallet!
How To Stake LINK
9. Go to the Chainlink Staking web page in a new browser tab
Make sure to verify that the URL in your browser is the correct official Chainlink Staking website: https://staking.chain.link
10. Connect your Safe Wallet
Press “Connect wallet” on the top right of the screen.
Read and accept the Terms of Service.
Then click the WalletConnect option.
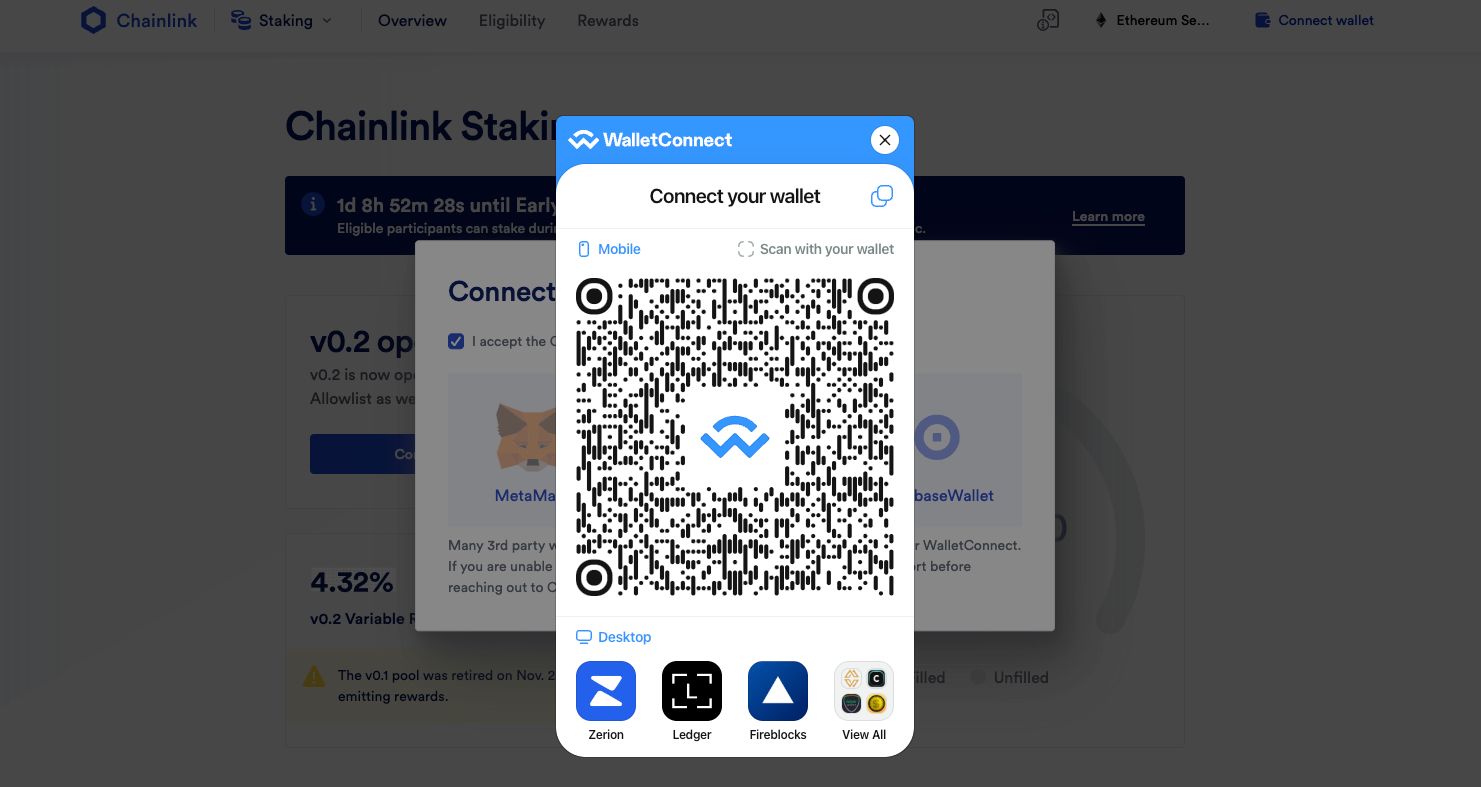
A WalletConnect popup should appear. Press the copy button on the top right of the popup to copy the pairing code.
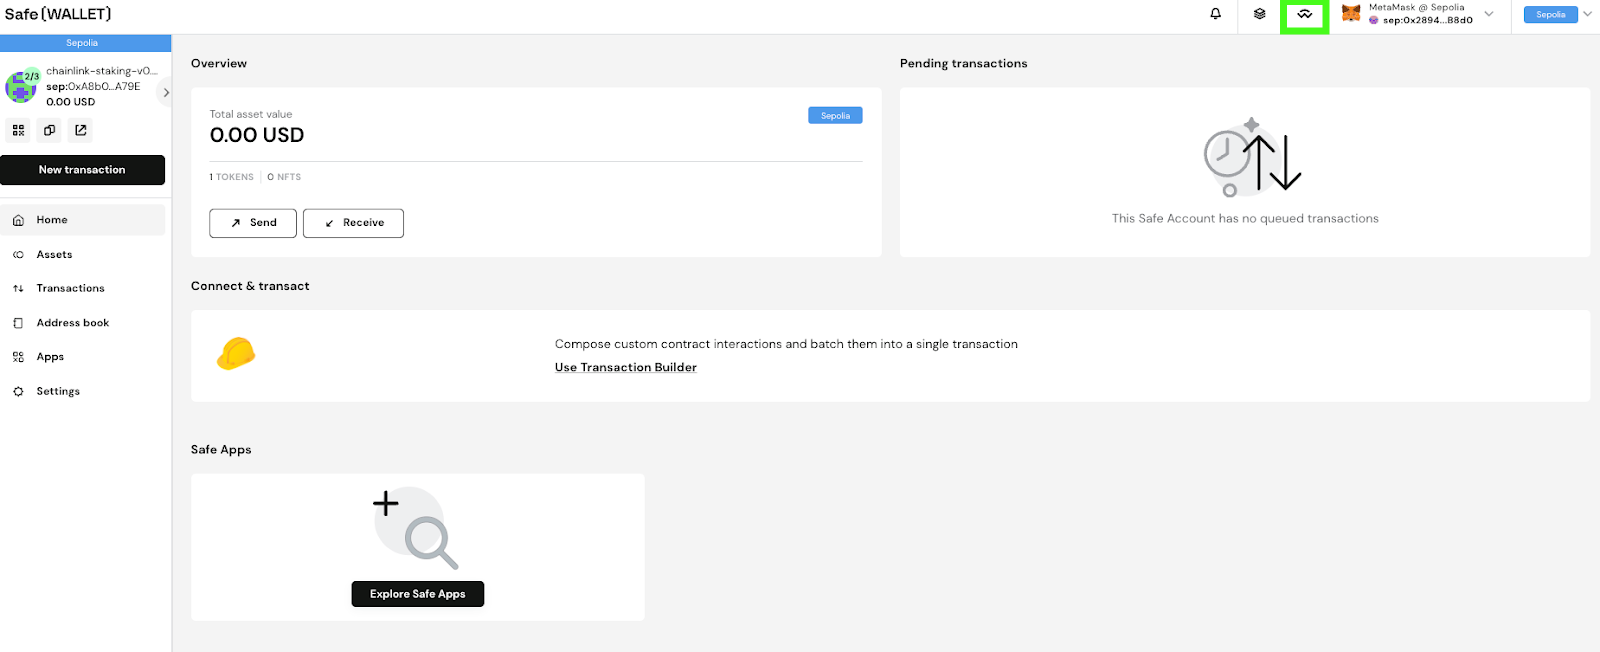
11. Navigate back to the Safe application
Then press the WalletConnect icon in the top right of the screen.
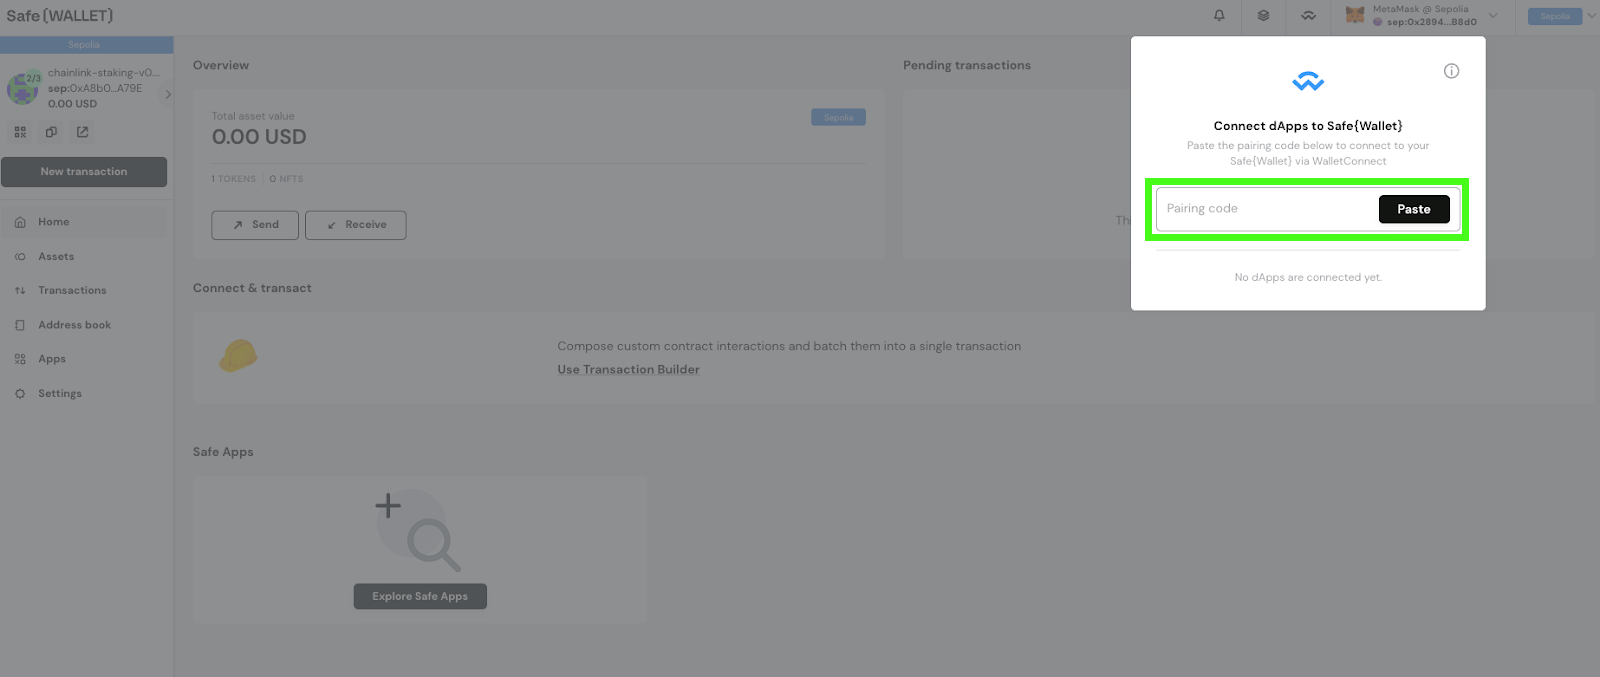
Paste the copied link into the text box.
Approve the connection.
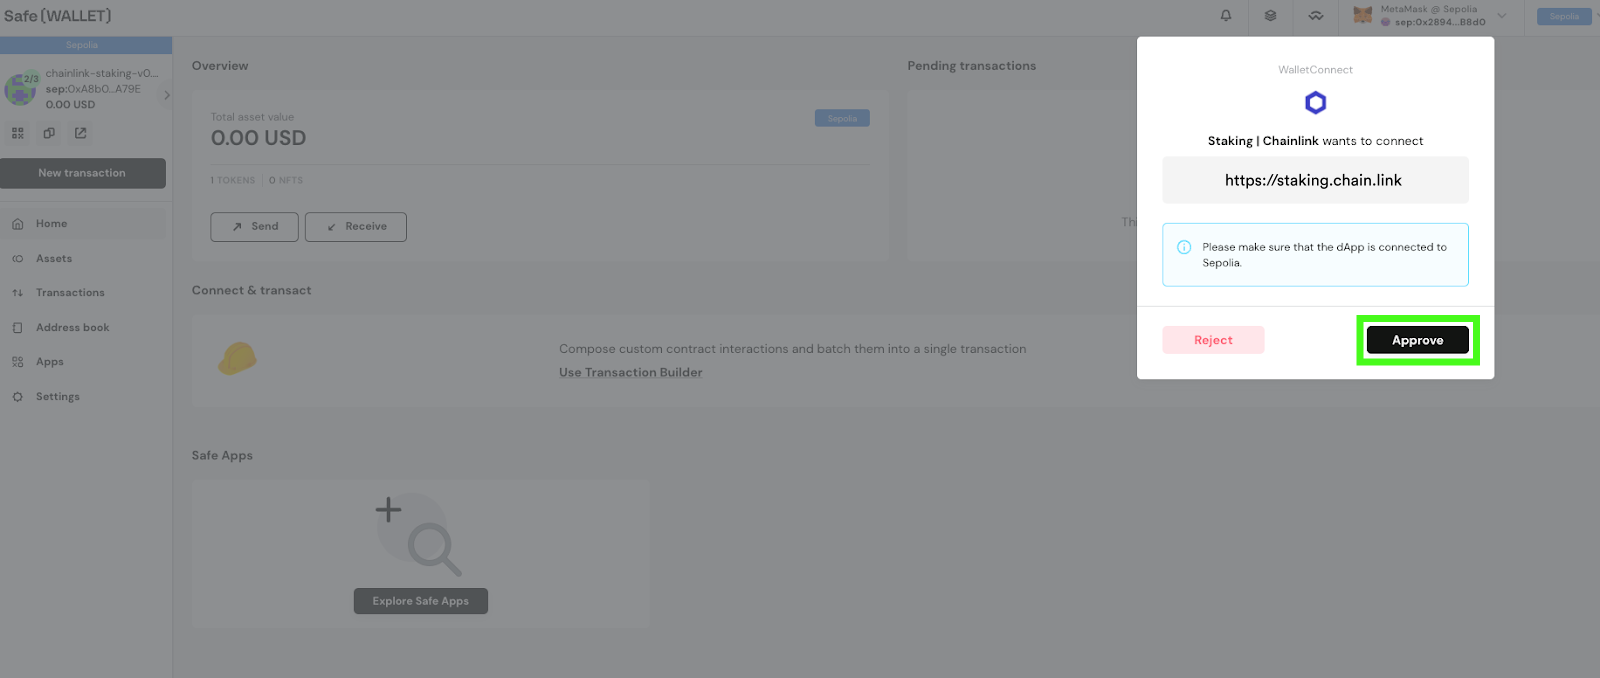
Congratulations! Your Safe Wallet has been connected to the Chainlink Staking v0.2 application.
If you navigate back to the Chainlink Staking browser tab that you left open, you should see that your Safe Wallet is now connected. Please keep your Safe Wallet tab open.
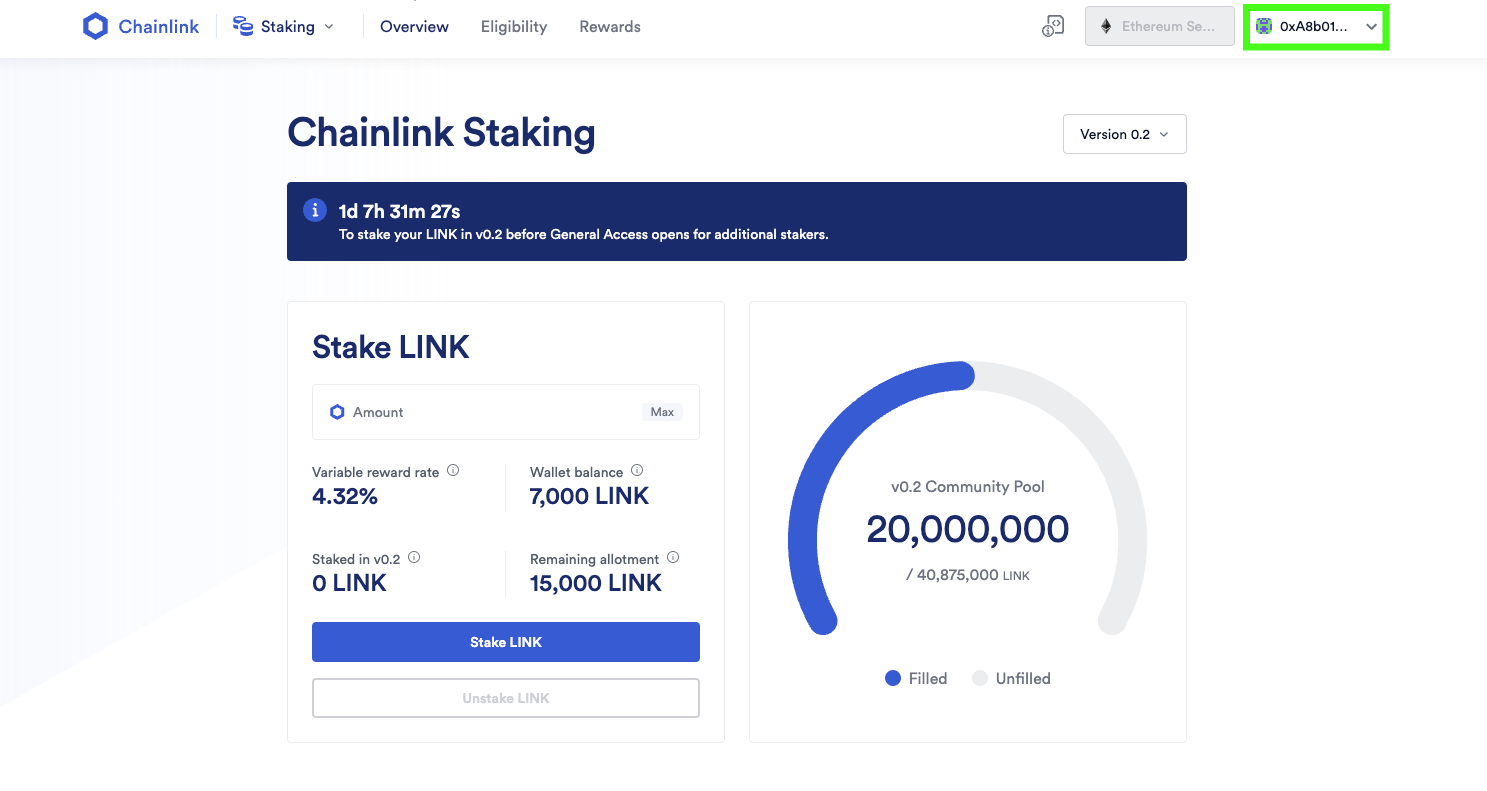
12. Choose how much LINK to stake
In the text entry box, input the amount of LINK you’d like to stake.
If you plan on staking all of the LINK in your Safe wallet, up to the per-address maximum, press “Max.”
Then press the “Stake LINK” button.
14. Read the Terms of Service
After reading, click “Accept and continue.”
You should now see the following screen to approve the transaction.
15. Navigate back to the Safe application
On the Safe browser tab, you should now see the option to sign a transaction.
After verifying the transaction is correct, press “Sign.”
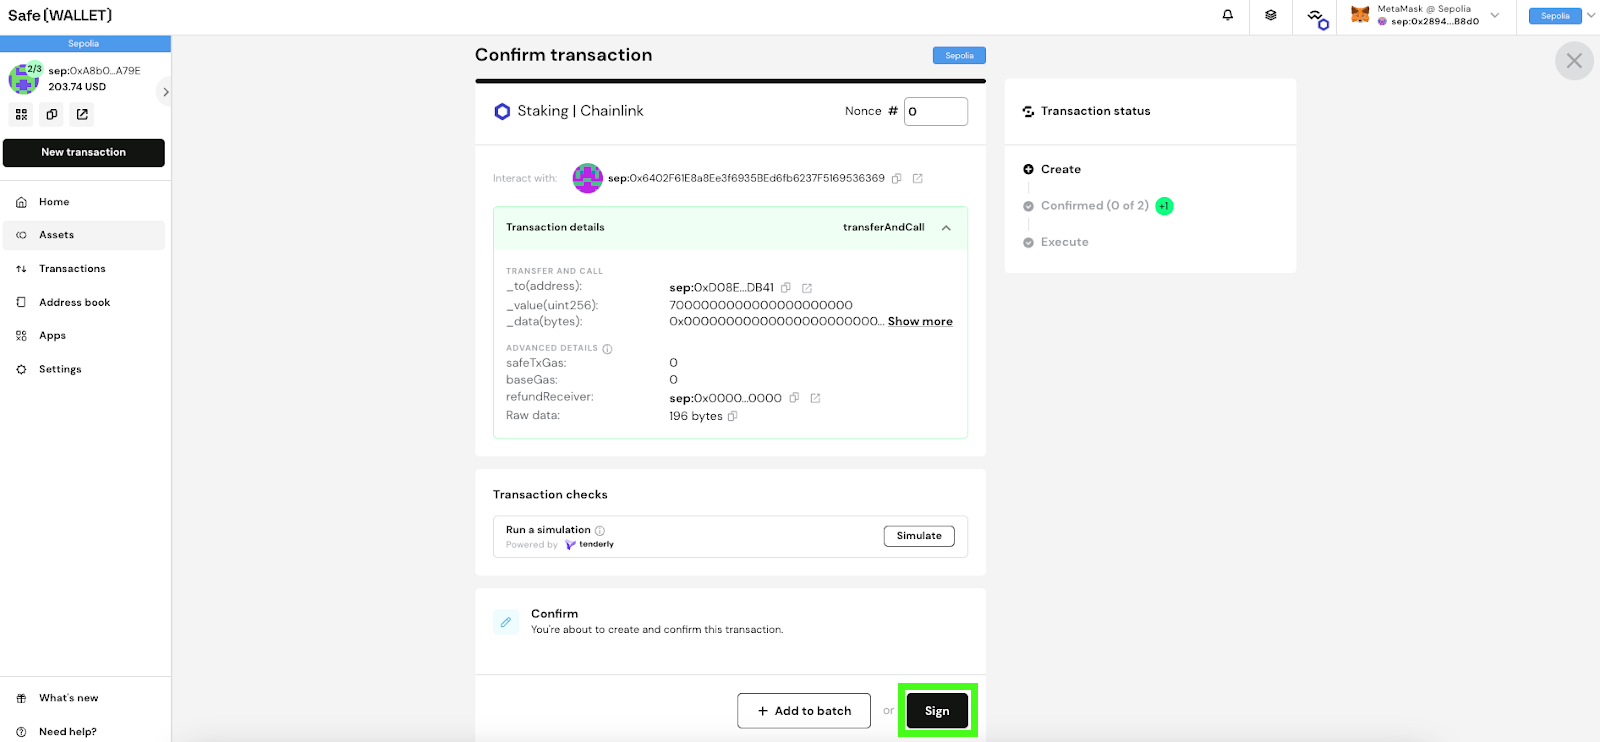
A wallet popup should appear. Press “Sign” again. This signature request will not incur any Ethereum network fees.
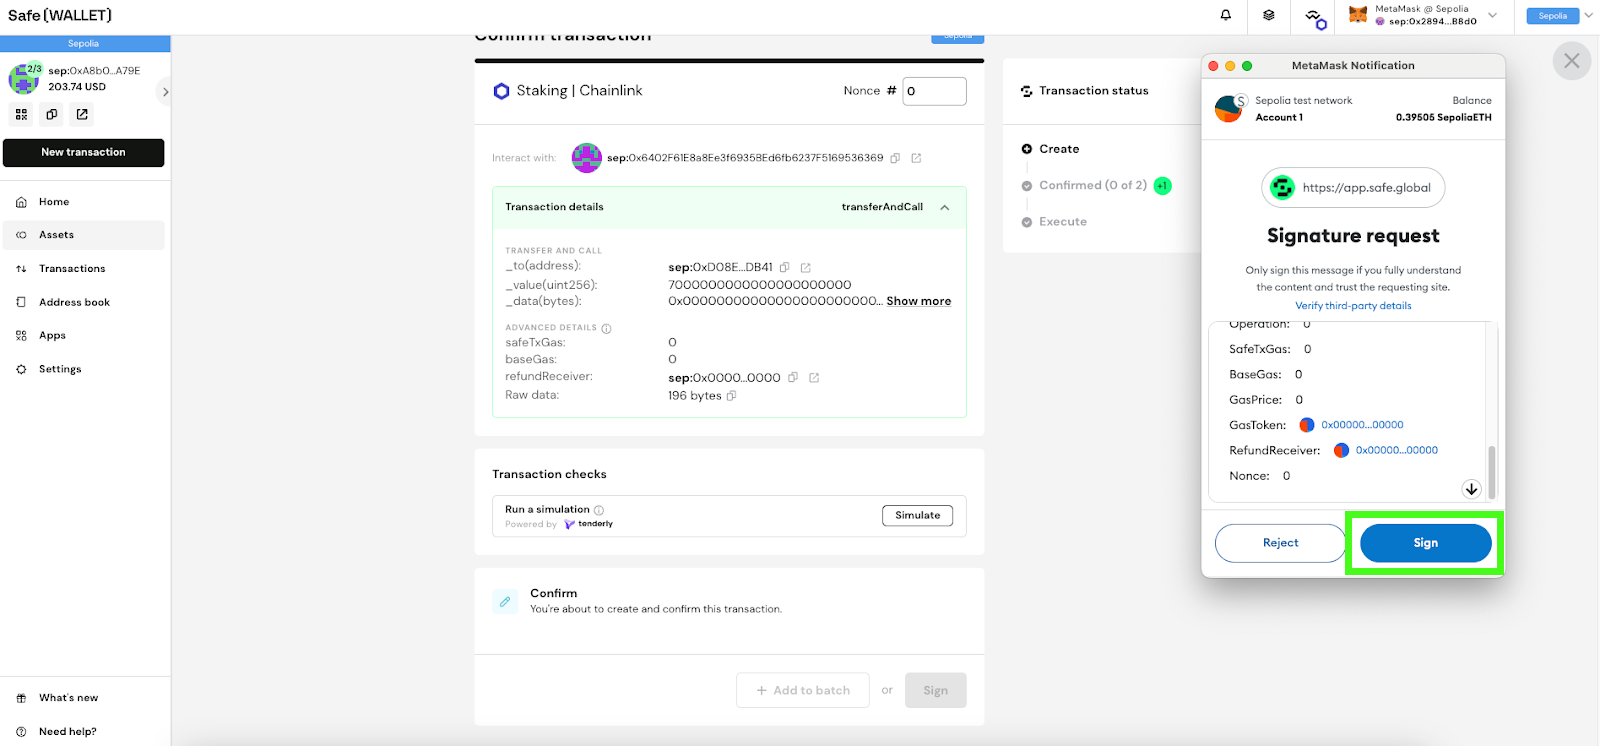
Great! You now have one signature needed to complete the transaction.
Other members of your multisig Safe Wallet must now log into Safe, access the wallet, and then sign the transaction. Here’s how.
How To Confirm a Multisig Safe Wallet Transaction
16. Navigate to the Safe application
Make sure to verify that the URL in your browser is the correct official Safe application website. Bookmark it for future reference: https://app.safe.global/welcome
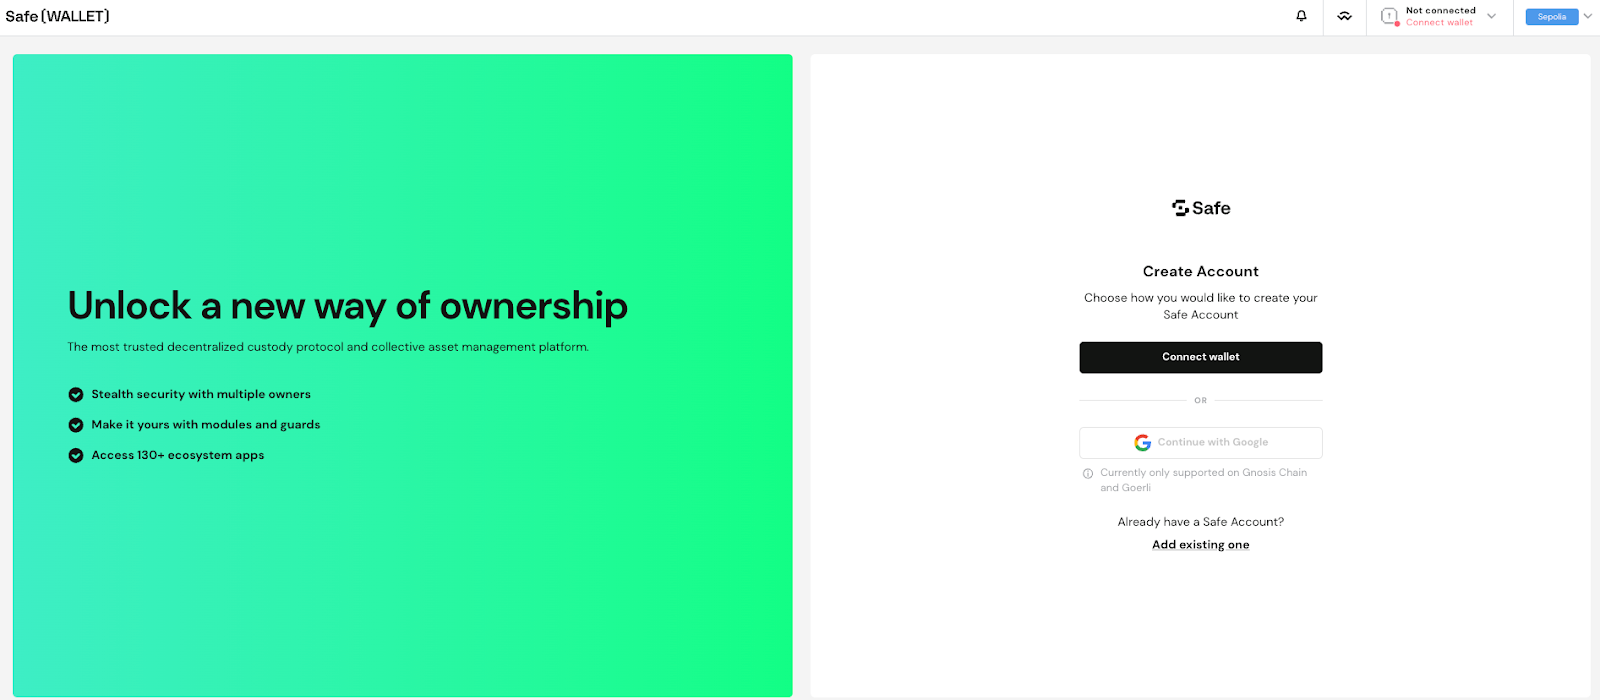
17. Press “Connect wallet”
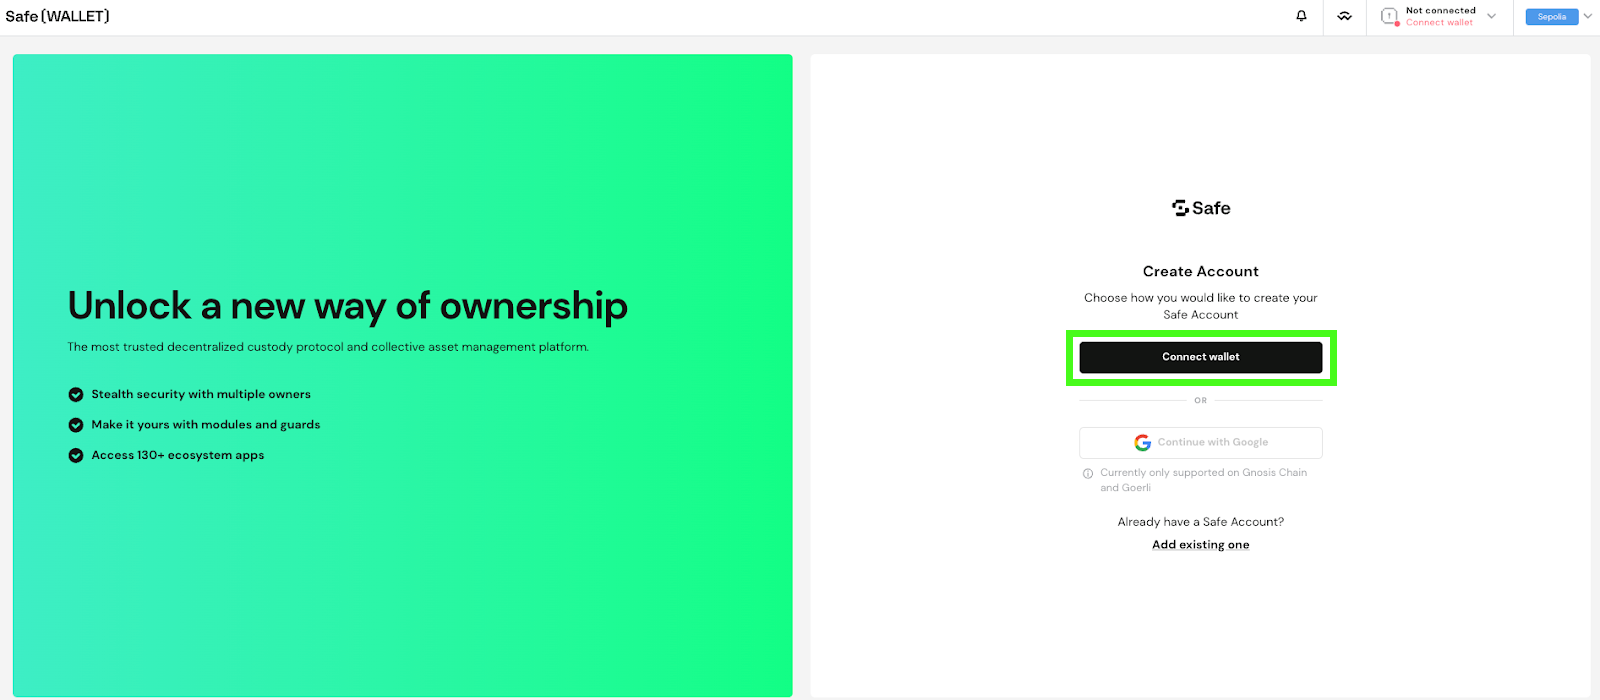
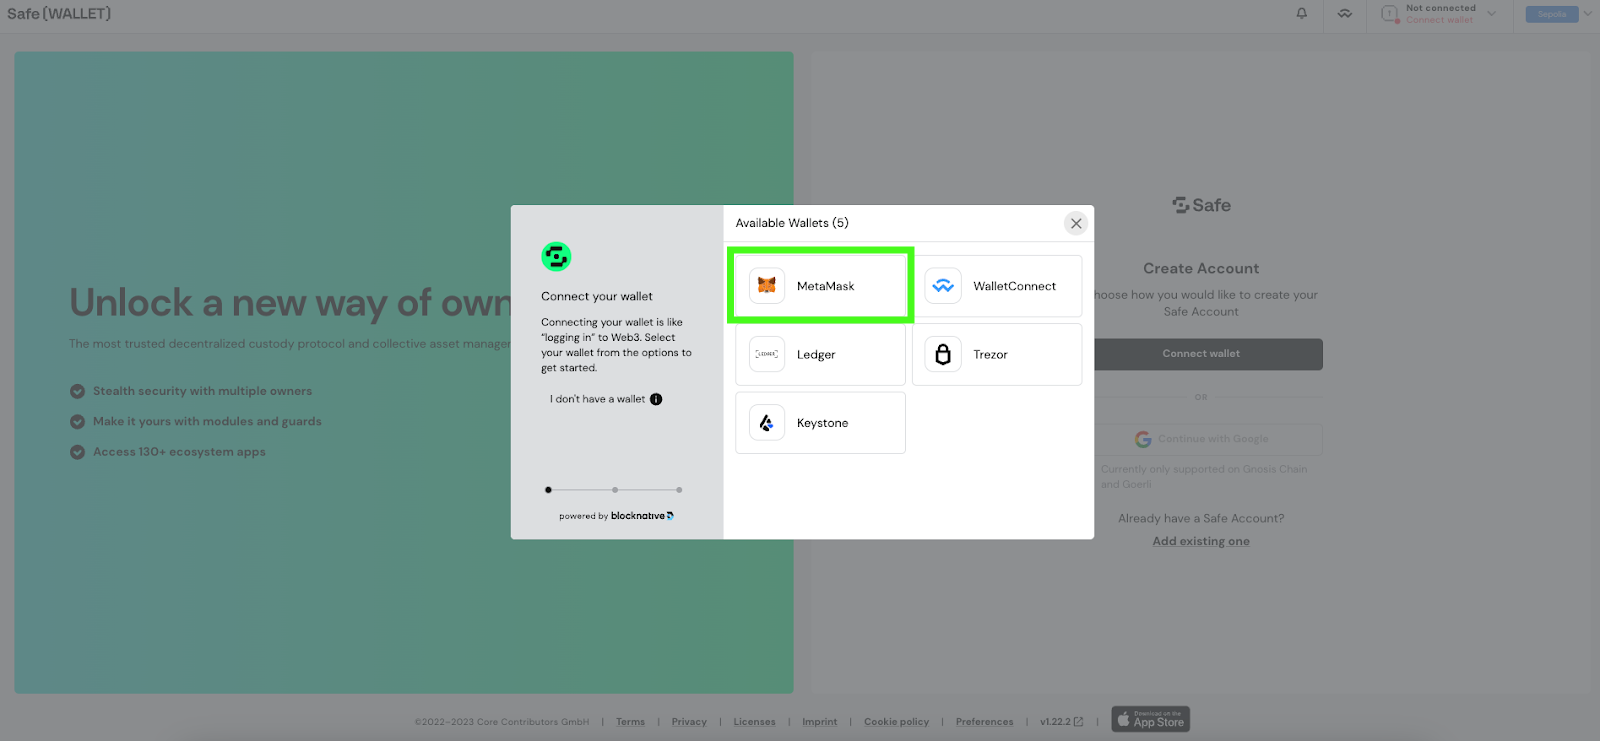
18. Choose your wallet provider
For this tutorial, we’ll be using another MetaMask wallet that is also on the multsig Safe wallet.
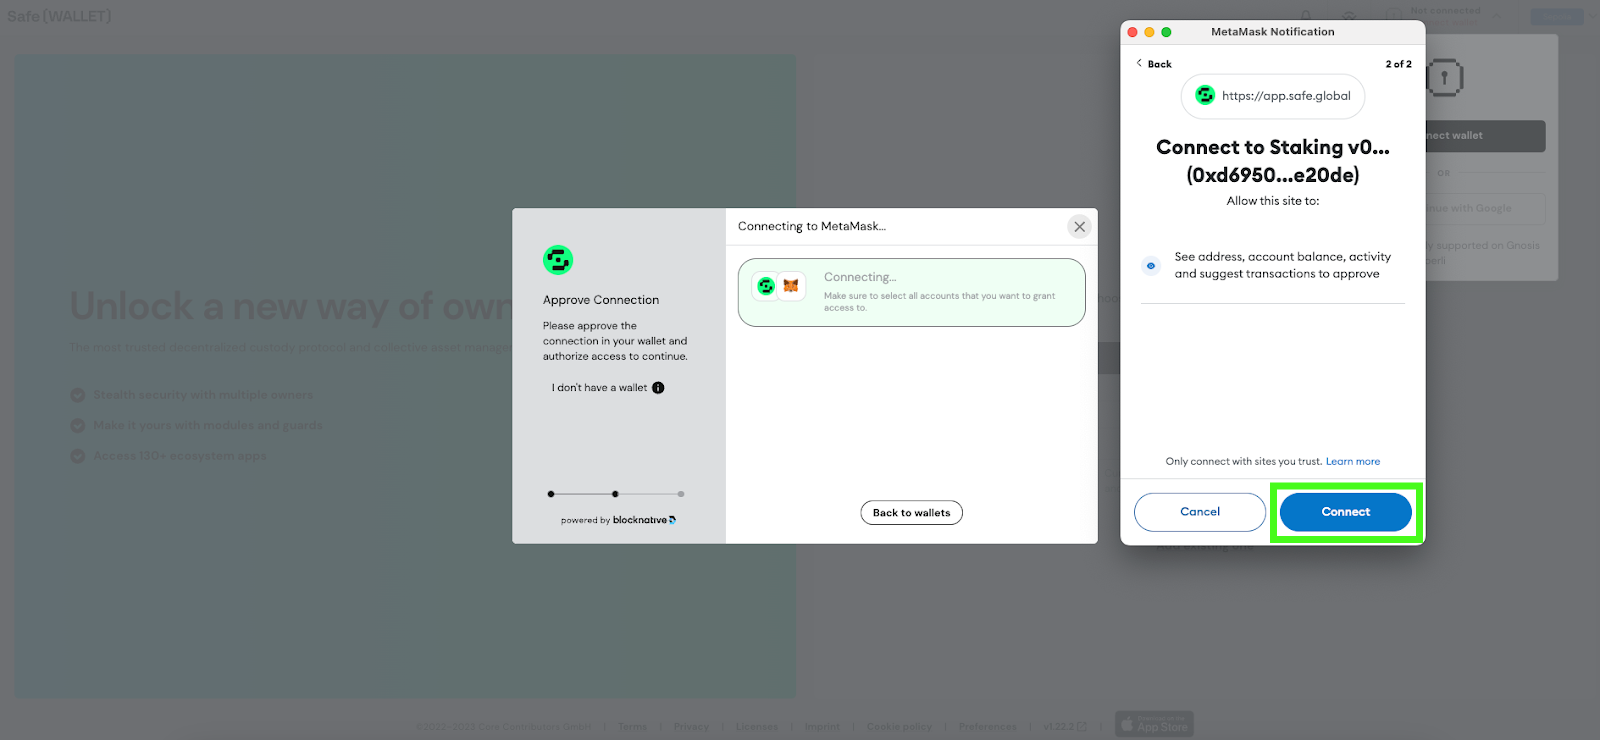
19. Press “Connect”
20. Press the dropdown menu for “My Safe Accounts”
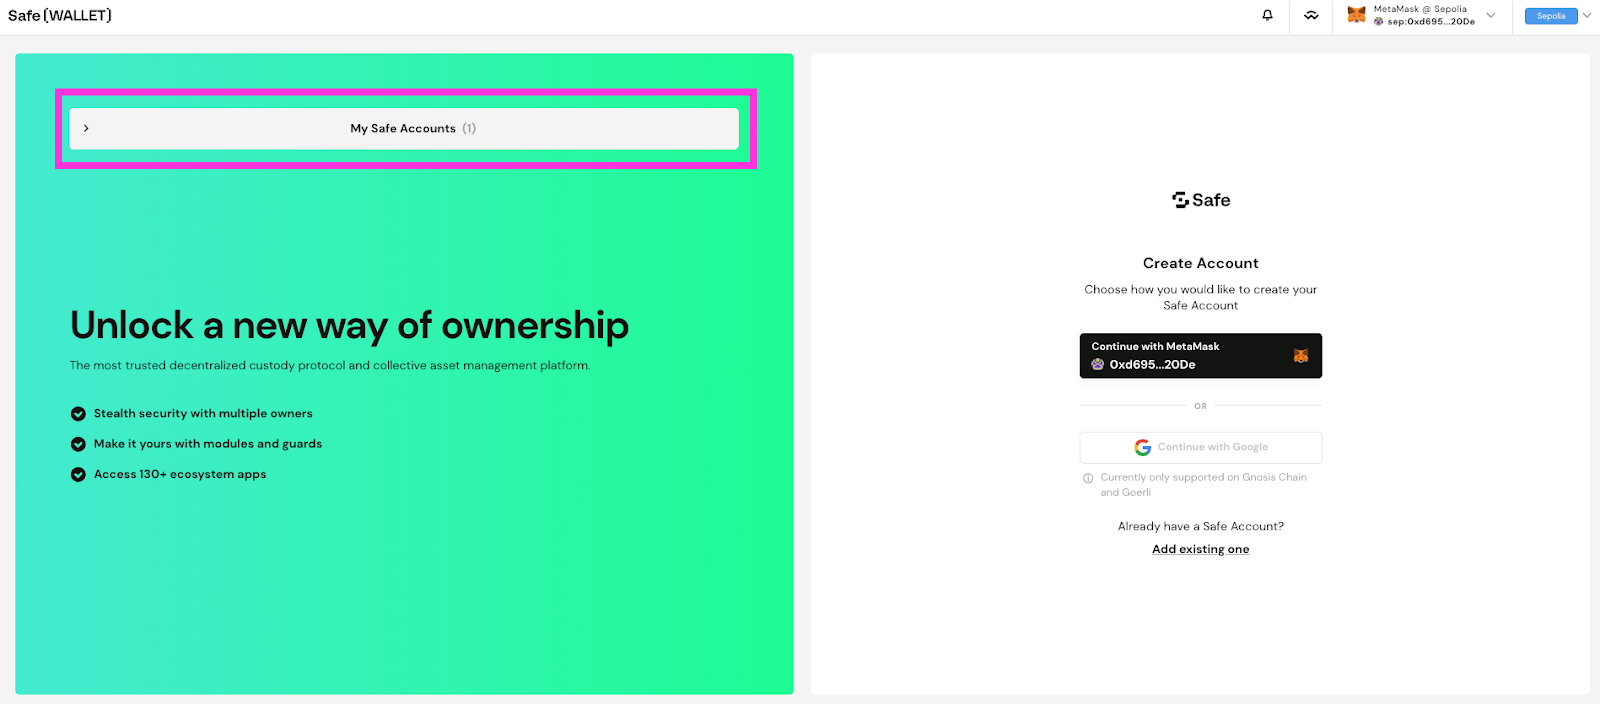
Your screen should now look like the below. Select the multisig wallet associated with your LINK staking transaction.

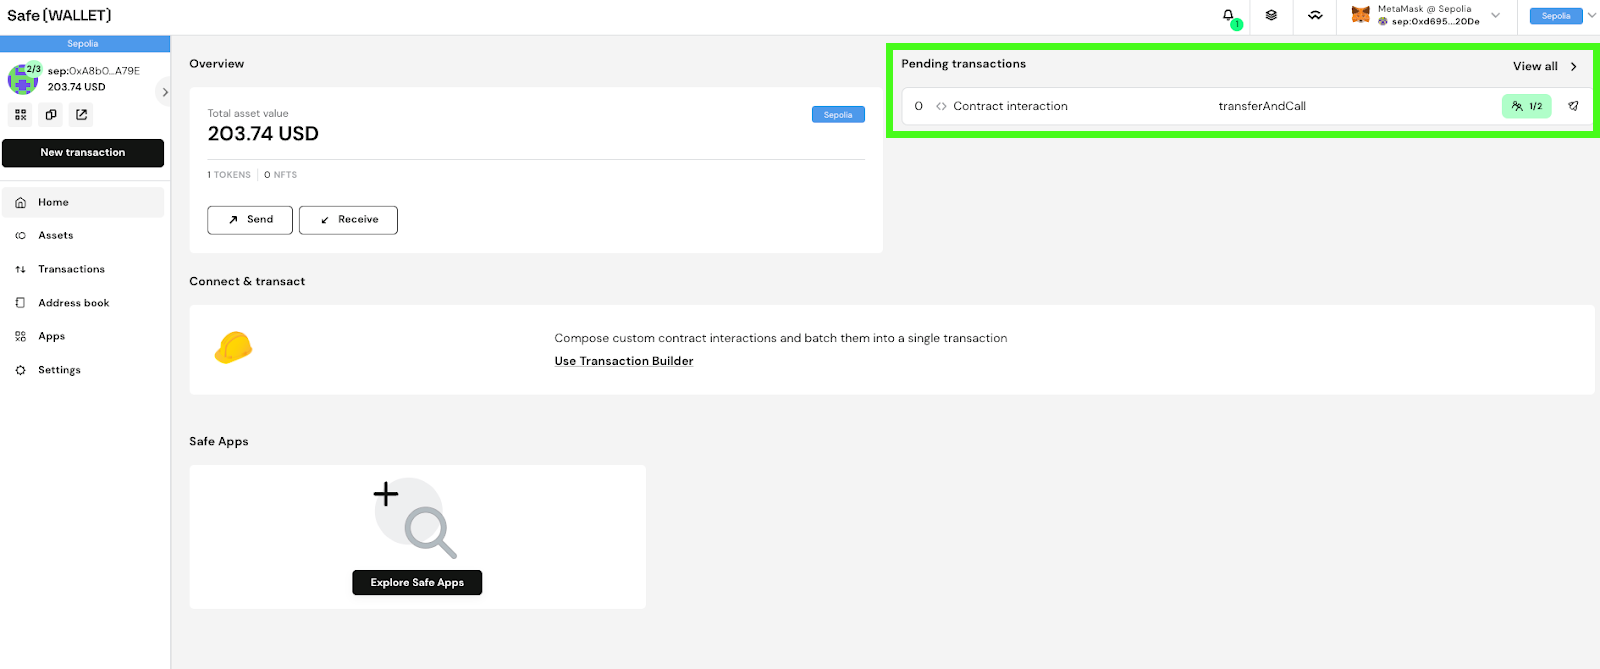
21. Go to pending transactions
You should see a pending transaction on the top right of your screen. Click into it.
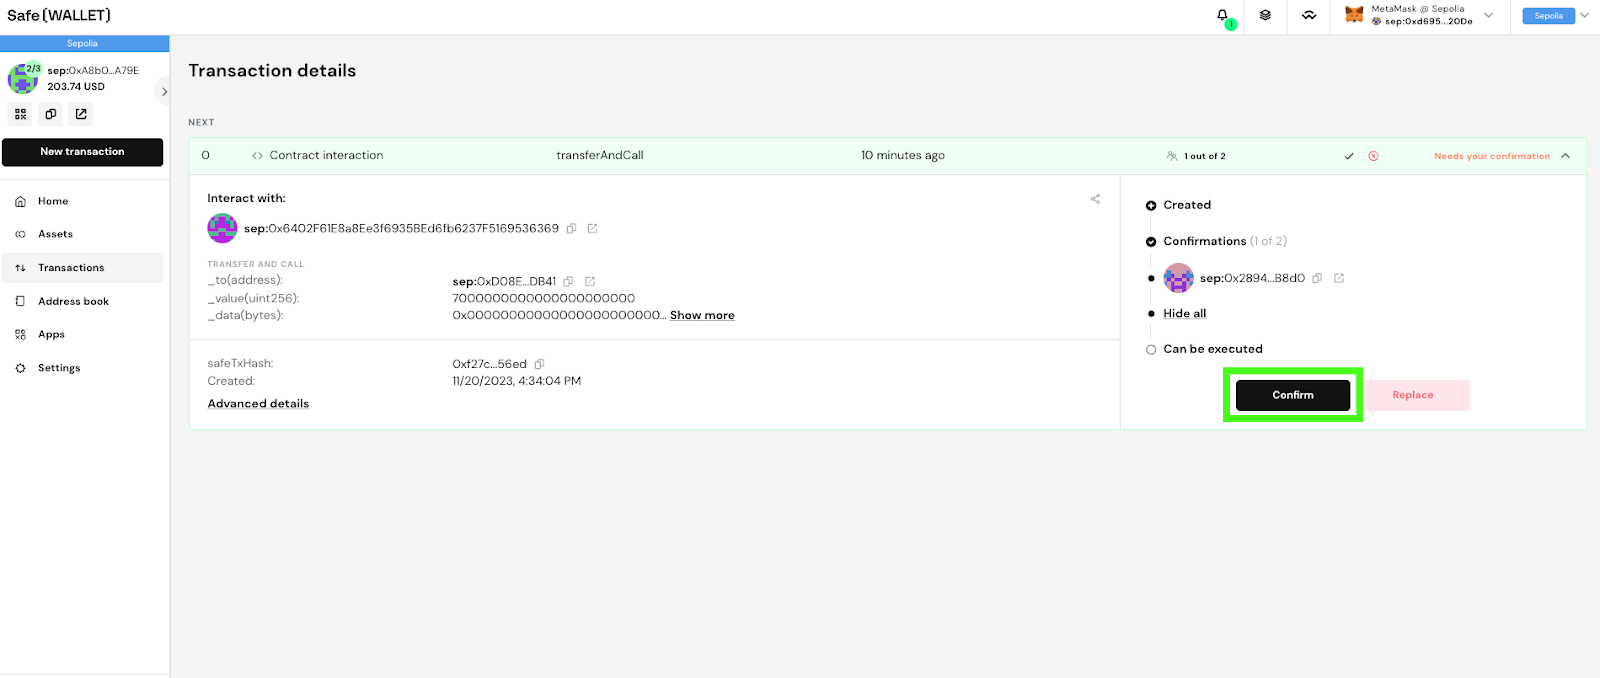
22. Confirm the transaction
Press the “Confirm” button on the right of your screen.
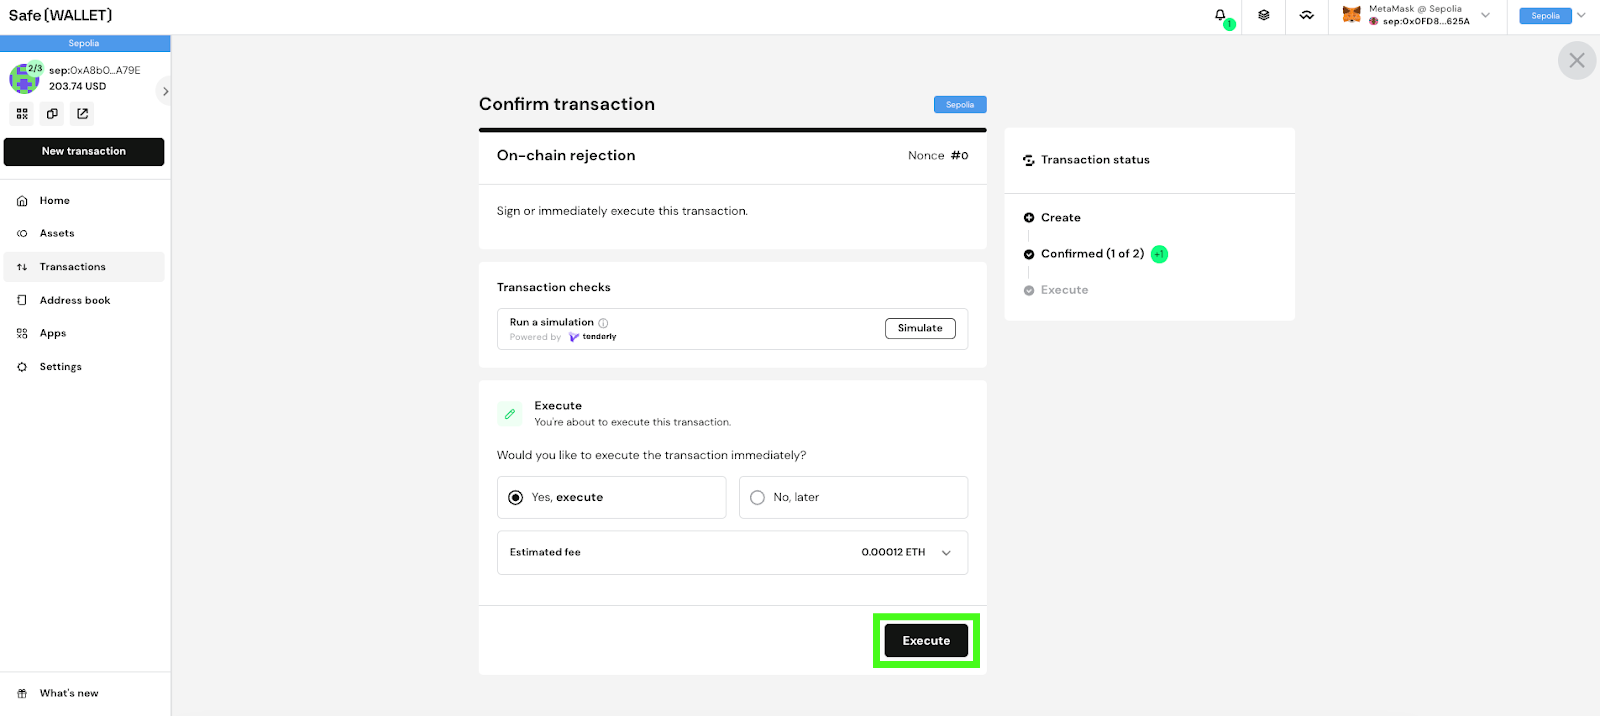
23. Execute the transaction
Press the “Execute” button at the bottom of your screen.
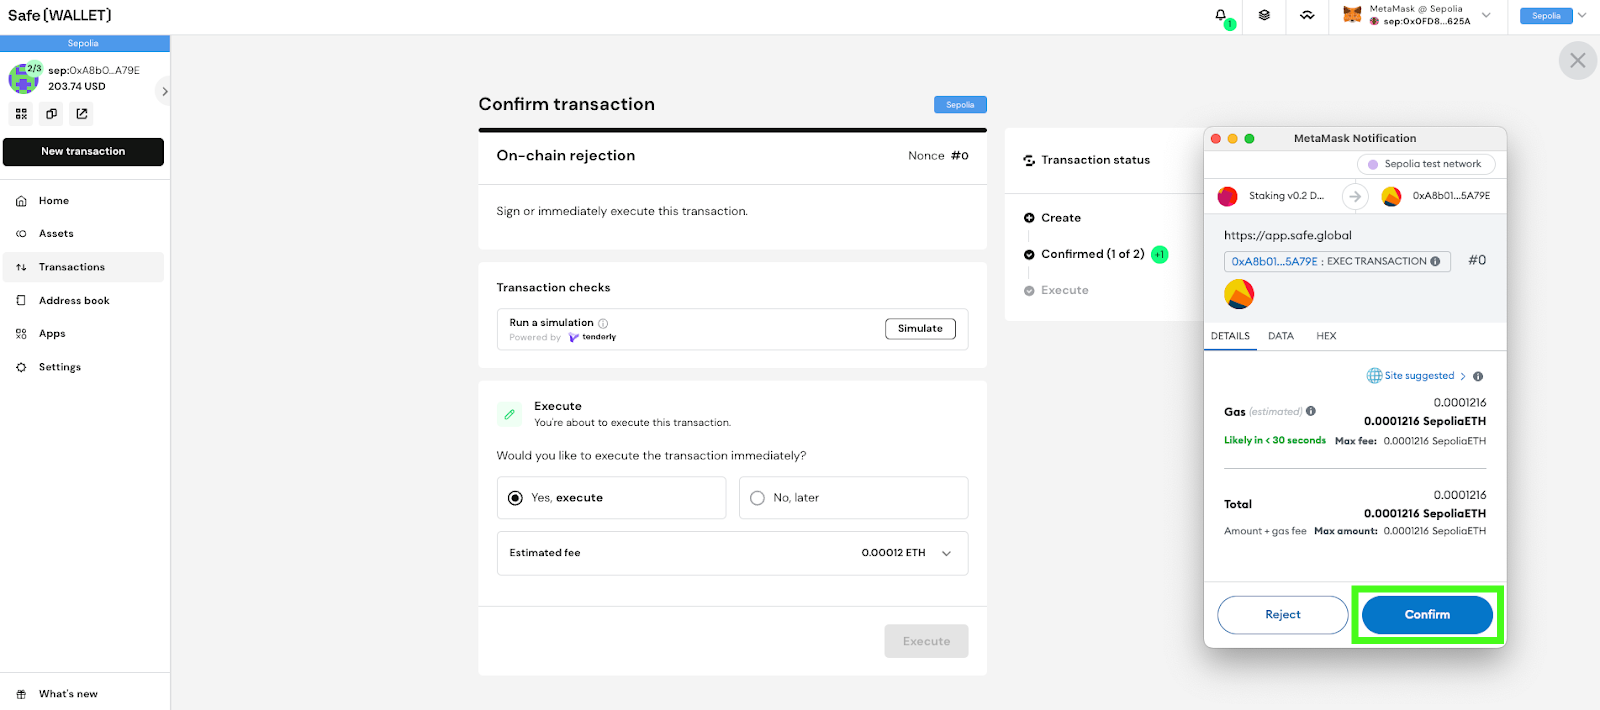
Verify the transaction fee amount before pressing “Confirm” to continue. The amount of ETH spent on network transaction fees will depend on network resource availability on Ethereum mainnet at the time of transaction.
Repeat this process with as many wallets as needed to satisfy the multisig conditions. Once the threshold has been reached, you will see the following screen.
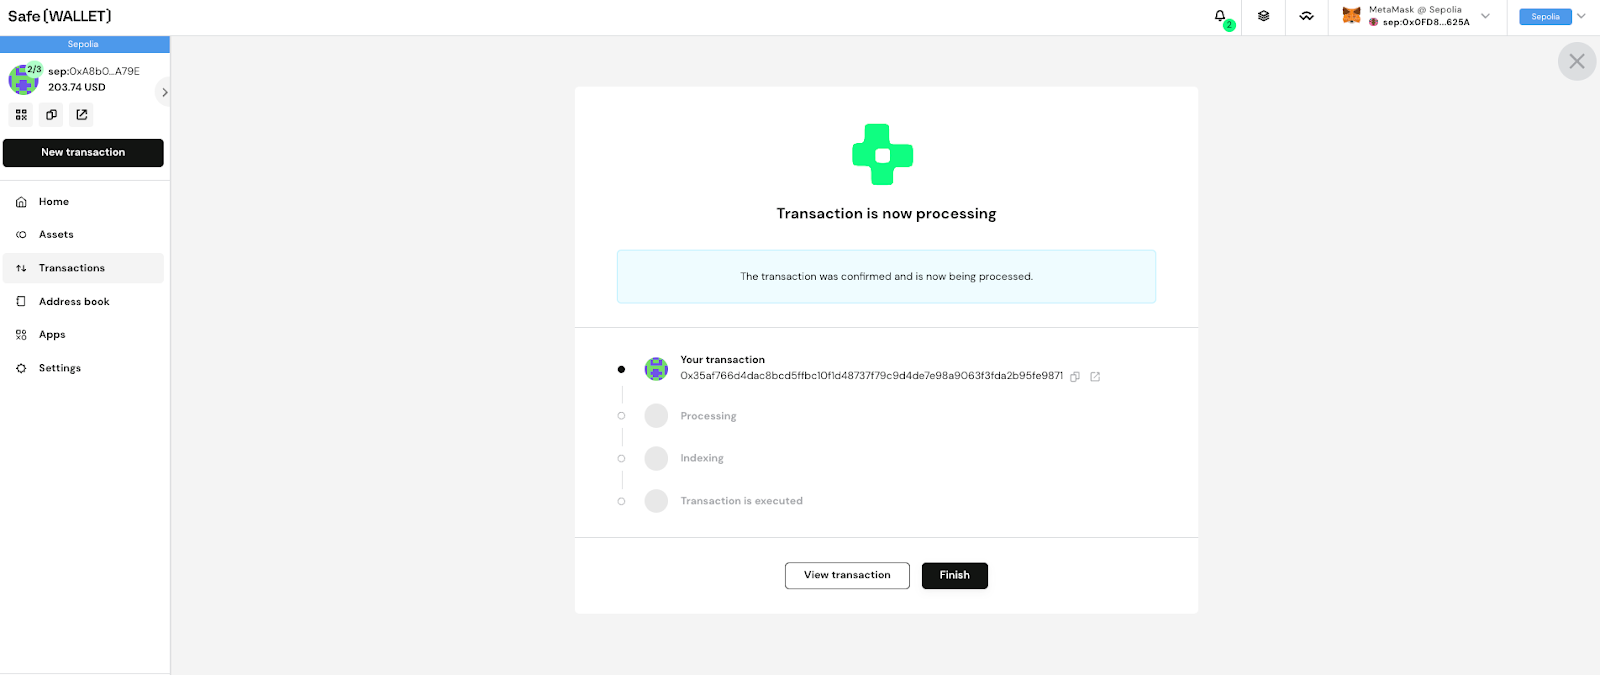
Congratulations! After this, your transaction should have been executed. You can now return to the Staking v0.2 tab to continue the process.
More Resources on Chainlink Staking
As a core part of Chainlink Economics 2.0, Chainlink Staking v0.2 represents the transformation of Chainlink Staking into a modular, extensible, and future-proof platform that can grow alongside the Chainlink Network. Instructions for staking directly at the smart contract level can be found on this IPFS-hosted guide.
Learn more about Chainlink Staking v0.2 and Economics 2.0:
- Introducing the Chainlink Staking Platform: v0.2 Upgrade and Launch Details
- Check Your Eligibility for Chainlink Staking v0.2: Priority Migration, Early Access, and General Access
- Chainlink Economics 2.0: One-Year Update
- Sustainable Oracle Economics Are Critical to the Success of Web3
Disclaimer: This post is for informational purposes only and contains statements about the future, including anticipated product features, development, and timelines for the rollout of these features. These statements are only predictions and reflect current beliefs and expectations with respect to future events; they are based on assumptions and are subject to risk, uncertainties, and changes at any time. Eligibility for Early Access does not guarantee your participation in the Chainlink Staking program. Staking eligibility and participation requirements are subject to modification at any time without notice. There can be no assurance that actual results will not differ materially from those expressed in these statements, although we believe them to be based on reasonable assumptions. All statements are valid only as of the date first posted. These statements may not reflect future developments due to user feedback or later events and we may not update this post in response.


