How To Build A Crypto Game
- How To Build A Crypto Game
- Getting Set Up
- Creating a Quiz
- Create a Test for Any Answer
- Cheating the Deal
- Answering a Question
- Adding Events
- Creating A Factory
- Create a Quiz From the Factory
- Contract Completed!
- Svelte Install
- Connecting Your Wallet
- Creating A Quiz
- Display a Question
- All Quiz Questions
- Summary
This technical tutorial will teach you how to build and deploy a full-stack dApp crypto game on the Ethereum Goerli test network. The game you will build stores quiz questions and their answers on the blockchain. The answers are hashed via keccak256, so you can verify the answer without giving it away. Keccak256 is a one-way cryptographic hash function, and it cannot be decoded in reverse. This means the way to check if the answer is correct will be to provide a guess and hash it. If both hashes match, your answer is correct.
This tutorial will use:
You can view a video tutorial covering the entire process below, and access the GitHub repo containing the game here.
Getting Set Up
Obtain Goerli ETH
If you haven’t used Goerli before, head to the Chainlink Faucet to obtain some testnet ETH.
Install Foundry
For this tutorial, you will be using Foundry to build, test, and deploy your Solidity. You can find instructions on the Foundry GitHub.
Initialize the Project
Enter the following into your Terminal:
❯ Development mkdir QuizGame
❯ Development cd QuizGame
❯ QuizGame forge init foundry
Initializing /Users/rg/Development/QuizGame/foundry...
Installing ds-test in "/Users/rg/Development/QuizGame/foundry/lib/ds-test", (url: https://github.com/dapphub/ds-test, tag: None)
    Installed ds-test
    Initialized forge project.
❯ Development cd foundry
❯ foundry (main) ✔
Create Your First Test
Once you have initialized the project, Foundry creates a basic contract and test for you within the src directory.
❯ src (main) ✔ tree
.
├── Contract.sol
└── test
    └── Contract.t.sol

1 directory, 2 files
These provide a basic idea of the Foundry file structure. You can remove both Contract.sol and Contract.t.sol as you will create your contract and test.
❯ src (main) ✔ rm Contract.sol test/Contract.t.sol
Create QuizGame.t.sol within the test directory. The basic skeleton should look like this.
foundry/src/test/QuizGame.t.sol

// SPDX-License-Identifier: UNLICENSED
pragma solidity ^0.8.13;

import "ds-test/test.sol";
import "../QuizGame.sol";

interface CheatCodes {
    function deal(address, uint256) external;
}

contract QuizTest is DSTest {
    function setUp() public {}
    function testExample() public {
        assertTrue(true);
    }
}
This will allow you to ensure everything is working via forge test. If you run the test, it will fail due to the QuizGame contract not being available. This begins the test-driven development cycle of writing a test, watching it fail, fixing the test, seeing it pass, and writing another failing test. You can expect to see similar errors going forward until you fix the failing tests. Congratulations, your tests are failing as expected!
Error:
   0: Compiler run failed
      ParserError: Source "/Users/rg/Development/QuizGame/src/QuizGame.sol" not found: File not found.
       --> /Users/rg/Development/QuizGame/src/test/QuizGame.t.sol:6:1:
        |
      6 | import "../QuizGame.sol";
        | ^^^^^^^^^^^^^^^^^^^^^^^^^
Create a new file named QuizGame.sol in the src directory.
foundry/src/QuizGame.sol

// SPDX-License-Identifier: UNLICENSED
pragma solidity ^0.8.13;

contract QuizGame {}
At this point, your test should be passing.
❯ src (main) ✘ forge test
[⠢] Compiling...
[⠆] Compiling 2 files with 0.8.13
[⠰] Solc finished in 37.90ms
Compiler run successful

Running 1 test for src/test/QuizGame.t.sol:QuizTest
[PASS] testExample() (gas: 190)
Test result: ok. 1 passed; 0 failed; finished in 1.31ms

❯ src (main) ✘
Creating a Quiz
Now that you have the scaffolding for the game contract and tests in place, you can write your first actual test. While it may not appear to be a test, the steps you will add to the setup() function will ensure that you can create a quiz. Once it’s created, you can check that the quiz correctly stores the question and answer.
foundry/src/test/QuizGame.t.sol

contract QuizTest is DSTest {
    QuizGame public game;

    function setUp() public {
        // The salt means pre-generated dictionaries are not valid
        bytes32 salt = bytes32("123123123");
        // Store the answer to the question
        string memory answer = "42";
        // Store the question
        string
            memory question = "What is the answer to life, the universe, and everything?";
        // Store the hashed correct answer
        bytes32 hashedAnswer = keccak256(abi.encodePacked(salt, answer));
        // Create a new game with the question and hashed answer
        game = new QuizGame(question, hashedAnswer);
        emit log(game.question());
    }

    function testExample() public {
        assertTrue(true);
    }
}
To pass the test, update your contract.
foundry/src/QuizGame.sol

contract QuizGame {
    // The salt means pre-generated dictionaries are not valid this can be
    // changed to any value you want
    bytes32 public salt = bytes32("123123123");
    // Store the answer to the question
    bytes32 public hashedAnswer;
    // Store the question
    string public question;

    // Create the quiz contract with the passed in question and answer
    constructor(string memory _question, bytes32 _hashedAnswer) {
        // Store the hashed answer
        hashedAnswer = _hashedAnswer;
        // Store the question
        question = _question;
    }
}
At this point, your contract will store a question and answer, but it doesn’t do much else.
Create a Test for Any Answer
Once you have a question set up, you will need to check if the guess a player provides matches the answer stored in the quiz contract. You need to create a test you know will fail to do this. We view the failure as a success as the answer guessed will be incorrect.
foundry/src/test/QuizGame.t.sol

function testQuizFail() public {
    // This will fail, that mean you need to catch the failure to 'pass' the test
    try game.guess("33") {
        assertTrue(false);
    } catch {
        assertTrue(true);
    }
}
This test means you will need to create a function to accept a guess. Part of that function will be having the players guess to compare it to the stored hashed answer.
foundry/src/QuizGame.sol

function guess(string calldata answer) public {
    // Check if the answer is correct
    require(
        keccak256(abi.encodePacked(salt, answer)) == hashedAnswer,
        "Incorrect answer"
    );
}
This guess function will check if the answer is correct and that’s all. Nothing happens if the answer is correct. To provide the correct guess with a reward, you must send ETH to the contract and payout to the correct player.
Cheating the Deal
Foundry provides a set of tools to manipulate the state of the blockchain. These “cheat codes” can be found in the Foundry book.
The specific cheat code you will be using is deal, which will allow you to set the balance for a specified address. Create an interface outside of the contract.
foundry/src/test/QuizGame.t.sol

interface CheatCodes {
    function deal(address, uint256) external;
}
Within the contract, you need to use this cheat code to create a constant cheats.
foundry/src/test/QuizGame.t.sol

contract QuizTest is DSTest {
    CheatCodes constant cheats = CheatCodes(HEVM_ADDRESS);
.
.
.
This will allow you to create a new test that sends some ETH to the contract and then submits a correct answer.
foundry/src/test/QuizGame.t.sol

function testQuizPass() public {
    // Get the current balance of this contract
    uint256 beginBalance = address(this).balance;
    // Fund the contract
    cheats.deal(address(game), 10000);
    // Guess the correct answer
    game.guess("42");
    // Check balance after the guess is 10000 more than before
    assertEq(address(this).balance, beginBalance + 10000);
}
The goal is for the test contract to be paid by the quiz for the correct answer. You will need to create a fallback() and receive() function for that to happen.
foundry/src/test/QuizGame.t.sol

fallback() external payable {}

receive() external payable {}
Answering a Question
The contract should transfer its balance to the guesser when a question is answered correctly.
foundry/src/QuizGame.sol

function guess(string calldata answer) public {
    require(
        keccak256(abi.encodePacked(salt, answer)) == hashedAnswer,
        "Incorrect answer"
    );
    // If the contract has a balance, and the answer is correct,
    if (address(this).balance > 0) {
        // send the balance to the guesser
        (bool sent, bytes memory data) = payable(msg.sender).call{value: address(this).balance}("");
    }
}
fallback() external payable {
}

receive() external payable {
}
Fantastic! At this point, you have a fully working quiz contract. There are a couple more steps to complete the Solidity work before starting working on the frontend. First, you need to create a few events in the QuizGame contract.
Adding Events
Events will allow you to listen for changes in the state of the contract. For the quiz, you will want to create an event for both the funding of the quiz and correct guesses.
At the top of the contract, add the two events. Add them after
string public quesiton;
foundry/src/QuizGame.sol

event QuizFunded(uint256 balance);
event AnswerGuessed();
At the end of the guess function, add:
emit AnswerGuessed();
Add the following to both the fallback and receive functions, add:
emit QuizFunded(address(this).balance);
Creating A Factory
The final puzzle piece for your quiz game is the factory. What exactly is a factory contract? A factory contract is a contract that creates a set of other contracts and keeps track of them. You will need to create two new files for the factory, the contract, and the test.
foundry/src/test/QuizFactory.t.sol

// SPDX-License-Identifier: UNLICENSED
pragma solidity ^0.8.13;

import "ds-test/test.sol";
import "../QuizFactory.sol";

contract QuizFactoryTest is DSTest {
    QuizFactory public factory;

    function setUp() public {
        factory = new QuizFactory();
    }
}
foundry/src/QuizFactory.sol

// SPDX-License-Identifier: UNLICENSED
pragma solidity ^0.8.13;

import "./QuizGame.sol";

contract QuizFactory {
    constructor() {}
}
This basic factory will need a few more additions. First, you should add a test to test creating a quiz via the factory.
Create a Quiz From the Factory
The first step is to add a test for creating a quiz from the factory contract.
foundry/src/test/QuizFactory.t.sol

function testCreateQuiz() public {
    // Set Answer
    string memory answer = "42";
    // Set Question
    string
        memory question = "What is the answer to life, the universe, and everything?";
    // Set Hashed Answer
    bytes32 salt = bytes32("123123123");
    bytes32 hashedAnswer = keccak256(abi.encodePacked(salt, answer));
    // Create a new quiz with the question and hashed answer
    factory.createQuiz(question, hashedAnswer);
    // Get the new quiz
    QuizGame quiz = factory.quizzes(0);
    // Check the question
    assertEq(
        keccak256(abi.encodePacked(quiz.question())),
        keccak256(abi.encodePacked(question))
    );
}
This test expects a few things. First, a createQuiz function. It also expects you to have a way to reference the quizzes from the factory contract. You will need to create an array of QuizGames, which will be publicly available.
Set up the array at the top of your QuizFactory contract. It might be nice to have an event available as well. When you start building out the frontend, your future self will thank you.
foundry/src/QuizFactory.sol

QuizGame[] public quizzes;
event QuizCreated(QuizGame indexed quiz, address indexed creator);
Now you can build out the createQuiz function
foundry/src/QuizFactory.sol

function createQuiz(string memory _question, bytes32 _answer) public {
    // Create a new quiz
    QuizGame quiz = new QuizGame(_question, _answer);
    // Add it to the list of quizzes
    quizzes.push(quiz);
    // Emit the event
    emit QuizCreated(quiz, msg.sender);
}
You can add quizzes, and it would be helpful to return all of the quizzes that the factory has created.
foundry/src/test/QuizFactory.t.sol

function testCountquizzes() public {
    // Set Answer
    string memory answer = "42";
    // Set Question
    string
        memory question = "What is the answer to life, the universe, and everything?";
    // Set Hashed Answer
    bytes32 salt = bytes32("123123123");
    bytes32 hashedAnswer = keccak256(abi.encodePacked(salt, answer));
    // Create two new quizzes
    factory.createQuiz(question, hashedAnswer);
    factory.createQuiz(question, hashedAnswer);
    // Get all the quizzes
    QuizGame[] memory quizzes = factory.getQuizzes();
    // Check the number of quizzes
    assertEq(quizzes.length, 2);
}
This test checks that the number of quizzes returned matches what you expect. You need to create the function getQuizzes, which should return an array of QuizGames
foundry/src/test/QuizFactory.sol

function getQuizzes() public view returns (QuizGame[] memory col) {
    // Calculate number of quizzes
    uint256 size = quizzes.length;
    // Create a new array for the quizzes
    col = new QuizGame[](size);
    // Copy the quizzes to the new array
    for (uint256 i = 0; i < size; i++) {
        col[i] = quizzes[i];
    }
    // Return the array
    return col;
}
Contract Completed!
You did it! The contract is ready to be deployed! You can use this script to deploy it. Save it at the root of your project.
deploy.sh

#!/usr/bin/env bash

# Read the RPC URL
echo Enter Your RPC URL:
echo Example: "https://eth-goerli.alchemyapi.io/v2//XXXXXXXXXX"
read -s rpc

# Read the contract name
echo Which contract do you want to deploy \(eg Greeter\)?
read contract

forge create ./src/${contract}.sol:${contract} -i --rpc-url $rpc
This will let you deploy your contract to Goerli, and all this is doing is reading variables without displaying what you’re typing in on the command line. This will ensure your private keys aren’t stored in your command line history.
Once you run deploy.sh, you should see where your contract was deployed to. You will need this address for the next section, building out the frontend.
Deployer: 0x0000000000000000000000000000000000000000
Deployed to: 0x1234567890123456789012345678901234567890
Transaction hash: 0x1234567890123456789012345678901234567890594be2f670606ada53412aaa
Svelte Install
Initializing Svelte is simple. To see the instructions, you can head to the SvelteKit Homepage. For this tutorial, you should use the following. This will create a SvelteKit skeleton project within the Svelte directory.
❯ QuizGame (main) ✘ npm init svelte svelte
Need to install the following packages:
  create-svelte
Ok to proceed? (y) y
create-svelte version 2.0.0-next.139
Welcome to SvelteKit!
This is beta software; expect bugs and missing features.
Problems? Open an issue on https://github.com/sveltejs/kit/issues if none exists already.
✔ Which Svelte app template? › Skeleton project
✔ Add type checking? › None
✔ Add ESLint for code linting? … Yes
✔ Add Prettier for code formatting? … Yes
✔ Add Playwright for browser testing? … No
Your project is ready!
✔ ESLint
  https://github.com/sveltejs/eslint-plugin-svelte3
✔ Prettier
  https://prettier.io/docs/en/options.html
  https://github.com/sveltejs/prettier-plugin-svelte#options

Install community-maintained integrations:
  https://github.com/svelte-add/svelte-adders

Next steps:
  1: cd svelte
  2: npm install (or pnpm install, etc)
  3: git init && git add -A && git commit -m "Initial commit" (optional)
  4: npm run dev -- --open
To close the dev server, hit Ctrl-C

Stuck? Visit us at https://svelte.dev/chat
❯ QuizGame (main) ✘ cd svelte
You’ll need to add ethers to the project as well
❯ svelte (main) ✘ npm install ethers
added 43 packages, and audited 180 packages in 1s
51 packages are looking for funding
  run `npm fund` for details
found 0 vulnerabilities
You should be able to start the Svelte server up and see the following page.
npm run dev -- --open
Connecting Your Wallet
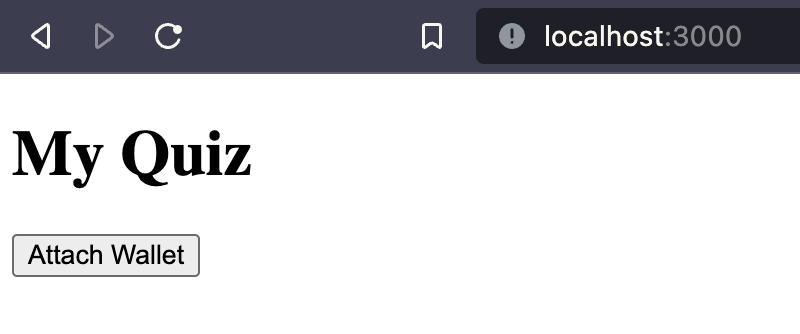
You will need to create a component in the svelte/src/lib directory, you will also need to create this lib directory. To start and ensure everything is working, create a single button in the component for now.
svelte/src/lib/WalletConnect.svelte

<button>Attach Wallet</button>
Then within svelte/src/routes/index.svelte, you can import this new component. Ensuring that the component is imported correctly is an excellent practice before fleshing it out completely. It also lets you see incremental changes as you build the component out via hot reload.
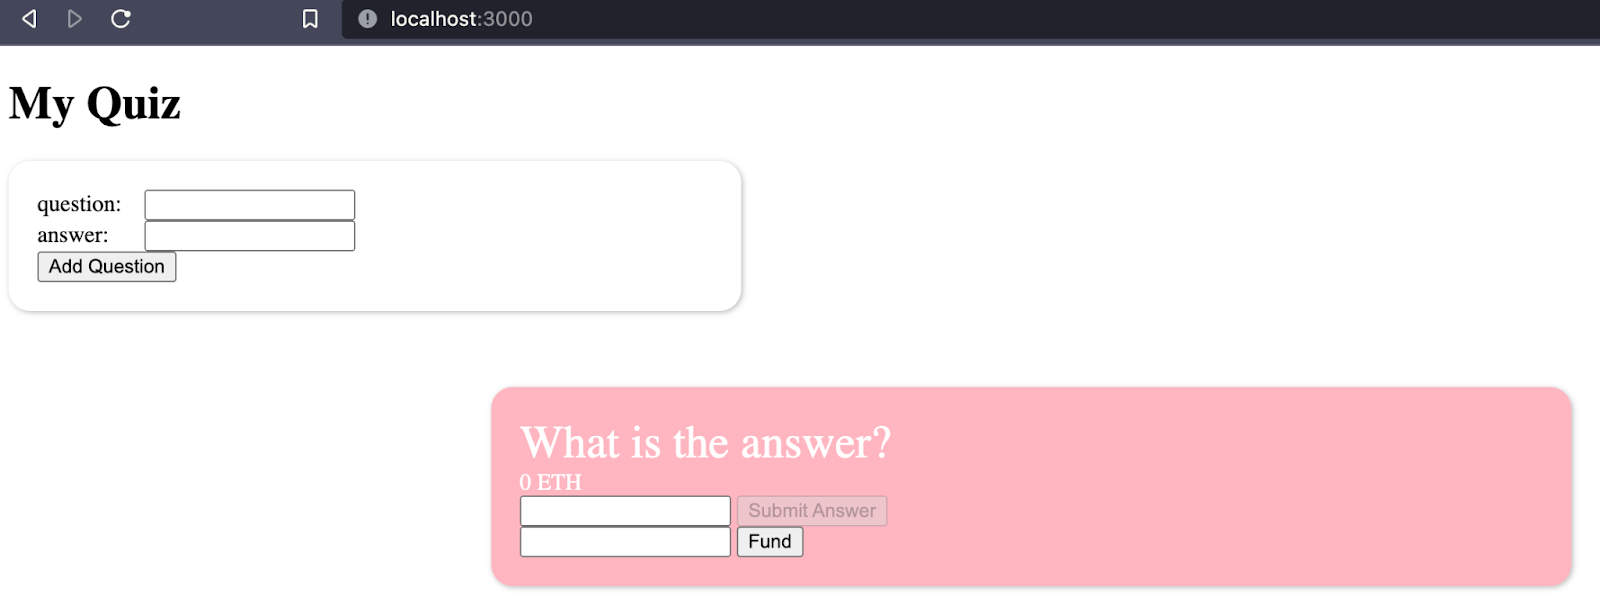
svelte/src/routes/index.svelte

<script>
    import WalletConnect from '$lib/WalletConnect.svelte';
</script>

<h1>My Quiz</h1>

<WalletConnect />
This should provide you with the following change to your page.
Once this is working, we can build out the rest of the components. I won’t be demonstrating these steps in the future but remember to create the components before importing them.
To pass the contract and wallet between components, you will need to create a place to store them. You can create a web3Props object that will hold this information.
svelte/src/lib/WalletConnect.svelte

<script>
    import { ethers } from 'ethers';
    // place holder for the properties we will be passing between components
    export let web3Props = { provider: null, signer: null, account: null, chainId: null };
    // connect the wallet
    async function connectWallet() {
        // get the provider, this time without ethereum object
        let provider = new ethers.providers.Web3Provider(window.ethereum, 'any');
        // prompt user for account connections
        await provider.send('eth_requestAccounts', []);
        // get the signer
        const signer = provider.getSigner();
        // get the account address
        const account = await signer.getAddress();
        // get the chainId
        const chainId = await signer.getChainId();
        // update the props
        web3Props = { signer, provider, chainId, account };
    }
</script>

<button on:click={connectWallet}>Attach Wallet</button>
Once the component is updated, you will need to pass the props from index.svelte into the component.
svelte/src/routes/index.svelte

<script>
    import WalletConnect from '$lib/WalletConnect.svelte';

    export let web3Props = {
        provider: null,
        signer: null,
        account: null,
        chainId: null
    };
</script>

<h1>My Quiz</h1>
{#if !web3Props.account}
    <WalletConnect bind:web3Props />
{:else}
    😎
{/if}
Creating A Quiz
You’ve connected your wallet! You can now move on to interacting with the Quiz Factory to create a question.
The first step will be bringing over the ABIs for both contracts. When the contracts were compiled via Forge for either testing or deployment, a file was created containing a JSON version of the ABI;
out/QuizFactory.sol/QuizFactory.json and out/QuizGame.sol/QuizGame.json are both created in the Foundry directory. Create a new directory in svelte/src named contracts and copy both files there. These will allow you to interact with the deployed versions of the contracts.
Once both the JSON files are saved into the new contracts directory, you can create a component to add a quiz.
svelte/src/lib/AddQuestion.svelte

<script>
    // ethers allows you to interact with the Ethereum blockchain
    import { ethers } from 'ethers';
    // web3Props holds the properties of the web3 provider
    export let web3Props = {
        provider: null,
        signer: null,
        account: null,
        chainId: null,
        contract: null
    };
    // values for the quiz factory contract
    $: question = '';
    $: answer = '';
    $: encryptedAnswer = null;
    async function encryptAnswer() {
        // encrypt the answer using the same salt as the contract
        encryptedAnswer = ethers.utils.keccak256(
            ethers.utils.solidityPack(
                ['bytes32', 'string'],
                [ethers.utils.formatBytes32String('123123123'), answer]
            )
        );
        // use the factory contract to create a new quiz
        web3Props.contract.createQuiz(question, encryptedAnswer);
    }
</script>

<div class="wrapper">
    <span class="input-label"> question: </span>
    <!-- bind lets changes to question update the value of the variable  -->
    <input bind:value={question} />
    <br />
    <span class="input-label"> answer: </span>
    <input bind:value={answer} />
    <br />
    <!-- On click, run the encryptedAnswer function -->
    <button on:click={encryptAnswer}> Add Question </button>
</div>

<!-- Scoped CSS -->
<style>
    .wrapper {
        overflow: hidden;
        position: relative;
        margin-bottom: 1rem;
        padding: 20px;
        border-radius: 15px;
        width: 33%;
        box-shadow: 1px 1px 4px rgba(0, 0, 0, 0.3);
    }
    .input-label {
        display: inline-block;
        width: 15%;
    }
</style>
You’ll want to ensure you’ve added this component to index.svelte
svelte/src/routes/index.svelte

<script>
    import WalletConnect from '$lib/WalletConnect.svelte';

    // NEW
    import AddQuestion from '$lib/AddQuestion.svelte';
    import contractAbi from '../contracts/QuizFactory.json';
    const contractAddr = "<YOUR CONTRACT ADDRESS HERE>;

    export let web3Props = {
        provider: null,
        signer: null,
        account: null,
        chainId: null
    };
</script>

<h1>My Quiz</h1>
{#if !web3Props.account}
    <WalletConnect bind:web3Props />
{:else}
<!-- NEW -->
    <AddQuestion {web3Props} />
{/if}
Please note: You will need the contract address you recorded from the “contract completed” section above. This will be the contractAddr value.
Add both the new values to the WalletConnect component in index.svelte
<WalletConnect bind:web3Props {contractAddr} {contractAbi} />
Add them to the component itself.
svelte/src/lib/WalletConnect.svelte

<script>
    import { ethers } from 'ethers';
    export let web3Props = {
        provider: null,
        signer: null,
        account: null,
        chainId: null,
        // new prop
        contract: null
    };
    // new variable for the contract address
    export let contractAddr = '';
    // new variable for the contract ABI
    export let contractAbi = { abi: null };

    async function connectWallet() {
        let provider = new ethers.providers.Web3Provider(window.ethereum, 'any');
        await provider.send('eth_requestAccounts', []);
        const signer = provider.getSigner();
        const account = await signer.getAddress();
        const chainId = await signer.getChainId();
        // new contract variable
        const contract = new ethers.Contract(contractAddr, contractAbi.abi, signer);
        // new value for contract
        web3Props = { signer, provider, chainId, account, contract };
    }
</script>

<button on:click={connectWallet}>Attach Wallet</button>
Display a Question
Go ahead and add a question. This will use the quizFactory contract to create a new quizGame. Once you’ve confirmed the transaction, it would be great to see the quizzes. You will need to build out a Question component. This component will display a single question. You will reuse this component to display all the questions shortly.
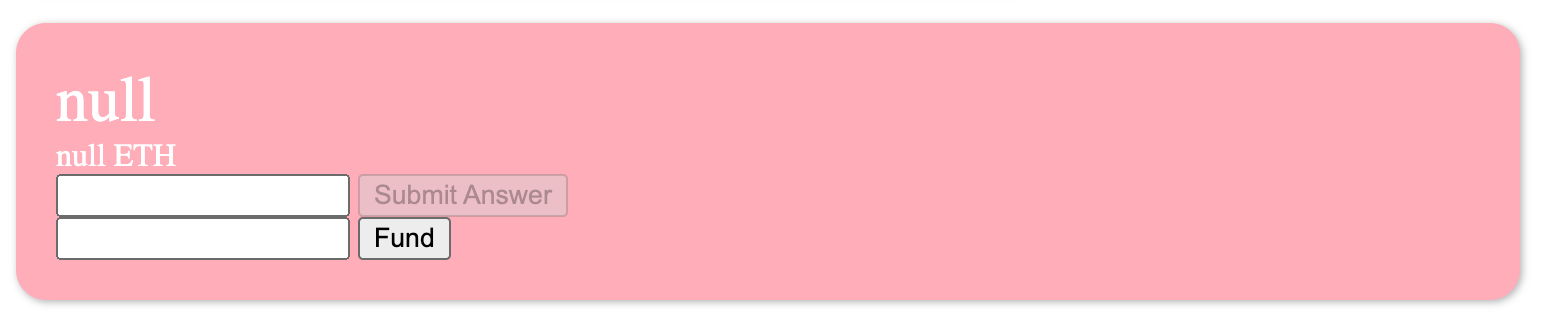
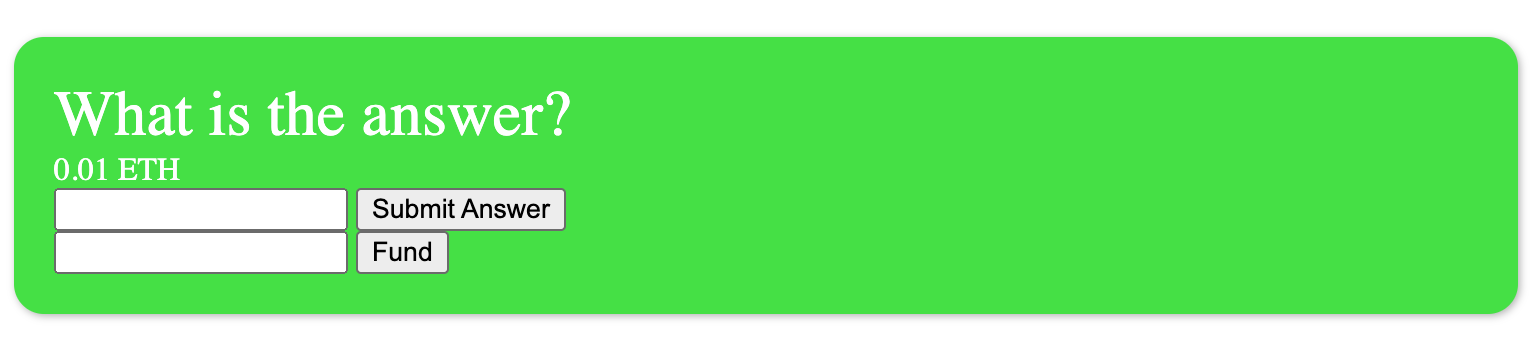
svelte/src/lib/Question.svelte

<script>
    import { ethers } from 'ethers';
    // import the single quiz game contract
    import contractAbi from '../contracts/QuizGame.json';
    // place holders for variables
    let answer = null;
    let funding = null;
    export let web3Props = {
        provider: null,
        signer: null,
        account: null,
        chainId: null,
        contract: null
    };
    export let questionAddr = null;
    $: question = null;
    $: value = null;
    // funded will determine what CSS and functionality is available
    $: funded = value > 0 ? 'question-funded' : 'question-not-funded';
    let qContract = null;
    async function getQuestion() {
        // get the question contract
        qContract = new ethers.Contract(questionAddr, contractAbi.abi, web3Props.signer);
        // get the question
        question = await qContract.question();
        // get the value of a correct answer
        value = Number(ethers.utils.formatEther(await web3Props.provider.getBalance(questionAddr)));
        // listen for funding
        qContract.on('QuizFunded', (balance) => {
            console.log('QuizFunded', balance);
            value = Number(ethers.utils.formatEther(balance));
        });
        // listen for correct answers
        qContract.on('AnswerGuessed', () => {
            getQuestion();
        });
    }
    // submit a guess to the contract
    async function submitGuess() {
        await qContract.guess(answer);
    }
    // fund the quesiton
    async function fund() {
        web3Props.signer.sendTransaction({
            to: questionAddr,
            value: ethers.utils.parseEther(funding)
        });
        funding = null;
    }
    // run the getQuestion function
    getQuestion();
</script>

<!-- Based on the funding change the CSS class -->
<div class="{funded} qwrap">
    <div class="question">
        {question}
    </div>
    <div class="value">
        {value} ETH
    </div>
    <input type="text" bind:value={answer} />
    <!-- If the question has no value, disable it -->
    <button on:click={submitGuess} disabled={value <= 0}>Submit Answer</button>
    <br />
    <input type="text" bind:value={funding} />
    <button on:click={fund}>Fund</button>
</div>

<style>
    .question-funded {
        background: #4ee44e;
    }
    .question-not-funded {
        background: #ffb6c1;
    }
    .qwrap {
        overflow: hidden;
        position: relative;
        color: white;
        margin-bottom: 1rem;
        padding: 20px;
        border-radius: 15px;
        width: 50%;
        box-shadow: 1px 1px 4px rgba(0, 0, 0, 0.3);
    }
    .question {
        font-size: 2em;
    }
</style>
Add your new component to the index.svelte
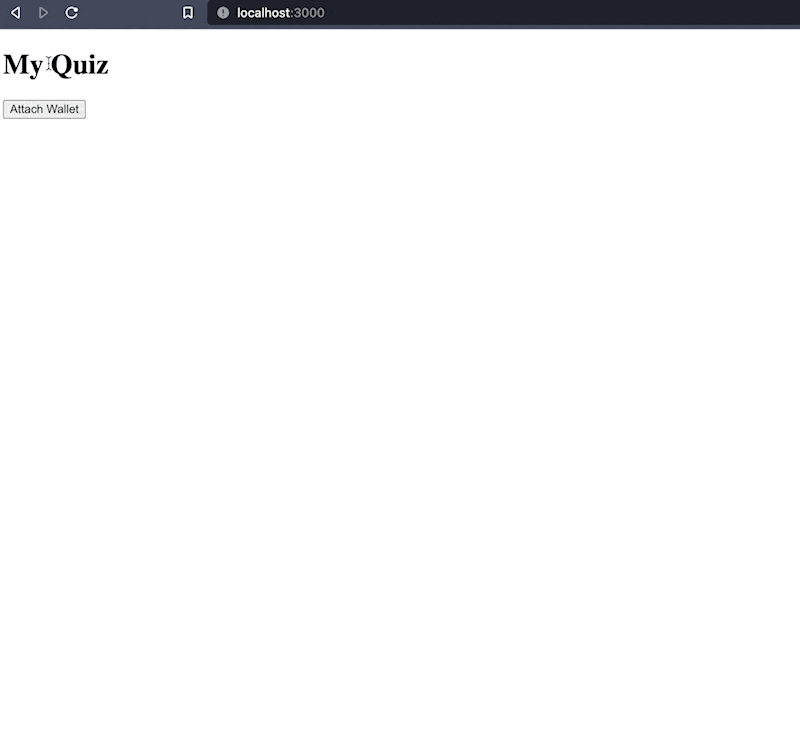
svelte/src/routes/index.svelte

<script>
    import WalletConnect from '$lib/WalletConnect.svelte';
    import AddQuestion from '$lib/AddQuestion.svelte';
    import contractAbi from '../contracts/QuizFactory.json';
    // NEW
    import Question from '$lib/Question.svelte';
    const contractAddr = '0xe7608e790a0ac33014fdeaef9c8bf0c37bf443f0';
    export let web3Props = {
        provider: null,
        signer: null,
        account: null,
        chainId: null
    };
</script>

<h1>My Quiz</h1>
{#if !web3Props.account}
    <WalletConnect bind:web3Props {contractAddr} {contractAbi} />
{:else}
    <AddQuestion {web3Props} />
    <!-- NEW -->
    <Question {web3Props} />
{/if}
At this point, you should see the following.
This is due to not passing in a contract address. You can pass in the address if you like or move on to get all the quizzes.
All Quiz Questions
Congratulations, you have reached the final step!
Once you have a single quiz component you can revert the changes you made to index.svelte. You will be adding in a new component: AllQuestions. Go ahead and create it.
svelte/src/lib/AllQustions.svelte

<script>
    // import your question component
    import Question from './Question.svelte';
    // variables for the contract
    export let web3Props = {
        provider: null,
        signer: null,
        account: null,
        chainId: null,
        contract: null
    };
    $: questions = null;
    // get ALL of the questions
    async function getQuestions() {
        questions = await web3Props.contract.getQuizes();
        // listen for new questions
        web3Props.contract.on('QuizCreated', (addr) => {
            console.log('QuizCreated', addr);
            getQuestions();
        });
    }
    getQuestions();
</script>

<!-- If there are questions -->
{#if questions}
    <div class="question-wrapper">
        <!-- Loop through the questions -->
        {#each questions as questionAddr}
            <!-- Render the question component -->
            <Question {questionAddr} {web3Props} />
        {/each}
    </div>
{/if}

<style>
    .question-wrapper {
        display: flex;
        flex-direction: column;
        justify-content: center;
        align-items: center;
    }
</style>
Update index.svelte to use AllQuestions
svelte/src/routes/index.svelte

<script>
    import WalletConnect from '$lib/WalletConnect.svelte';
    import AddQuestion from '$lib/AddQuestion.svelte';
    import contractAbi from '../contracts/QuizFactory.json';
    // NEW
    import AllQuestions from '$lib/AllQuestions.svelte';
    const contractAddr = '0xe7608e790a0ac33014fdeaef9c8bf0c37bf443f0';
    export let web3Props = {
        provider: null,
        signer: null,
        account: null,
        chainId: null
    };
</script>

<h1>My Quiz</h1>
{#if !web3Props.account}
    <WalletConnect bind:web3Props {contractAddr} {contractAbi} />
{:else}
    <AddQuestion {web3Props} />
    <!-- NEW -->
    <br />
    <br />
    <AllQuestions {web3Props} />
{/if}
You now have all of your quiz questions displayed!
From here you can add more quiz questions or fund the existing ones. Once funded you will be able to answer them.
Summary
In this tutorial, we’ve used test-driven development to create a set of contracts that allow us to store hashed answers to quiz questions on the blockchain. These answers are stored in a secure manner that prevents participants from cheating. We’ve also connected a SvelteKit frontend to the blockchain using a participant’s wallet and allowed them to add and answer questions.
From here you could build out more complete quiz sections or perhaps work on the display of the frontend. One neat idea would be to use Chainlink Automation to limit the window of time in which a question is available to be answered, or allow multiple “winners” to split the prize at the end.
Learn more about Chainlink by visiting chain.link or reading the documentation at docs.chain.link. To discuss an integration, reach out to an expert.


