Develop a DeFi Project Using Python
Updated November 5, 2021
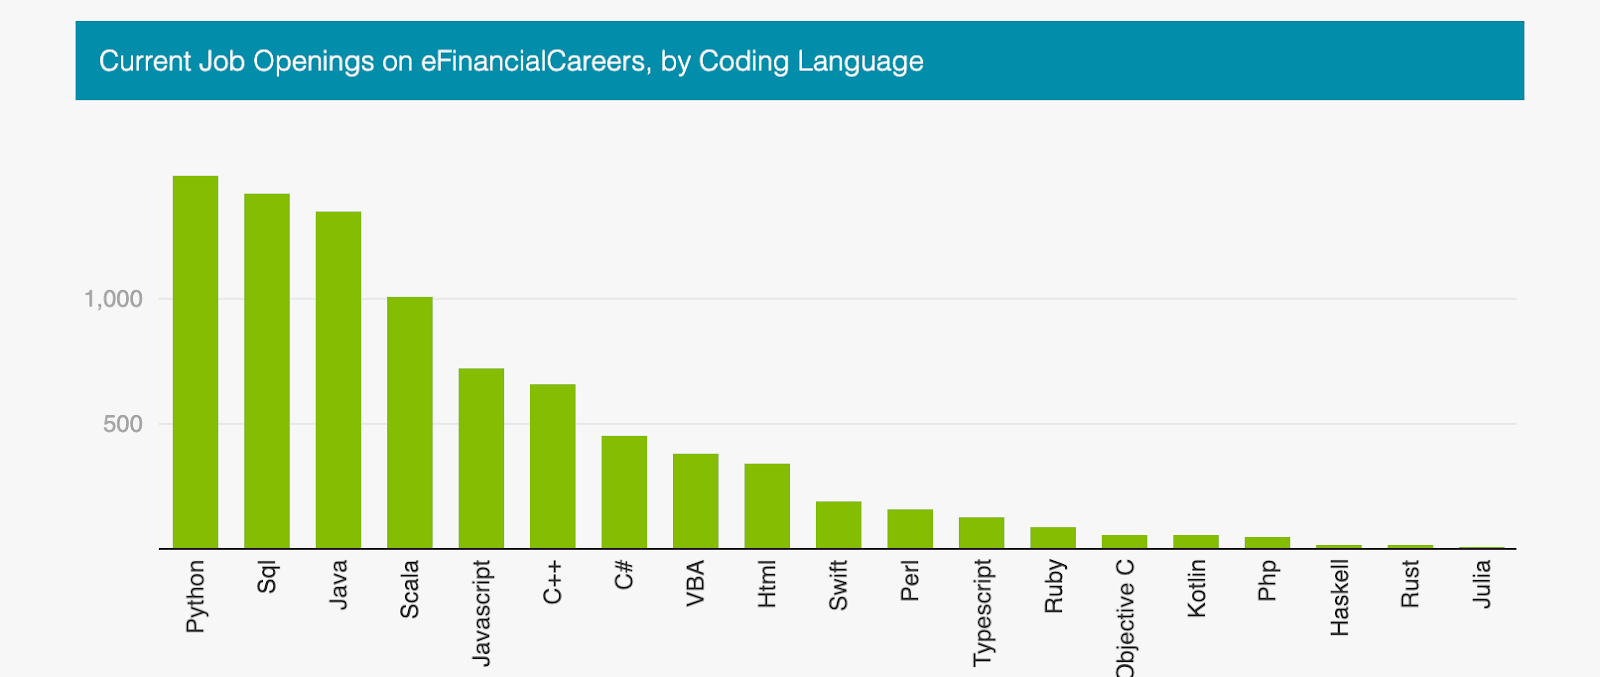
In this tutorial, we’ll walk through how to develop a DeFi project in Python. Decentralized finance (DeFi) is one of the most significant advancements of the blockchain and smart contract world and is often referred to as “the new fintech.” Right now, smart contract development is dominated by JavaScript, partially because JavaScript is the most commonly used language on the planet, and it’s easier to build full-stack applications with the “JavaScript everywhere” mentality that comes with Node.js. However, this isn’t the case with the fintech world of quantitative analysts, stock traders, and hedge funds. A majority of these fintech technology companies use Python for a variety of reasons:
- Great developer experience
- Powerful AI and machine learning
- Bundled fintech packages
- Comprehensive analytic tools
- Reliability in production settings
There is a reason why so many data scientists, academics, and fintech institutions use Python. Some projects in the DeFi space share this sentiment and have built their entire DeFi platforms with Python and Solidity. It’s because of libraries and frameworks like web3.py and Brownie that we are able to see these projects come to life. Brownie is a Truffle-like framework (they are both quite “sweet”) that maintains your deployments, scripts, testing, and allows you to make an end-to-end backend.
Web3.py and Brownie also come with “mixes” where you can pre-open a project with some boilerplate code. This is what we will work with today, the Chainlink Brownie mix.
Now why do we want to use Chainlink + Python? Just as Python is the de-facto programming language for fintech, Chainlink is the de facto oracle solution for providing DeFi smart contracts with off-chain data and computation, currently securing more than $75B in value for top DeFi protocols. The combination of these two technologies offers a powerful framework for securely decentralizing the fintech landscape.
To get started building your DeFi app with Brownie and Python, you first need to install Python. It is not recommended to have Python below version 3.6 at this point, so please upgrade if you have an older version than 3.6. You can see your version of Python and verify it’s correctly installed by running:
python --version
Or, if with python3:
python3 --version
You’ll also need to have Ganache installed. Ganache is a one-click-blockchain written in Python that allows you to easily spin up a local blockchain. Though you do have to download it with npm and node.js, this will be the only piece of JavaScript that you have to interact with.
First, you’ll need node.js and npm installed. Node.js comes installed with npm. Once you download it, you can check to see if it was done properly by running:
npm --version
node --version
Then, you can install Ganache via the command line.
npm install -g ganache-cli
Once you have those installed, we will install eth-brownie. We recommend using pipx instead of pip, so we can install eth-browniein it’s own environment.
First, install pipx:
python3 -m pip install --user pipx
python3 -m pipx ensurepath
Then, close and restart the terminal. If you’re using VSCode, it’ll look like a little trash can icon. pipx
should be successfully installed. You can check with pipx --version. Then, install eth-brownie.
pipx install eth-brownie
Sometimes, you can run into issues at this step. If you google the issue, you’ll likely find a thread with the issue. Otherwise, make a StackOverflow question, and tag it with brownie.
If you’d like to install without the virtual environment, you can use pip or pip3:
pip3 install eth-brownie
You’ll know you’ve done it right if you run brownie in your terminal, and you get an output similar to:
Brownie v1.17.0 - Python development framework for Ethereum
Usage:  brownie <command> [<args>...] [options <args>]
Commands:
  init               Initialize a new brownie project
  bake               Initialize from a brownie-mix template
  pm                 Install and manage external packages
  compile            Compile the contract source files
  console            Load the console
  test               Run test cases in the tests/ folder
  run                Run a script in the scripts/ folder
  accounts           Manage local accounts
  networks           Manage network settings
  gui                Load the GUI to view opcodes and test coverage
  analyze            Find security vulnerabilities using the MythX API
Options:
  --help -h          Display this message
  --version          Show version and exit
Type 'brownie <command> --help' for specific options and more information about
each command.
Also, you’ll need a MetaMask or other Ethereum wallet. If you’ve never used an ETH wallet before, you can watch this video to help you get set up. Please note this also shows getting testnet ETH for Ropsten, which Chainlink doesn’t support anymore. If you follow along, please use Kovan.
And last, be sure to have some testnet LINK and Kovan ETH in your ETH wallet. You can find both ETH and LINK at the Chainlink faucets.
Starting a Chainlink Project
To get started with Brownie, we can use what’s called a Brownie mix to give us boilerplate code. In this example, we will be deploying a simple Chainlink Price Feed as a way to learn about the Brownie framework. Let’s bake the chainlink-mix.
brownie bake chainlink-mix
cd chainlink
This will place us into a new project with some default code already built for us. If we run ls we can see what the layout of the file looks like:
- build : This is where the project keeps track of your deployed smart contracts and compiled contracts
- contracts : The source code of your contracts, typically written in Solidity or Vyper
- interfaces : A layout of interfaces you’ll need to work with deployed contracts. Every interaction with a contract needs an ABI and an address. Interfaces are great ways to get a contract’s ABI
- scripts : Scripts we create to automate processes of working with our contracts
- tests : Tests
- brownie-config.yaml : This is where we have all the information for Brownie to understand how to work with our smart contract. What blockchain do we want to deploy to? Are there any special parameters we want to set? All these are set in the config file.
requirements.txt , README.md, LICENSE, and .gitignore can be ignored for now. You’ll find out what they are for as you practice.
Setting Up Environment Variables
Even though we just installed Ganache to do local testing, we also want to be able to connect to the ETH mainnet and testnets so we can deploy them on real testnets. To do this, we need to set our WEB3_INFURA_PROJECT_ID. You can get an Infura ID for free from the Infura site. You can use other web3 providers or your own node as well, but you’ll have to do a little more configuration for that.
Now that you have your web3 ID, we need to have our private key as an environment variable, so that we can use our account with our wallet. If you’re using MetaMask, look for export key. With MetaMask, you may have to add 0x to the start of your private key. It is recommended to use a different account than your main account when testing and exporting your key, just in case.
> Important note: Please do not send your private keys to GitHub or anywhere public! If someone gets your private key, they will have access to all the funds in your account! We highly recommend you use a different account for testing than the account you hold funds with.
Now we need to make them environment variables. We’ll use an easy way to setup the environment variables, create a .env file, and add the following:
export PRIVATE_KEY=0x96789…..
export WEB3_INFURA_PROJECT_ID=’dog cat mouse….’
Where the PRIVATE_KEY is your key from MetaMask, and the WEB3_INFURA_PROJECT_ID is your project ID from Infura. Then, make a brownie-config.yaml file (or just add to it, if it’s there) and add the following line:
dotenv: .env
And you’re ready to deploy to both testnets and a local network!
Deploy Your Smart Contract
Now that we have everything set up, we can even go ahead and deploy a smart contract to the Kovan testnet!
In our scripts folder, we have a script called deploy_price_consumer_v3.py. This will deploy our smart contract that reads the price of Ethereum in USD.
If you want to see an easier walkthrough of what this contract does and how to deploy it, feel free to check out the Chainlink tutorial on deploying a price feed contract.
Just use `brownie run` to use the deploy script:
brownie run scripts/price_feed_scripts/deploy_price_consumer_v3.py --network kovan
You’ll see something like this:
Running 'scripts/price_feed_scripts/deploy_price_consumer_v3.py::main'...
Transaction sent: 0x23d1dfa3937e0cfbab58f8d5ecabe2bfffc28bbe2349527dabe9289e747bac56
Gas price: 20.0 gwei   Gas limit: 145600   Nonce: 1339
PriceFeed.constructor confirmed - Block: 22721813   Gas used: 132364 (90.91%)
PriceFeed deployed at: 0x6B2305935DbC77662811ff817cF3Aa54fc585816
If this worked properly, we can go to Kovan Etherscan and find the contract we deployed. The link above shows the contract deployed in this example.
Read Your Smart Contract
Now that we have deployed a smart contract, we can read the price of ETH from the contract we just deployed. We will be using another script that we have:
brownie run scripts/price_feed_scripts/read_price_feed.py --network kovan
And we will get an output like:
Brownie v1.12.2 - Python development framework for Ethereum
ChainlinkProject is the active project.
Running 'scripts/price_feed_scripts/read_price_feed.py::main'...
Reading data from 0x5A….
122322000000
Where 122322000000 is the current price of ETH in USD! Solidity doesn’t understand decimals, and we know that Chainlink Price Feeds have 8 decimals, so the price is $1,223.22 .
And you’ve just deployed your first smart contract using Python with Brownie!
Testing Your Smart Contract
This is also a great example of how to test smart contracts. We use mocks objects to test even locally!
Simply run:
brownie test
And your tests will run on a local Ganache instance!
You can also test on testnets with something like:
brownie test --network kovan
The tests have some functionality that know if you’re working on a testnet or not. If you are working locally, it deploys dummy or “mocks” of the oracle code, so that we can test from them.
Going Further
Now that you know how to deploy smart contracts with Python, you can begin building on top of this framework to do more interesting things. Python has powerful packages like Numpy, Scikit, Pandas, and TensorFlow to do quantitative work, machine learning, and more. Being able to finally combine these technologies together is a recipe for success in the new age of fintech: decentralized finance.
Chainlink is a flexible framework for bringing external financial data and systems on-chain and integrates seamlessly with data-focused packages like Numpy and Pandas. If you’re a developer and want to quickly get your application connected to Chainlink, visit the developer documentation and join the technical discussion in Discord. If you build something great with Python, Chainlink, and Brownie, be sure to tag us with @chainlink so we can check out all the cool work you do!


