Building and Using External Adapters
Introduction
API calls in solidity, the native language of Ethereum, are a great way to get off-chain external data into smart contract-based applications. Chainlink’s blockchain-agnostic and decentralized oracles make it easy for developers everywhere to connect real-world data and events to the world of blockchains. Chainlink built-in core adapters make it easy to configure and validate data from any desired open APIs.
However, developers often need additional flexibility and functionality that isn’t covered by the native core adapters, such as:
- API Authentication (keep private API password keys private)
- Private, low latency, and/or high throughput off-chain computation to save gas
- Writing data to other blockchains (interoperability)
- Any desired functionality that isn’t covered with the core adapters
External adapters allow access to high-quality data and enable extreme flexibility to connect smart contracts to premium web APIs, and are already utilized in highly reliable and secure oracle networks such as the 35+ Price Reference Feeds that secure over 3B+ in the DeFi economy. In this article, we will go over:
- What an external adapter is
- How to build one
- Who should host it
- How to use one
What is an external adapter?
When we talk about adapters/tasks there are two types:
- Core adapters
- External adapters
Core adapters are functions that come natively installed with the chainlink core node client. Httpget, Copy, and Jsonparse are all examples of these core adapters. External adapters are where you can customize the functionality of Chainlink oracle networks however you want. We won’t dive into connecting other blockchains in this article, but the customizability of the Chainlink external adapters and the external initiators is what makes Chainlink so versatile as it can be configured to work with any blockchain, and is one of the two crucial components.
Now, remember, if we want our smart contracts to stay decentralized end to end, we have to keep in mind that other oracle nodes should be able to run this external adapter as well. Think of external adapters like an open-sourced package but for Chainlink nodes. This means that if you don’t want to run a node you don’t have to, but you can still have your smart contracts use the customizable functionality. You can have other nodes host the external adapter for you, and you’ll see that a lot of projects that utilize Chainlink don’t need to run nodes themselves. This way, smart contract engineers can focus on the business logic of the decentralized application and let the node operators focus on running nodes. You can add your external adapter to a third-party node listing service like market.link, or you can just #ask-a-node-operator to host your external adapter so you can test and build with it.
And of course, if you want to run your own node too, then you absolutely can!
How to build an external adapter
Quickstart
One of the simplest ways to make an external adapter is by making it an API itself. This way, we can customize the off-chain computation in any way we like, using any language, and then you can simply make an API call to transform and receive the data. There are tons of tutorials out there on how to make your own API, and we are going to look at a simple Chainlink adapter template in nodejs. We also have a Python example if you want to get started there. We are going to use this repo as our starting point. It is a fully working external adapter, and it’s really easy to customize to whatever data you want. You are welcome to write your own from scratch, but this makes it a lot easier.
You’ll need yarn and nodejs to follow along. To get started, clone the repo and cd into the project.
git clone https://github.com/thodges-gh/CL-EA-NodeJS-Template.git ExternalAdapterTemplate
cd ExternalAdapterTemplate
Then we install the packages and start the API server.
yarn
yarn start
This will start our API/external adapter server. It is now listening for entities to call it.
patrick@iMac: [~/code/ExternalAdapterTemplate -  (master)] $ yarn start
yarn run v1.22.4
$ node app.js
Listening on port 8080!
Remember that Chainlink nodes run through a list of adapters. Once it gets to the external adapter in it’s adapters/tasks list, it will make the call to the external adapter/this API that’s listening. We can mimic a Chainlink node making a request by making a call to it ourselves.
This is a curl command that will make an Httppost request to our now running API server. You can try it yourself in a new terminal window on your local machine.
curl -X POST -H "content-type:application/json" "http://localhost:8080/" --data '{ "id": 0, "data": { "from": "ETH", "to": "USD" } }'
The http://localhost:8080/ is the url that the API server is listening to, and the data next to the –data flag are the parameters that we need to send for the Chainlink node to understand the request. Chainlink nodes send json requests that have:
- An id
- A data object
It could be as simple as: {“id”:”0″, “data”:{}}
In our data object, we can clearly see we are looking for from and to parameters. These are customizable parameters that we set so the external adapter can get a plethora of different prices. We can see when we run the curl script, we get the output:
{"jobRunID":0,"data":{"USD":441.49,"result":441.49},"result":441.49,"statusCode":200}
Note: some of the numbers will be different because the price of ETH changes over time!
All external adapters need to respond with a json object containing at least a:
- jobRunID
- data object
Ideally you’ll also have a status and result field to make error handling and getting the result you want easier. In our example, the result is 441.49, which represents the current price of Ethereum. We are getting this data because our external adapter is actually calling an api as well. The API that it is calling is here:
https://min-api.cryptocompare.com/data/price?fsym=ETH&tsyms=USD
This external adapter is actually an API that is wrapped around an API, which is a common framework for external adapters. Now that we know what it does, let’s see how it does it.
Getting Weather Data
The full code and final solution for this can be found in PatrickAlphaC’s Github repo.
Let’s jump into editing the code now so that we can get weather data from a new API, OpenWeatherMap. To follow along, we can get a free API key by signing up for free here. Once we have our account verified we can find our API key here, and the documentation for the API we will be using for getting the current weather data of a city. Note: It may take ~10 minutes after you sign up for your key to be fully functional.
We now will be adjusting the current external adapter that gets the price of ETH, to an external adapter that gets the current temperature of a city.
The 1 file we will be editing is index.js (and test/index_test.js later when you go to production). app.js defines how the external adapter/api server will listen for requests, and we can ignore it for now. In our data object previously, we used 2 parameters from and to. We can choose our list of custom parameters by updating customParams:
Old customParams:
const customParams = {
 base: ['base', 'from', 'coin'],
 quote: ['quote', 'to', 'market'],
 endpoint: false
}
New customParmas:
const customParams = {
 city: ['q', 'city', 'town'],
 endpoint: false
}
This way, we can input city, town, or q and they will all mean city.
The createReqeust const is where most of the magic happens, and it’s where we need to get the URL. If we look at the weather data documentation we can see that a sample string looks like https://api.openweathermap.org/data/2.5/weather?q=<CITY_NAME>&appid=<YOUR_API_KEY>
We can test this API by entering your API key and having the city name be something like boston and then paste the URL into your browser (if you get errors saying your API key is invalid, just wait a few more minutes).
With this URL, we now know what we need to update a few pieces:
Old:
const endpoint = validator.validated.data.endpoint || ‘price’
New:
const endpoint = validator.validated.data.endpoint || ‘weather’
Old:
const url = ‘https://min-api.cryptocompare.com/data/${endpoint}’
New:
const url = ‘https://api.openweathermap.org/data/2.5/${endpoint}’
Now we want to add our parameters. Our two parameters are going to be the city that we want (according to the docs, this is q) and our API key (`appid`).
For the city we can just edit the old line:
const fsym = validator.validated.data.base.toUpperCase()
To:
const q = validator.validated.data.city.toUpperCase()
However, we don’t want to hard code our API key into our code.
API Authentication
Instead, what we will want to do is change this old line:
const tsyms = validator.validated.data.quote.toUpperCase()
To this new line:
const appid = process.env.API_KEY;
And put our API key into a .envrc file. We want to keep our API key out of our source code, so we create an .envrc file that will look like this:
export API_KEY=<YOUR_KEY_HERE>
Remember to add it to .gitignore! If you’re having trouble when you run the curl below to test, you can also run export API_KEY=<API_KEY> in your terminal.
Note: You can find more about environment variables here.
Then we just need to update the params from:
const params = {
   fsym,
   tsyms
}
To:
const params = {
  q,
  appid
}
And update our result from:
response.data.result = Requester.validateResultNumber(response.data, [tsyms])
To:
response.data.result = Requester.validateResultNumber(response.data, [‘main’,’temp’])
And we are all done! The output of the weather API has the temperature mapped in the temp key of the main object, which is why we have the response.data.result variable look as it does.
And that’s it, you now have a working API key authenticated external adapter!
Now let’s try to call our api. curl -X POST -H “content-type:application/json” “http://localhost:8080/” –data ‘{ “id”: 0, “data”: { “city”: “Boston”} }
Sample response:
{“jobRunID”:0,”data”:{“coord”:{“lon”:-71.06,”lat”:42.36},”weather”:[{“id”:804,”main”:”Clouds”,”description”:”overcast clouds”,”icon”:”04d”}],”base”:”stations”,”main”:{“temp”:296.81,”feels_like”:298.49,”temp_min”:295.15,”temp_max”:297.59,”pressure”:1008,”humidity”:78},”visibility”:10000,”wind”:{“speed”:2.6,”deg”:360},”clouds”:{“all”:90},”dt”:1599162213,”sys”:{“type”:1,”id”:3486,”country”:”US”,”sunrise”:1599127933,”sunset”:1599174905},”timezone”:-14400,”id”:4930956,”name”:”Boston”,”cod”:200,”result”:296.81},”result”:296.81,”statusCode”:200}
Awesome! It looks like it worked! We have here all the key pieces the chainlink node needs in order to understand it. You can clearly see that it’s a great way to do work off-chain. You could do very computationally expensive work as a part of your smart contract and just paste the answer back on-chain.
Now that we have this external adapter done, how can we get a chainlink node to host it? How can we call from it? We will skip over actually hosting an external adapter ourselves, since we don’t actually have to be the ones to do so. At the bottom of our index.js there were some nice wrappers that work great for node operators to deploy the code via a serverless function. So we can then do a few things:
- Add the adapter to a third-party node listing service like market.link
- Ask a node operator to host our adapter (#ask-a-node-operator discord)
- Run a node ourselves (not necessary)
As you can see, you don’t even have to run a node to use your custom external adapter. This is ideal because we want our adapters to be useable by other oracle nodes so we can have many nodes accessing data. This keeps the Chainlink network highly decentralized.
We will go over how to host an external adapter in another video/blog. For now, if you’ve made a new adapter, share it with a node and join the community!
Using External Adapters
Let’s say a node is now hosting your external adapter, let’s find it and use it to get data into our smart contracts. For this example, let’s say we built the Alpha Vantage external adapter. Alpha Vantage is a stock and crypto data API that requires an API key as well. Let’s see if we can get the price of TSLA through an external adapter hosted by Linkpool’s Kovan node. To find it, we can find publicly uploaded adapters through the adapters page. We can scroll through this page till we find an adapter we want, like the Alpha Vantage External adapter.
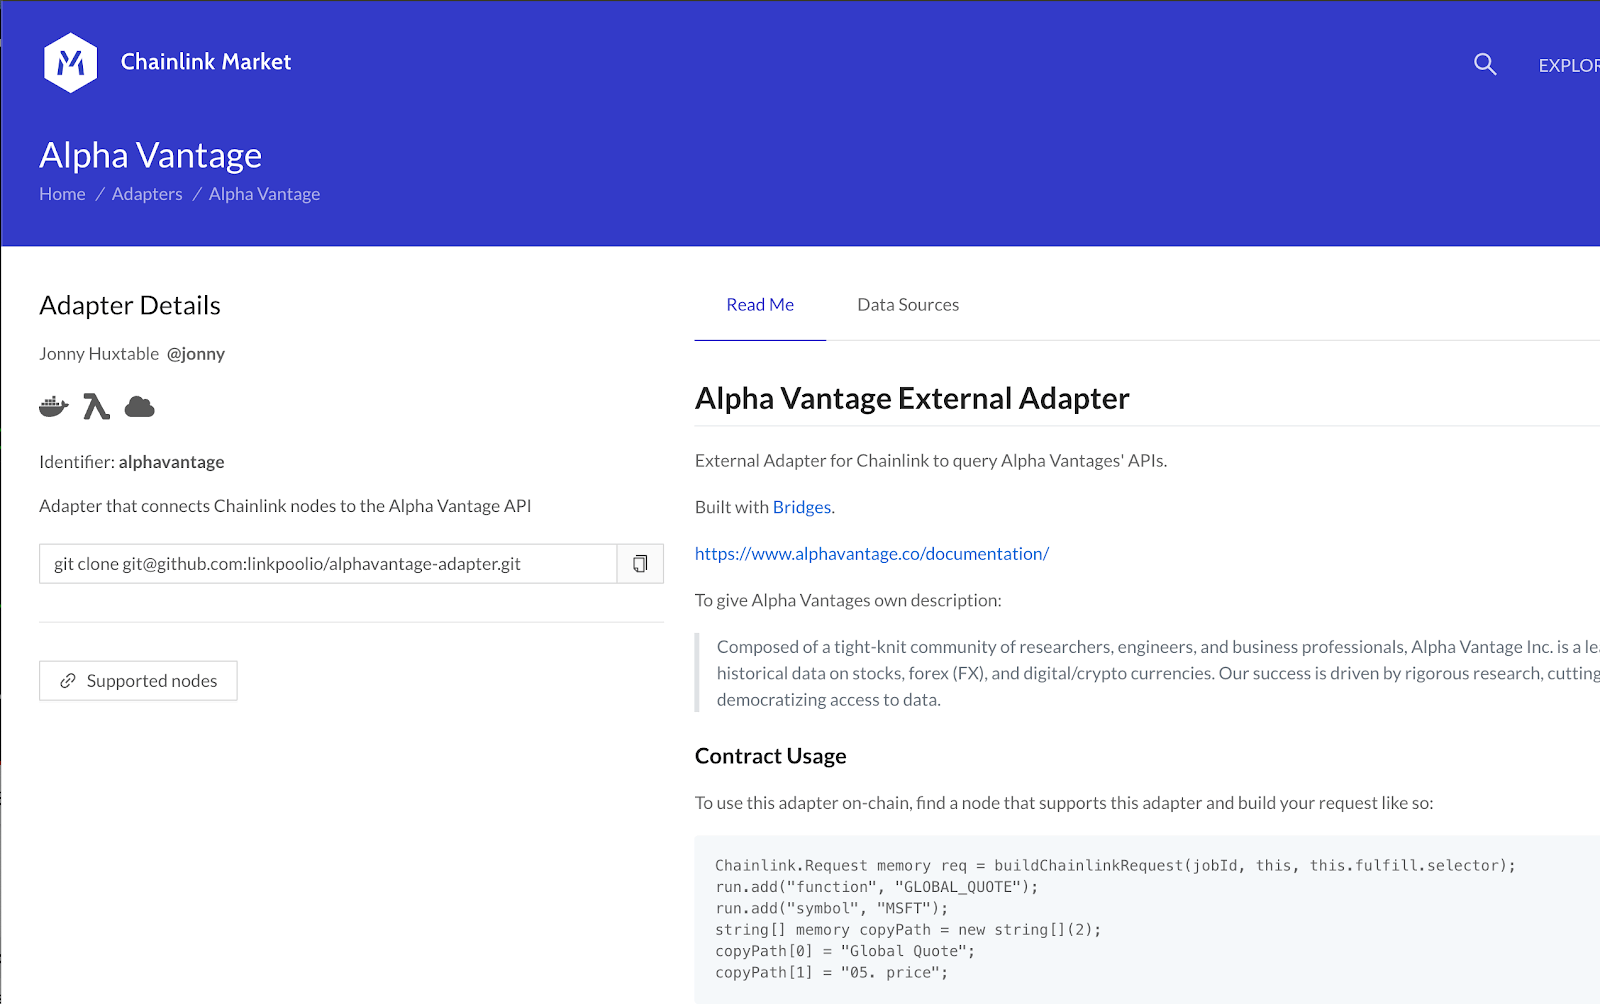
It describes all the functionality of the external adapter. We then can hit the supported nodes button to see who supports it. We can see there is one node who supports it, and we can find it’s details on the jobs page. You’ll see it’s using the Alpha Vantage adapter in its adapters/tasks list.
Now to use it, we just grab the job ID and the Oracle ID like normal, and add it to our code. We now can add all the parameters of the Alpha Vantage documentation.
bytes32 jobId =  “802ec94e00184b789a016b8e71ae9fb4”;
address oracle =  0x56dd6586DB0D08c6Ce7B2f2805af28616E082455;

function requestTSLAPrice() public {
    Chainlink.Request memory req = buildChainlinkRequest(jobId, address(this), this.fulfillEthereumPrice.selector);
    req.add("function", "GLOBAL_QUOTE");
    req.add("symbol", "TSLA");
    string[] memory copyPath = new string[](2);
    copyPath[0] = "Global Quote";
    copyPath[1] = "05. price";
    req.addStringArray("copyPath", copyPath);
    req.addInt("times", 100000000);
    sendChainlinkRequestTo(oracle, req, fee);
}
Here is the full code in remix for you to try. You can also follow along in the using any API documentation, because at this point it’s all the same as you already know!
Summary
As you can see, external adapters are really powerful tools we can use to make your smart contracts exponentially more smart and connected. API authentication, off-chain computation, are other layer two solutions that are all enabled by the flexibility of external adapters. If you learned something new here, why not try your skills at the Chainlink Hackathon? We are awarding over $40k of prizes and we highly recommend you take part.
If you’re reading this after the hackathon, be sure to join the community on Twitter, Discord, or Reddit, and hashtag your repos with #chainlink and #ChainlinkEA. You can stay up to date with Chainlink events so you can try out your skills!
If you’re developing a product that could benefit from Chainlink oracles or would like to assist in the open-source development of the Chainlink network, visit the developer documentation or join the technical discussion on Discord.


